Introduction
If you are actively using Google Analytics and/or Google Tag Manager for tracking and analytics, we've made it easy to add tracking and conversions to your online forms! In this article, we will provide you with a few steps to connect your Google Analytics Measurement ID and/or Google Tag Manager Container ID to begin data analysis within your organization. If you have questions about Google Analytics and/or Google Tag Manager functionality, please visit Google for information on this product feature.
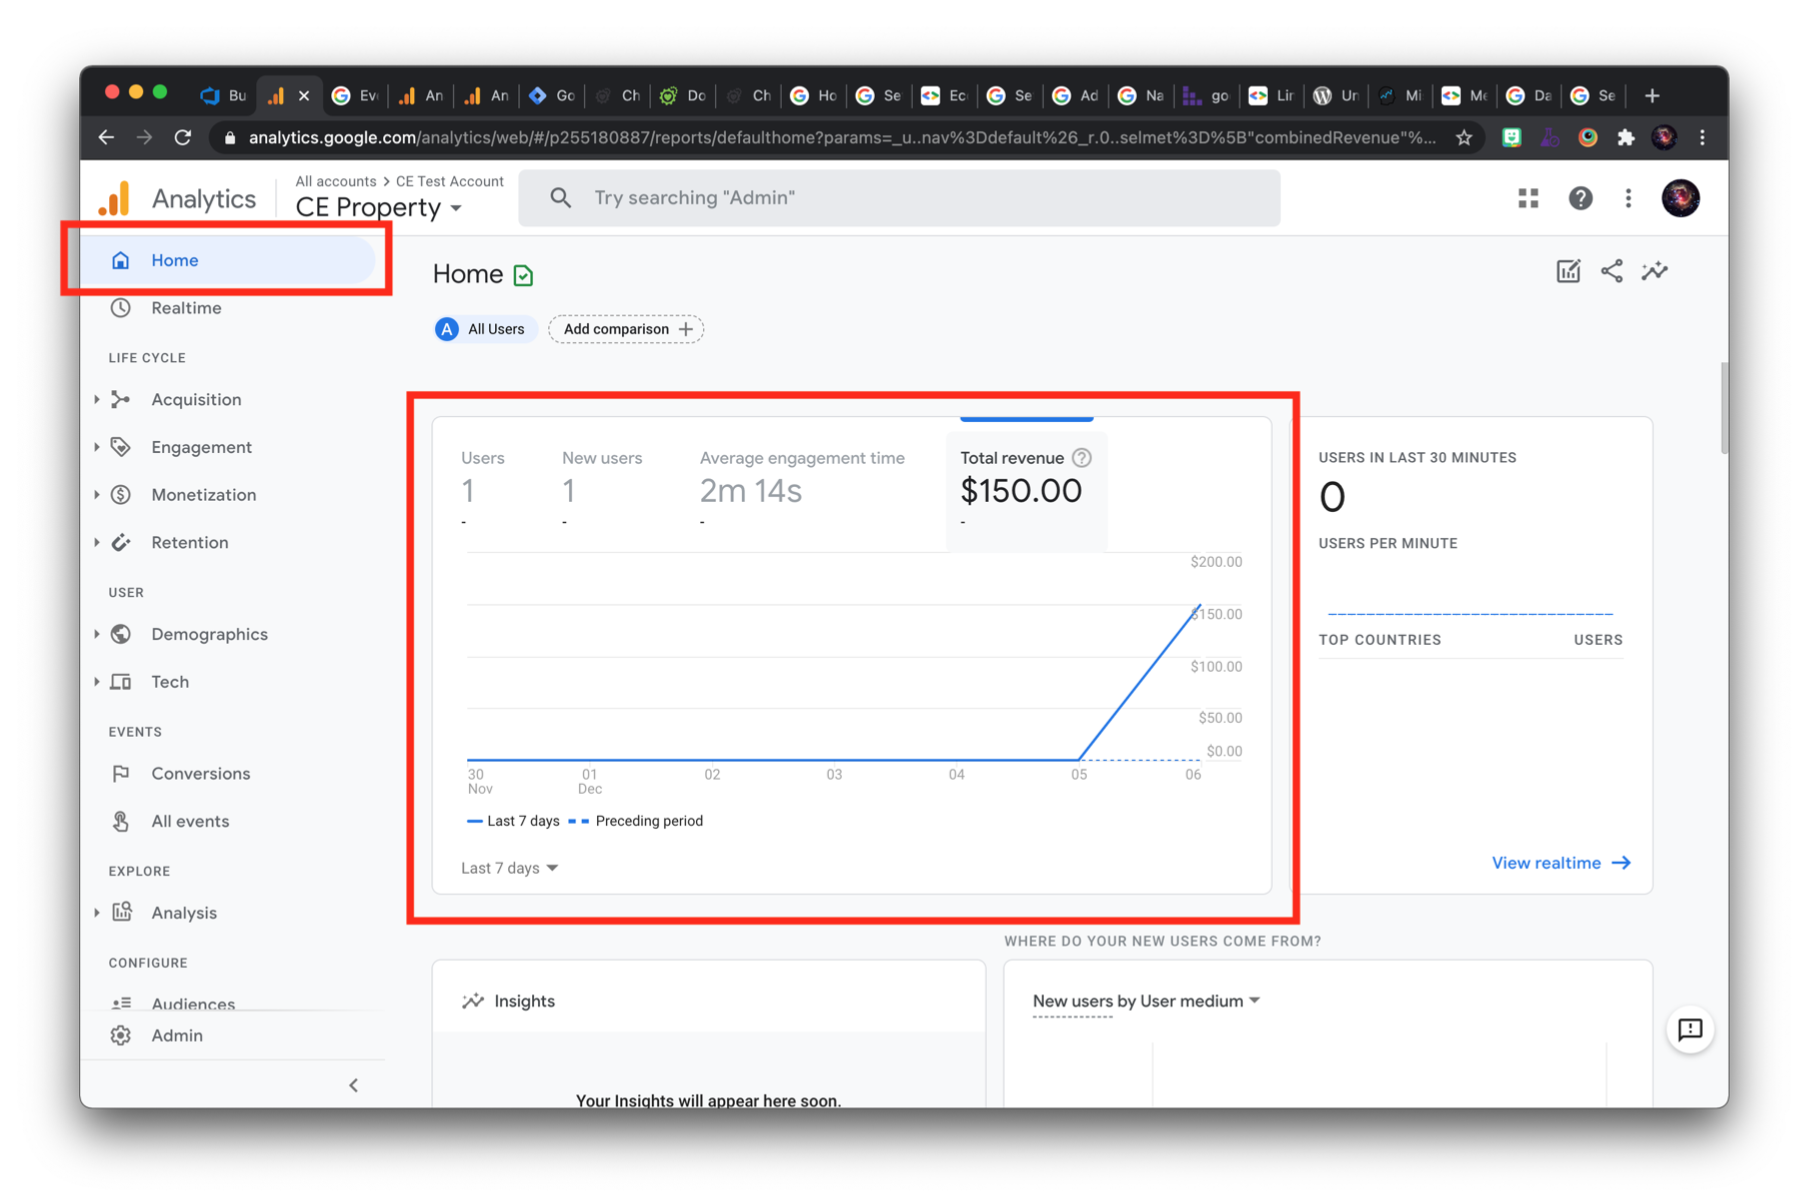
Table of Contents
Prerequisites
- Please have your Google Analytics Measurement ID and/or Google Tag Manager Container ID available.
- You have already set up a data stream for your CharityEngine form (instructions for that can be found here: https:// support.google.com/analytics/answer/9304153?hl=en) and use gtag.js.
- You have already set up a data stream for your CharityEngine form (instructions for that can be found here: https://support.google.com/analytics/answer/9304153?hl=en) and use Google Analytics GA4.
Instructions: Google Analytics Integration
Prerequisites: You have already set up a data stream for your CharityEngine form (instructions for that can be found here: https:// support.google.com/analytics/answer/9304153?hl=en) and use gtag.js.
Step 1: Instructions for finding your Google Analytics Measurement ID:
In your Google Analytics dashboard, go to Admin > Data Streams > Click on your CharityEngine Form’s Data stream settings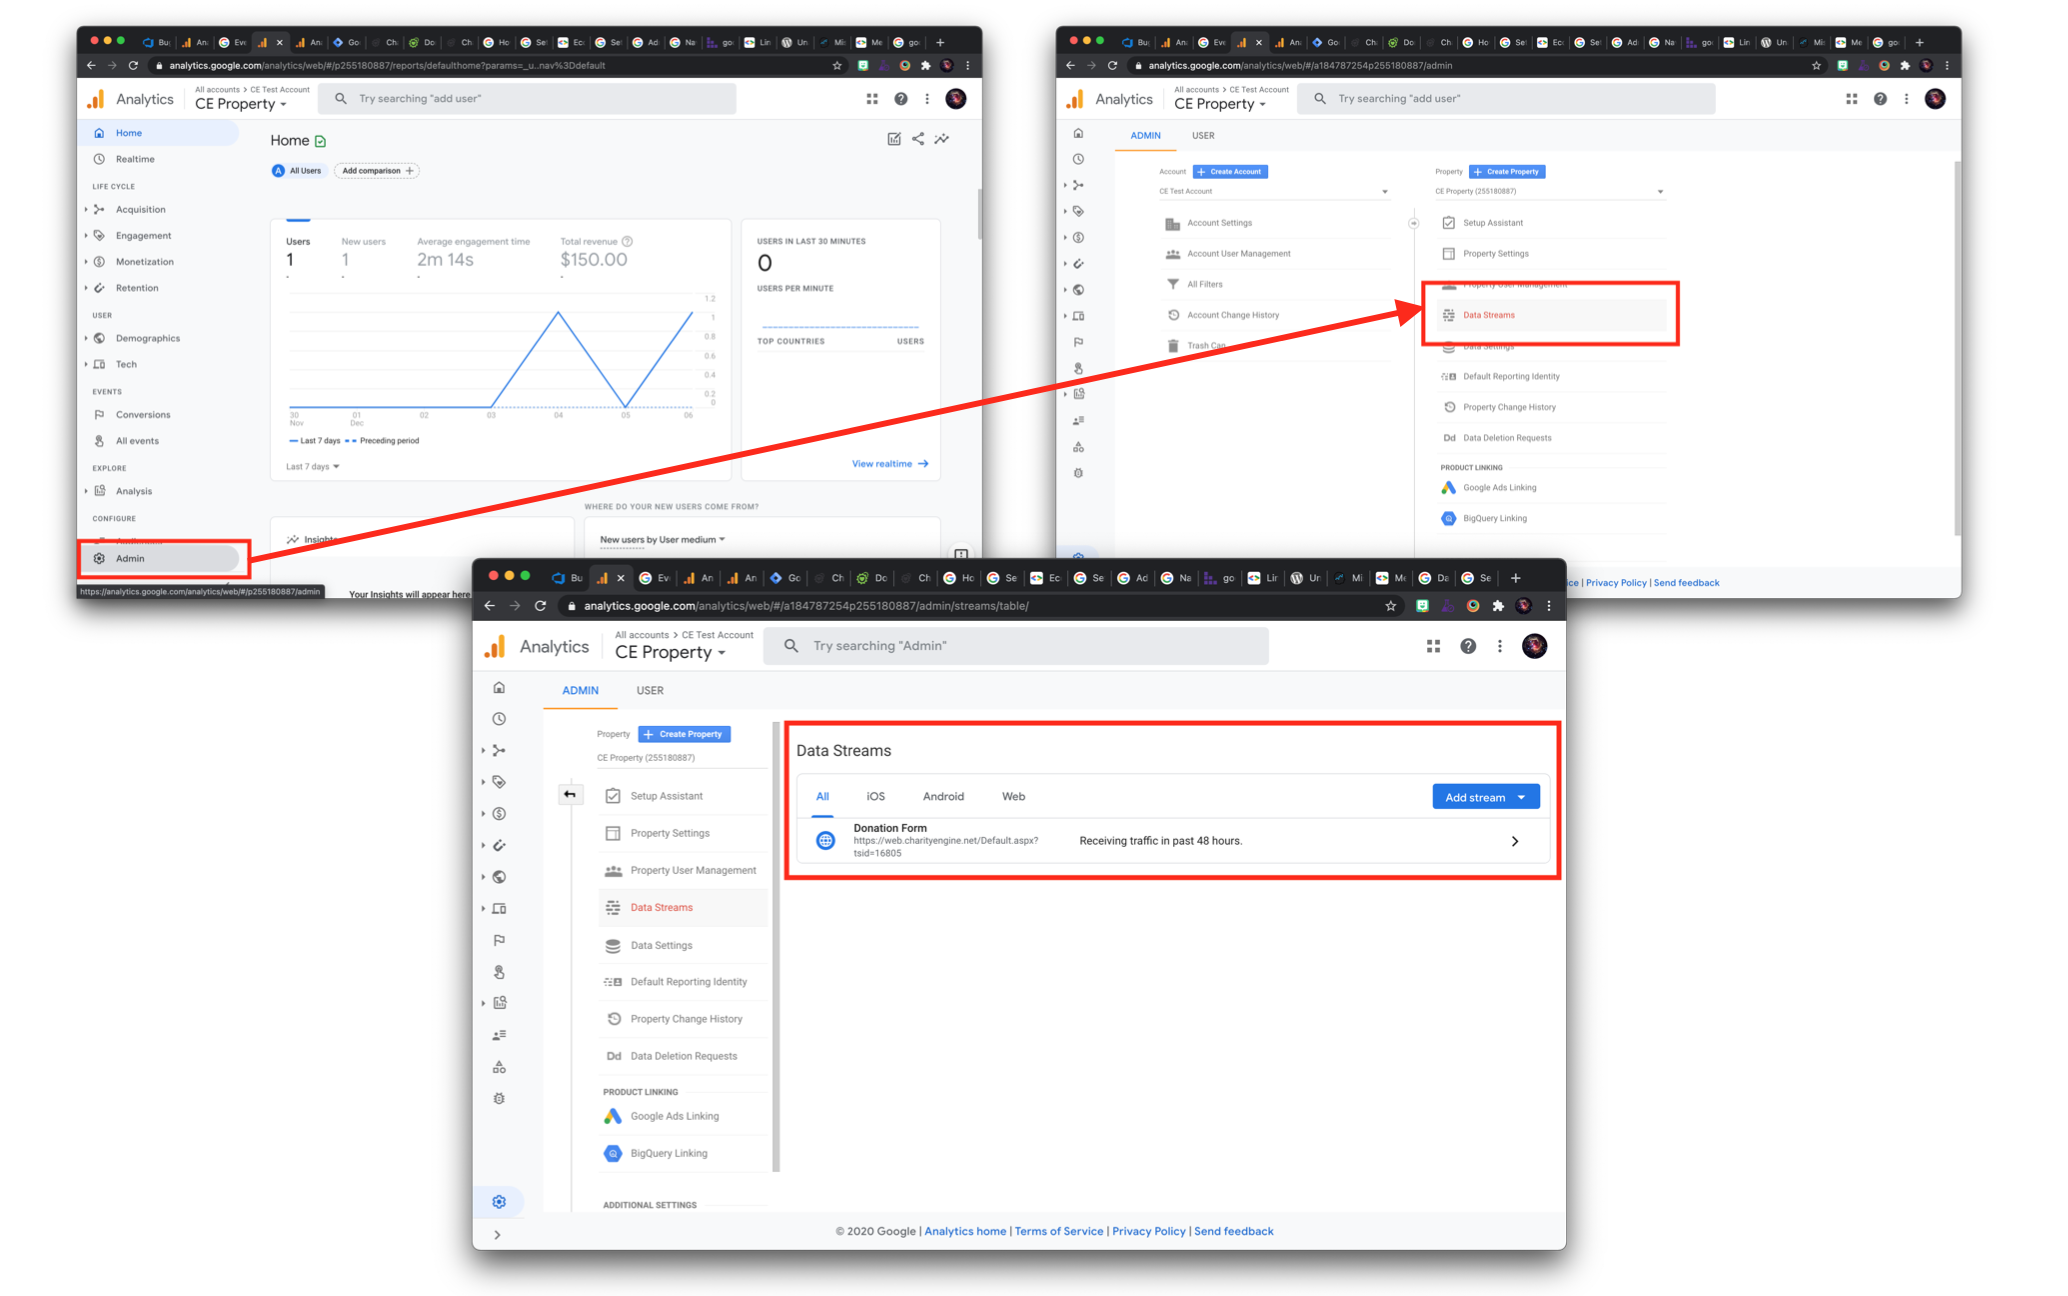
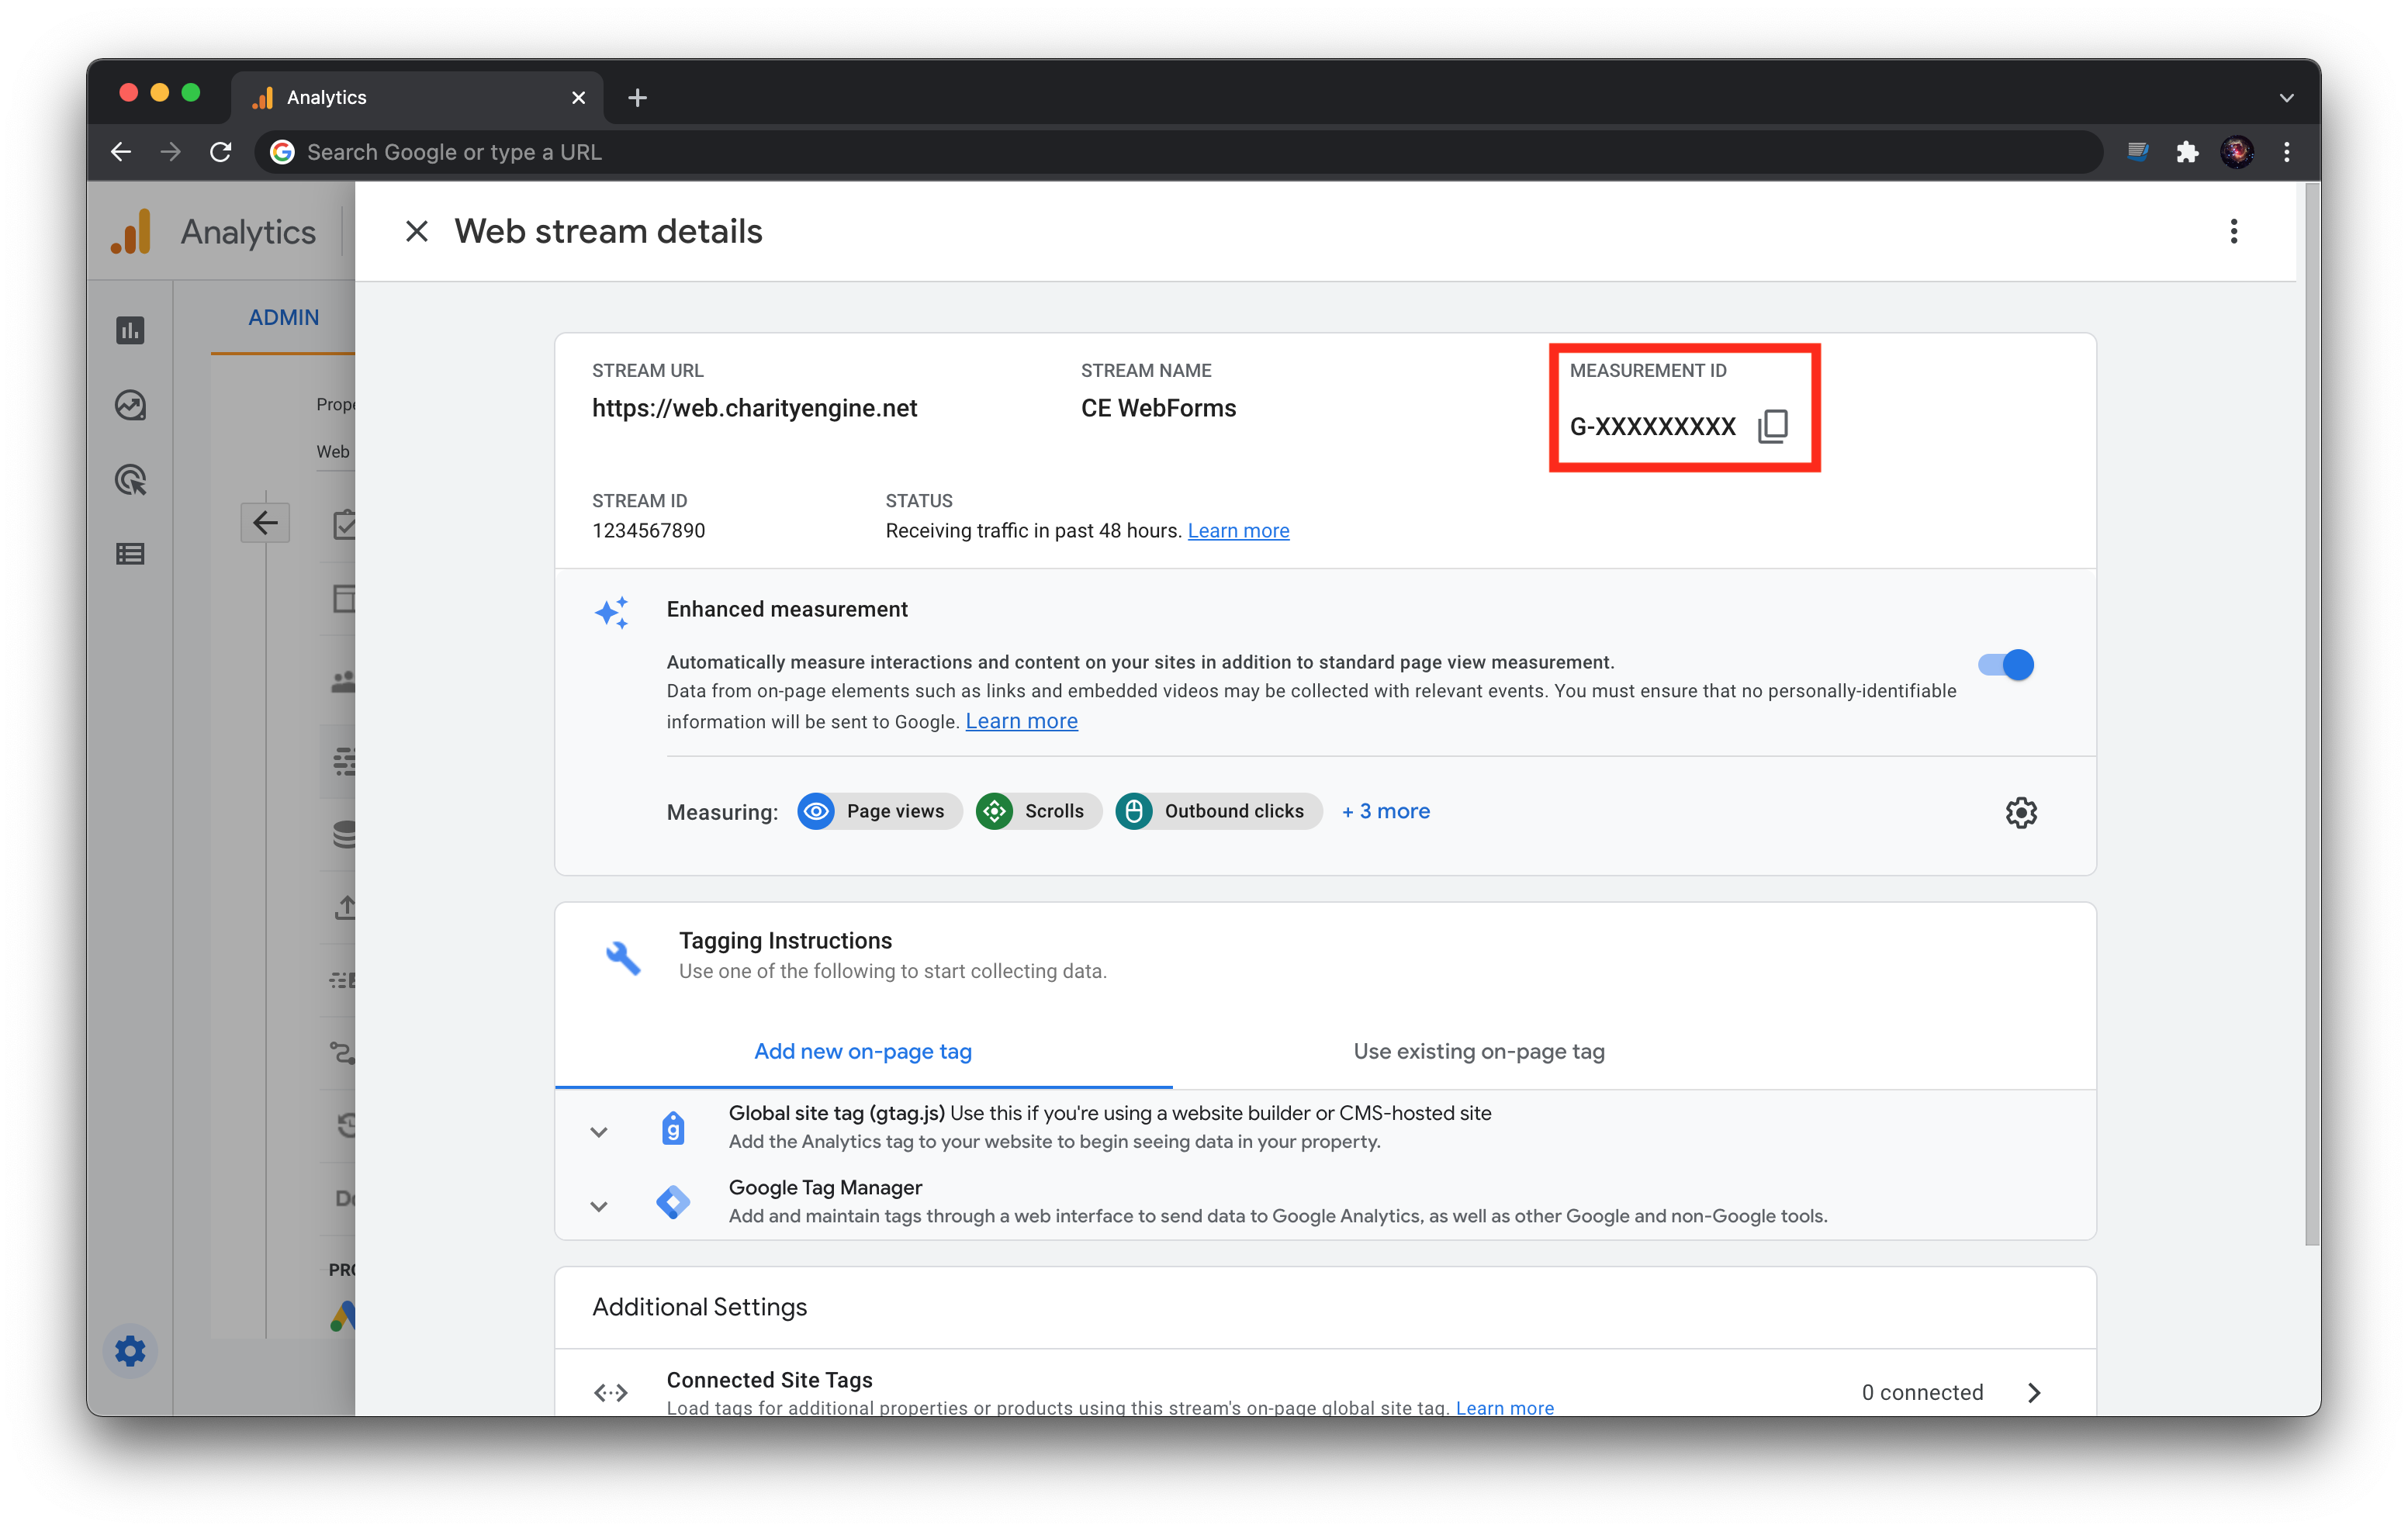
Step 2: Once you have found the correct stream, copy your Measurement ID:

Instructions: CharityEngine-Google Analytics Template
For easier, faster integration, simply import the CharityEngine Template following these steps:
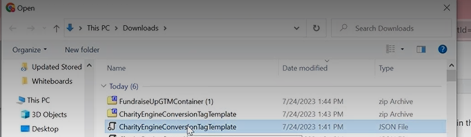
Prerequisite: Upload the CharityEngineConversionTagTemplate.zip here and unzip file to expose the JSON
Step 1: Log-in to Google Tag Manager
Step 2: Locate the fear icon for the CharityEngine container
Step 3: Select Import Container

Step 4: Select Choose Container file and upload the
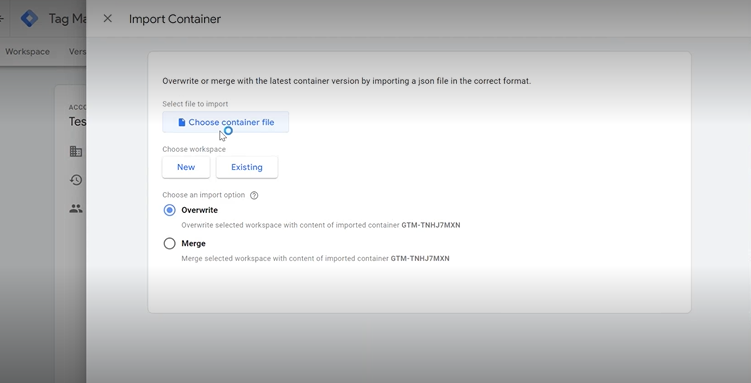
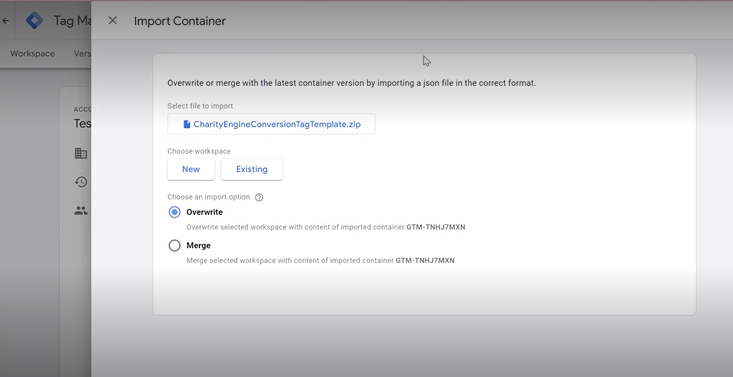
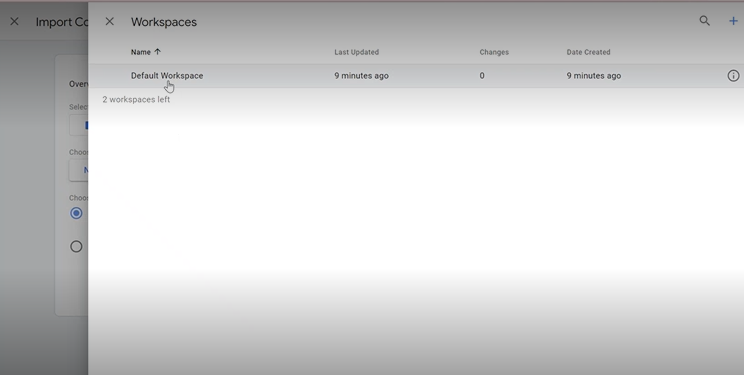
Step 5: From Choose workspace, select Existing option to import the template file to your existing container

Step 6: Select Merge as the import option and click Confirm
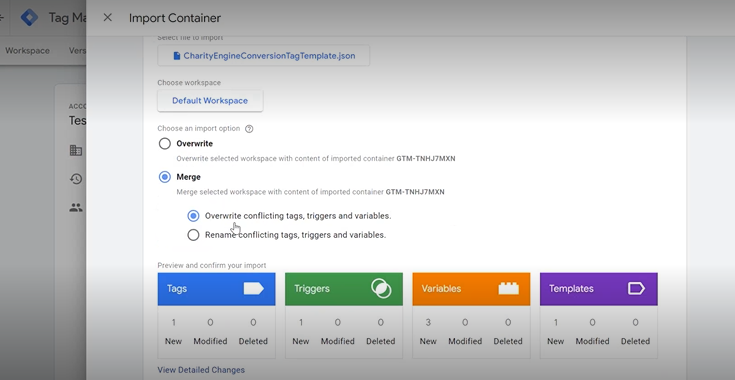
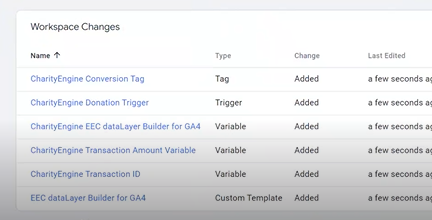
Step 7: Workspace Changes will now reflect in the Google account
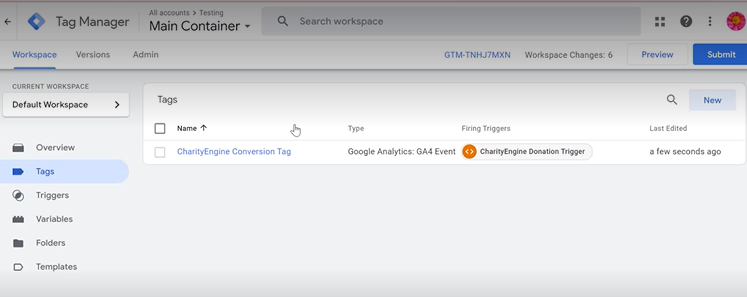
Step 8: Access the Tags to locate the CharityEngine Conversion Tag
Step 9: Add your Measurement ID from Google Analytics

Important to note: ensure the container value (new or existing) within Google Tag matches the value as established above within Instructions: Google Analytics Integration
Advanced Web Developer Configuration
Step 1: If you need to modify the conversion code sent to Google, manage the web form by navigating to the Online App > Web Forms > Search & Manage > locate your identified form > ACTIONS: Manage > Advanced tab > Developer sub tab > Custom JS and Conversion Code
Note: The Google Analytics conversion code is automatically added to each CharityEngine web form. If you are managing your Google Analytics at the web form level, you will not need to complete the steps outlined in Goggle Analytics Integration steps as this will result in duplication in your analytics. You can also add the Google Analytics conversion code to the by navigating to the Configuration App > Design & Messages > Templates > locate your template > ACTIONS: Manage > Screen HTML Page Content.
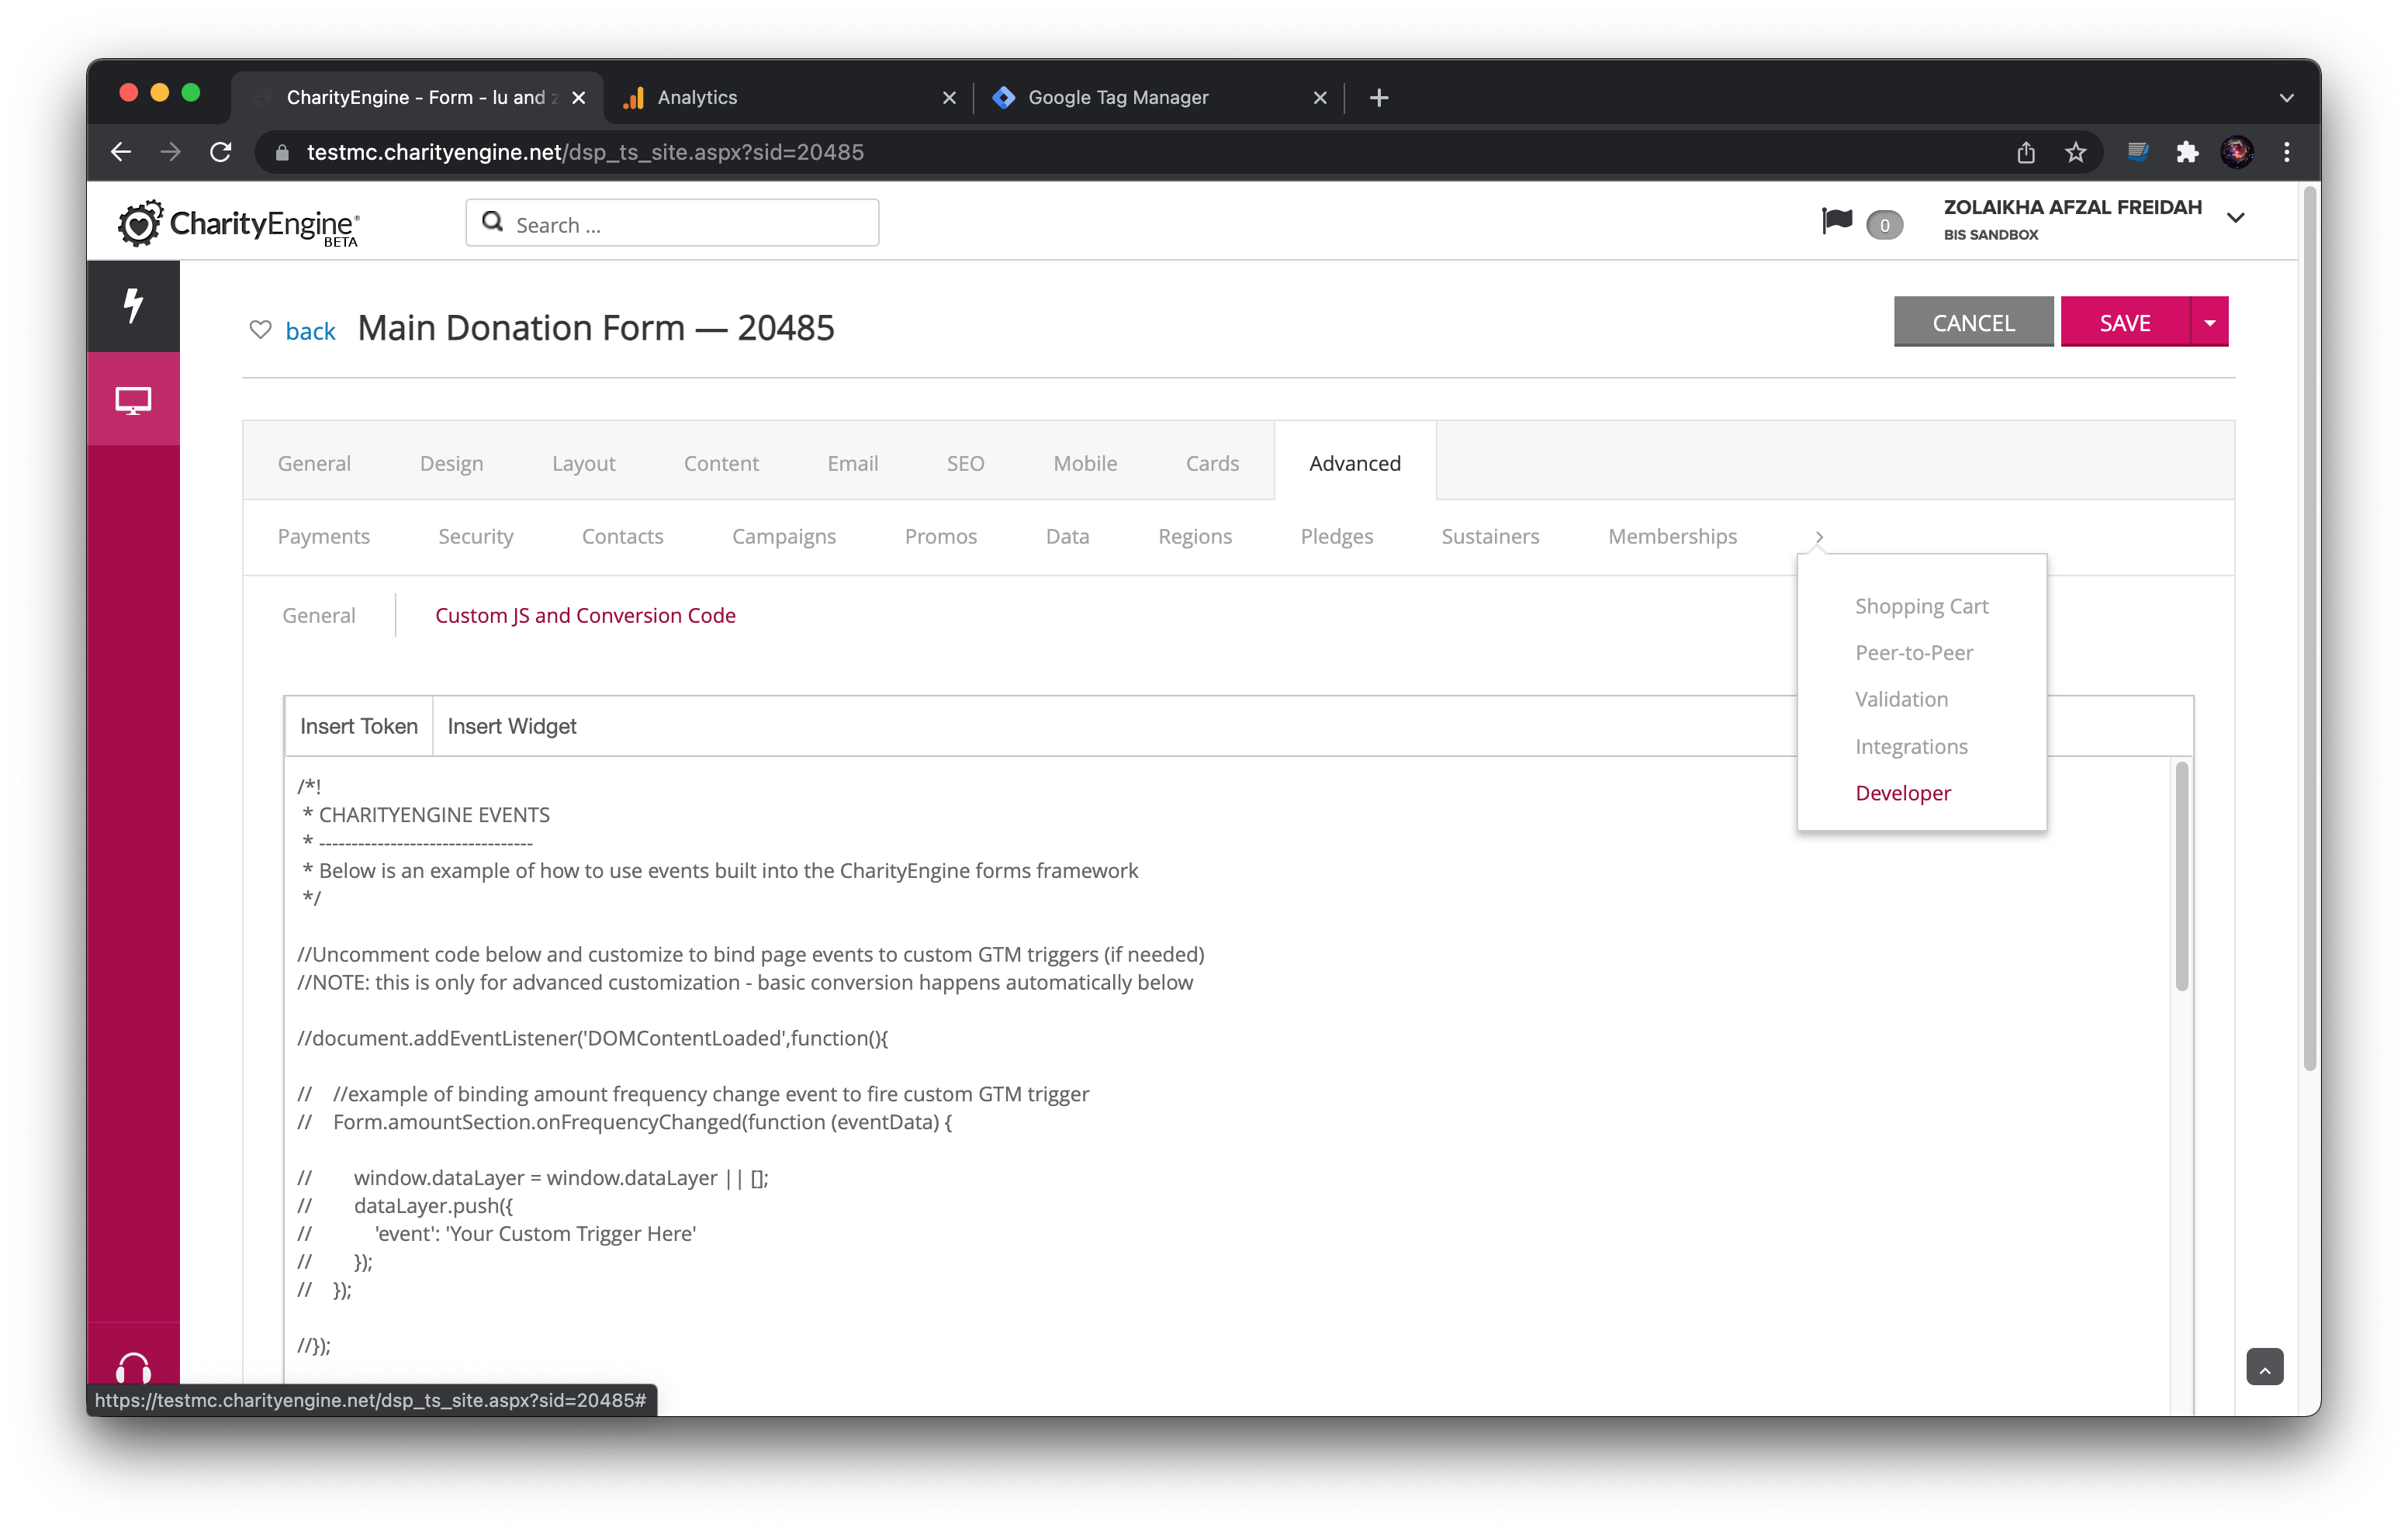
Step 2: There, you will see the conversion code sent to Google. If you need to revert the code back after modifying or if your form does not have the default code, please reference below:
Google Analytics conversion code:
/*!
* GOOGLE ANALYTICS
* -------------------------------
* The Google Analytics code below can be modified or added to depending on what data you would like sent to Google
*/

document.addEventListener('DOMContentLoaded', function () {

    if (WebFormContext.Form.StepName == 'Process Step' && WebFormContext.Form.RenderedViewName == 'Success View') {

        gtag('event', 'purchase', {
            "transaction_id": "[[transaction.id]]",
            "affiliation": "Donation",
            "value": "[[transaction.amount (no formatting)]]",
            "currency": "USD",
            "items": [
                {
                "id": "[[transaction.id]]",
                "name": "CharityEngine Donation",
                "category": "Donation",
                "quantity": 1,
                "price": "[[transaction.amount (no formatting)]]"
                }
            ]
        });

    }

});
Google Tag Manager conversion code:
/*!
 * GOOGLE TAG MANAGER
 * -------------------------------
 * The Google Tag Manager code below can be modified or added to depending on what data you would like sent to Google
 */

document.addEventListener('DOMContentLoaded', function() {

	//make sure the gift processed successfully
    if (WebFormContext.Form.StepName == 'Process Step' && WebFormContext.Form.RenderedViewName == 'Success View') {

        window.dataLayer = window.dataLayer || [];

        dataLayer.push({
            event: 'purchase',
            ecommerce: {
                purchase: {
                    actionField: {
                        id: '[[transaction.id]]',
                        revenue: '[[transaction.amount (no formatting)]]'
                    },
                    products: [{
                        id: '[[transaction.id]]',
                        name: '[[web form.name]]',
                        price: '[[transaction.amount (no formatting)]]',
                        category: 'Donation',
                        quantity: 1
                    }]
                }
            }
        });

    }

});
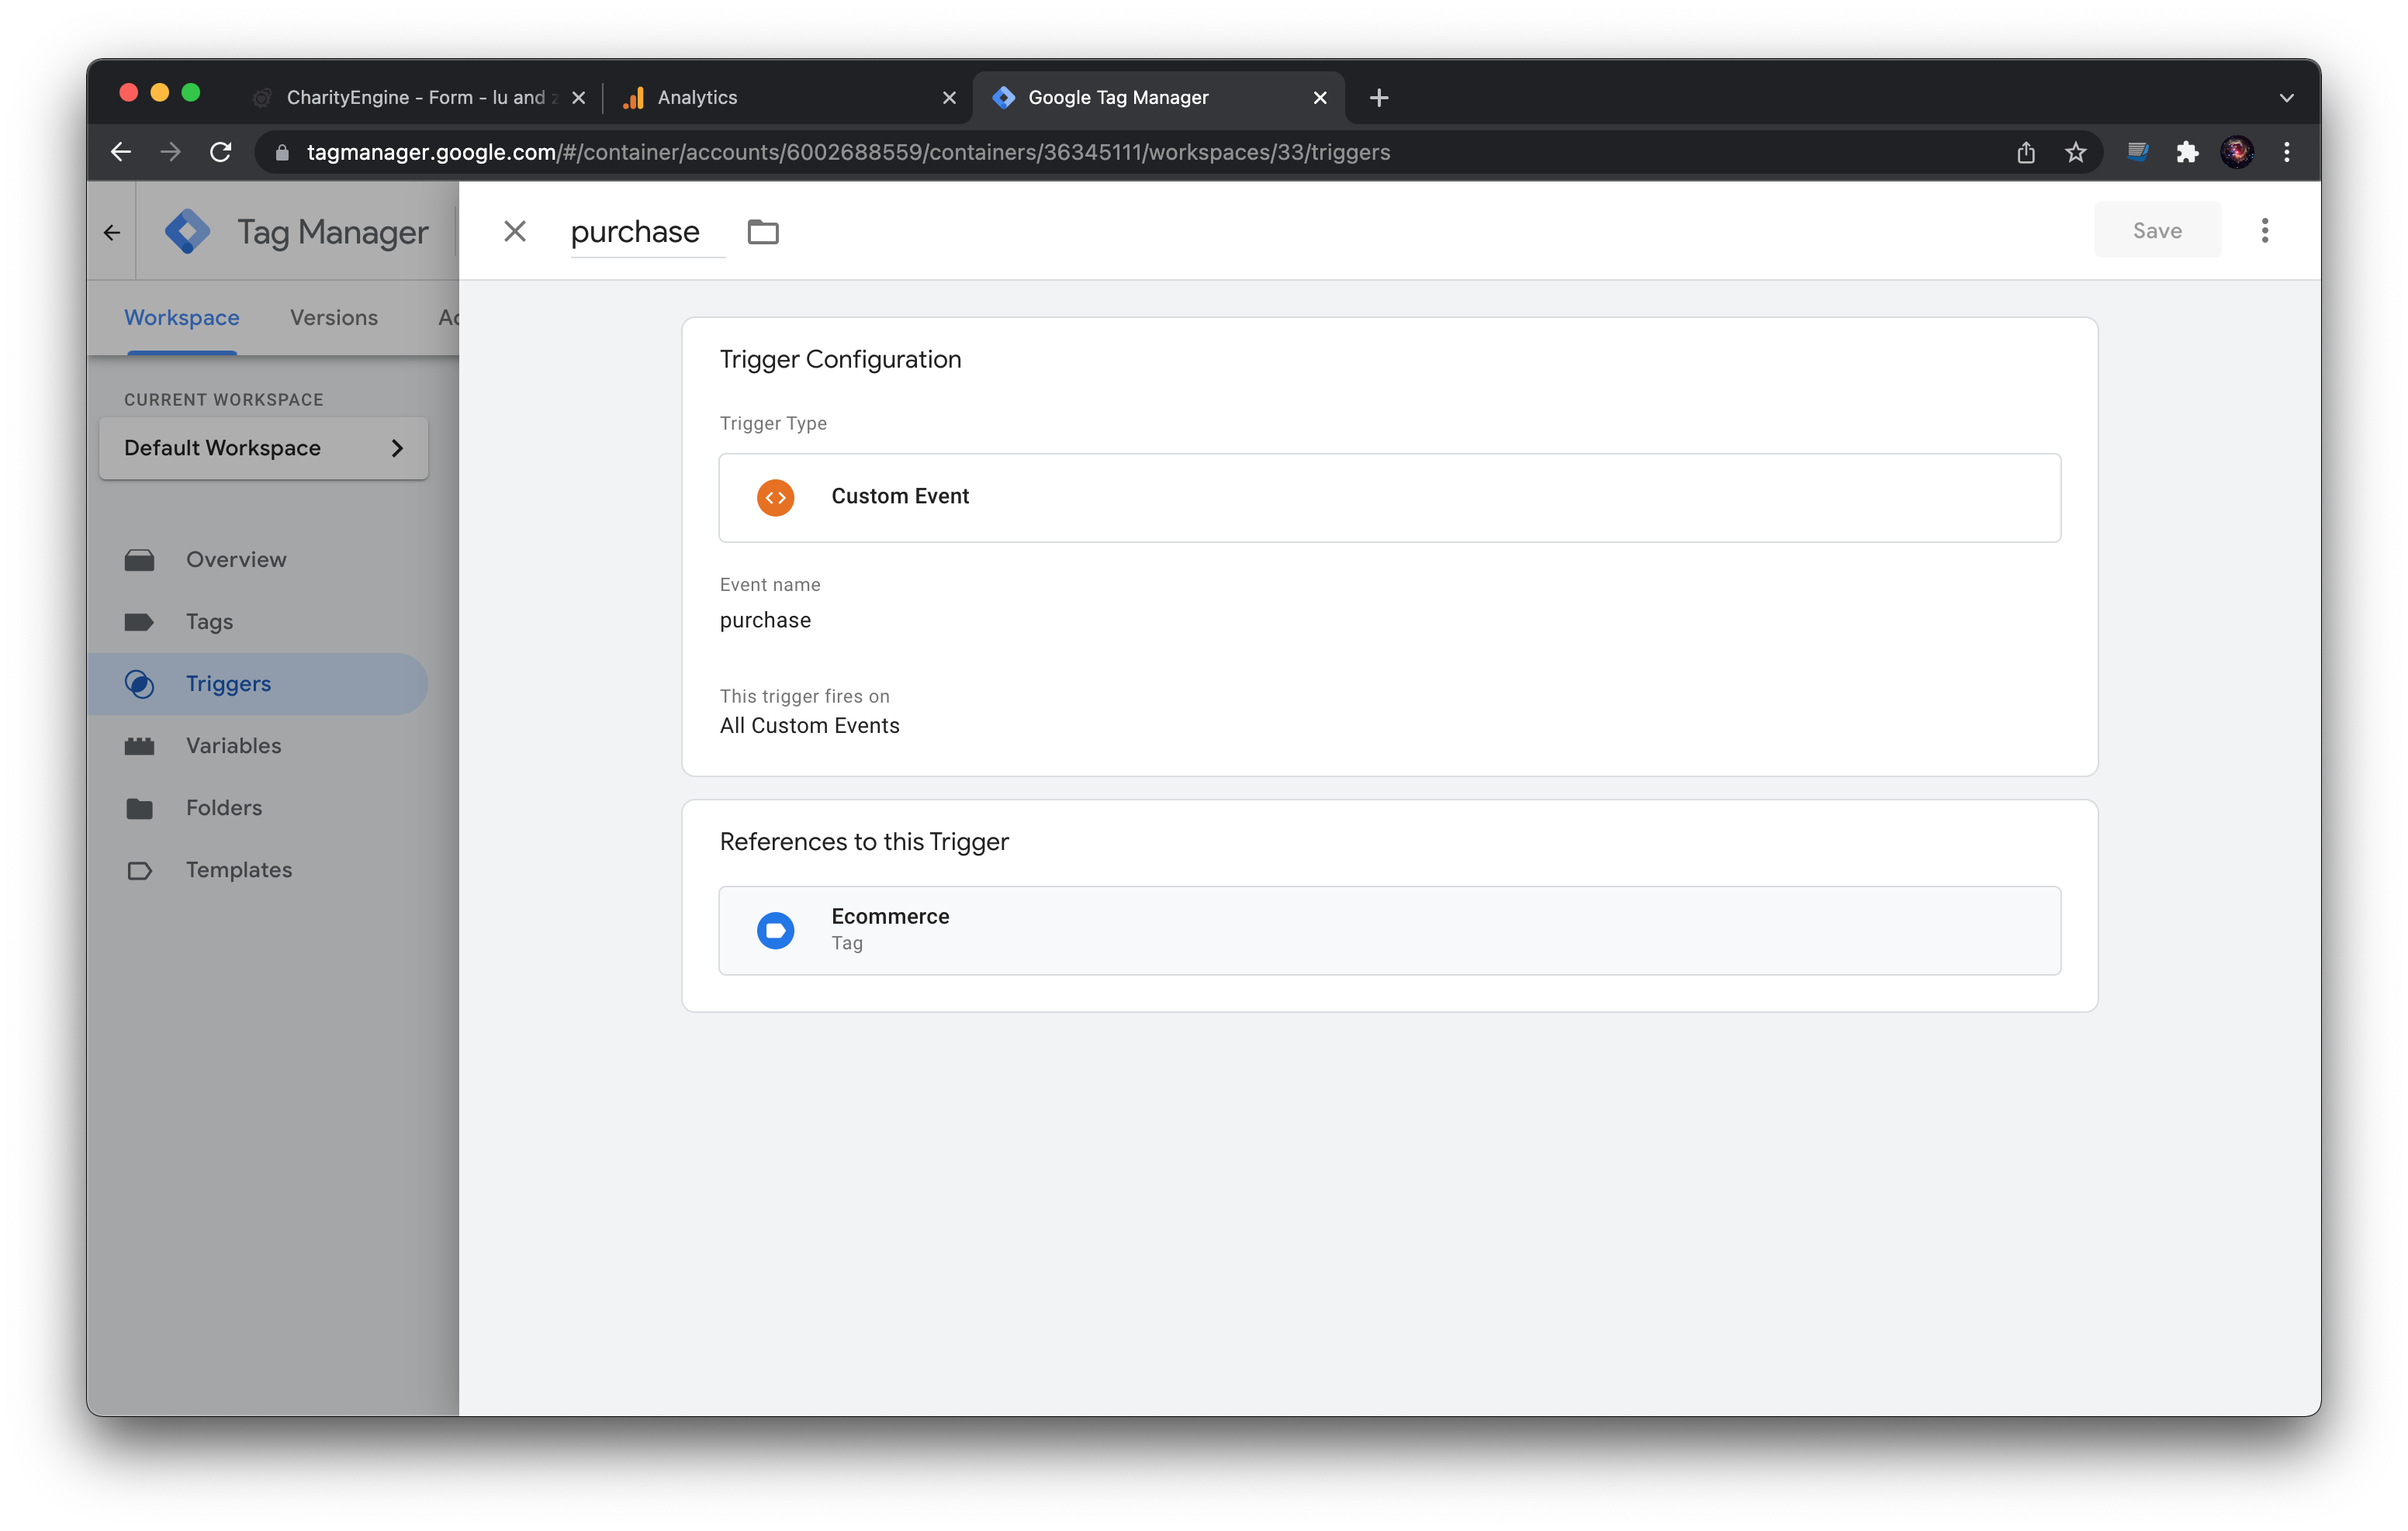
Below is an example of the Tag and Trigger that will work with the Google Tag Manager code above: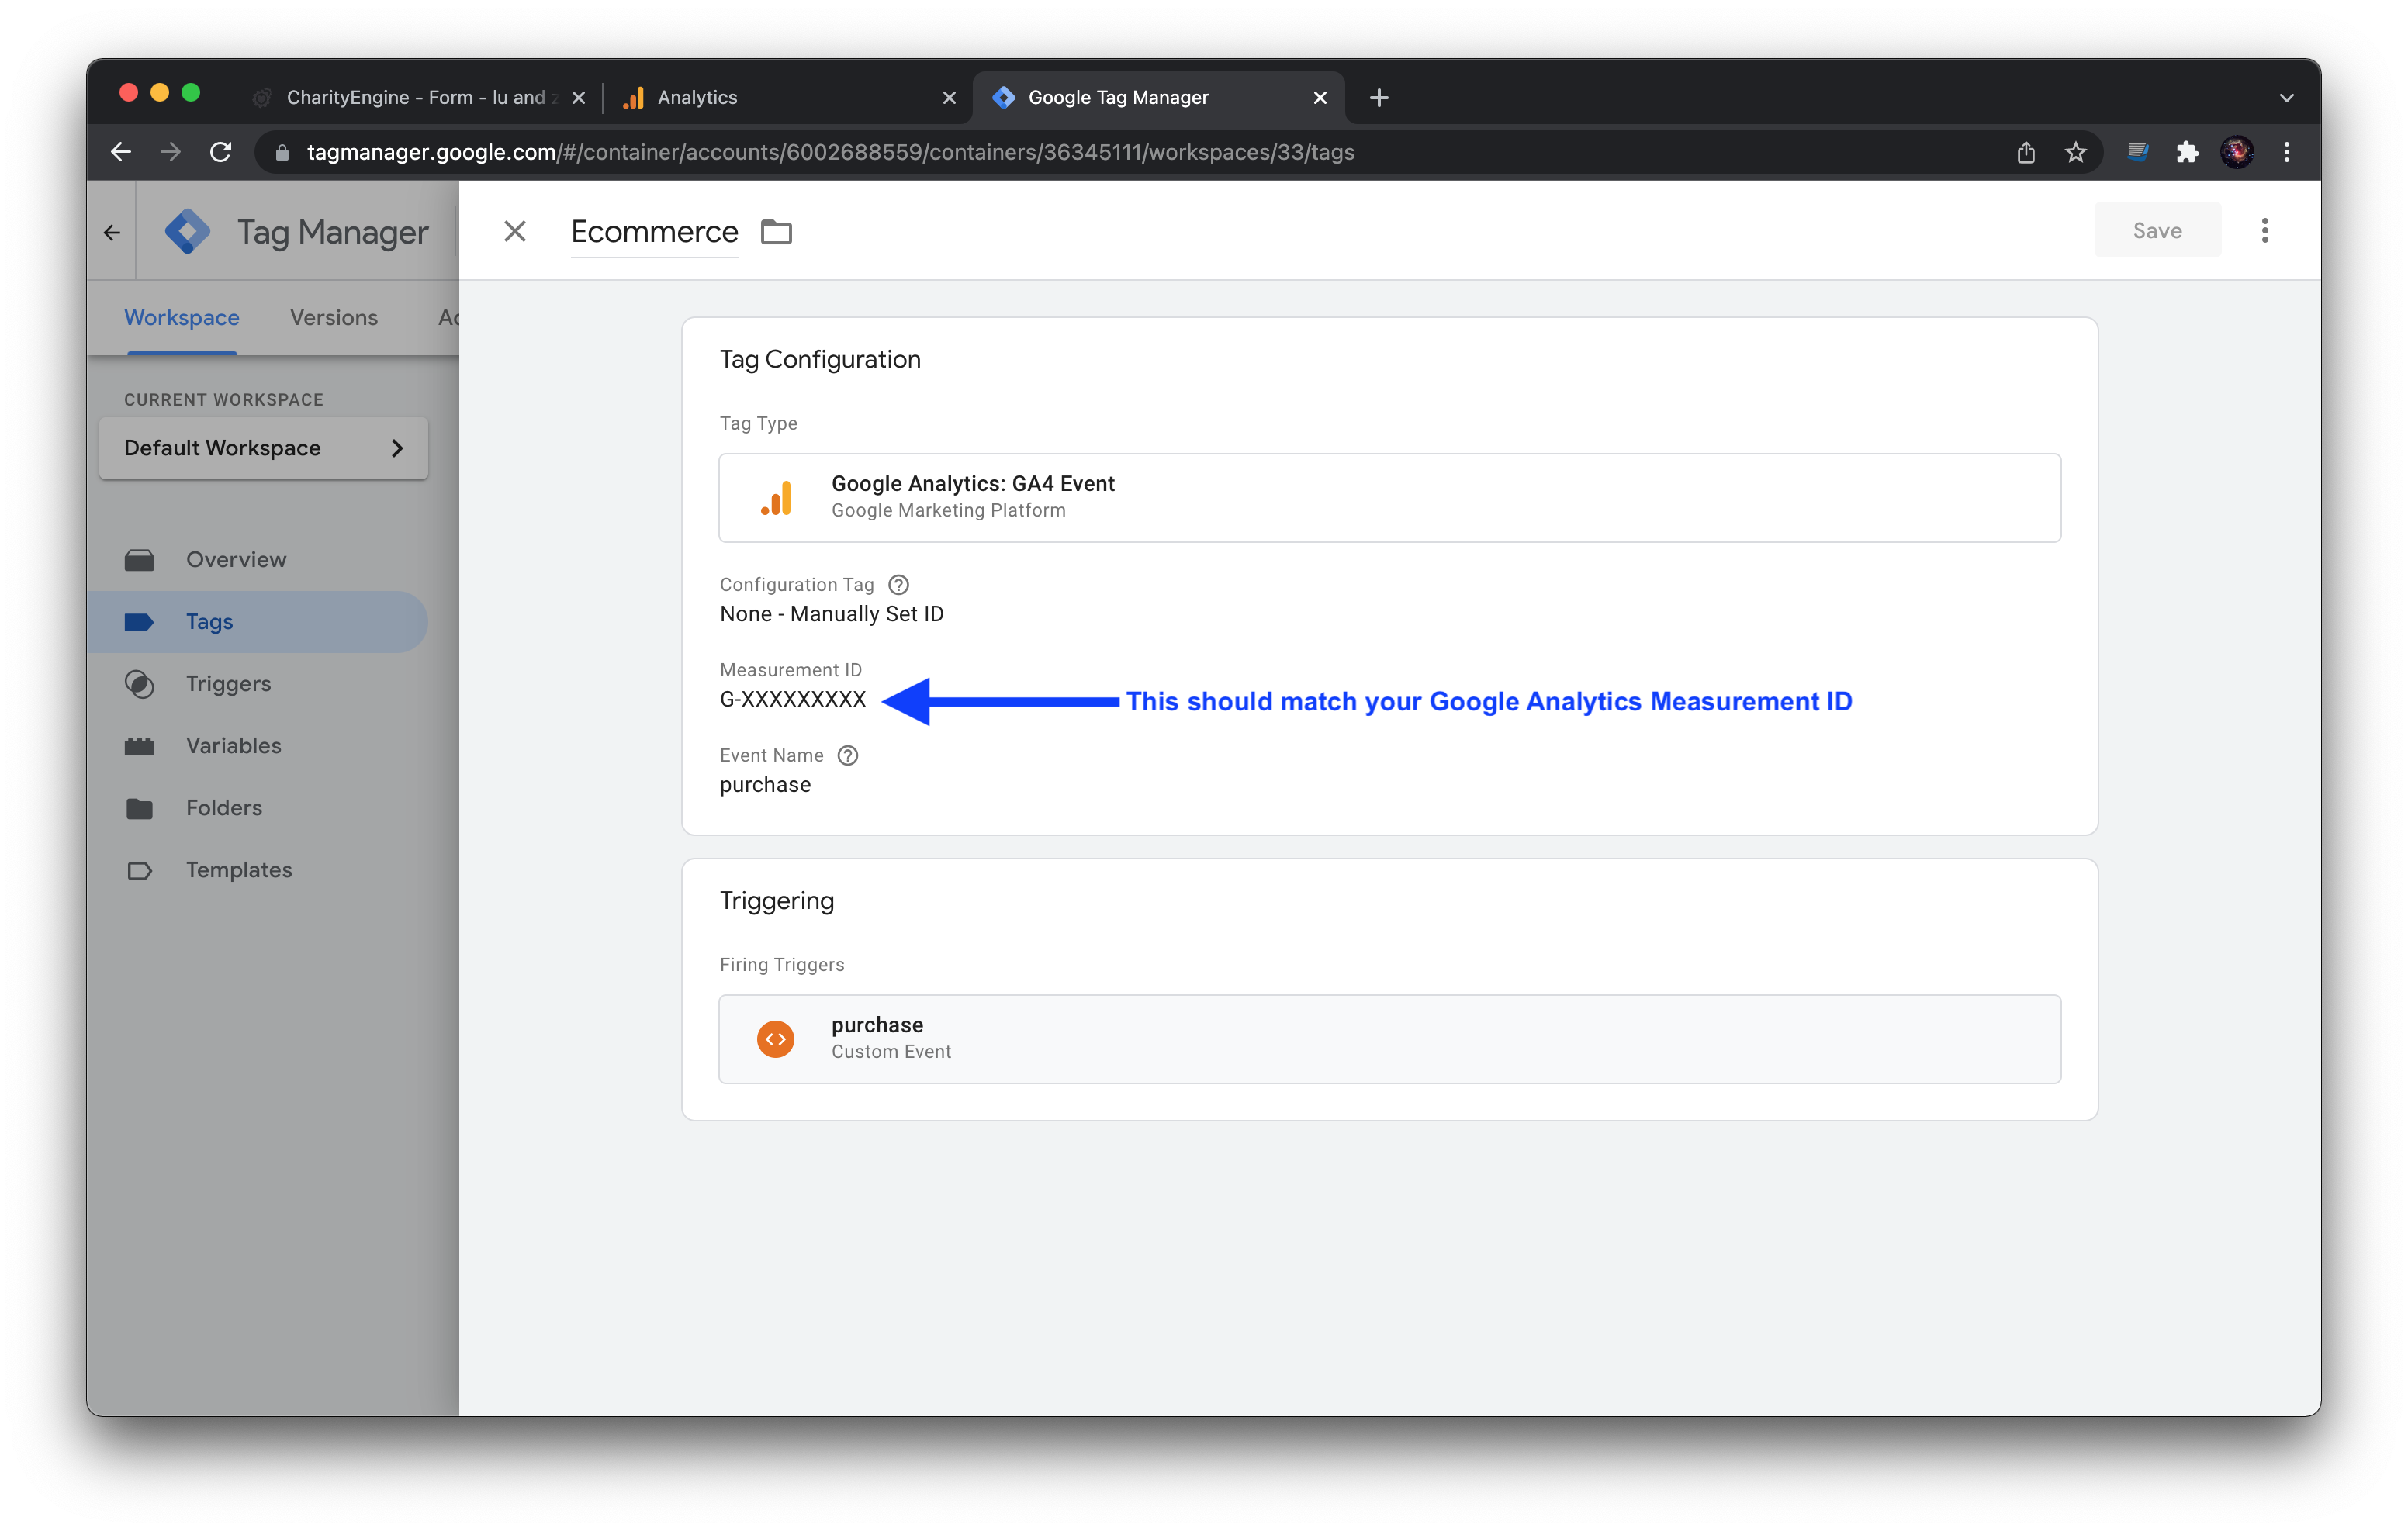
*NOTE: There is 24-48 hour latency with E-commerce reporting: 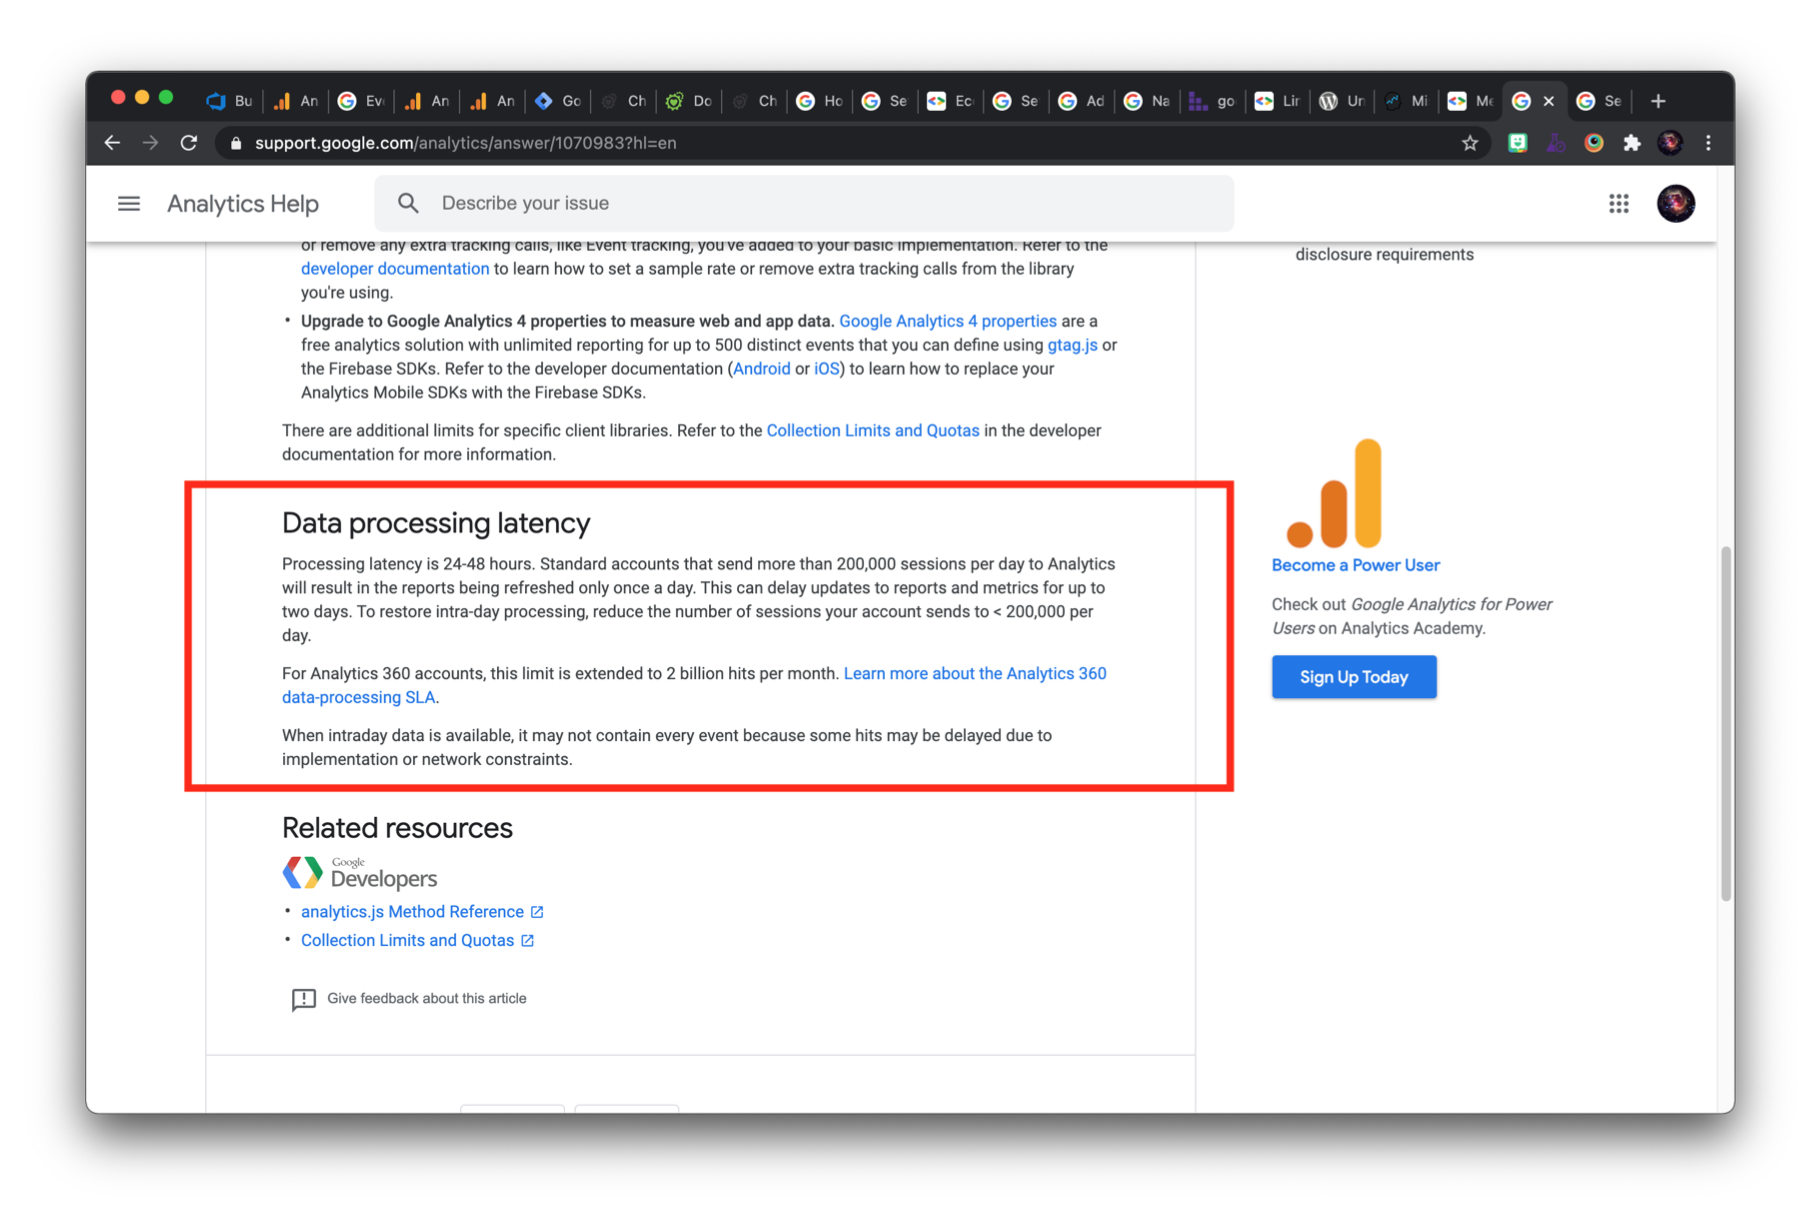
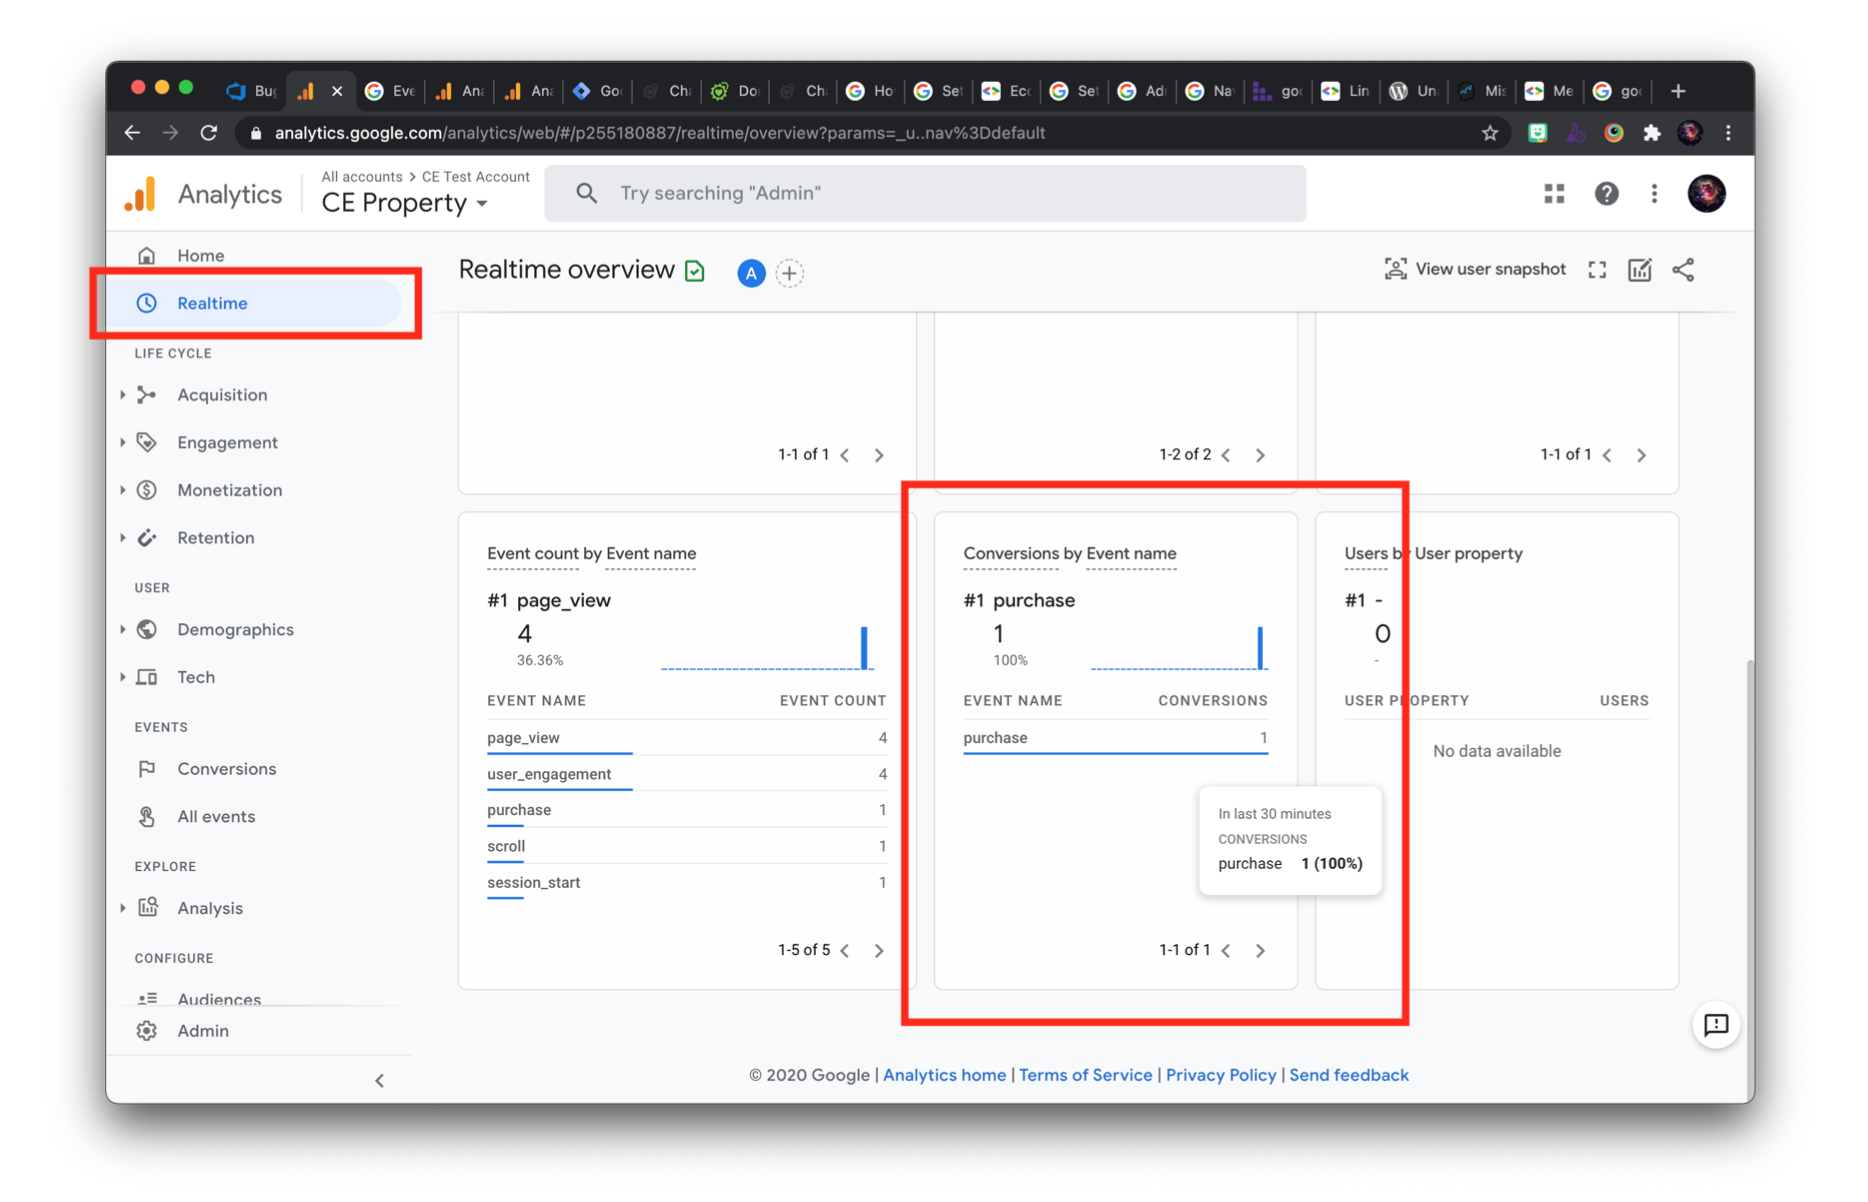
You can make sure the event was captured by going to your Google Analytics dashboard and looking at the Realtime data:
After 24-48 hours, you will see the data counted as Revenue in your Dashboard Home:
FAQs & Additional Reading
Q. How can I locate my Google Analytics Measurement ID?
A. You have already set up a data stream for your CharityEngine form (instructions for that can be found here: https:// support.google.com/analytics/answer/9304153?hl=en) and use gtag.js.
Q. How can I locate my Google Tag Manager Measurement ID?
A. You have already set up a data stream for your CharityEngine form (instructions for that can be found here: https://support.google.com/analytics/answer/9304153?hl=en) and use Google Analytics GA4.
Q. I am using the Google Analytics within the web form for customized analytics. How can I best leverage at the web form level?
A. The Google Analytics conversion code is automatically added to each CharityEngine web form. You can access the code by navigating to the Online App > Web Forms > Search & Manage > locate your identified web form > ACTIONS: Manage > Advanced tab > Developer sub tab > Custom JS and Conversion Code. You will not need to complete the steps outlined in Goggle Analytics Integration steps as this will result in duplication in your analytics. You can also add the Google Analytics conversion code to the by navigating to the Configuration App > Design & Messages > Templates > locate your template > ACTIONS: Manage > Screen HTML Page Content.
Q. Can Google Analytics be used within Advocacy Issues?
A. Yes - when creating a new issue, navigate to the Advanced > Developer > Custom JS & Conversion Code to view the Google Analytics and Google Tag Manager code.
