Introduction
As a non-profit, acknowledging and/or receipting is an important activity for your donors. This is not only a great way to express your gratitude for your donor's support, but the receipt is also a helpful activity for tax purposes. This article will provide you with steps you can take to easily acknowledge or send a receipt to your donors.
Table of Contents
- Introduction
- Prerequisites
- Instructions - Sending Individual Acknowledgements
- Instructions - Sending Multiple Acknowledgements
- Instructions - Sending Acknowledgements when Entering Batches, or to Previously Processed Batches
- Instructions - Multiple Acknowledgements: Ready-to-Mail-Merge Letters
- Instructions - Viewing the Receipt Log
- FAQs & Additional Materials
Prerequisites
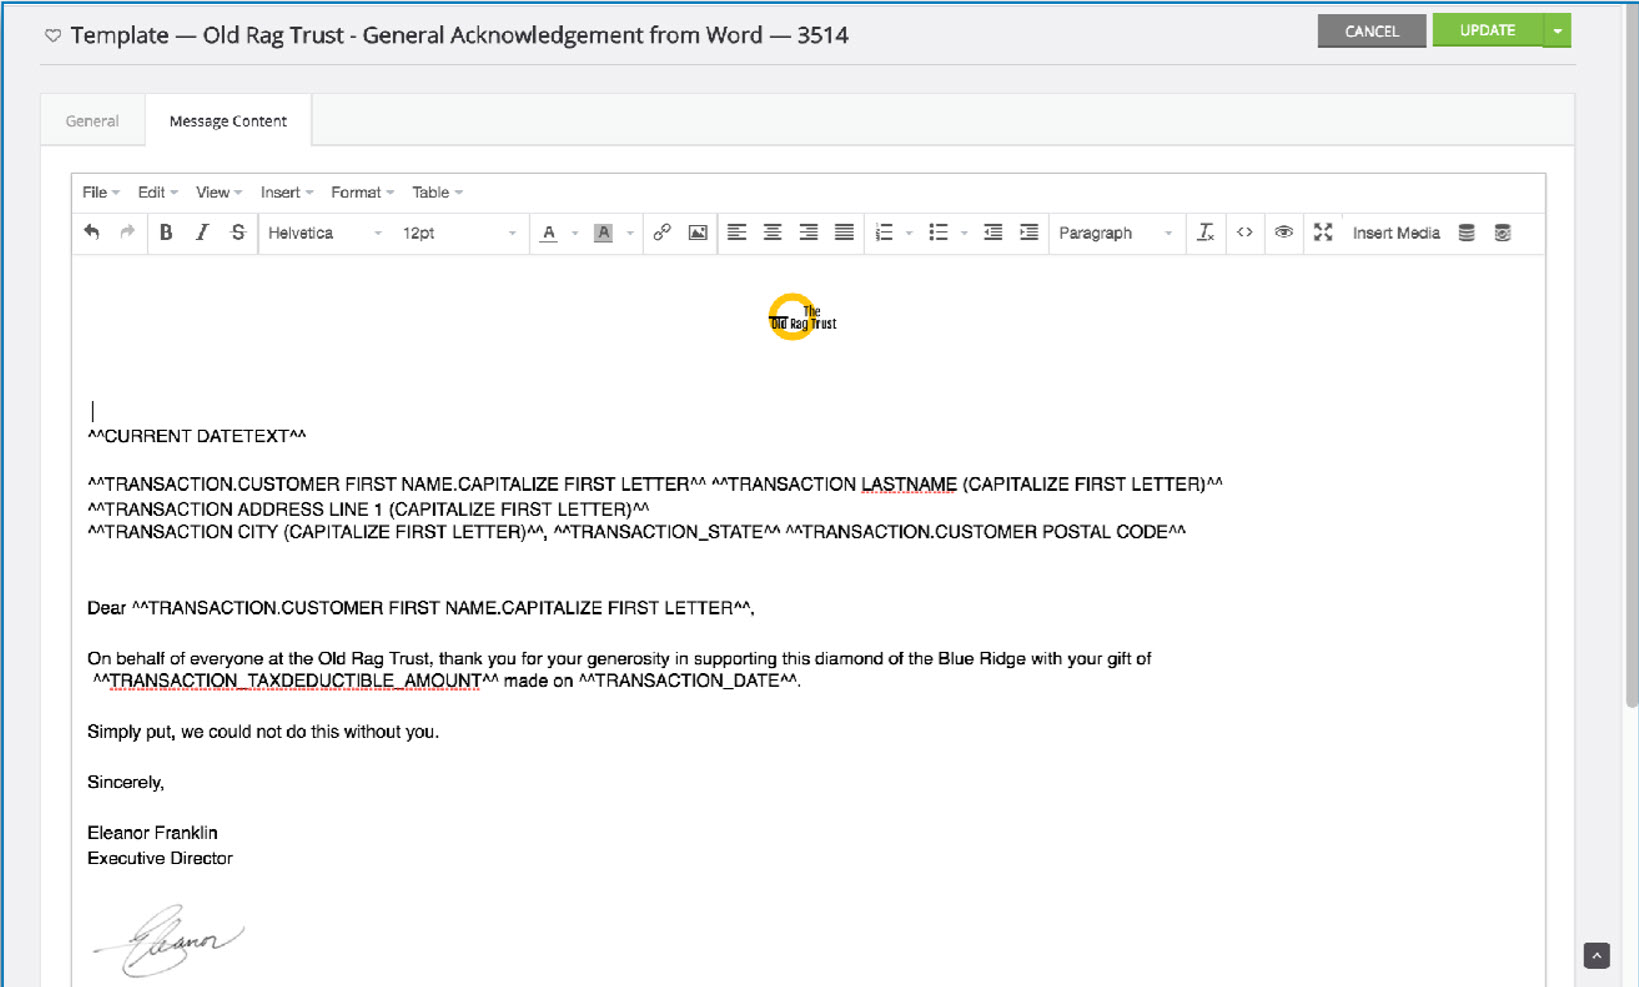
While not required for this feature, creation of a receipt or acknowledgement template can be leveraged for both individual as well as multiple acknowledgement/receipting activities.
Instructions - Sending Individual Acknowledgements
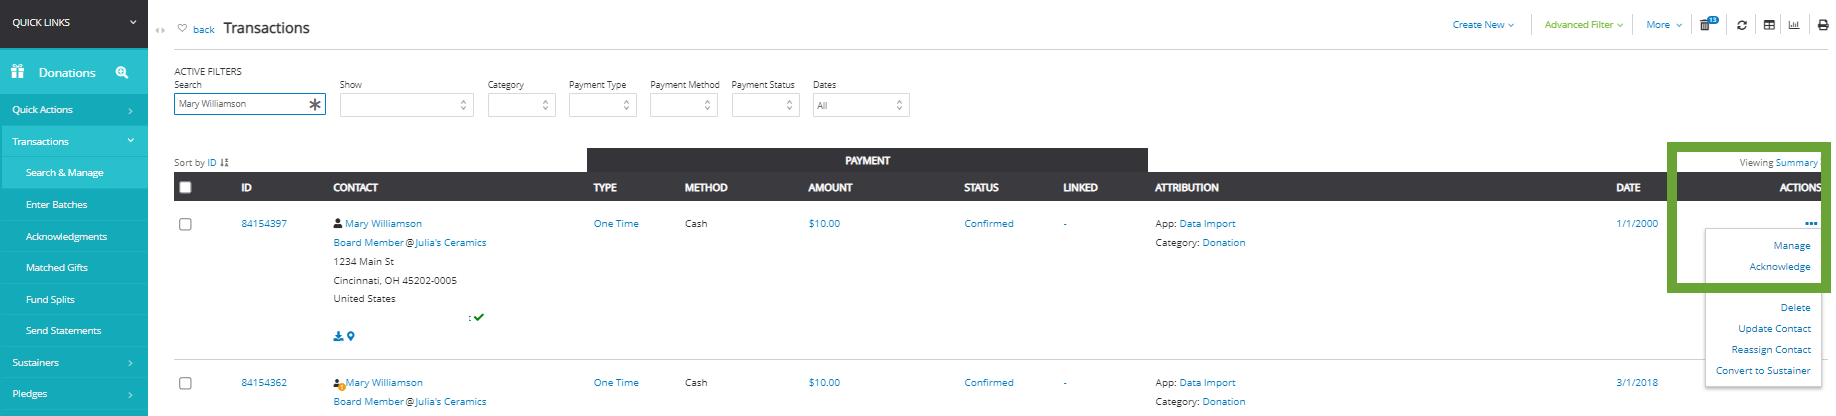
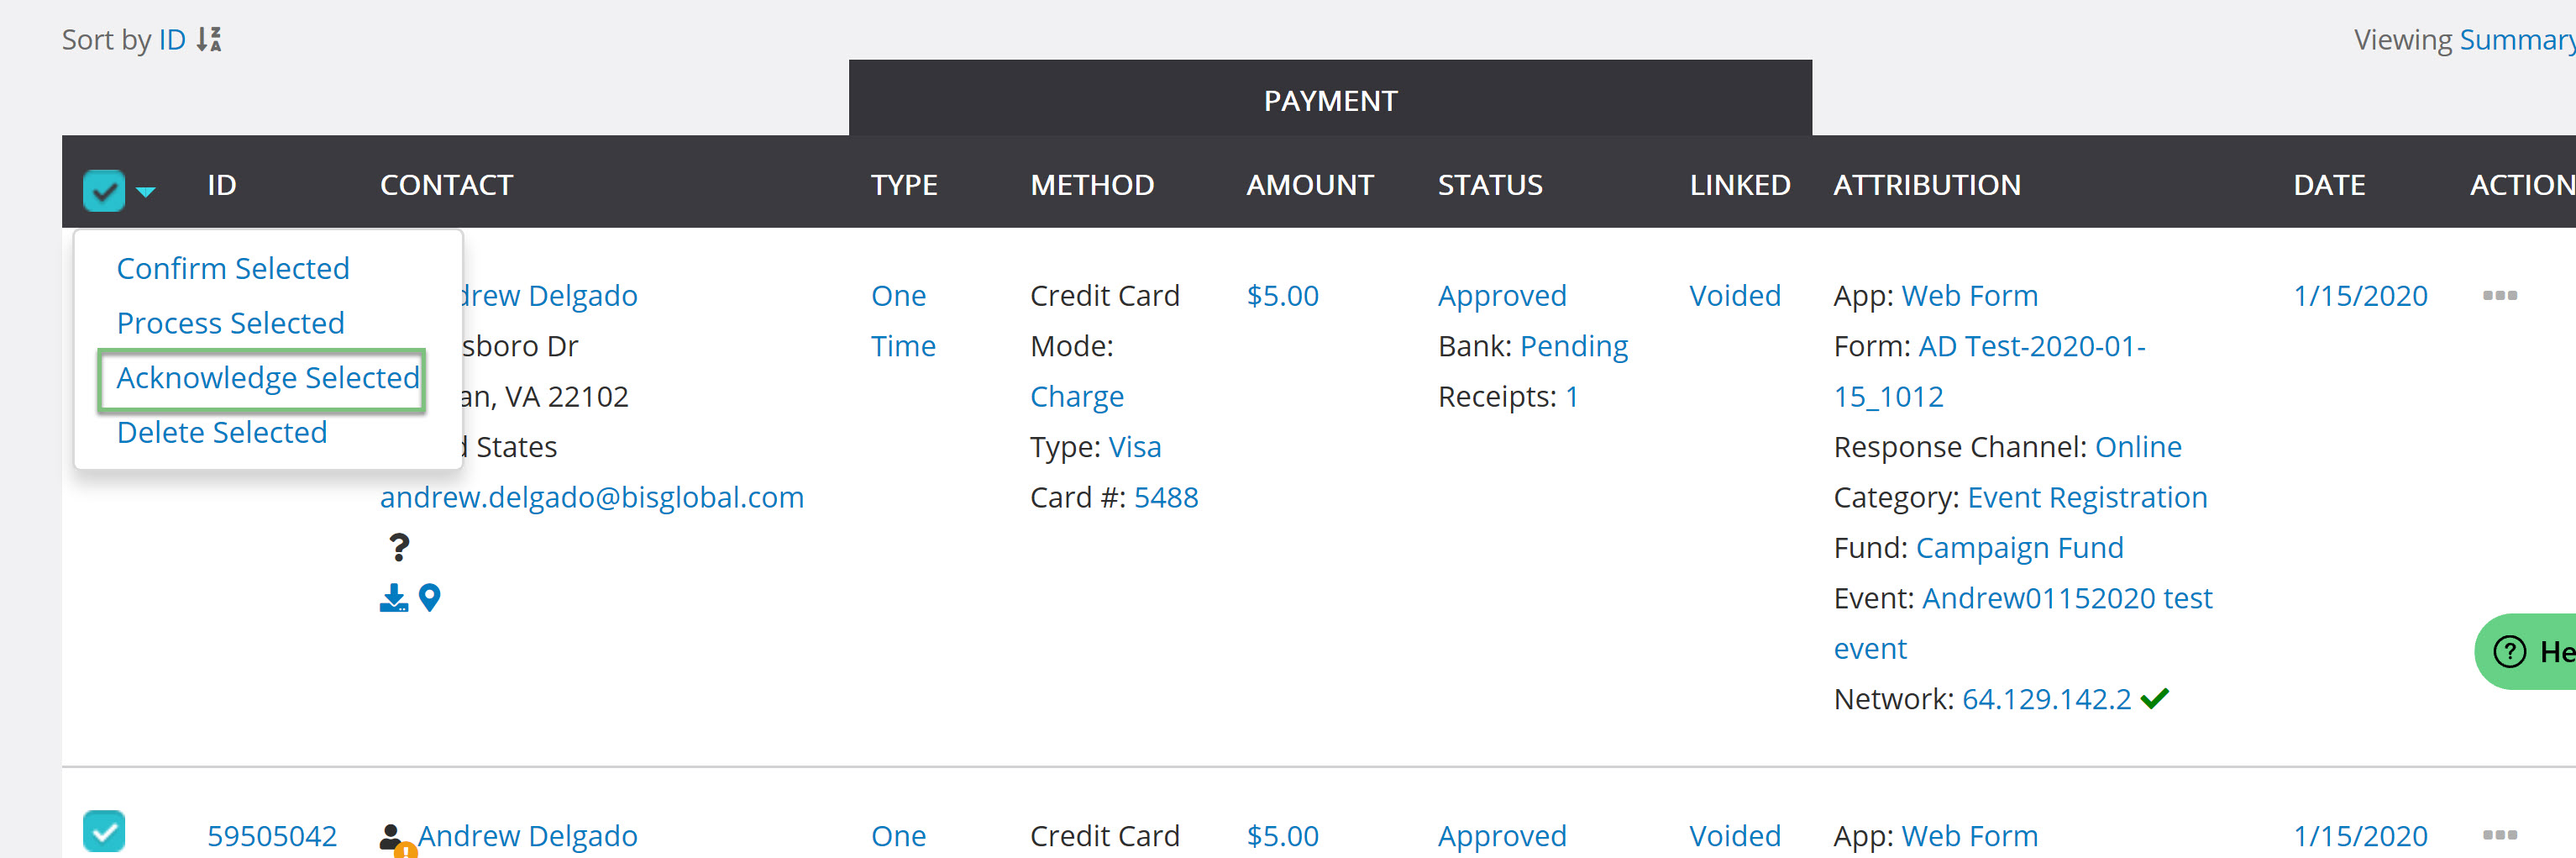
Step 1: If you are only sending a single acknowledgment or just want to do a one-off, navigate to the Donations App > Transactions > Search & Manage > locate the transaction > ACTIONS > Acknowledge
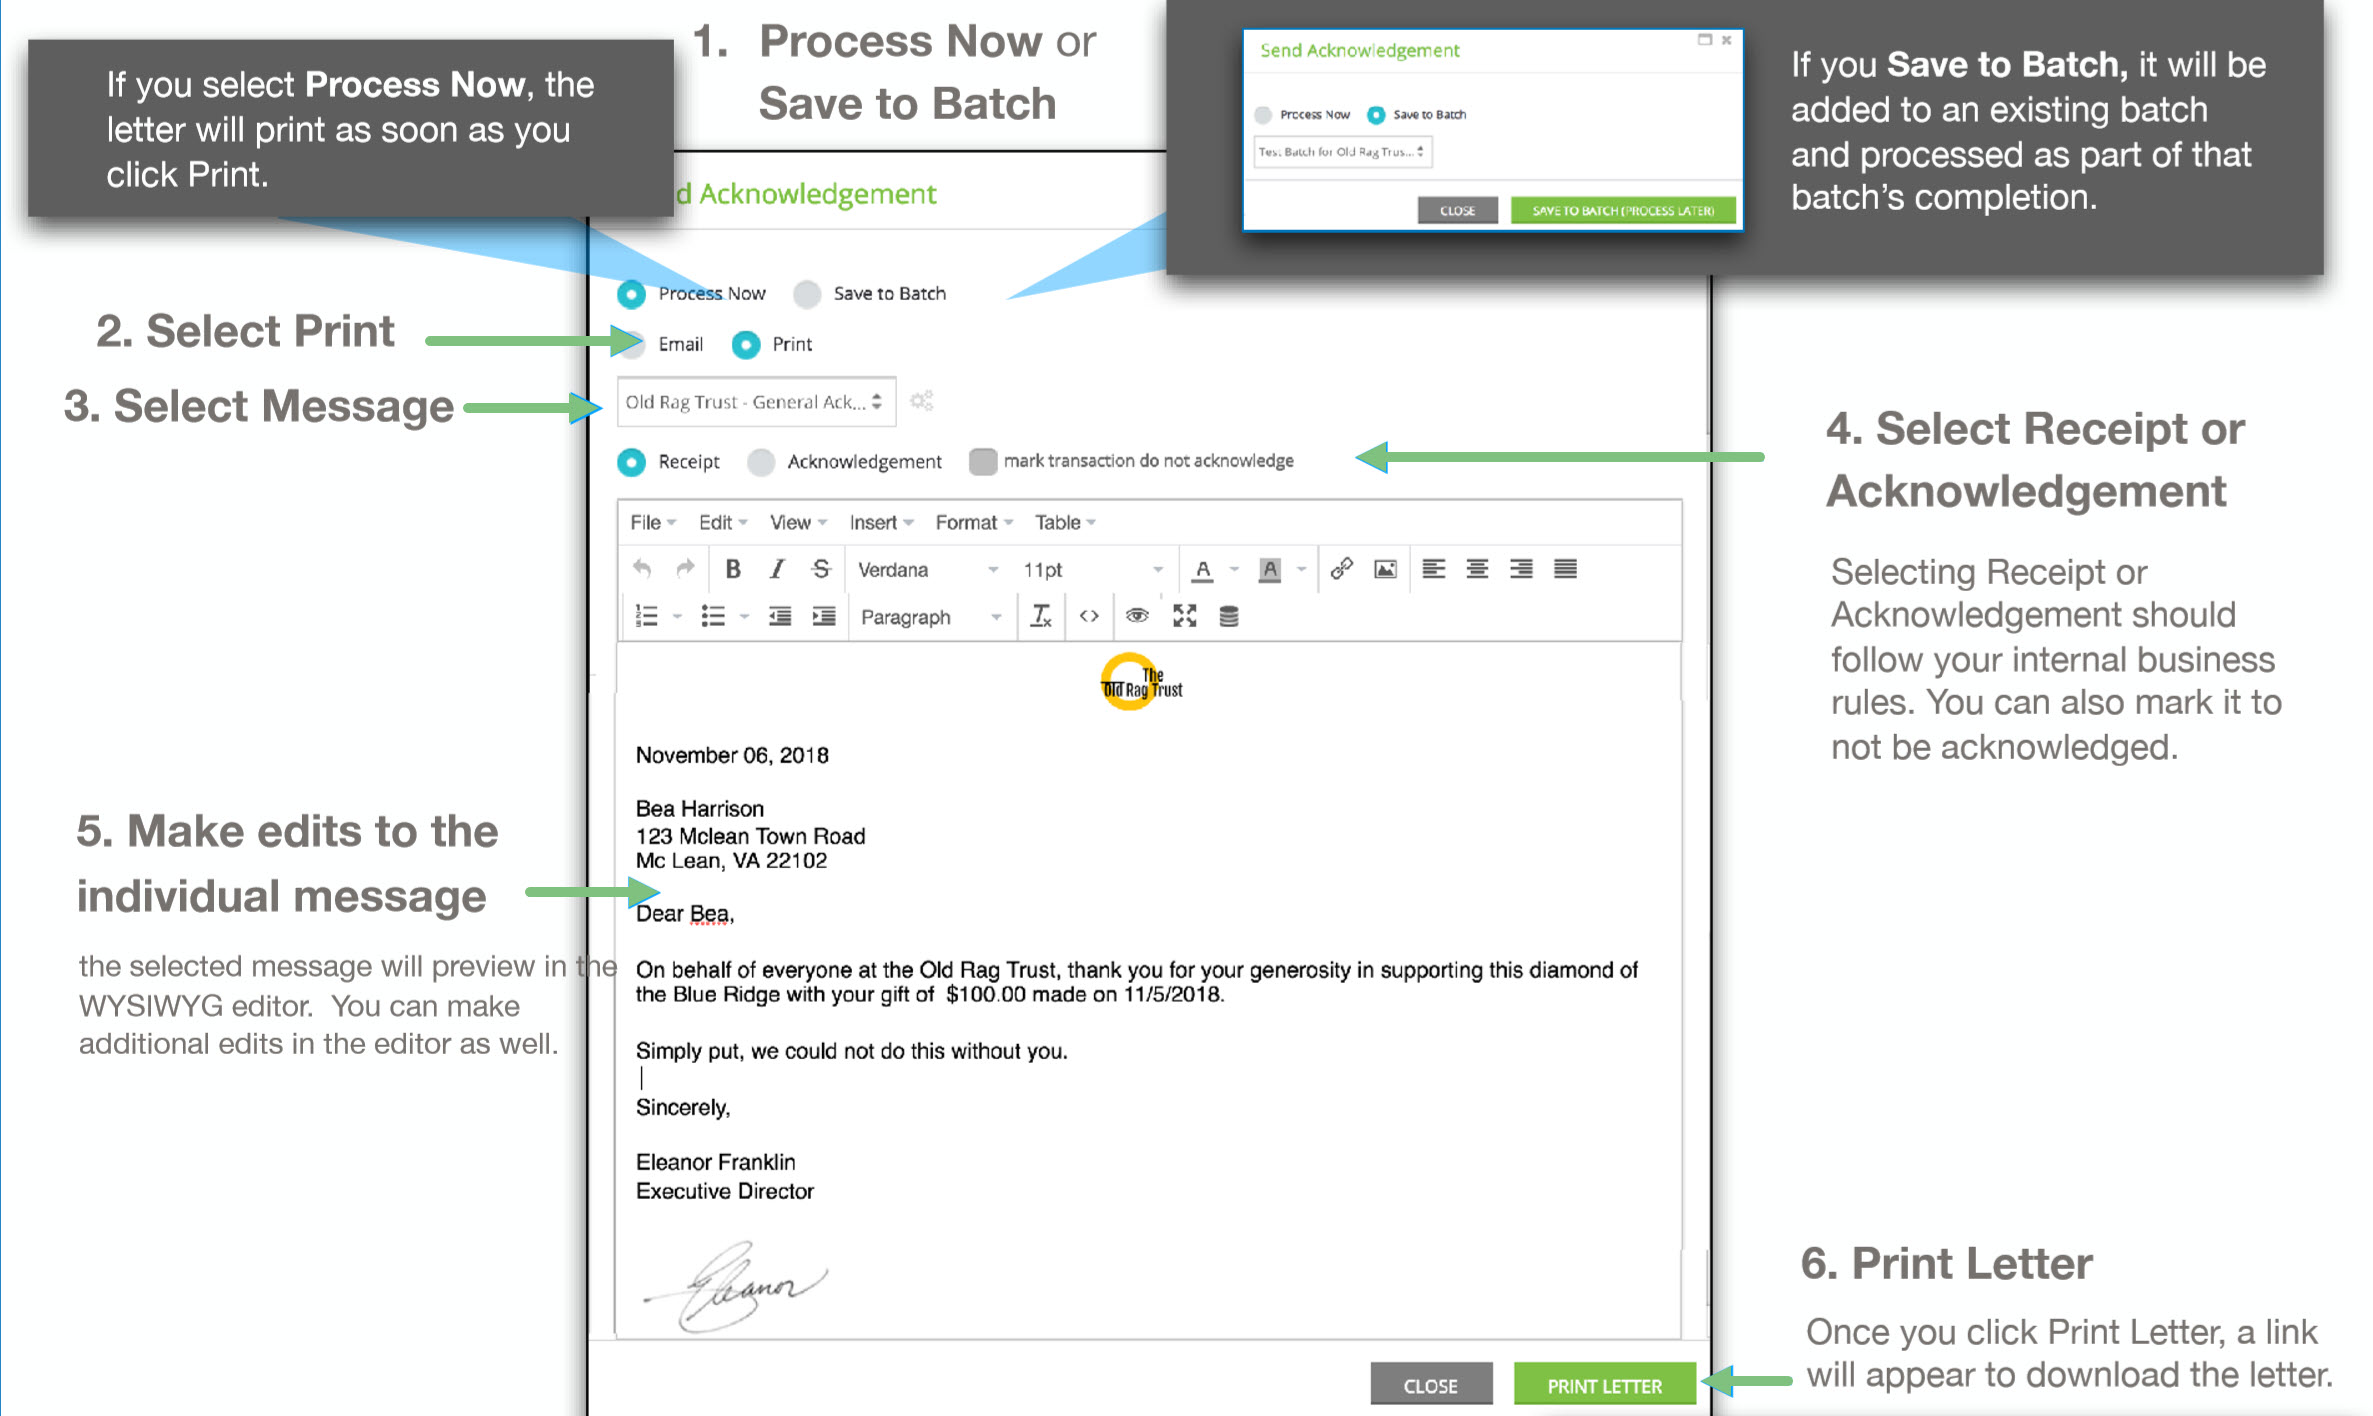
Step 2: The Send Acknowledgement wizard will be initiated. From here select:
- Process Now or Save to Batch
- Email or Print
- Select an existing acknowledgement template or create a new one - or leave null and craft a custom message in the text box at the bottom
- Select as a Receipt or Acknowledgement type
- If email is selected as the sending method, verify or adjust Email Address, Email Subject, Email Display Name, Email Reply-To
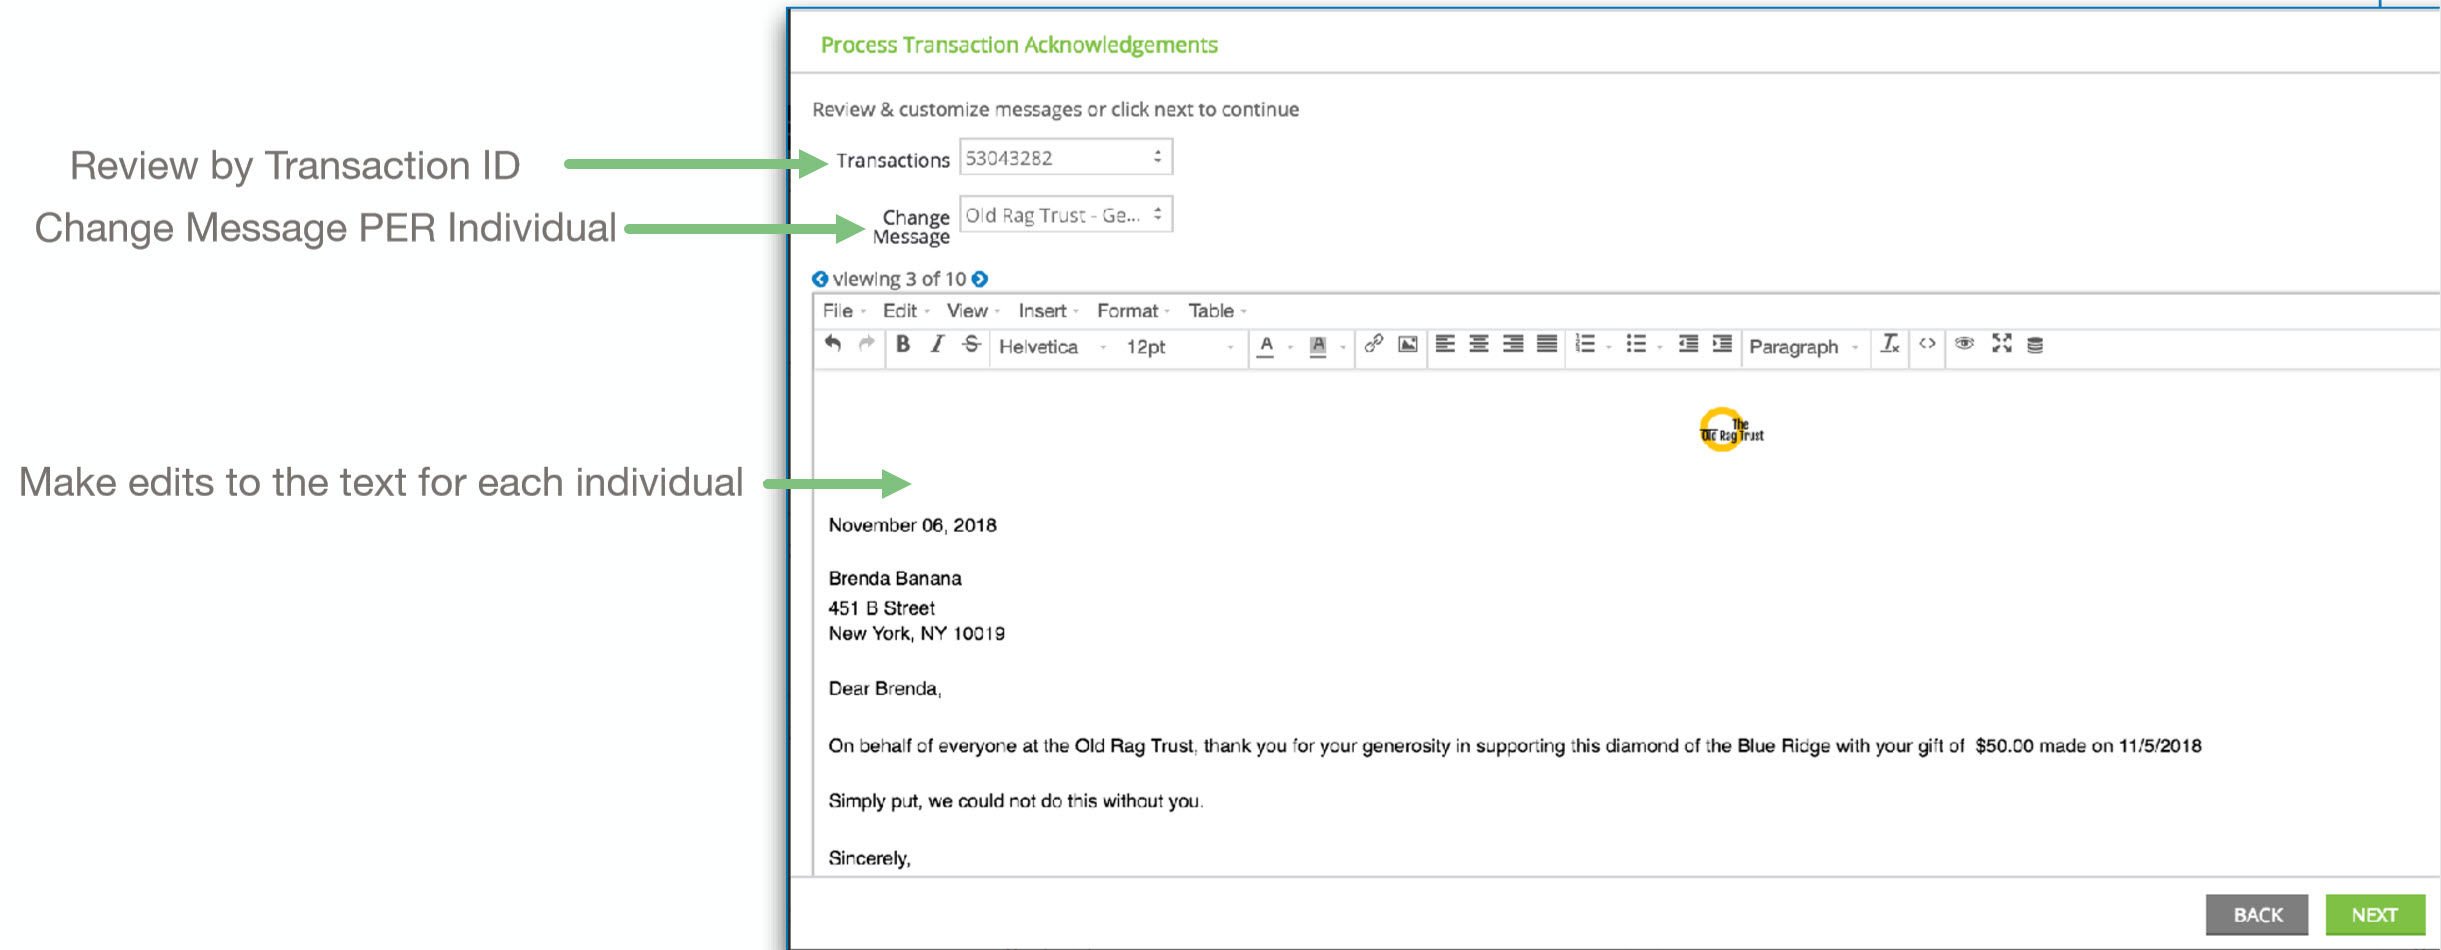
- In the message box, customize or create. As demonstrated here, if using an existing template the wizard will also verify all tokens are valid
- Click CLOSE once complete
Sending an Individual Acknowledgement: Email
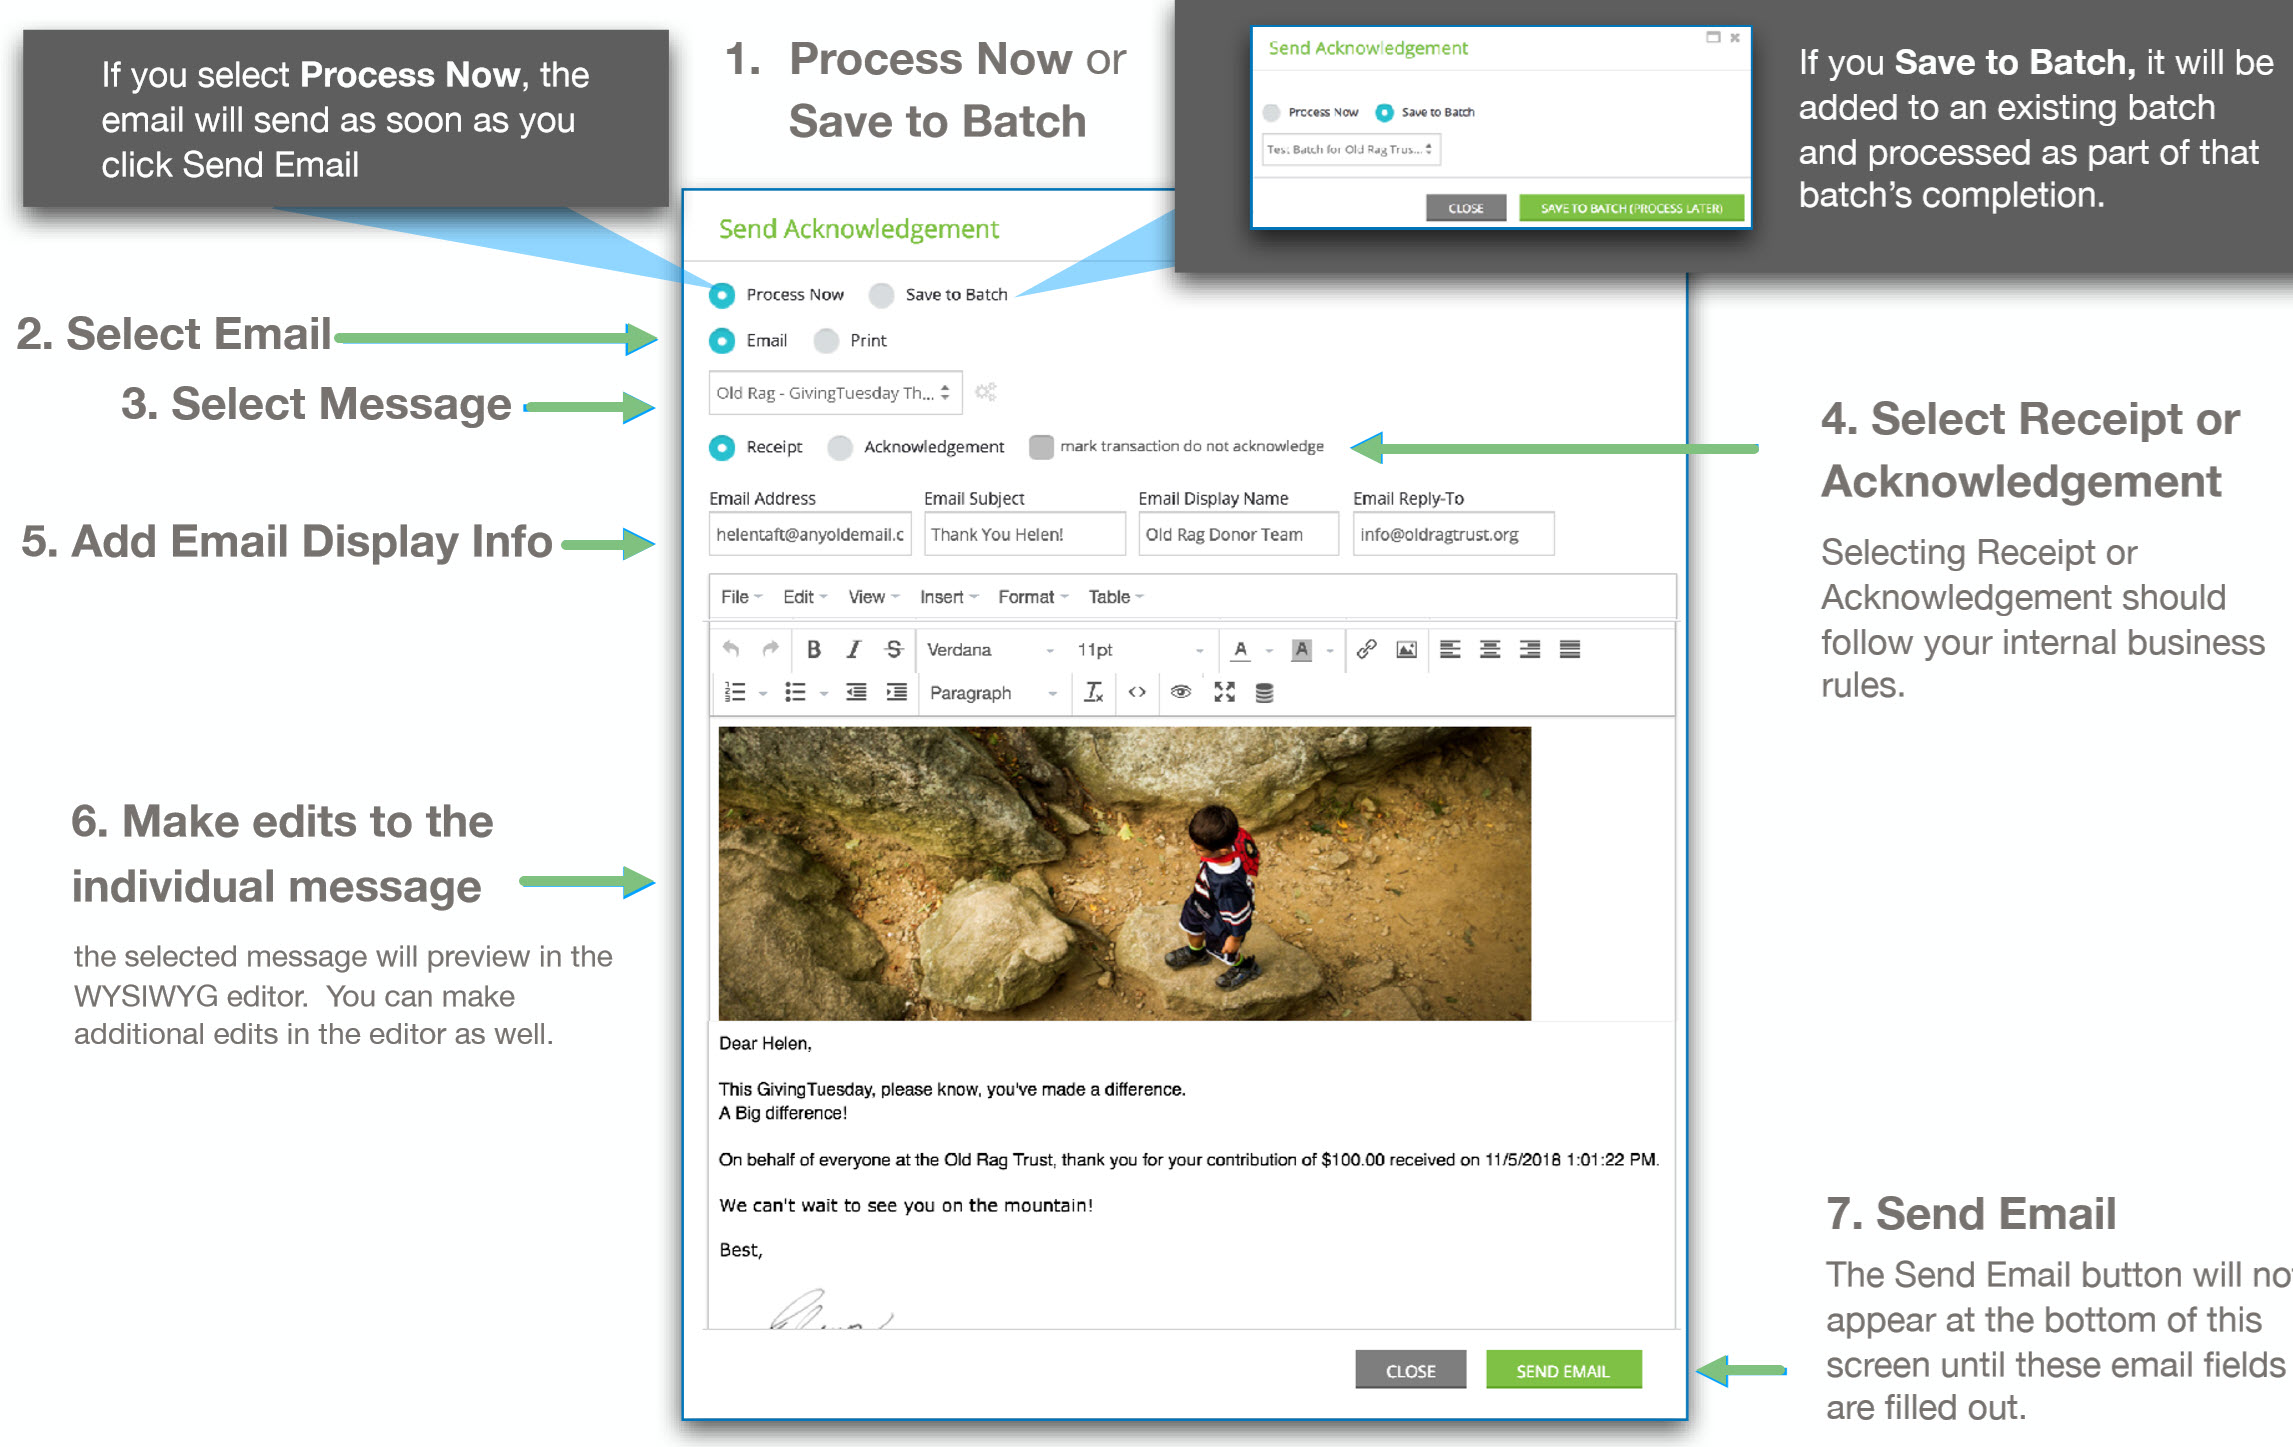
Note: Users can leverage the +CC option to allow additional carbon copies to be delivered to others identified and requested by the donor (i.e. spouse, assistants)
Sending an Individual Acknowledgement: Print
Instructions - Sending Multiple Acknowledgements
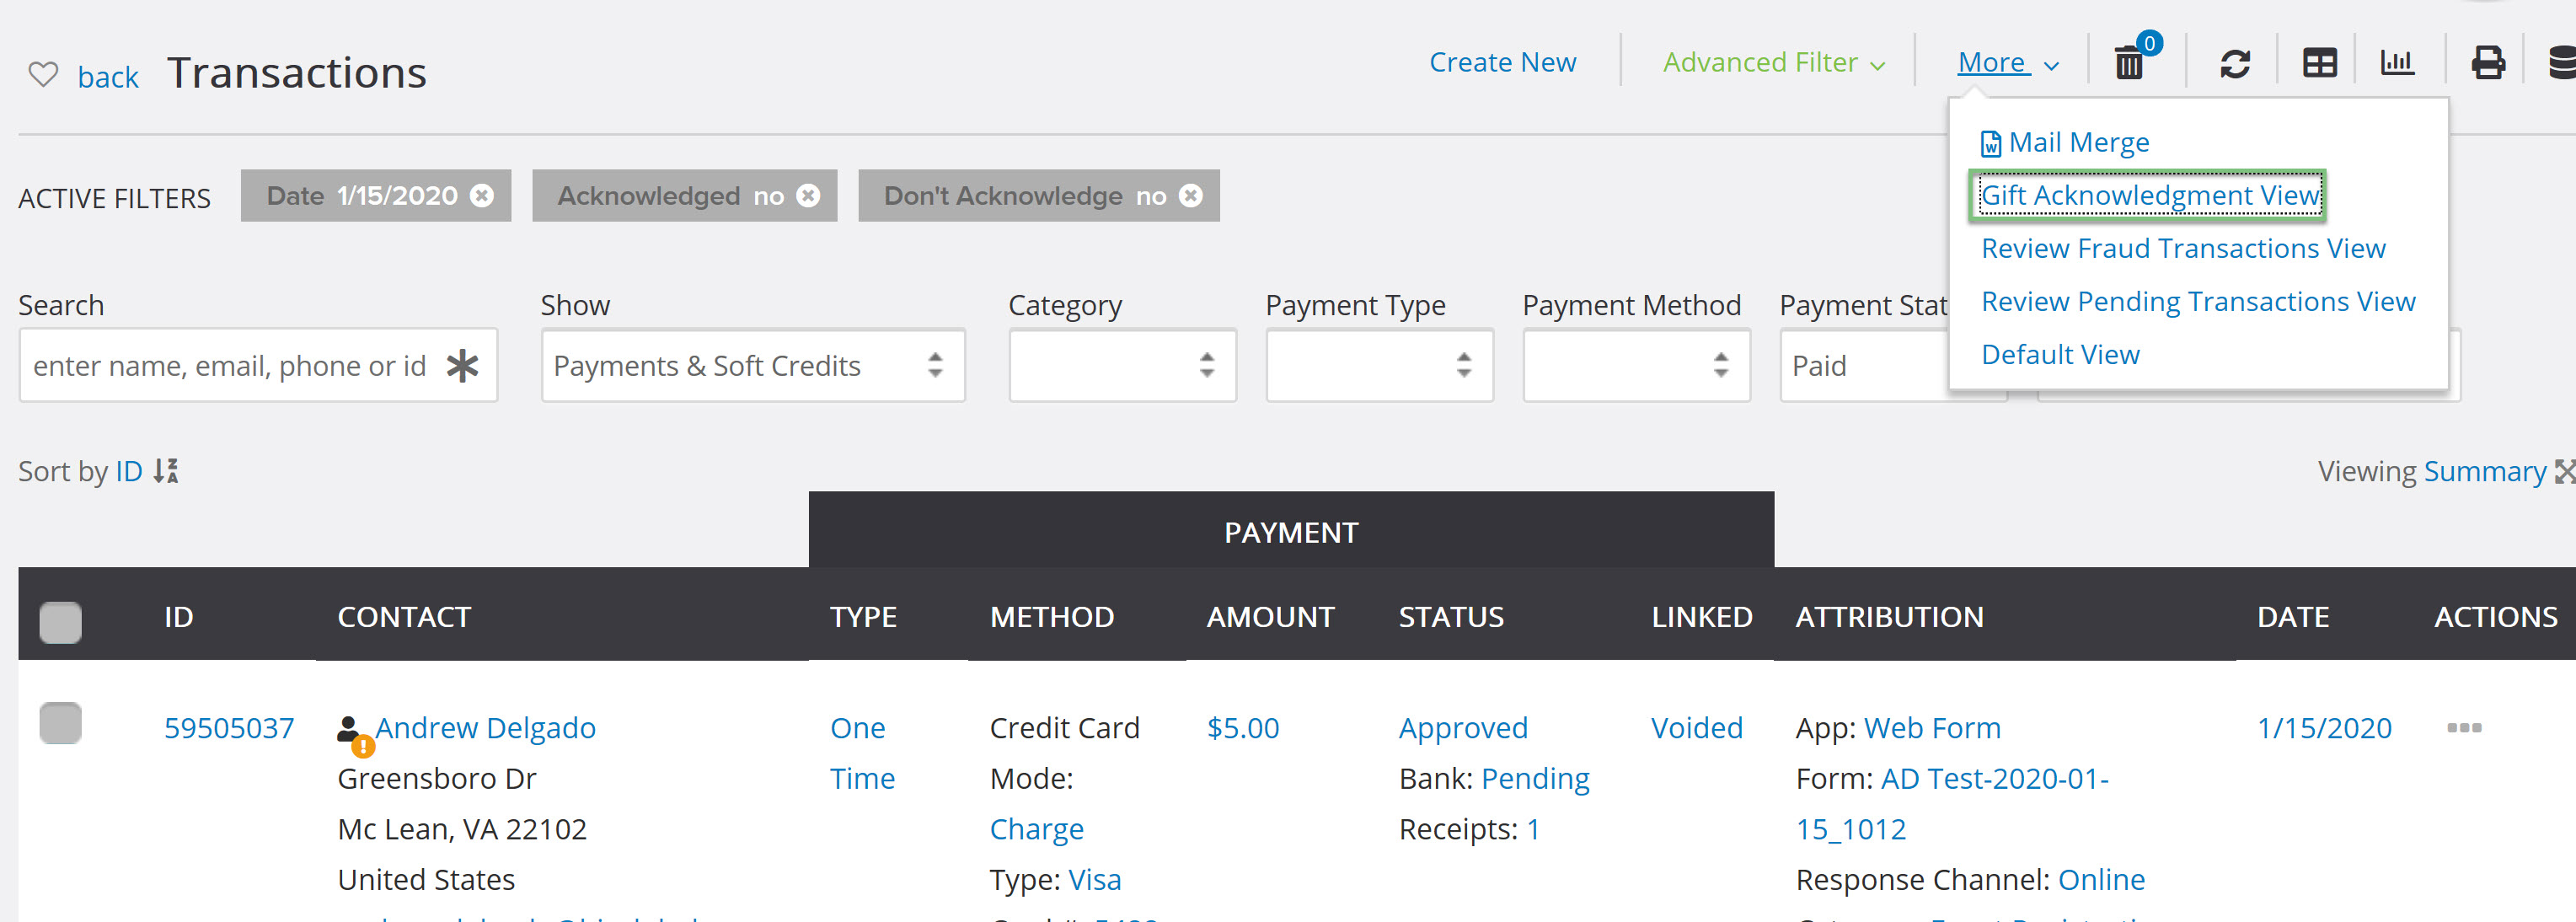
Step 1: To send multiple acknowledgements at once, navigate to the Donations App > Transactions > Search & Manage > set filters to create the segment of transactions which require acknowledgement/receipt > More (top right-hand corner) > Gift Acknowledgement View
Note: By selecting Gift Acknowledgement View, the transaction listing screen will filter to also exclude voided transactions, refunded transactions, acknowledged transactions, and transactions that are marked as 'Don't acknowledge'
Step 2: Once you have set up your filters as desired, click the check box in the top left-hand corner (to select all) or individually select transactions to be included
Step 3: Once one or more checkbox has been selected, use the white dropdown arrow to select Acknowledge Selected
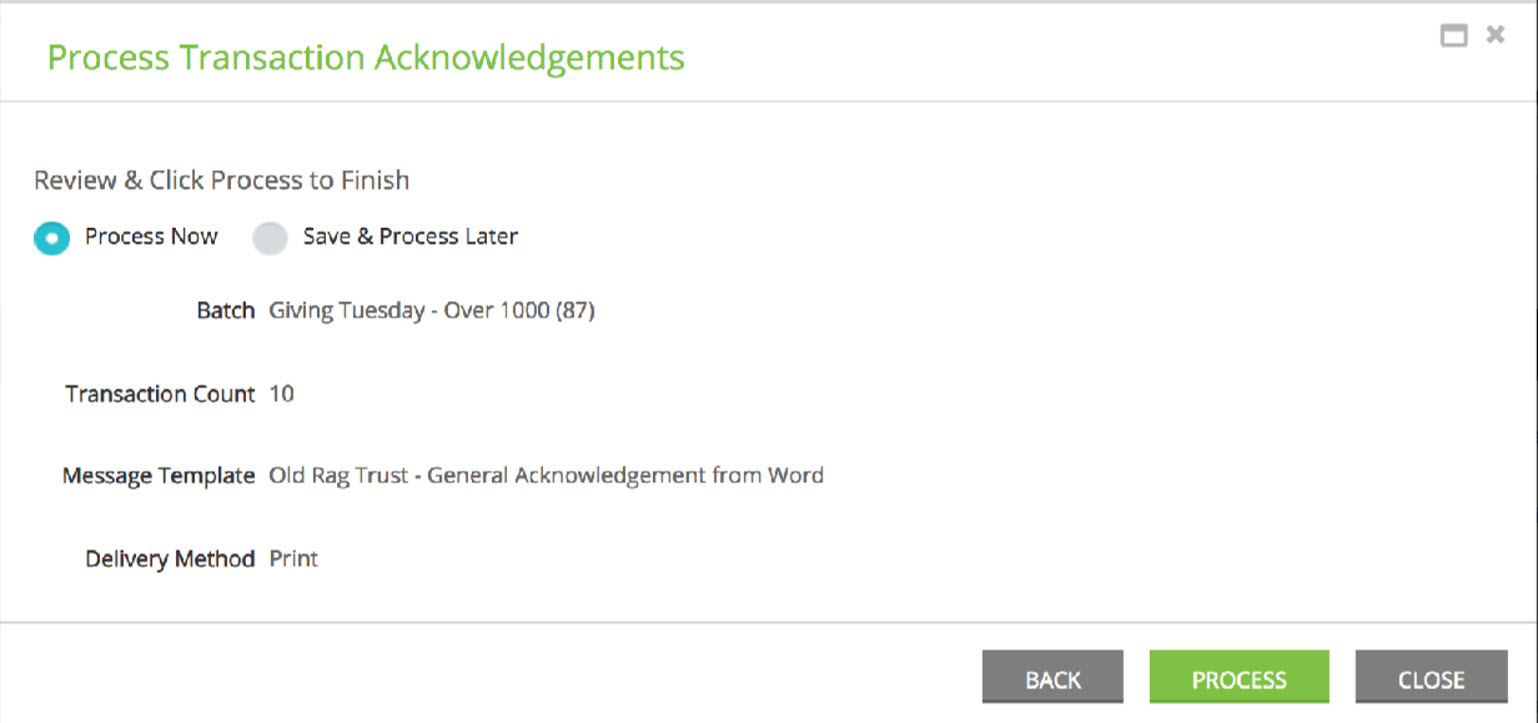
Step 4: The Process Transaction Acknowledgements wizard will be initiated.
In this first screen, (1) name this Transaction batch (or use an existing one), (2) select/ create the message for sending, and then (3) select the delivery method (Print or Email).
Important - the term Batch here refers to your batch of acknowledgements, not transactions entered in a Batch entry. While those acknowledgements may be from transactions that were entered as a batch entry, this use of Batch is not the same thing.
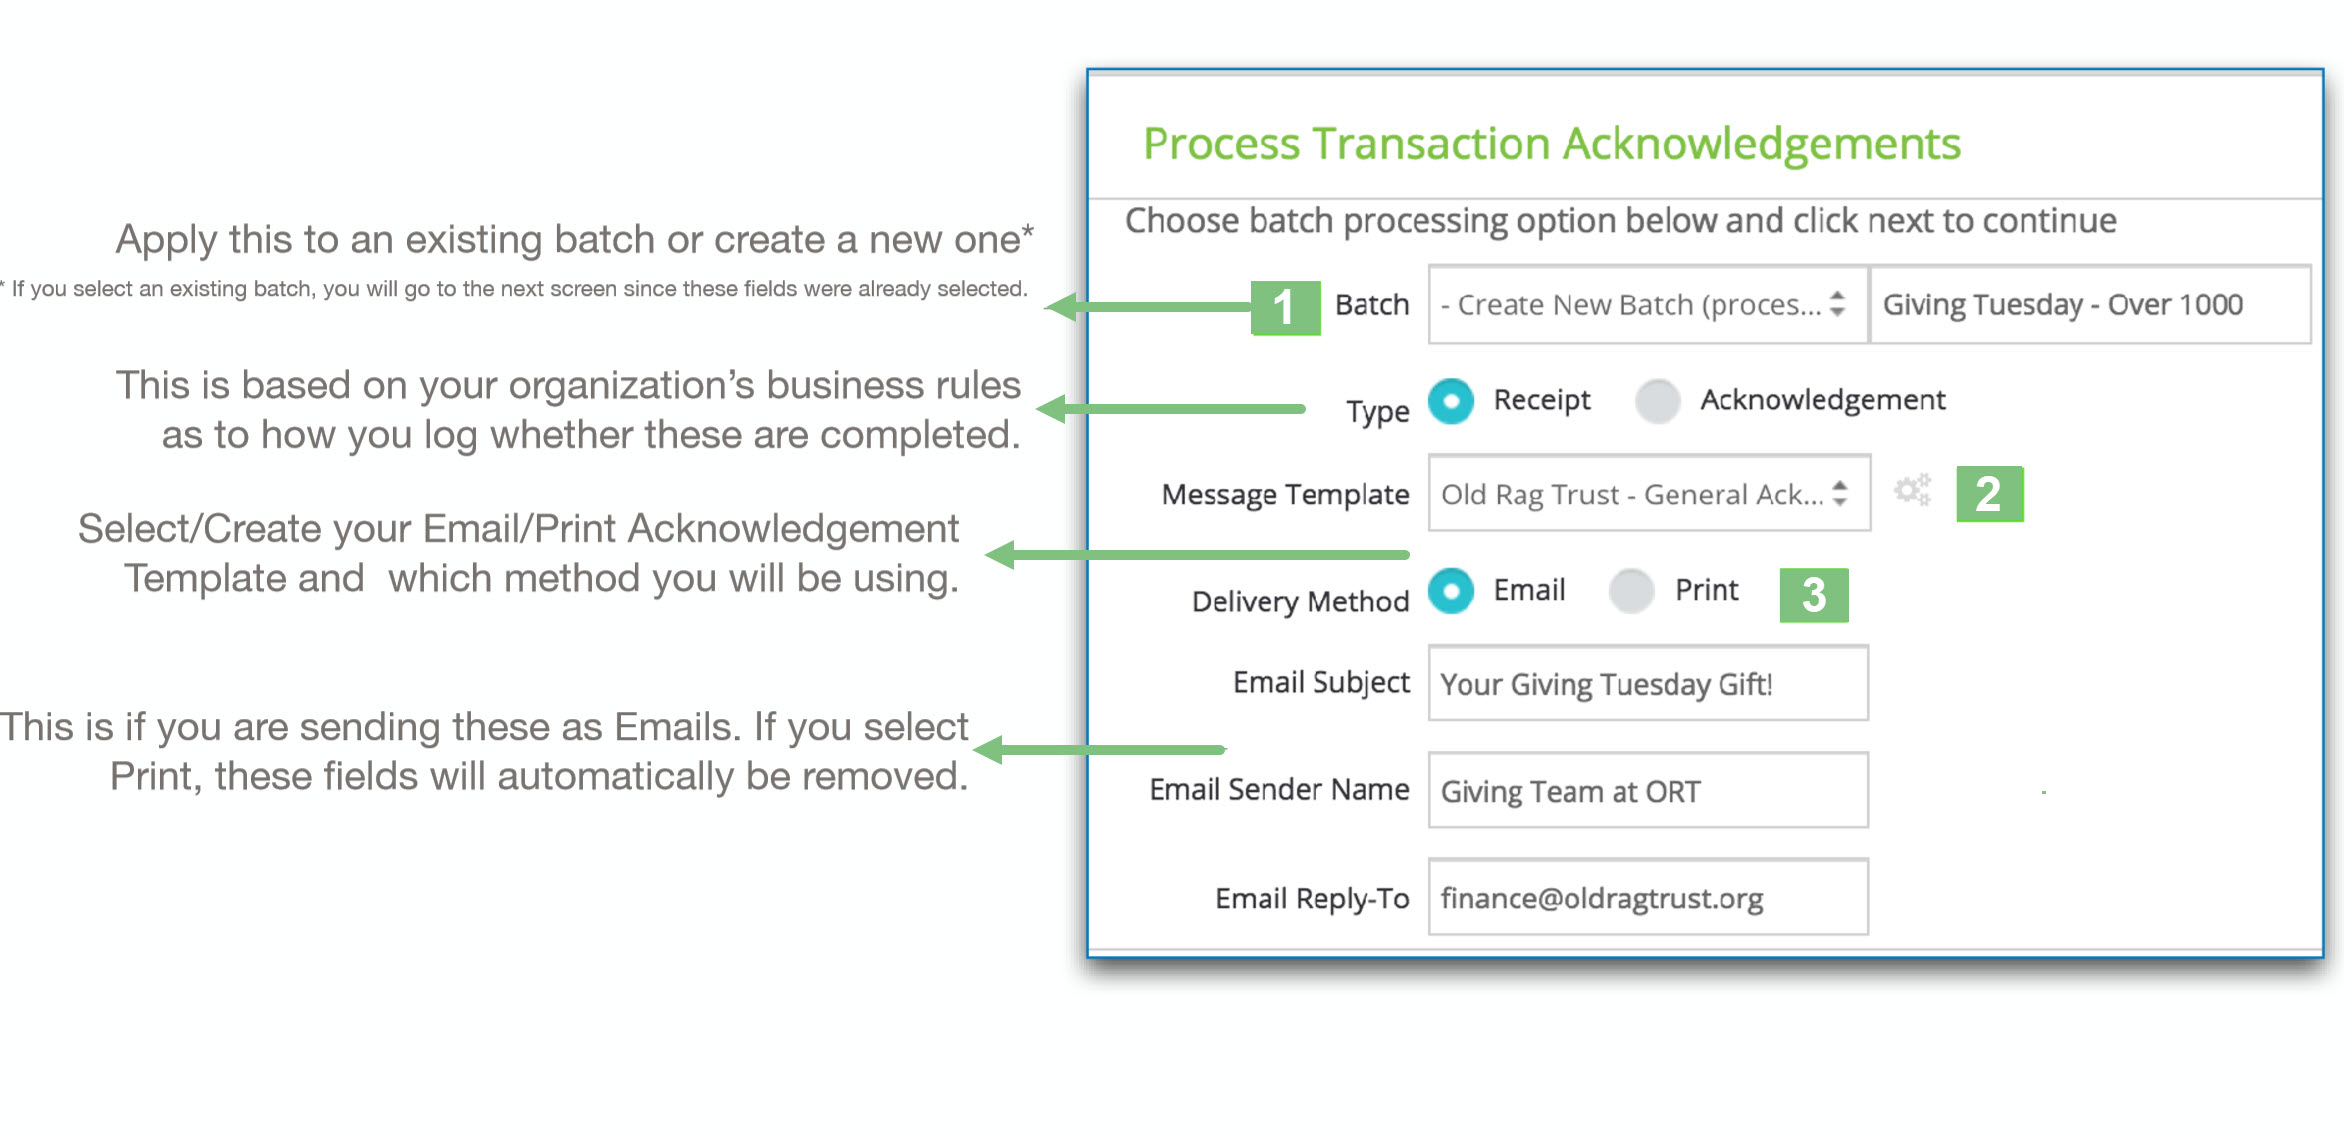
- If you select Email, and Process Now, emails will be sent right away.
- If you select Print, it will Create A Word Doc.
Instructions - Sending Acknowledgements when Entering Batches, or to Previously Processed Batches
Step 1: First, you'll need to enter your batch. For instructions on Batch Transaction History, please review this article.
Step 2: Hover to manage the batch that you would like to send an acknowledgement to, and click 'SendAcknowledgements'.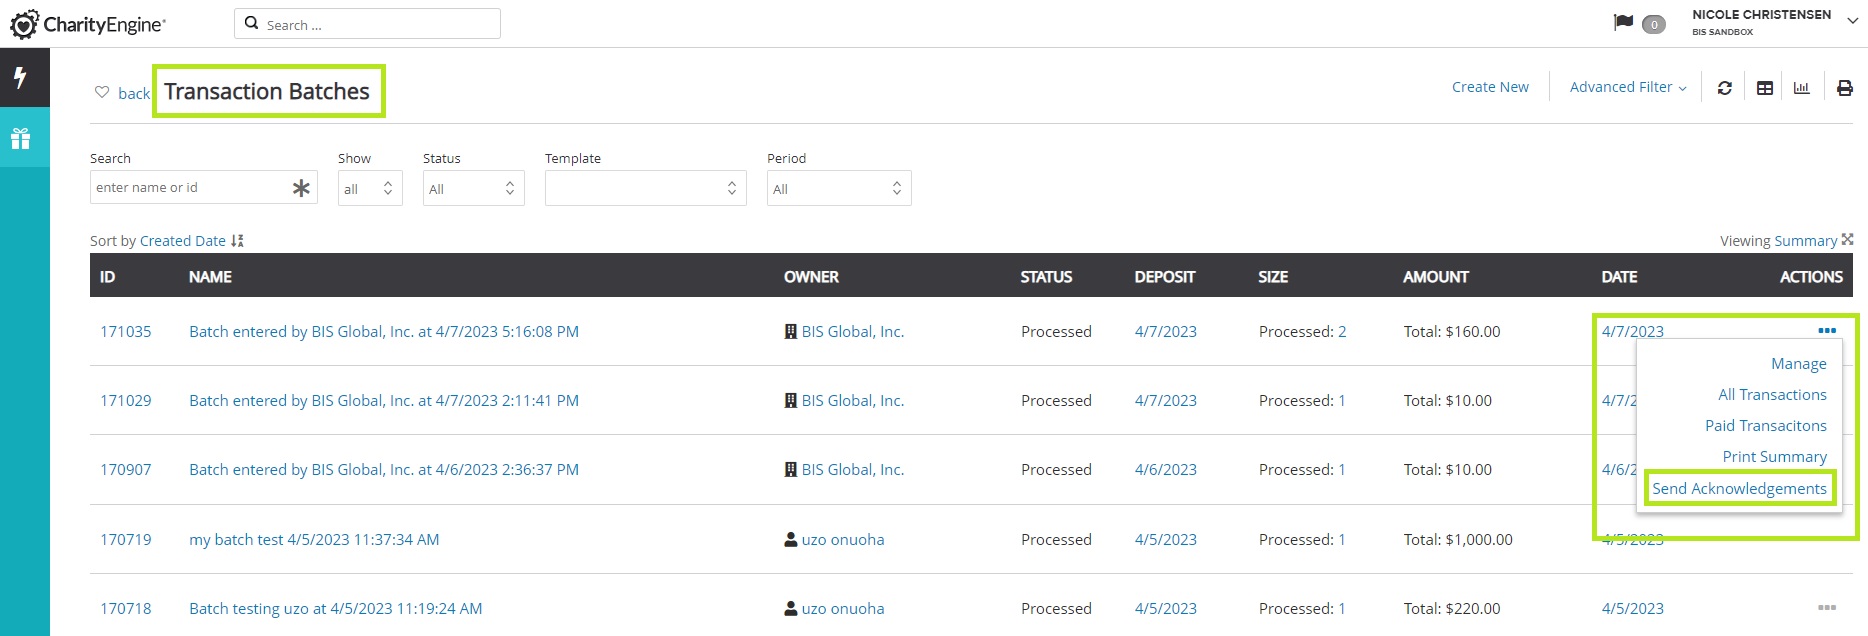
Step 3: Next, you'll be in the batch transaction listing screen. Click the checkbox to select all transactions from the batch. You can also deselect transactions in the batch that you do not wish to send an acknowledgement to. 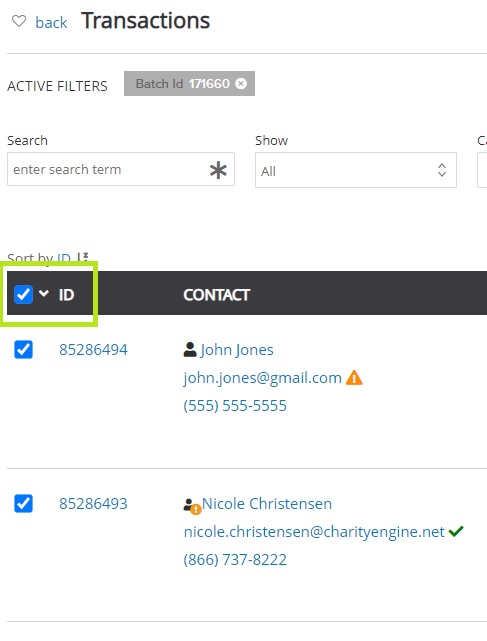
Step 4: Click the down arrow next to the checkbox and then click 'Acknowledge'.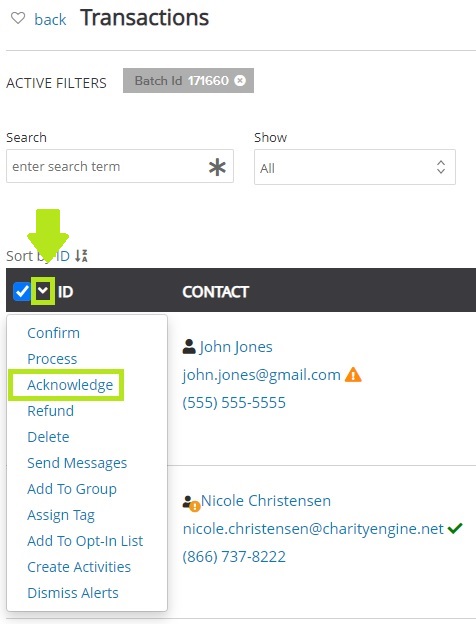
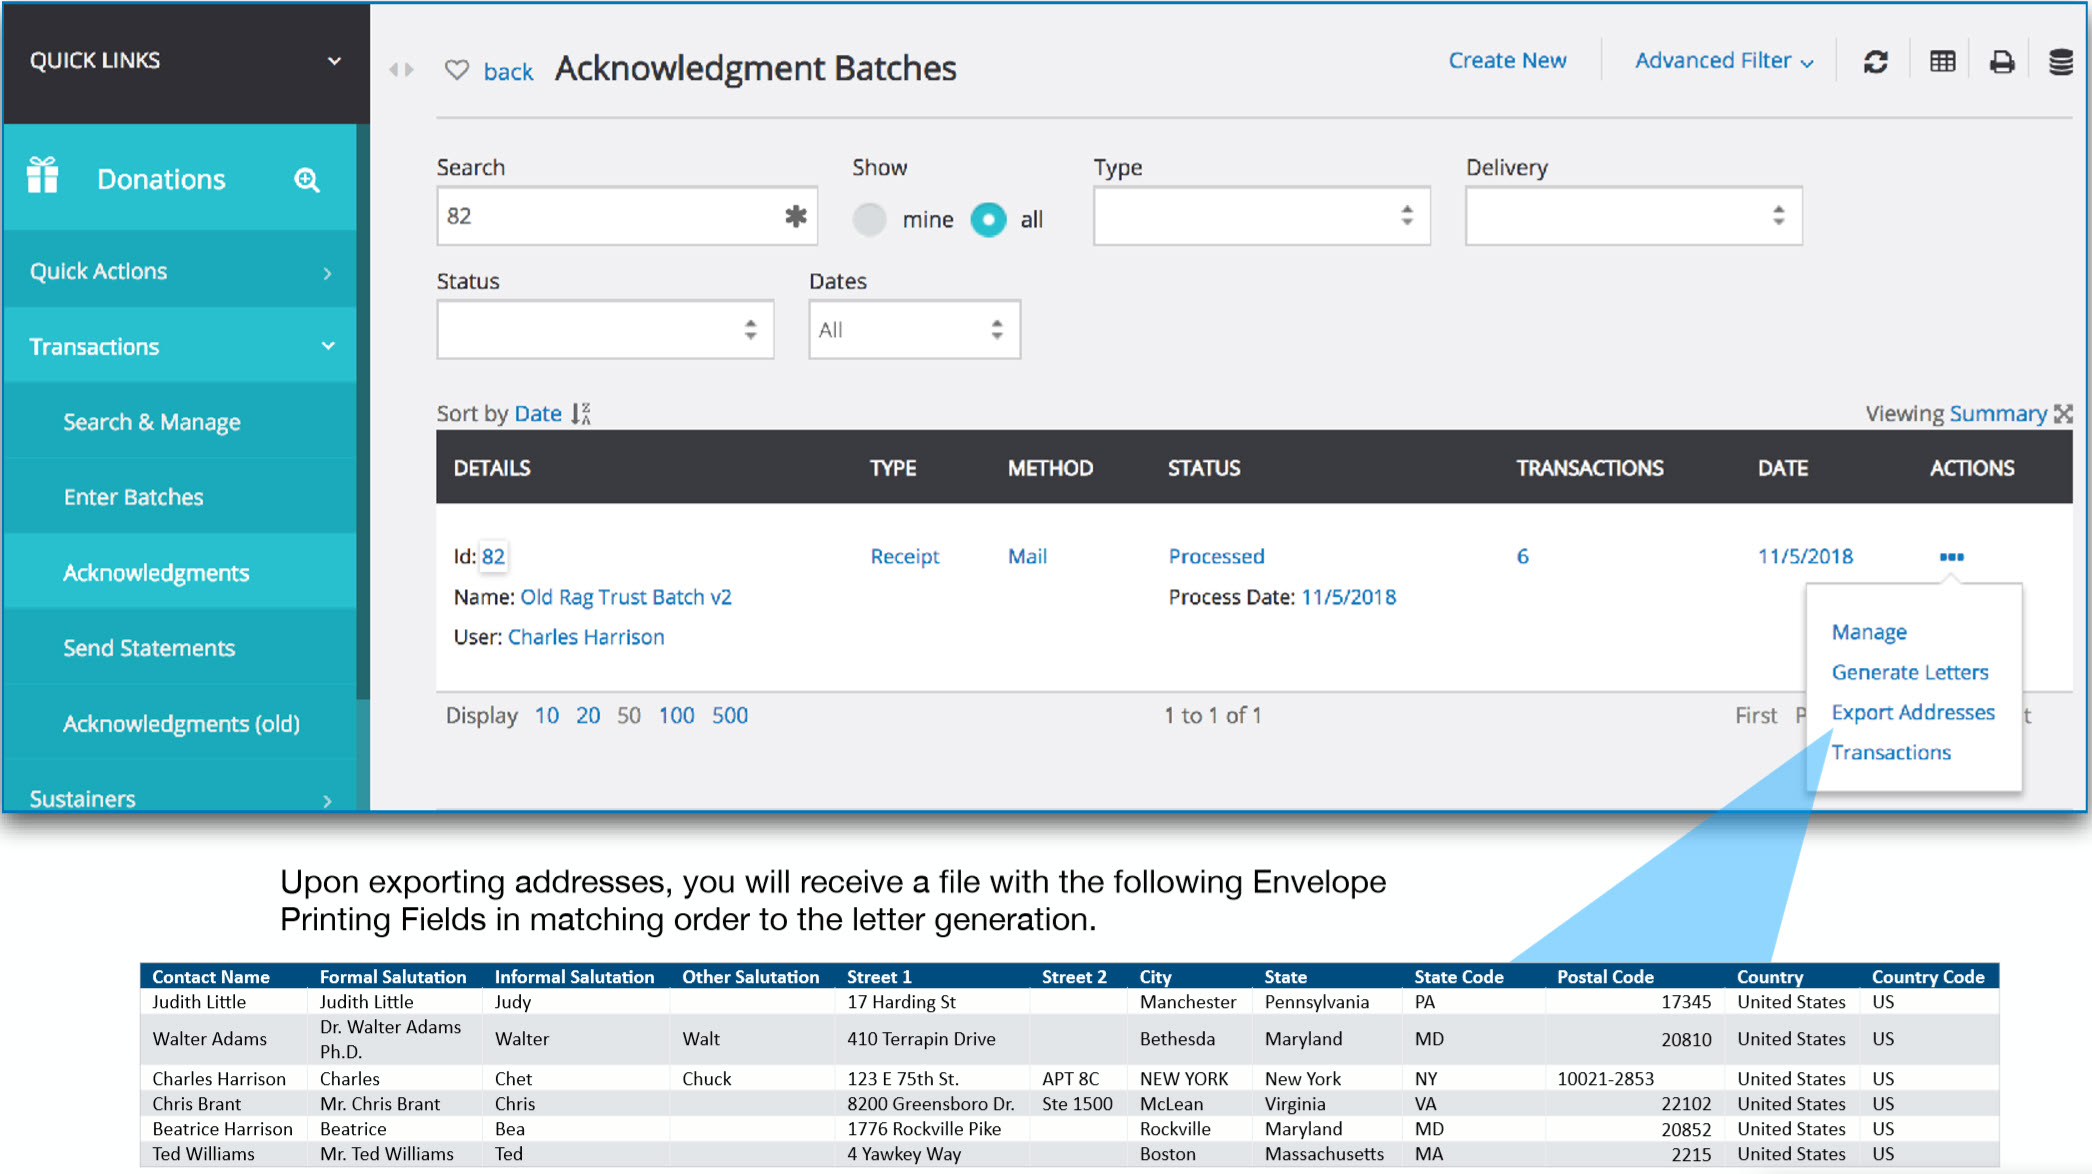
Instructions - Multiple Acknowledgements: Ready-to-Mail-Merge Letters
Step 1: Once the Acknowledgements are processed, access the Donations App > Transactions > Acknowledgements > locate your letter batch > ACTIONS
Step 2: Select Generate Letters to download a file of the letters within the selected batch
Step 3: Repeat to select Export Addresses to download a file of ready-to-mail-merge address data
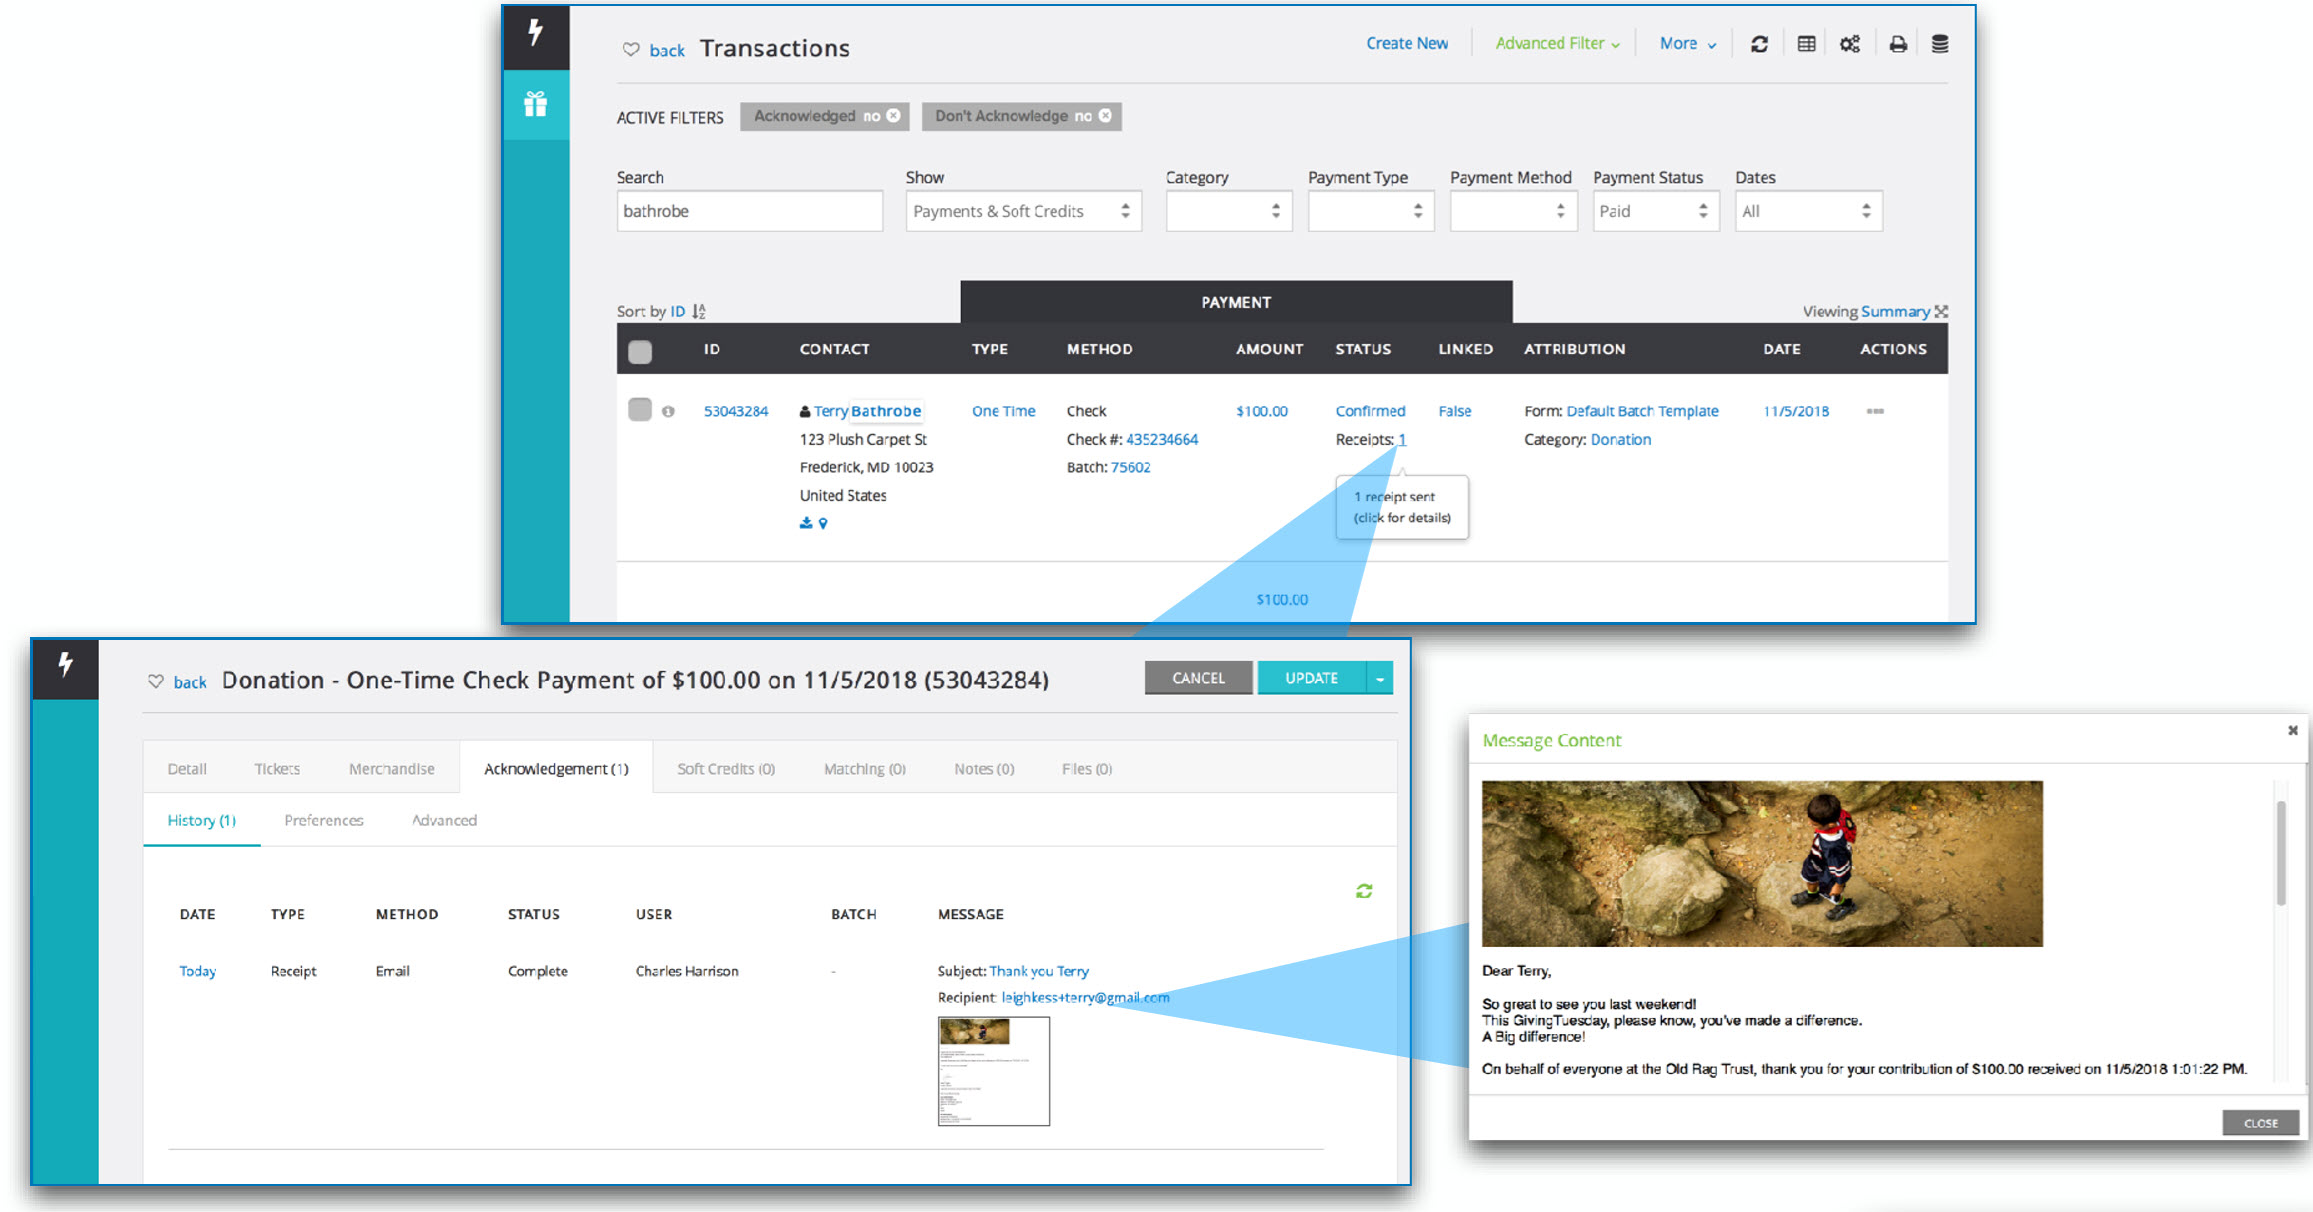
Instructions - Viewing the Receipt Log
After Acknowledgements have been sent, a log of the email or letter that was sent appears on the record, so you know exactly what was sent to the person and when. If a Tribute donation with a Tribute acknowledgement is sent, that will appear on the record as well.
Step 1: Navigate to the transaction by navigating to the Donations App > Transactions > Search & Manage > locate the transaction
Step 2: From the transaction listing screen, Receipt will be presented under Status
Step 3: Navigate to ACTIONS > Manage > Acknowledgement tab where you will have access to all details associated with the acknowledgement/receipt
FAQs & Additional Materials
Q. I would like to learn more about acknowledgement and receipts.
A. For additional information about acknowledgements click Here
Q. Can receipts/acknowledgements be automatically generated when a financial transaction was made through a web form?
A. Yes. You can establish your receipting/acknowledgement process by navigating to the Online App > Web Forms > Search & Manage > locate your identified web form > ACTIONS > Manage > Email tab > Donor or Constituent Auto-Responder. By leveraging this feature, the receipt/acknowledgement can be automatically delivered to your constituent for ease of use.
