CharityEngine allows you to create a data sync and send transaction information to your QuickBooks Online account. The steps below will guide you through finding and adding your API Key, setting up your accounts, and scheduling for the data synchronization job.
Table of Contents
- Help Center - New User Interface
- Prerequisite
- Instructions: Adding your API Key to CharityEngine
- Creating the Deposit or Bank Account
- Setting up the QuickBooks Sync
- Usage of General Ledger Codes & Batch Entry
- Usage of Additional General Ledger Codes & QuickBooks
- Usage of Sync Type: Detail
- FAQs & Additional Reading
Prerequisite
- You must have a QuickBooks Online account
- You must also establish a General Ledger account within CharityEngine that matches the deposit or bank account exactly as presented within QuickBooks
- Your QuickBooks must also have Bank Account Account and a Revenue Account (referenced as Income in QuickBooks)
- As a reminder, these must match exactly as located within QuickBooks
- Please ensure that your transactions contain the General Ledge Code that is established below.
- PLEASE NOTE: The following screen and walk through of QuickBooks Online Version "QuickBook Plus"
- If you are using another version, please consult your QuickBooks help resource to to locate the required needs for this integration.
Instructions: Adding your API Key to CharityEngine
Follow these steps to configure your QuickBooks integration within CharityEngine.
Note, this configuration will create a default GL Code. The user can leverage additional GL Codes within CharityEngine. Simply enter GL codes within CharityEngine and in QuickBooks with the same/matching text for synchronization.
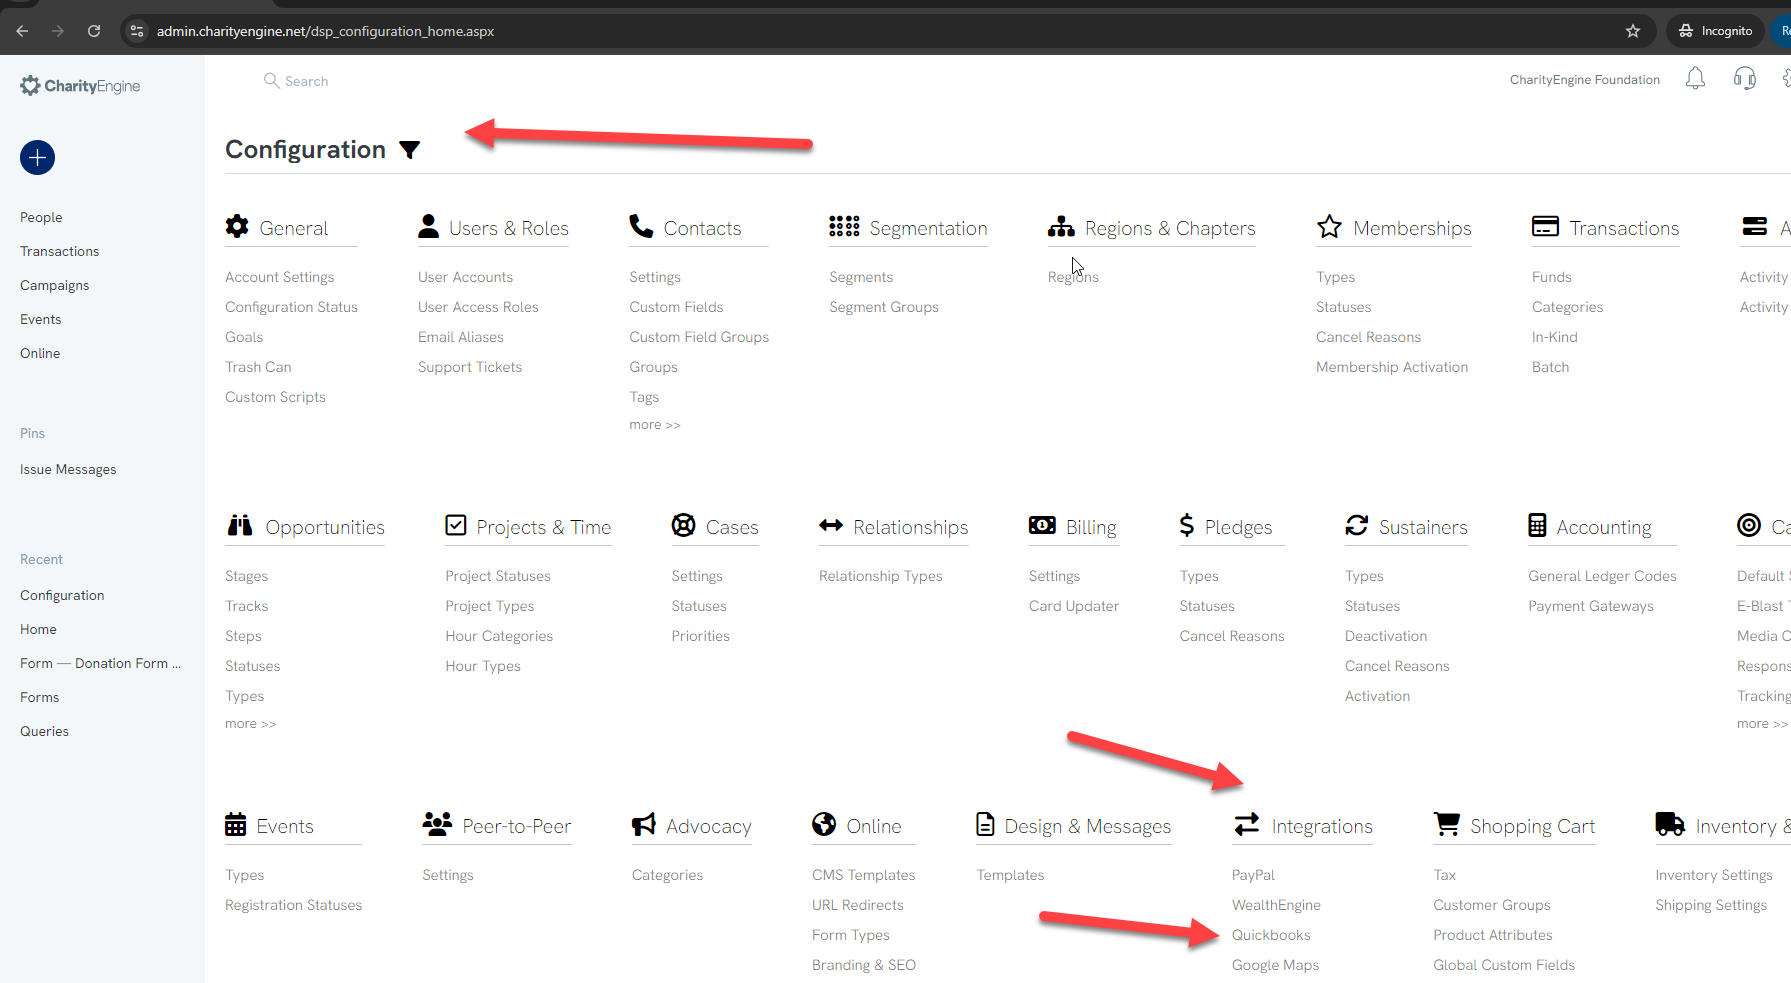
Step 1: Navigate to the Configuration App > Integrations > QuickBooks 
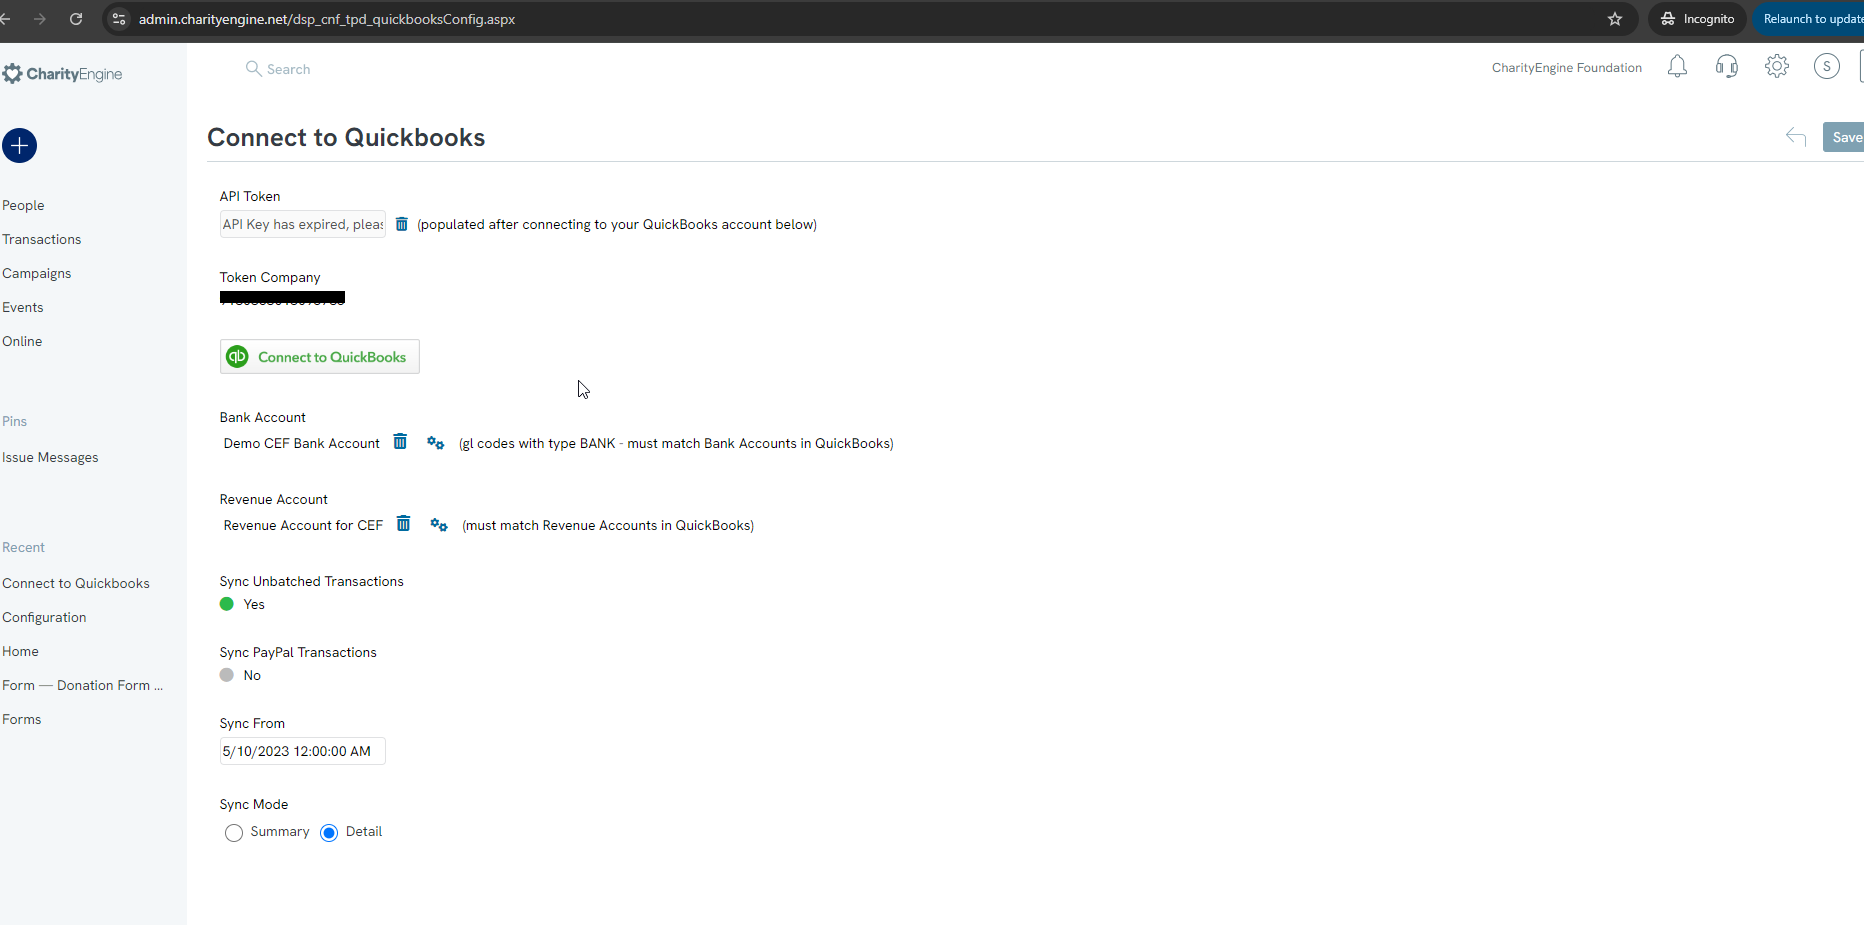
Step 2: If setting up for the first time, select and update the following fields and click SAVE:
- Bank Account
- Revenue Account
- Sync Unbatched Transactions
- Sync PayPal Transactions
- Sync From (If this date is not set correctly in accordance with your existing QuickBooks transactions, duplicates can be created)
- Sync Mode

Step 3: The Connect to QuickBooks button will appear. Click Connect to QuickBooks.
Note: If the user does not immediately see the Connect to QuickBooks button, please refresh the page.
Step 4: A pop-up will open requiring you to log into to have you log into your QuickBooks account (if you already connected in the same browser, you will automatically be logged in).
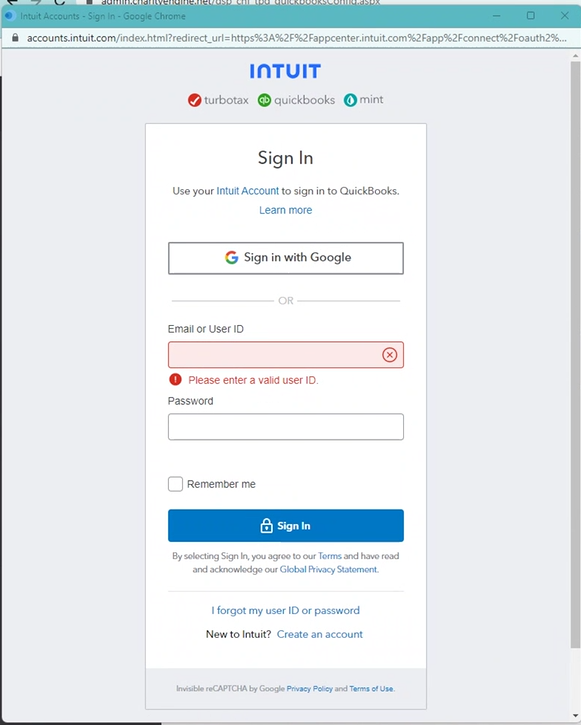
**The QuickBooks login pop-up might be blocked by your browser, if so, allow it: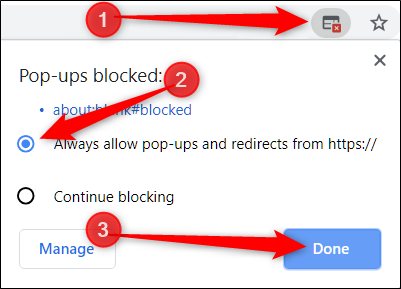
Step 5: You will see your API Key, copy this value
Step 6: Populate/paste the API Key in the API Token field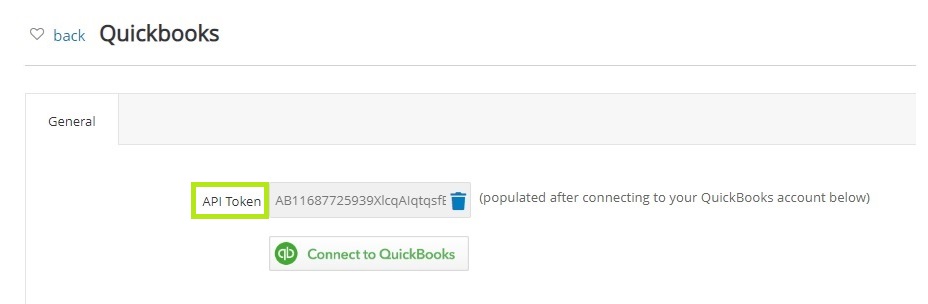
- PLEASE NOTE: The following screen and walk through of QuickBooks Online Version "QuickBook Plus"
- If you are using another version, please consult your QuickBooks help resource to to locate the required needs for this integration.
Creating the Deposit or Bank Account
- PLEASE NOTE: The following screen and walk through of QuickBooks Online Version "QuickBook Plus"
- If you are using another version, please consult your QuickBooks help resource to to locate the required needs for this integration.
Next, you need to select the correct deposit account. As a reminder, your organization should have Bank AND Income account. The naming convention must match exactly for proper syncing and management.
Step 1: Access your QuickBooks Online account
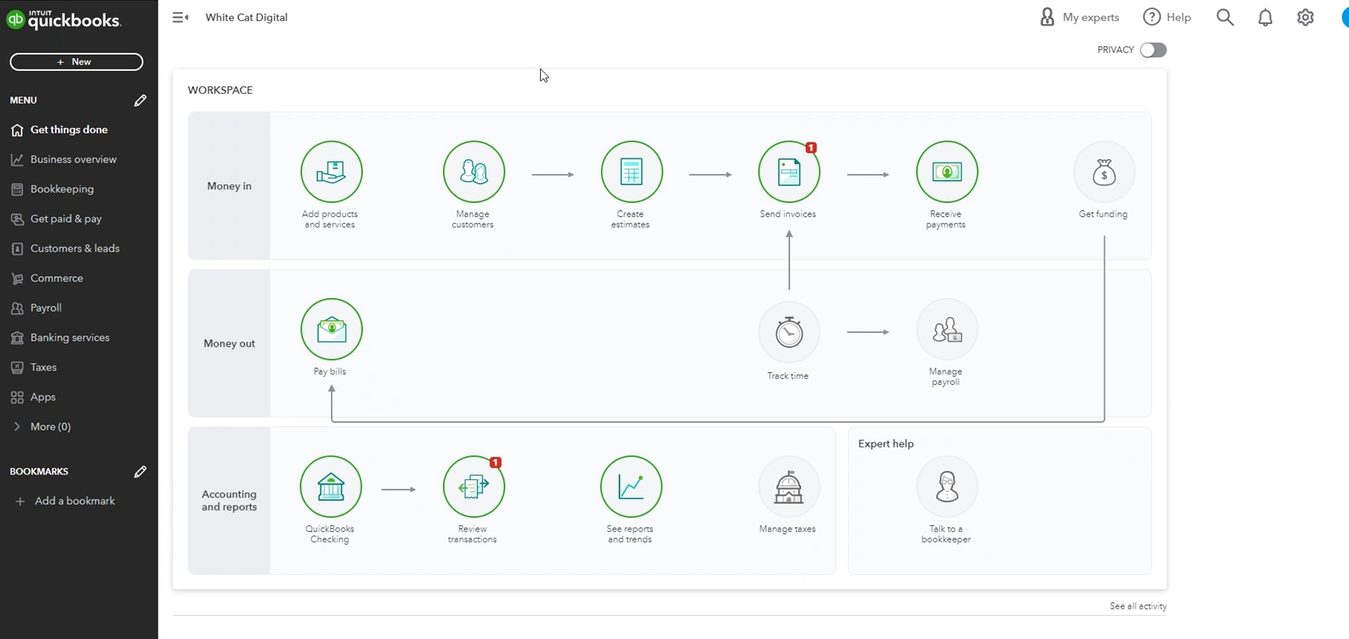
Step 2: Navigate to your QuickBooks Dashboard > Bookkeeping
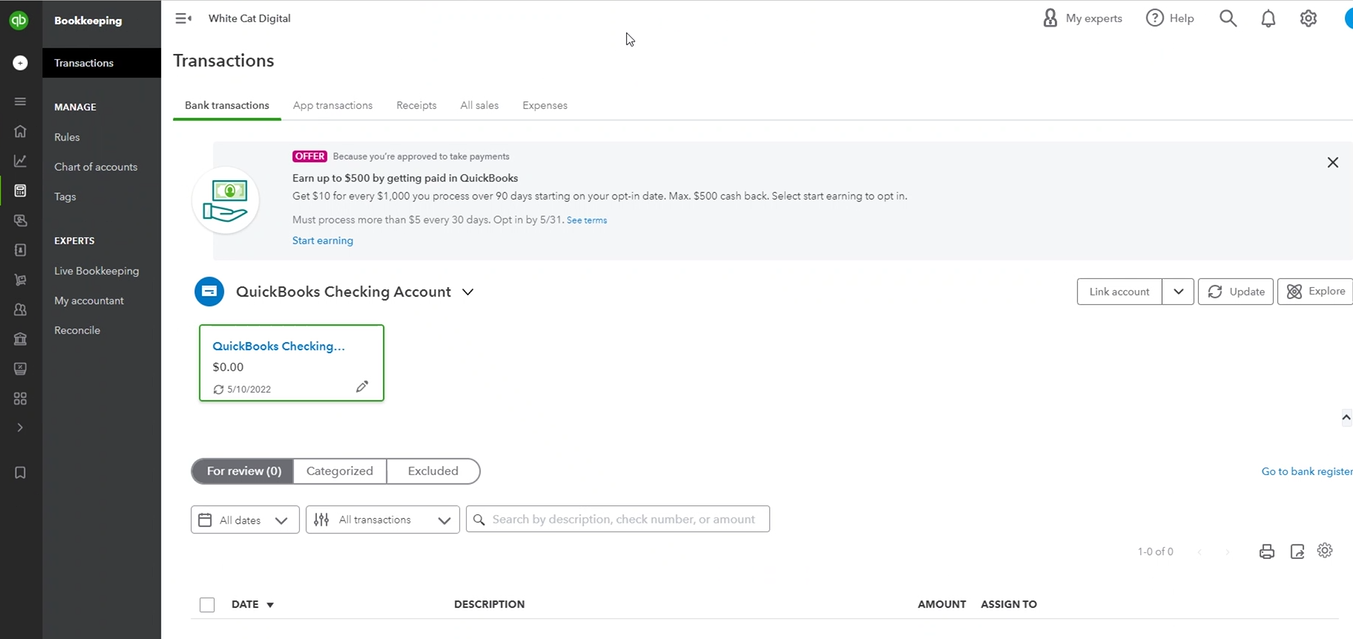
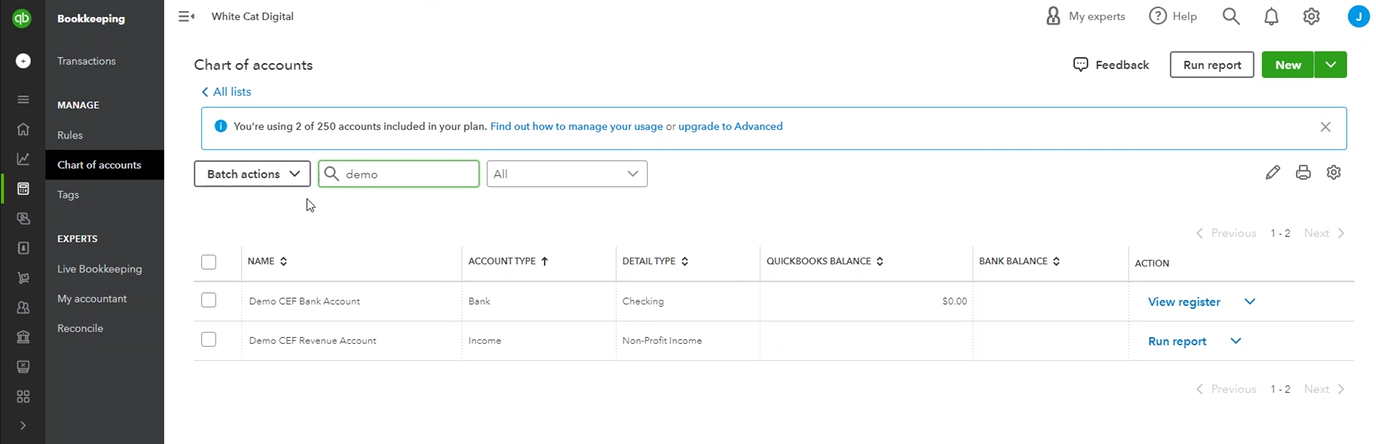
Step 3: Click on Chart of Accounts
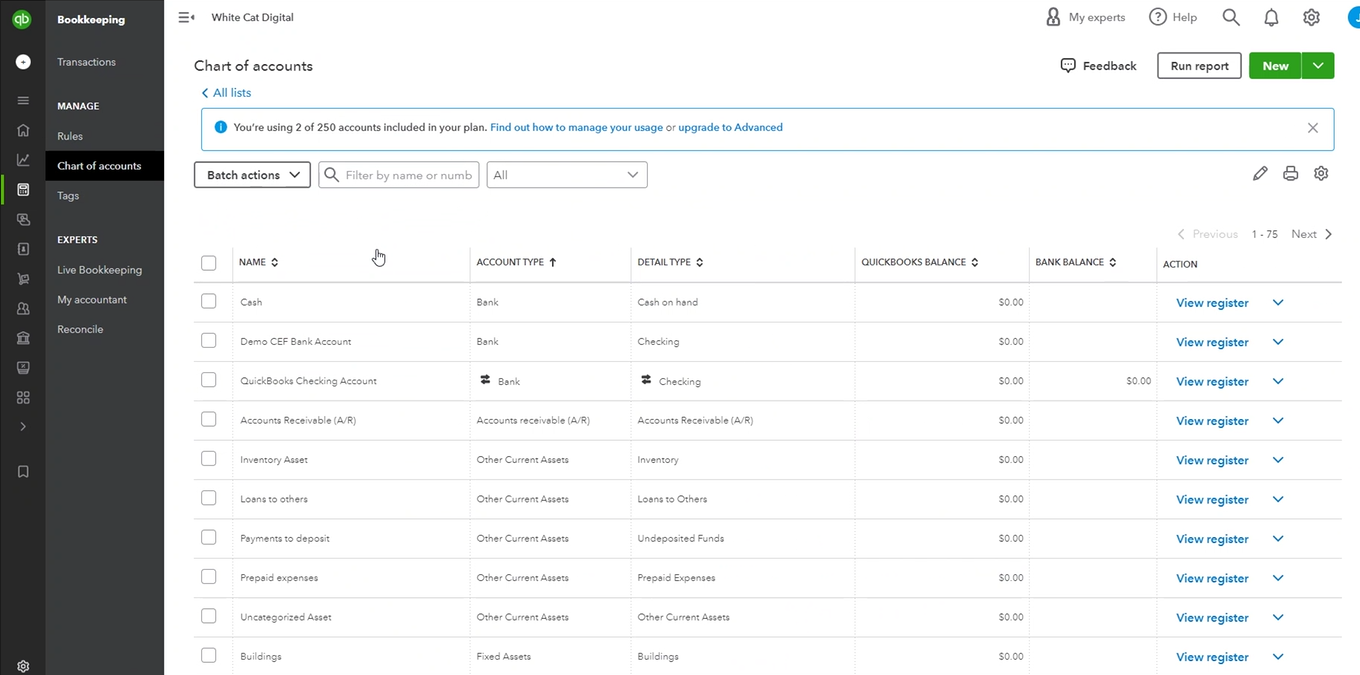
Step 4: Make note of the name of the bank account you will be using.
- Note: You will be required to include both an Account Type of Bank and Income (reference as Revenue in CharityEngine)
- Note: The name in CharityEngine General Ledger must match exactly as presented in QuickBooks for proper synchronization
Step 5: Create the General Ledger Code for Bank Account Type. Hover over the gear icon to next to Bank Account, to see the options to create a new GL code: Click the NEW option to add directly from the QuickBooks integration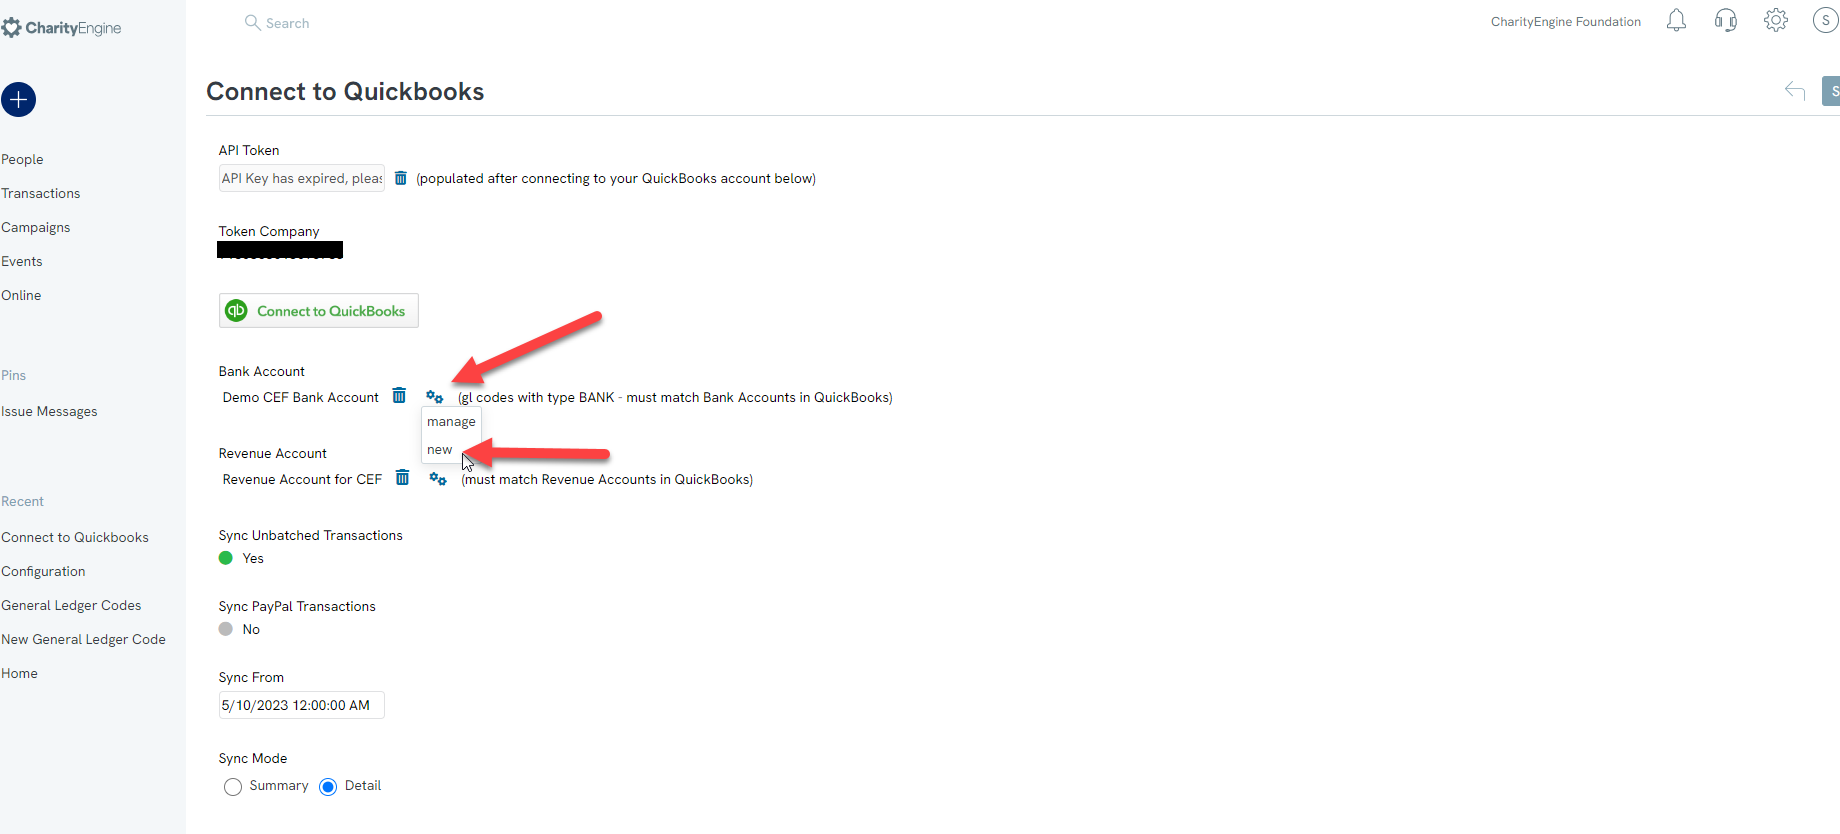
- Alternatively you can navigate to the Configuration App > Accounting > General Ledger Codes > Create New. If using this flow, select the newly created General Ledger Code in the Bank Account field.
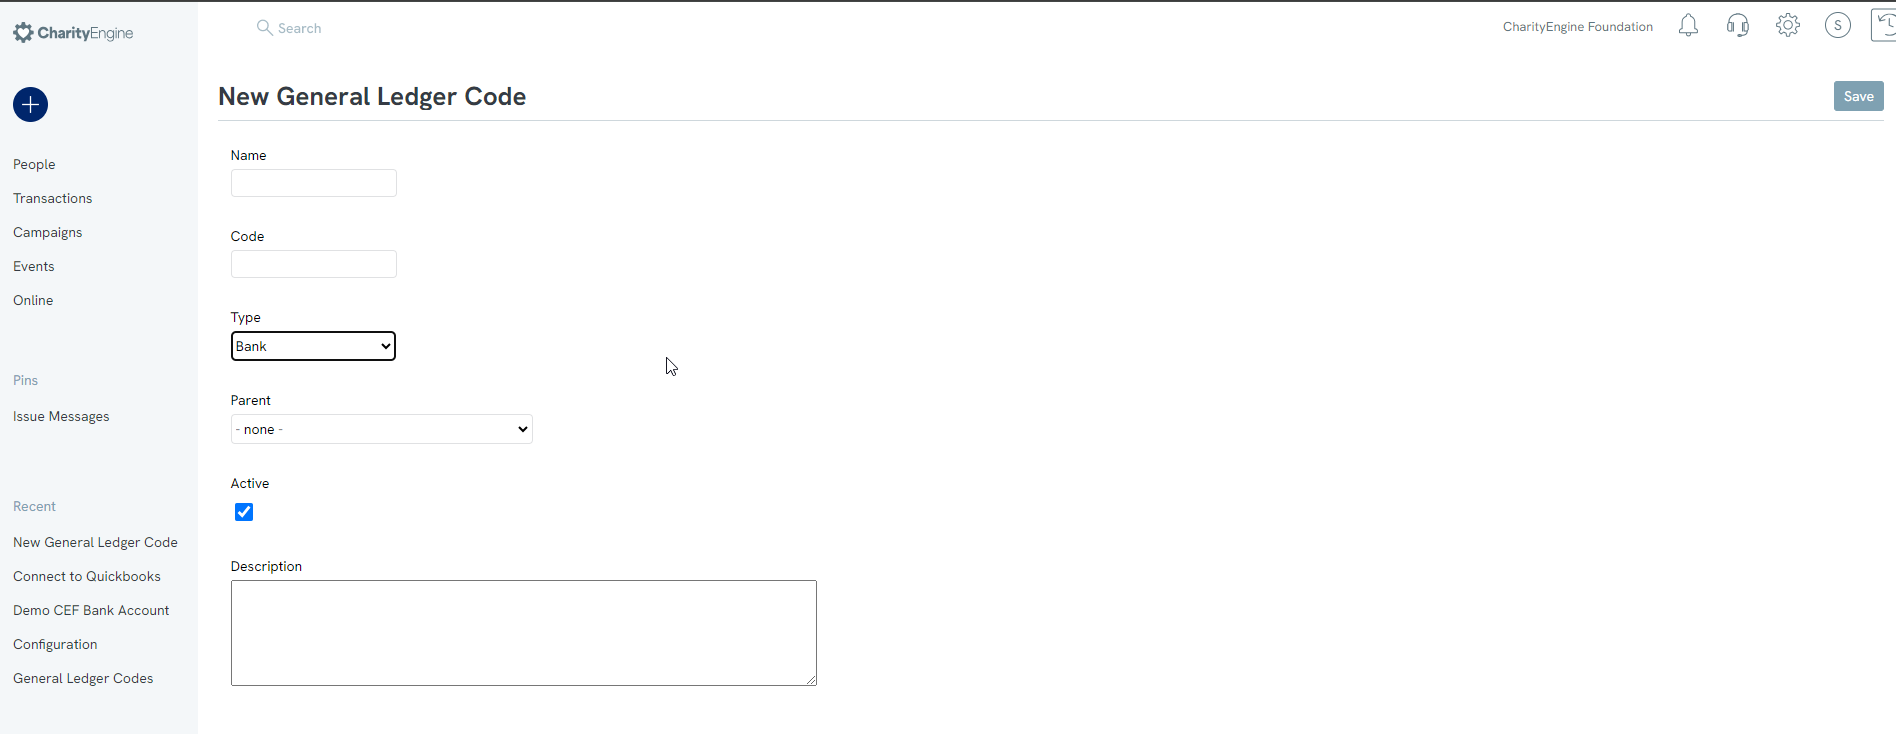
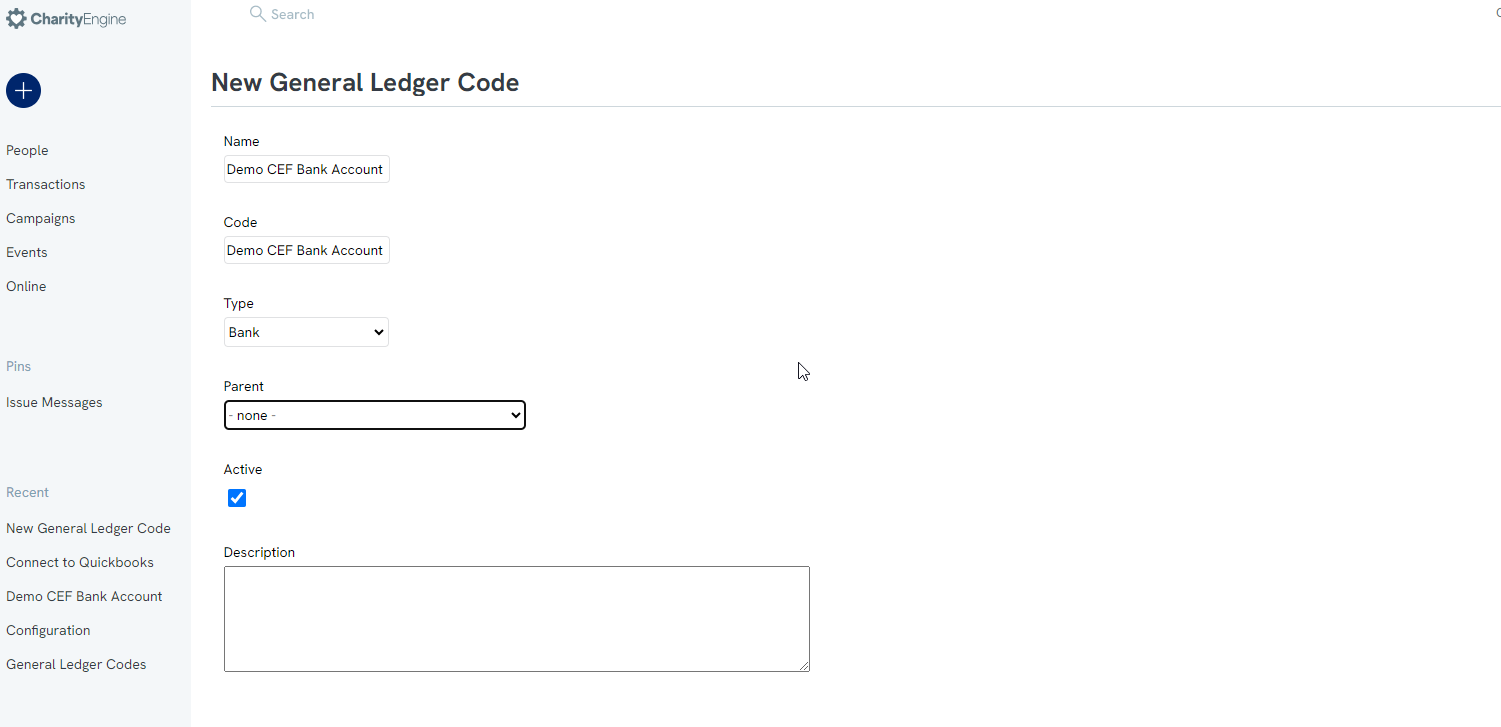
Step 6: From the New General Ledger Code add
- Name: This represents the internal CharityEngine name/reference
- Code: This represents the QuickBooks Bank Account and must match exactly as presented within QuickBooks
- Type: This must represent Bank for proper sync
- Parent: Optional
- Description: Optional
Click SAVE to secure your Bank account.
Step 7: Create the General Ledger Code for Income Account Type. Navigate to and click the plus icon to add directly from the QuickBooks integration.
- Alternatively you can navigate to the Configuration App > Accounting > General Ledger Codes > Create New. If using this flow, select the newly created General Ledger Code in the Revenue Account field.
Step 8: From the New General Ledger Code add
- Name: This represents the internal CharityEngine name/reference
- Code: This represents the QuickBooks Income Account and must match exactly as presented within QuickBooks
- Type: This must represent Income for proper sync
- Parent: Optional
- Description: Optional
Click SAVE to secure your Income account.
Step 9: Within CharityEngine, you will be able to complete batch sync jobs to QuickBooks (see below for set up instructions). However, you can also choose to sync transactions that are excluded from a batch. If you wish to have this capability:
- Toggle Sync Unbatched Transactions to ‘Yes’
Step 10: Within CharityEngine, if you leverage PayPal as a payment type and wish to sync to your QuickBooks account.
- Toggle Sync PayPal Transactions to "Yes"
- Note: your organization will need to continue to monitor PayPal transactional funding through your PayPal account.
Step 11: Under the Sync Transactions Received After determine within your organization the start date to begin the synchronization
Step 12: For Sync Mode select Summary or Detail
Note: This is a critical business decision for your organization. For most organizations and accounting teams, we recommend leveraging Summary to provide your organization with financial summary. This will allow your accounting teams to easily reconcile deposits/withdrawals totals with the deposit/withdrawal total summaries from your financial institution. We recommend Summary as the selection but understand that some organizations do require individual transactions for reconciliation. If you require transactional data to be replicated within QuickBooks, select Detail.
- Summary: This will create a summary of daily transaction (Recommended)
- Detail: This will create a line item detail of transactions
Setting up the QuickBooks Sync
Important Note: All transactions within CharityEngine must contain the appropriate General Ledger Code within the CharityEngine transaction. Without the presence of the General Ledger Code on a transaction record, transaction(s) with null GL code values and/or other GL codes not associated with your QuickBooks accounts - will not by synchronized.
After you complete these steps, you will want to set up a sync job to transfer data to your QuickBooks Online account.
Step 1: Navigate to the Automation App > Synchronization > Sync Event 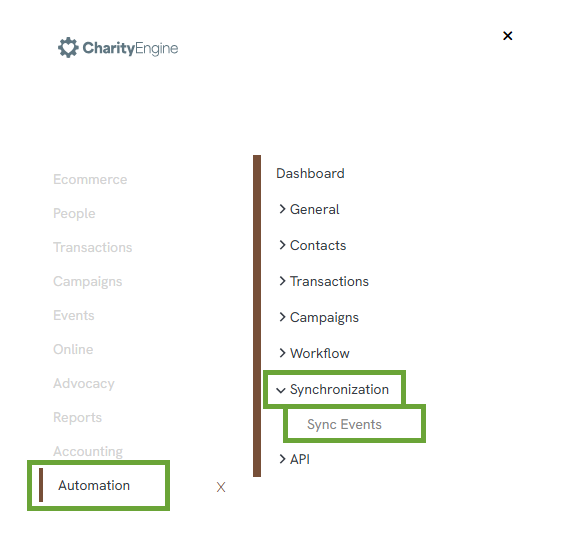
Step 2: Click the PLUS sign at the top right to "create new"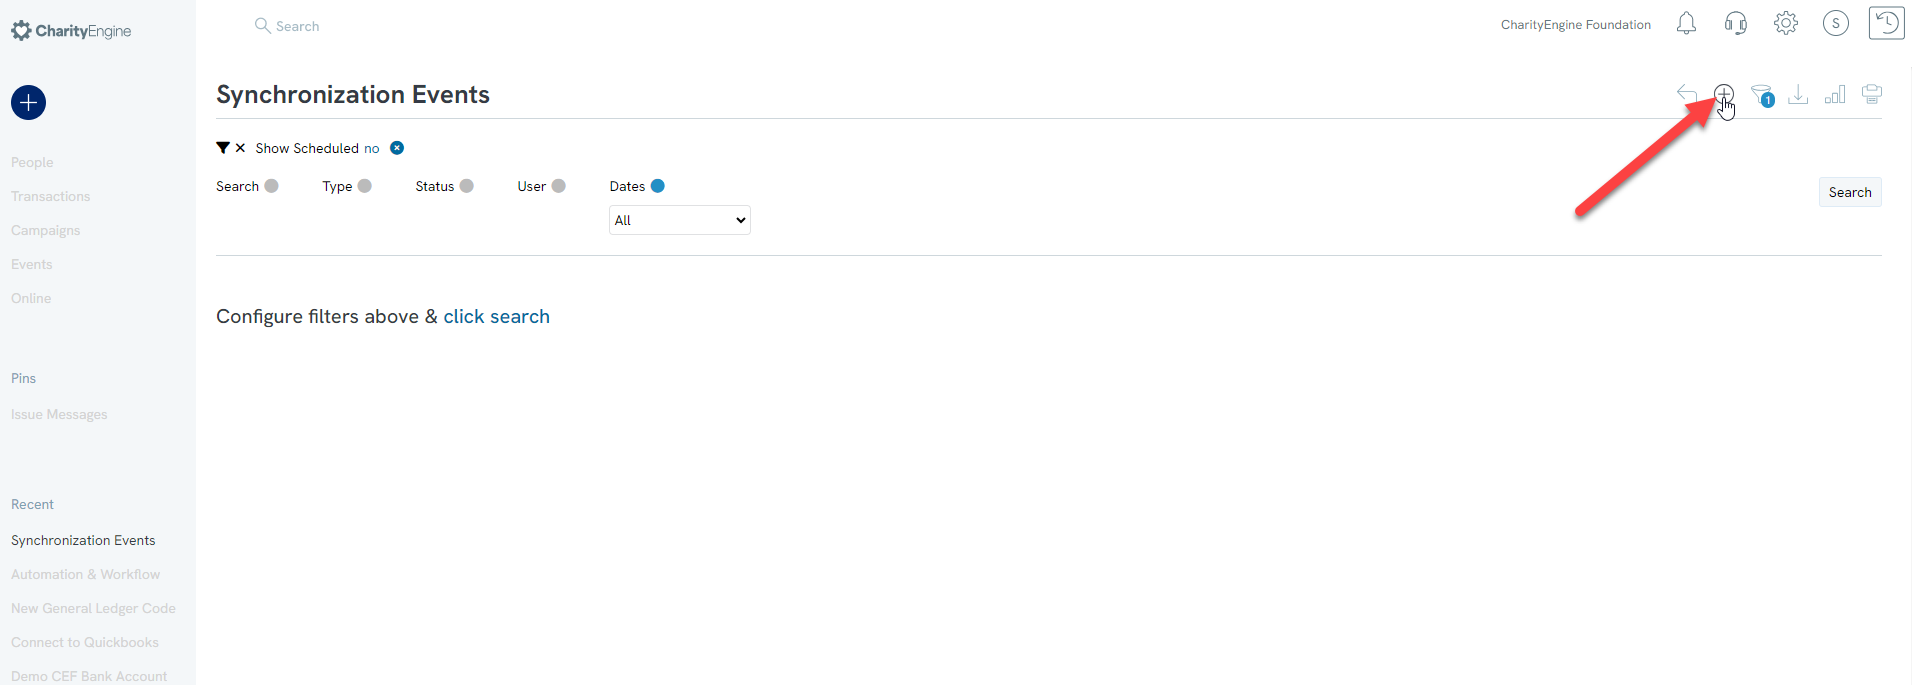
Step 3: Type = QuickBooks Sync > Next 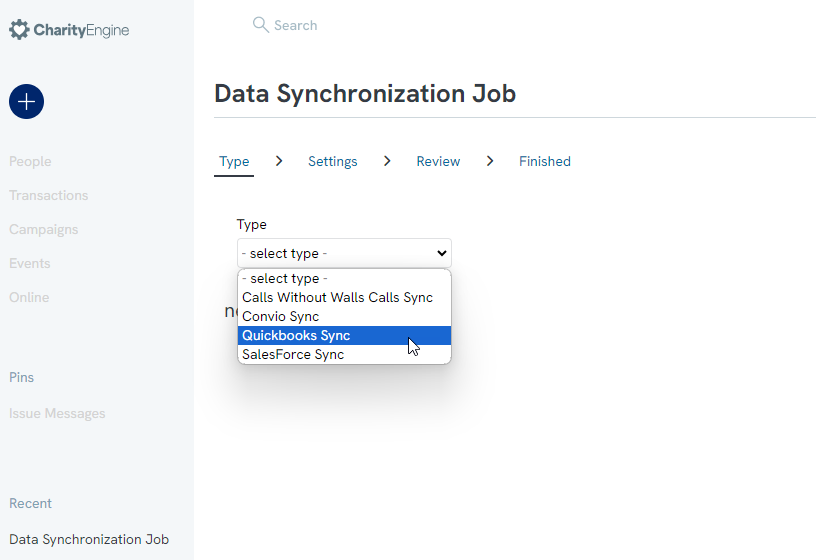
Step 4: Name the event> Select the Start date> input email addresses to Send Notifications of the job to > modify the Email Subject as needed > click NEXT 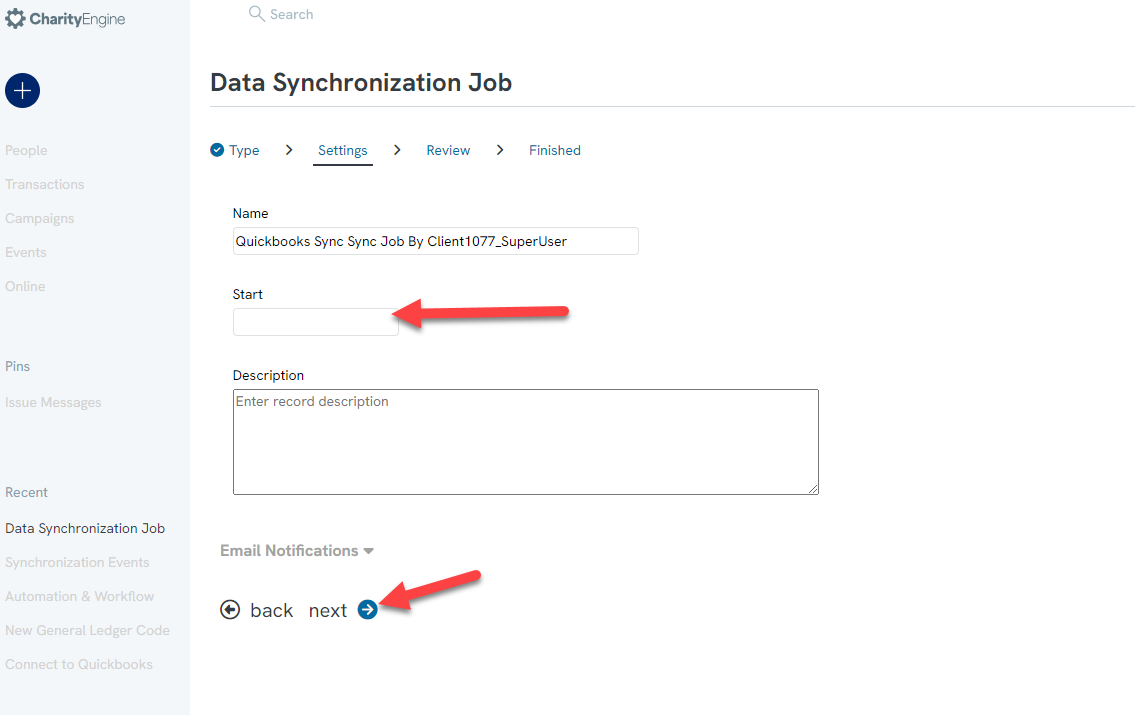
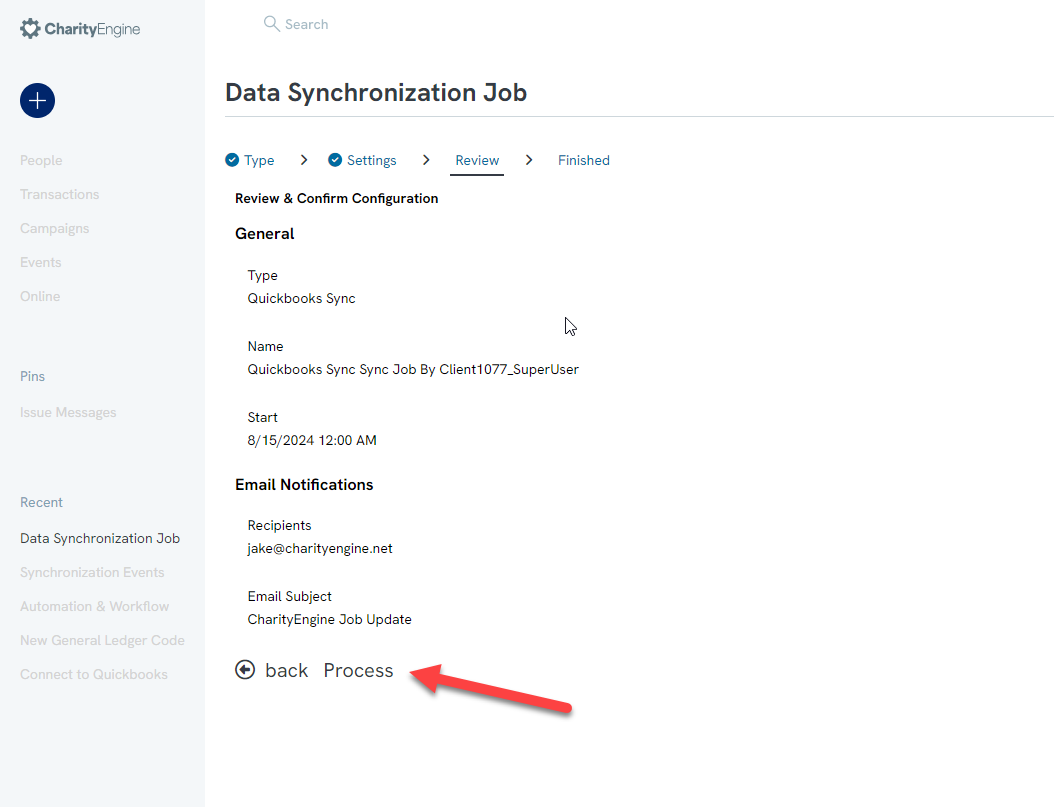
Step 5: Review your job details, enter a START DATE and click NEXT
Step 6: Click PROCESS to initiate
To view the status of the sync, click on View Job Status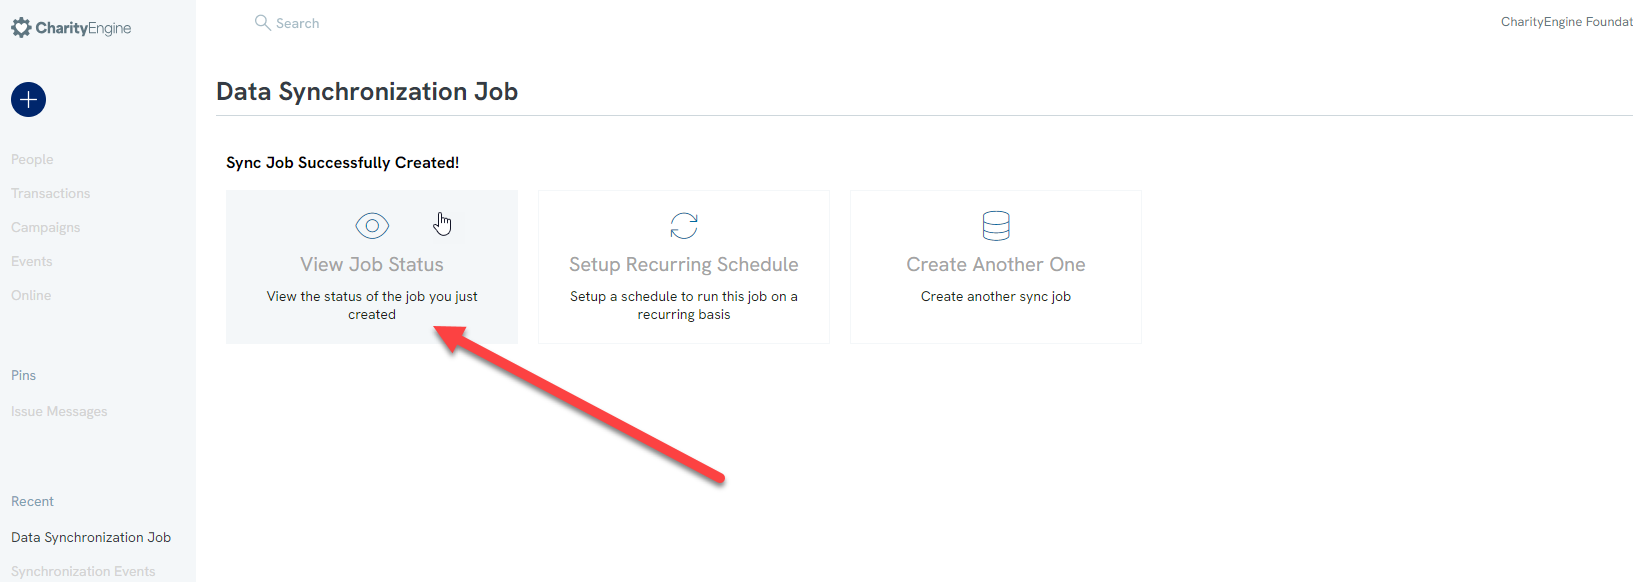
Step 7: To automate your Sync Job, click here to learn more about scheduling a job.

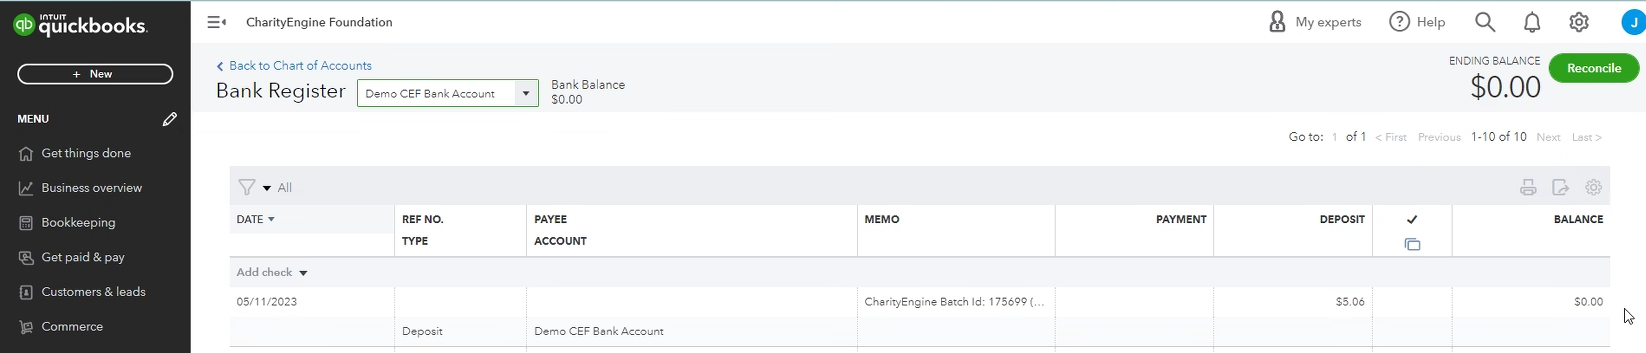
To confirm the synchronization of your transactions within QuickBooks:
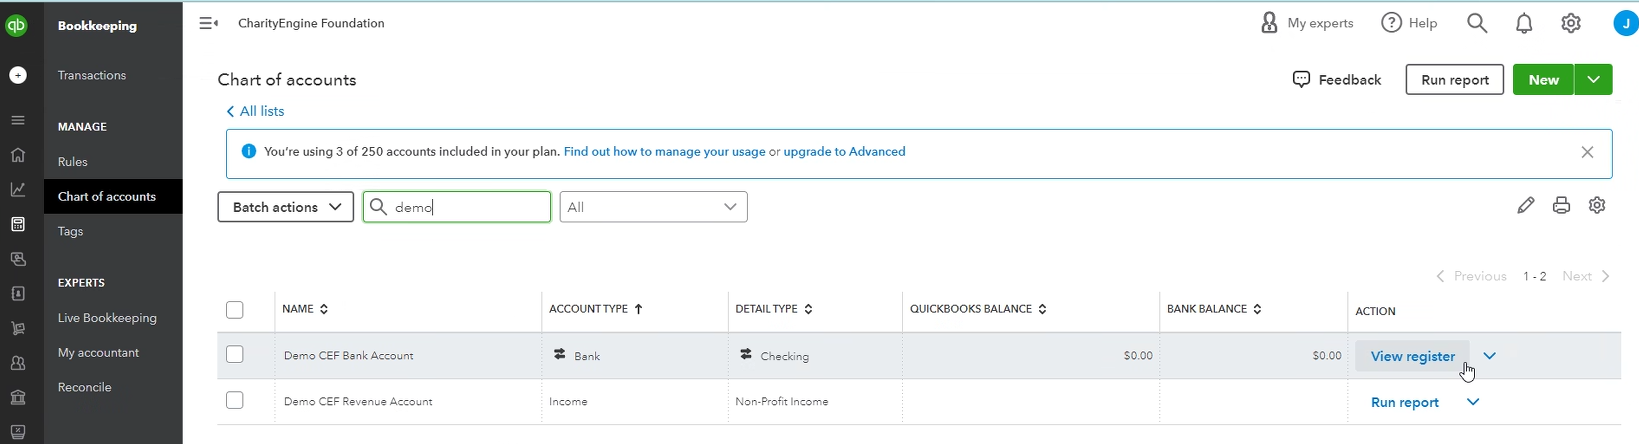
Step 8: Navigate to your QuickBooks account (sign in)
Step 9: Select Bookkeeping
Step 10: Chart of accounts
Step 11: Search for your GL Code which the user has synced to CharityEngine
Step 12: ACTION > View register
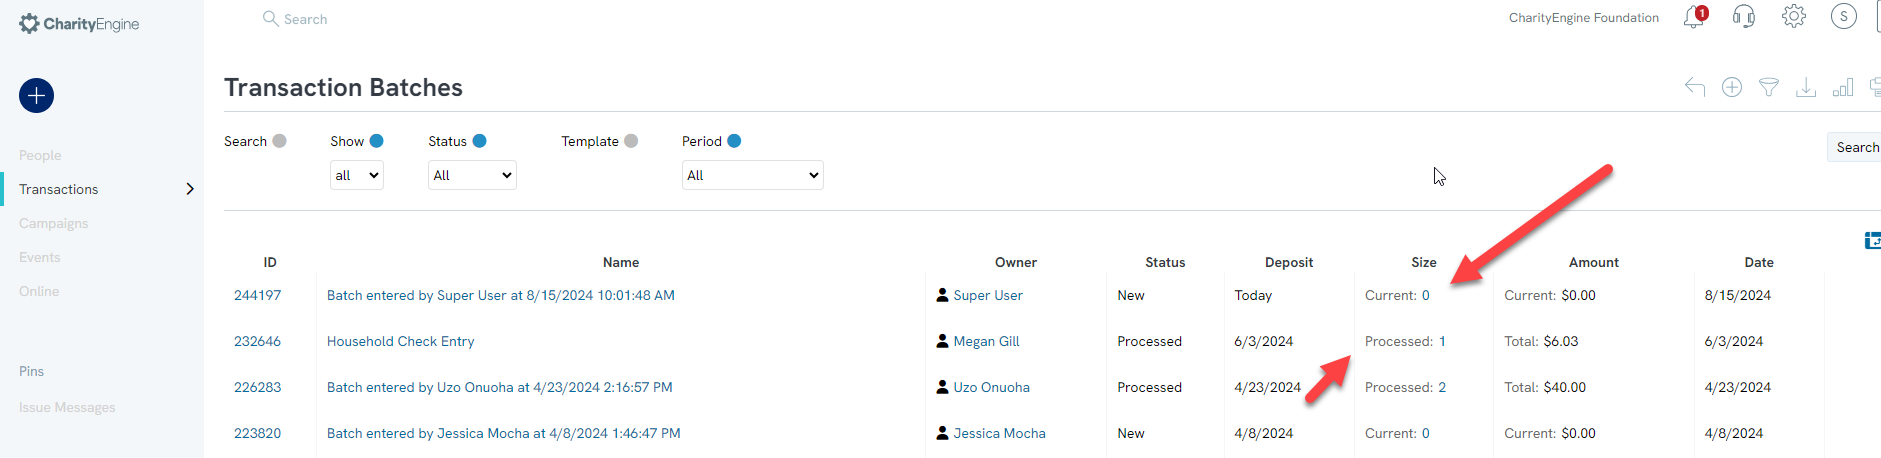
Step 13: Verify the synchronization file Batch Id in QuickBooks will match the Batch ID as located in CE Transaction Batches and/or Transaction IDs
Usage of General Ledger Codes & Batch Entry
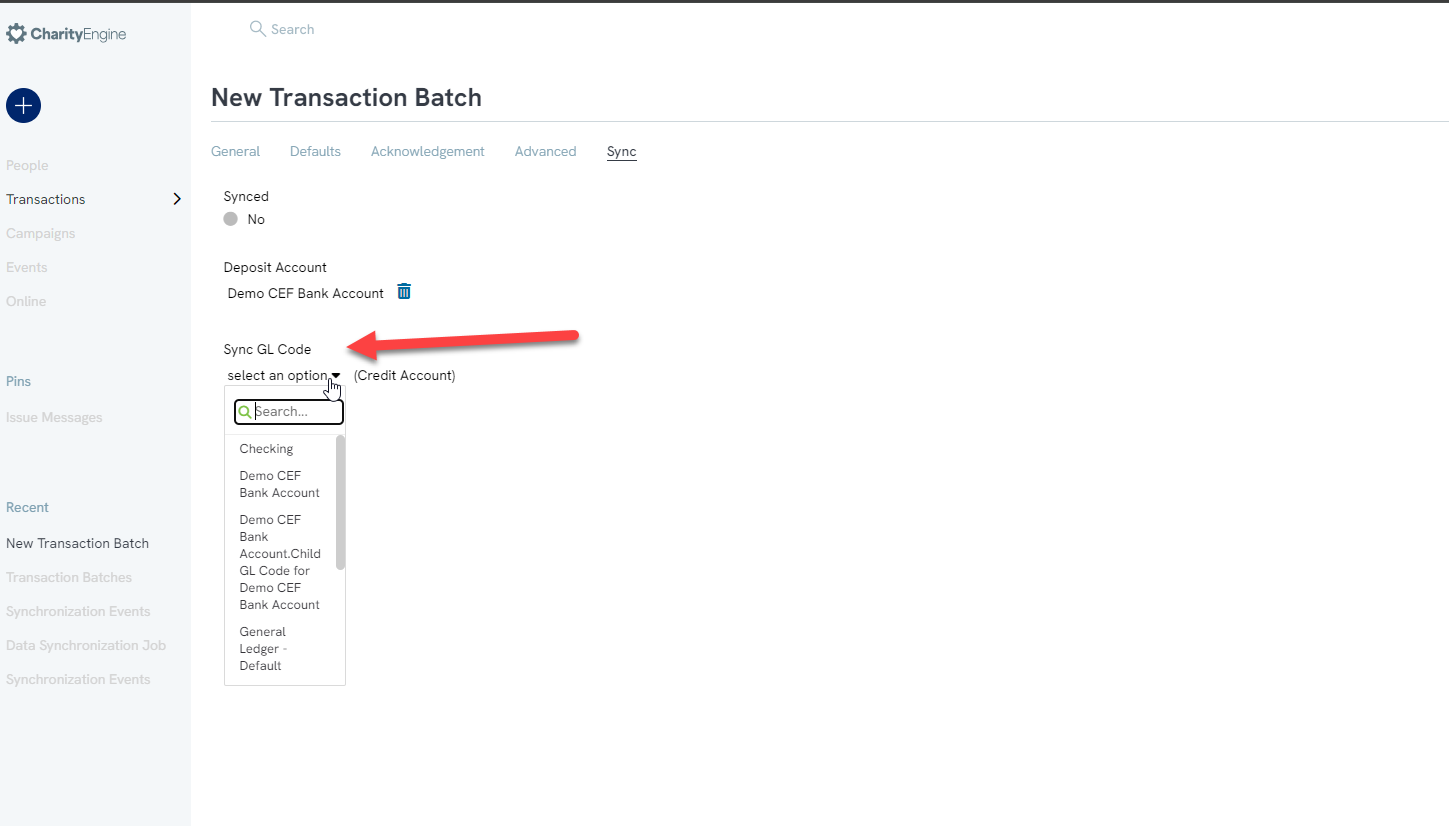
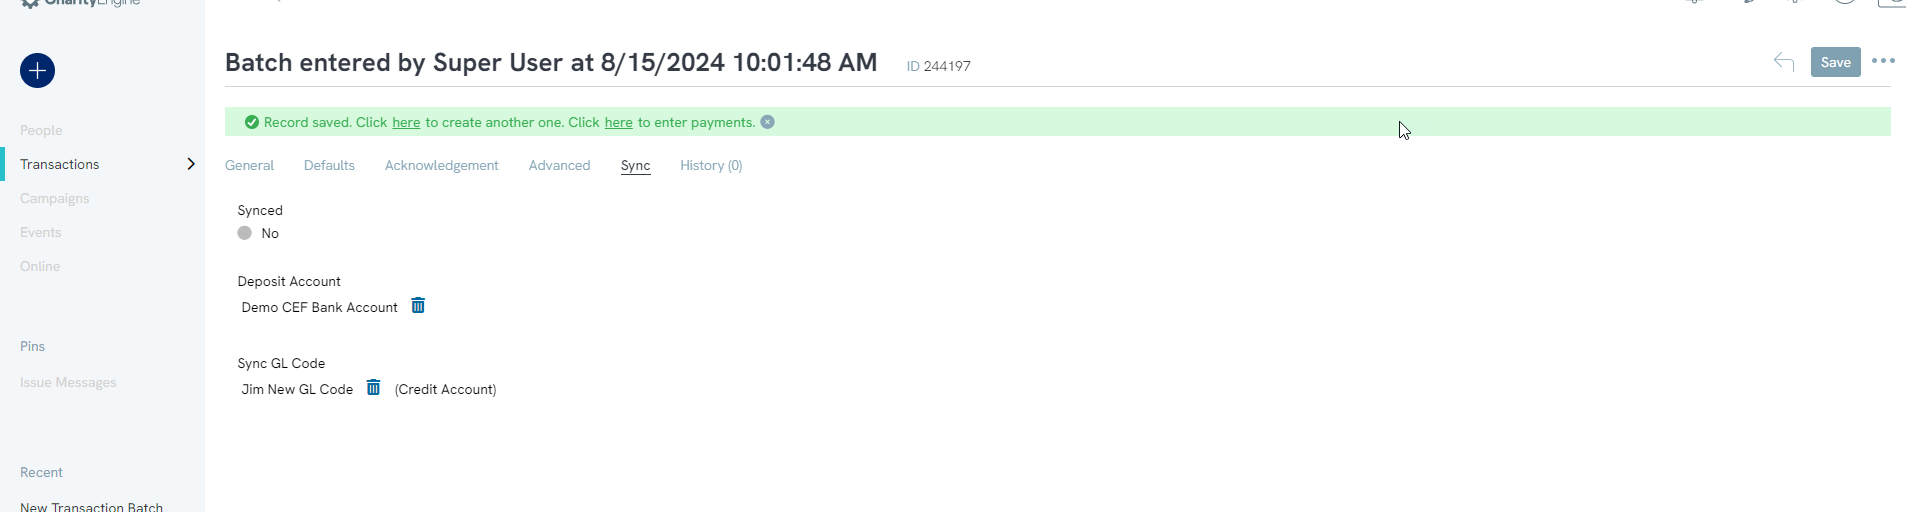
When leveraging CharityEngine batch entry for bulk transactions, for sync of a batch navigate to the Advanced tab of the New Transaction Batch and select:
1. Deposit Account - This must be the revenue account that you set up in configuration.
2. Sync GL Code
Note: The Synced toggle identifies if a transaction(s) was synced to QuickBooks. If the user is entering a batch and has already been synced to QuickBooks, toggle this option to Yes. Otherwise, retain as No for future QuickBooks synchronization.

Usage of Additional General Ledger Codes & QuickBooks
An organization may support the need for multiple general ledger codes. This can be supported within CharityEngine for your QuickBooks synchronization efforts.
Step 1: Establish your additional general ledger codes by accessing the Configuration App > Accounting > General Ledger Codes > Create New
Step 2: Add the Name and Code. Type = Bank, and Parent: select the GL code associated with the QuickBooks account (if appropriate)
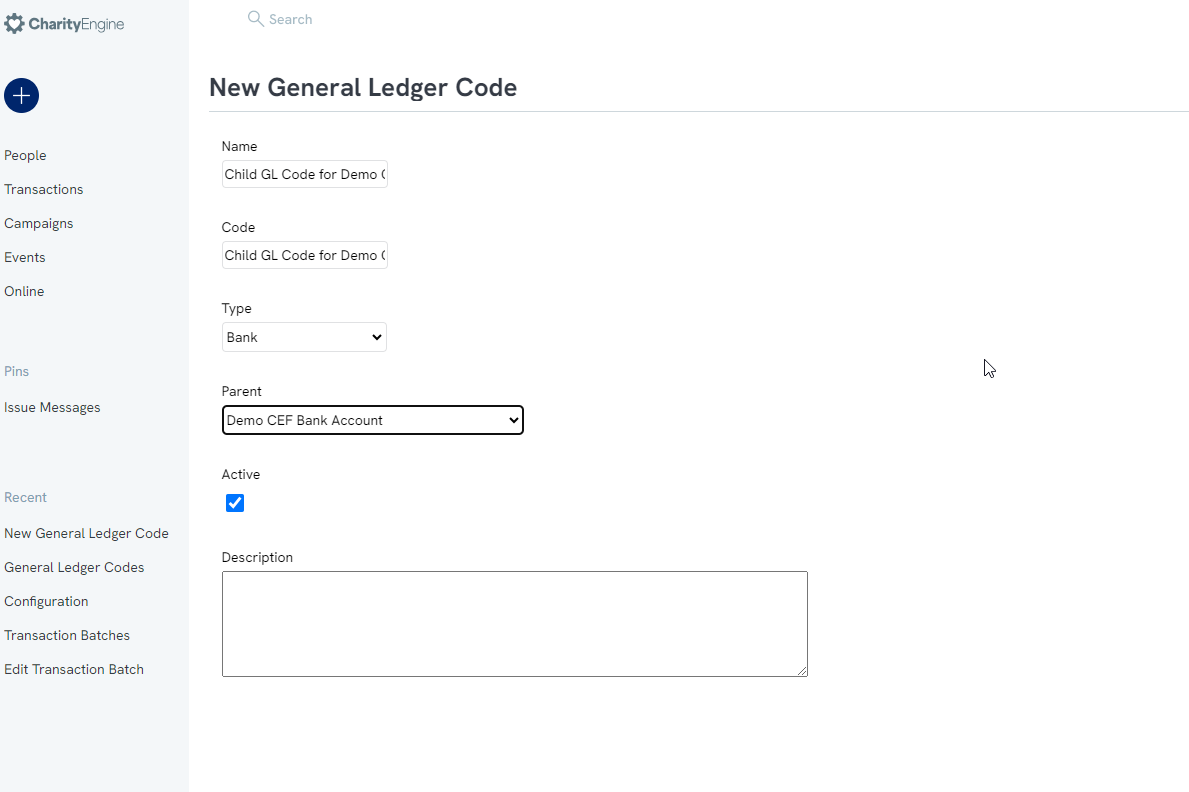
Note: Please ensure your organization is assigning the "child" General Ledger code through necessary standard operating practices.
Usage of Sync Type: Detail
Smaller organizations may require transactional details to be synchronized to QuickBooks. While we strongly recommend Summary for accounting and finance needs, the ability to sync transaction details is an available option.
To start, ensure the QuickBooks integration Sync Mode is set to Detail (see Creating the Deposit or Bank Account outlined above)
Complete the data sync job (see Setting up the QuickBooks Sync)
Access the organization's QuickBooks to view and confirm the synchronization
Accessing and confirming Sync
FAQs & Additional Reading
Q. I have additional General Ledger Codes that are needed for synchronization. These should also be linked to transactions that are processed via a specific web form or batch entry method.
A. This will be a base General Ledger code or a ‘catch all’ code, however, if you have any forms or campaigns set up to go into a different General Ledger code they will override this setting. Note, this will need to be configured in the same way you configured the bank account.
Q. I can't get my QuickBooks synchronization, to trigger.
A. Important Note: All transactions within CharityEngine must contain the appropriate General Ledger Code within CharityEngine. Without the presence of the General Ledger Code on a transaction record, transaction(s) with null GL code values and/or other GL codes not associated with your QuickBooks accounts - will not by synchronized.
Q. How frequently does the QuickBooks API change?
A. QuickBooks manages threshold which requires the user to refresh their QuickBooks API codes. The threshold is set based upon QuickBooks - learn more directly from QuickBooks - https://help.developer.intuit.com/s/article/Handling-OAuth-token-expiration
Q. I ran the Sync Event and I got an error, Authentication Failed, what does this mean?
A. Every so often, you will have to reconnect to QuickBooks and refresh the API token as it does expire and a new token will need to take its place. Simply navigate back to the configuration of QuickBooks in the Configuration application and click connect to QuickBooks.
