Overview
CharityEngine has a host of reporting options to assist you and your users to quickly and easily gain insights to your donors, their actions, and engagement with your organization. While there are over 90 out of the box reports, CharityEngine also provides you with more customizable reporting throughout each of the applications through our Report Builder feature. Queries can be used for more complex reporting needs.
The CharityEngine query tool is an extremely powerful back-office application that provides administrators nearly direct access to their database. In addition to querying the database in real-time through the query builder interface, saved queries can be used to create scheduled reports, automate data updates using transformations, create or update records automatically using trigger jobs, and even to create dynamic audiences for one-time or automated marketing initiatives, to name a few.
Table of Contents
- Overview
- Prerequisites
- Overview of Query Feature Structure
- Overview: Query Modules & Tables
- Query Modules
- Query Tables
- Instructions: Leveraging "Select" Data Options to Create a Query
- Instructions: Modifying labels for "Select" Data
- Instructions: Creating a Free Form Field
- Instructions: Leveraging "Filter" Data Options to Create a Query
- Instructions: Leveraging Fields as Filters
- Instructions: Leveraging "Sort" within Data
- Instructions: Leveraging "Preview" and "Page" View
- Instructions: Save - Additional Options
- Instructions: How To Export Data from a Query (Basic)
- Overview: Query Listing Screen
- Advanced Functionality
- Scheduling Queries
- Advanced Level: Dynamic Query Tokens
- Query Best Practices
- FAQs & Additional Reading
Prerequisites
Building a query requires an understanding of each module and tables within each module. When you begin to build a query, it is important you are starting with the correct module and table in order to target your data needs. Consider the desired outcomes when designing a query. This is especially import if the query will be used with other CharityEngine apps.
It is always recommended users follow database selection best practices in order to avoid slow load times and overwhelming result amounts. Remember, your query is a real-time selection against your database, so the more complex it is, the more load you will be placing on your system. NOTE: This is especially true if you are running jobs in parallel. Whether it be an initiative or a data job, running multiple complex queries at the same time can exacerbate the load on your database and dramatically slow down performance.
If a query runs in the user interface in CharityEngine and produces results, there is usually nothing to be concerned about. When queries are complex enough that they take longer than a few minutes to run and As a general rule of thumb, if a query takes longer than 5 or 10 minutes by itself (while no other heavy jobs are running) it is a pretty substantial workload. That does not mean it is wrong, incorrect or undesirable, it just means that you need to be aware that it is doing a lot and warrants special consideration. Any queries that take longer than 30 minutes should be looked at by a senior administrator to ensure that there is not a better way to implement them.
CharityEngine strongly recommends leveraging our Reports & Analytics out of the box reporting and our Reports Builder feature for easier end user experience. Queries should be used for advanced reporting.
Learn more here:
Reports & Analytics: Overview and Usage of the Reports & Analytics Application
Reports & Analytics: How to Use the Report Builder Tool
Overview of Query Feature Structure
Accessing the Query Feature: Navigate to Automation & Workflow > General > Queries > Create New
Locating Data Sets: Data is structured within Modules and Tables within the module.
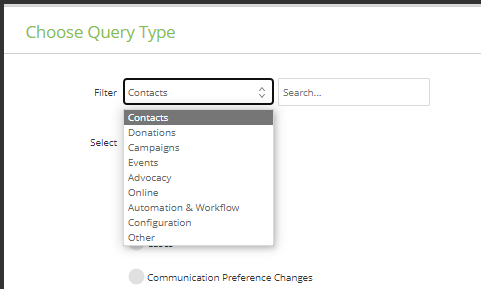
You will be offered a drop down as Filter to identify your module.
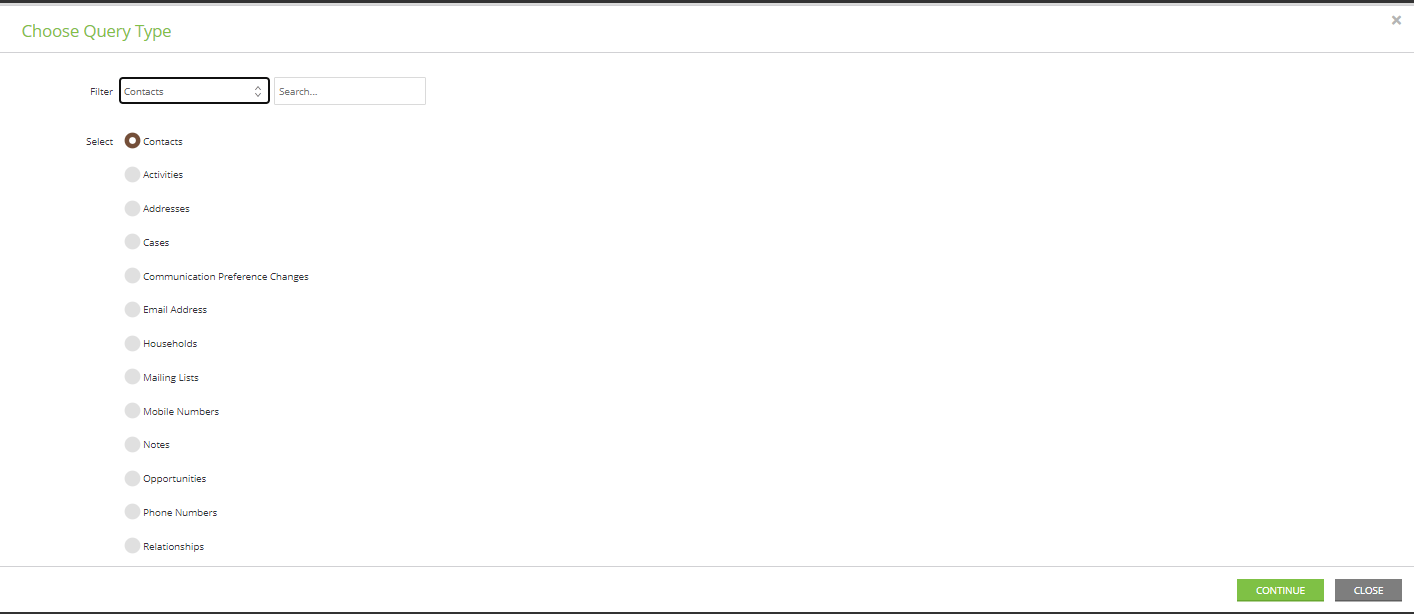
Within each module, you will be offered a list from Select - carefully consider the type of data you are looking to target in order to select your table.
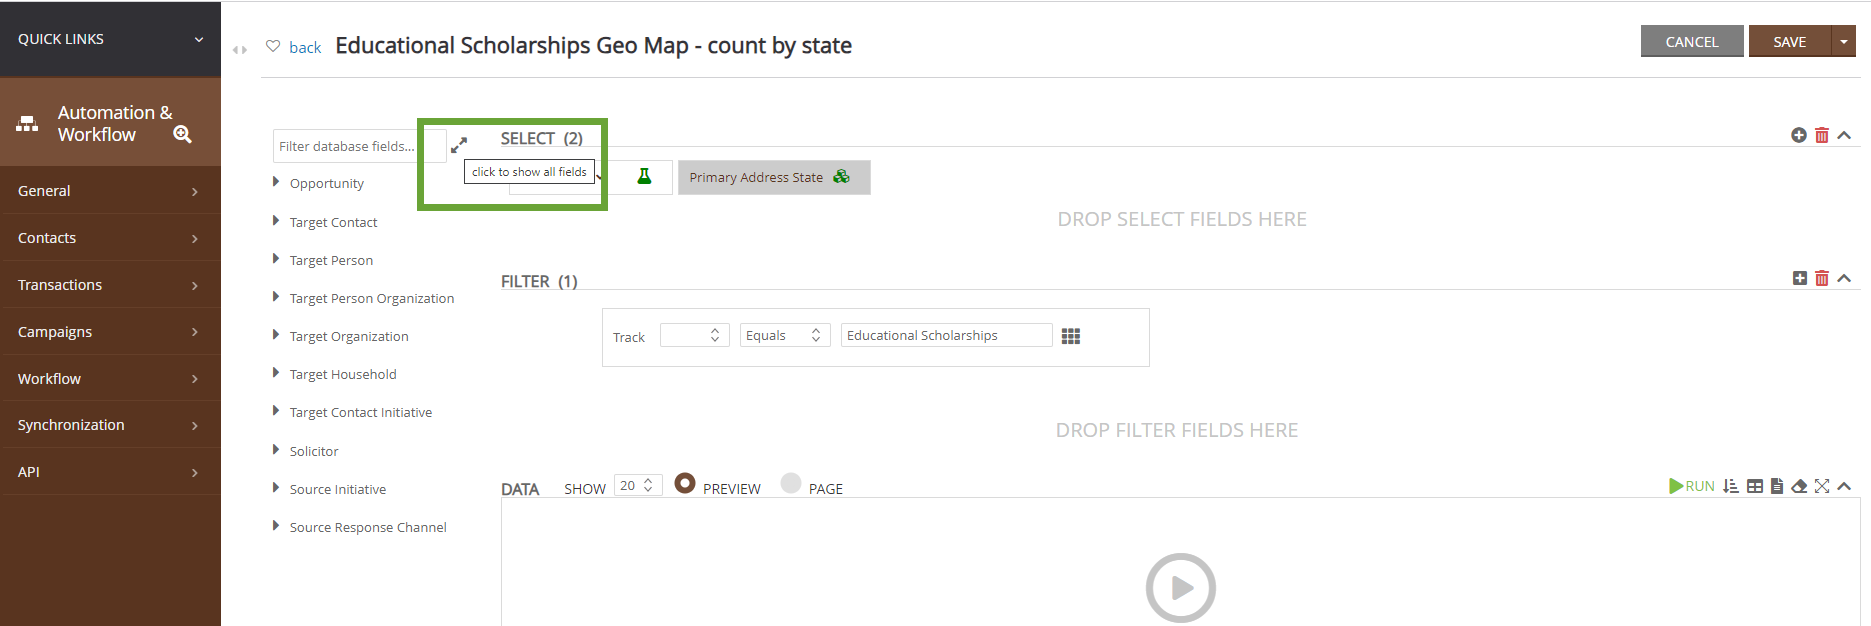
Database Fields: Use the arrows to expose additional data elements, you can also type in the field name in the text box
SELECT: In this area, you will drag and drop or double click the database field to add to the Select area. These will be the data fields that will be displayed in your query report.
FILTER: In this area, you will drag and drop or double click the database field to add to the Filter area. These will be the data fields that will filter your datasets.
SAVE: Be sure to secure your changes by clicking on SAVE in the top right hand corner.
Leverage the drop down to expose additional options related to the query.
RUN: Use the green Run arrow above the data view to see your results prior to exporting.
Overview: Query Modules & Tables
Building a query requires an understanding of each module and tables within each module. When you begin to build a query, it is important you are starting with the correct module and table in order to target your data needs. Consider the desired outcomes when designing a query. This is especially import if the query will be used with other CharityEngine apps.
It is always recommended users follow database selection best practices in order to avoid slow load times and overwhelming result amounts. Remember, your query is a real-time selection against your database, so the more complex it is, the more load you will be placing on your system. NOTE: This is especially true if you are running jobs in parallel. Whether it be an initiative or a data job, running multiple complex queries at the same time can exacerbate the load on your database and dramatically slow down performance.
If a query runs in the user interface in CharityEngine and produces results, there is usually nothing to be concerned about. When queries are complex enough that they take longer than a few minutes to run and As a general rule of thumb, if a query takes longer than 5 or 10 minutes by itself (while no other heavy jobs are running) it is a pretty substantial workload. That does not mean it is wrong, incorrect or undesirable, it just means that you need to be aware that it is doing a lot and warrants special consideration. Any queries that take longer than 30 minutes should be looked at by a senior administrator to ensure that there is not a better way to implement them.
Query Modules
When creating a query, your first action will be selection of the Query Module (or Filter). Each module corresponds to a CharityEngine database and the database's associated data elements. For example, Contacts will provide data points related to the contact record and it's associated tables. While the Donations selection will provide data points related to all tables related to transactions.
Query Tables
Once a query module has been selected by using the Filter drop down, each module will provide a specific list of query tables. Leverage the Select radio button to select your table.
Again, when building a query, it is import to consider the intended usage and design. The table selection is an important consideration to accurately locate the data elements required.
As an example, the Contacts module can be queried based upon tables ranging from the Contacts record table, to the Household record table, to the Email record table.
Whereas the Donations module allows the user to query against tables that range from the Transactions table, to the Sustainer table, to the Invoice table.
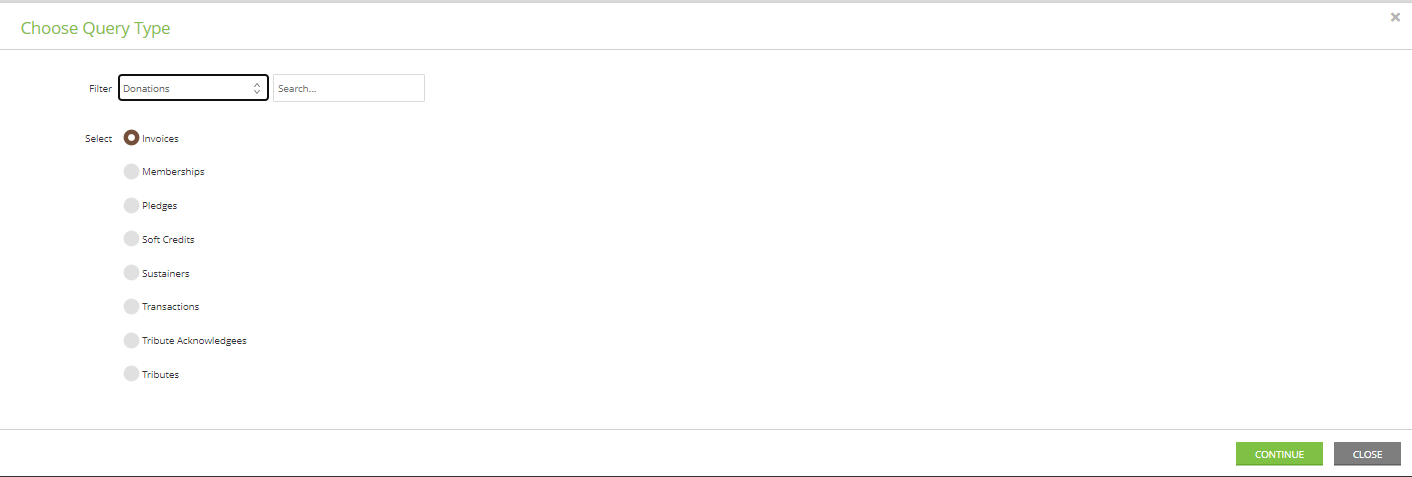
Once the table has been selected, click CONTINUE to begin exposing all available data fields within that module's table.
Instructions: Leveraging "Select" Data Options to Create a Query
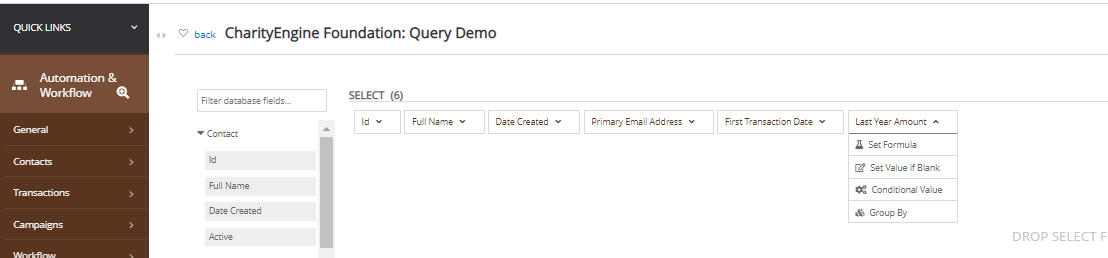
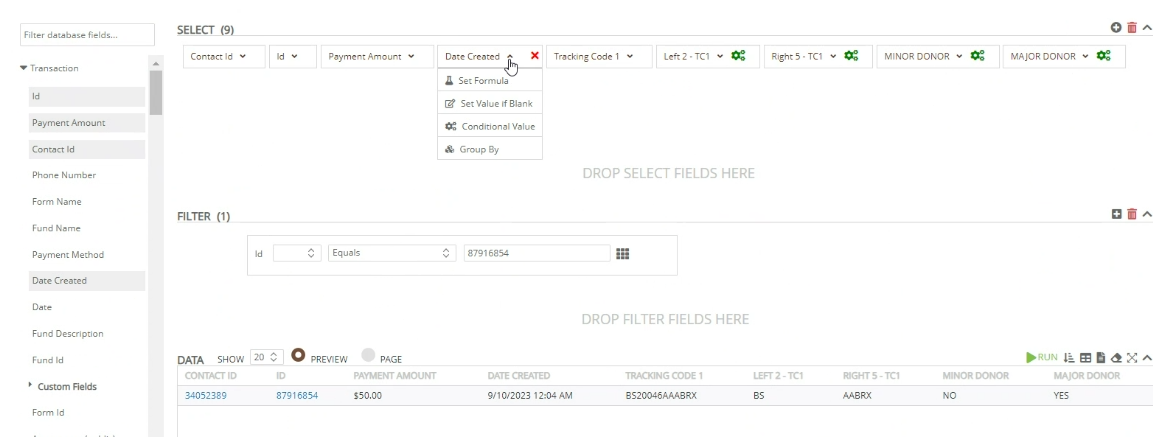
Within the data presented in the SELECT area, there are available data customization options. These options can be exposed by clicking on the down arrow of the data element.
Set Formula: Clicking on Set Formula will expose options such as setting the data element to Average, Count, Sum, Multiply. These options will vary based upon the field type.
Set Value If Blank: Clicking here will allow you to set a default value if the data element is null.
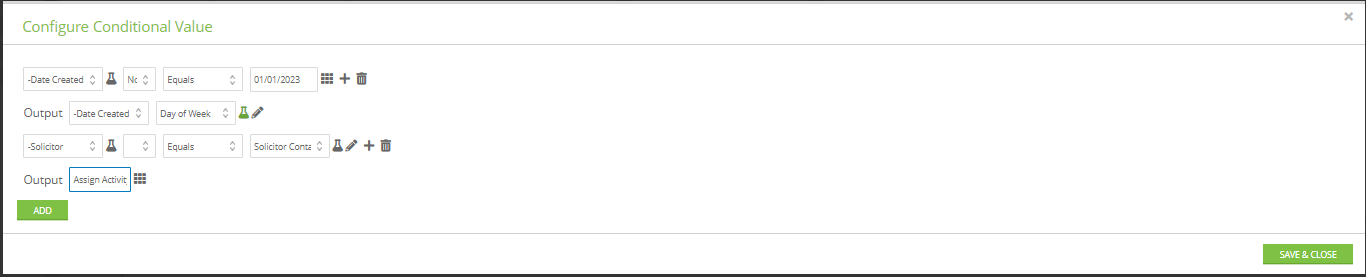
Conditional Value: This customization option will allow you to create advanced conditional values based upon the input and a customized output.
Group By: Allow your data to be grouped by the data element
To remove any of these conditions, simply click on the icon to remove.

Instructions: Modifying labels for "Select" Data

You may also find that changing the name of the data element will help with end user interpretation. You can change the data element name by clicking on the data element name and typing in your revised name. If you need to determine the original data element name, simply hover over the data element and a pop up will up.
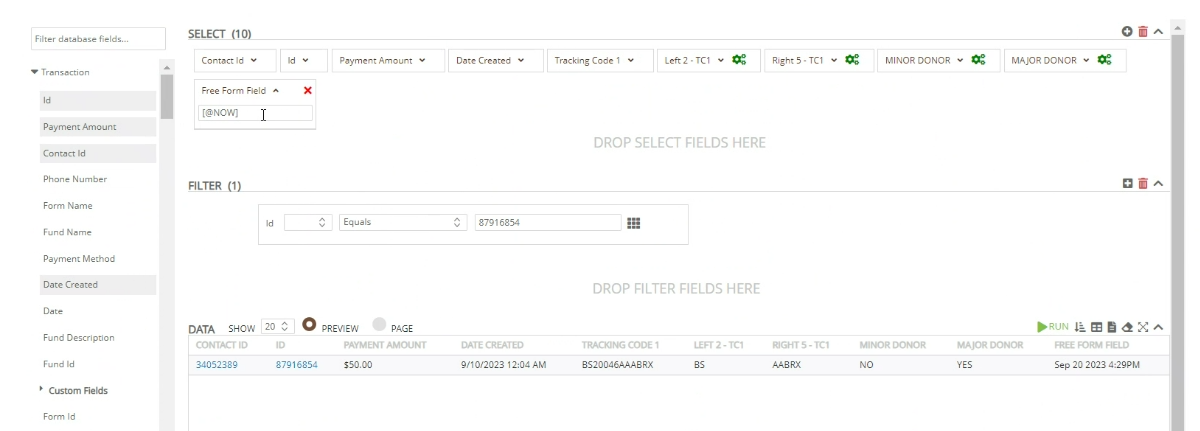
Instructions: Creating a Free Form Field
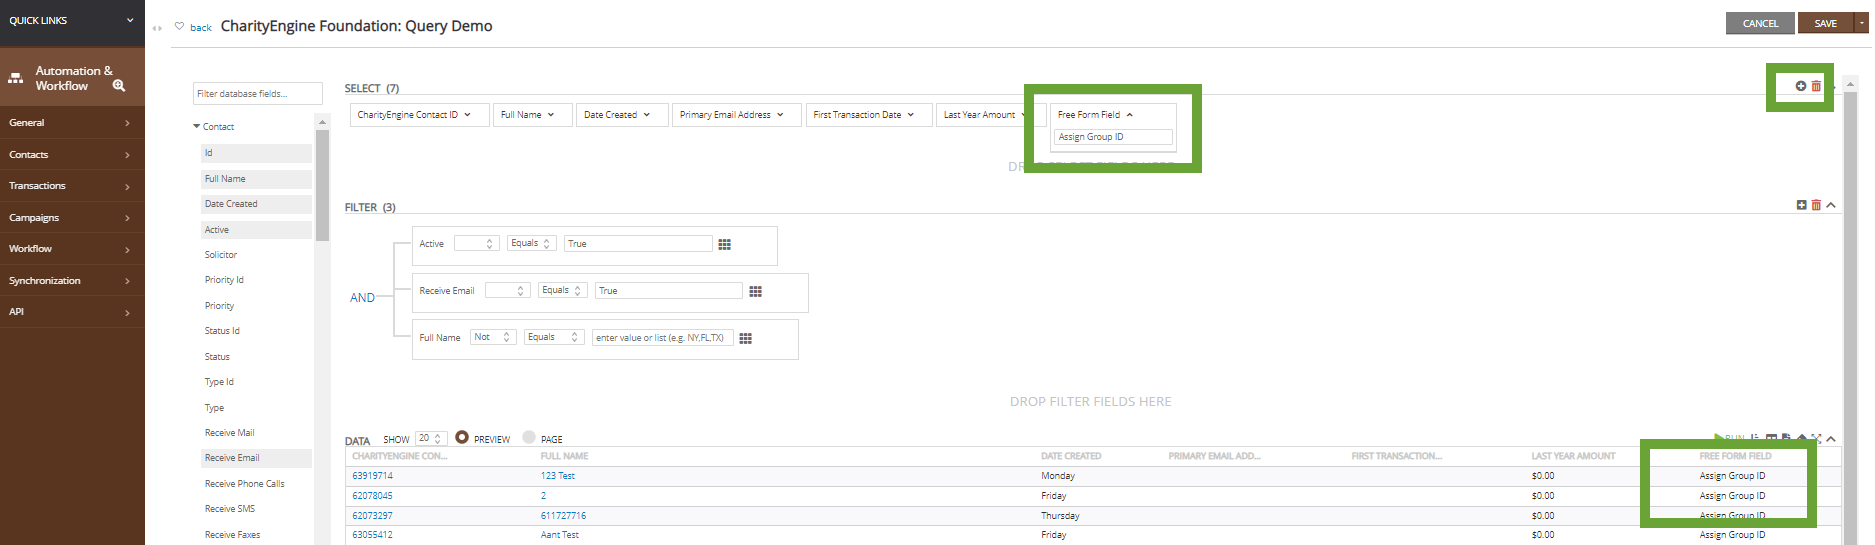
By clicking on the + icon in the SELECT section, you can create a free form field. Simply click on the down arrow to enter the value for that field.
Instructions: Leveraging "Filter" Data Options to Create a Query
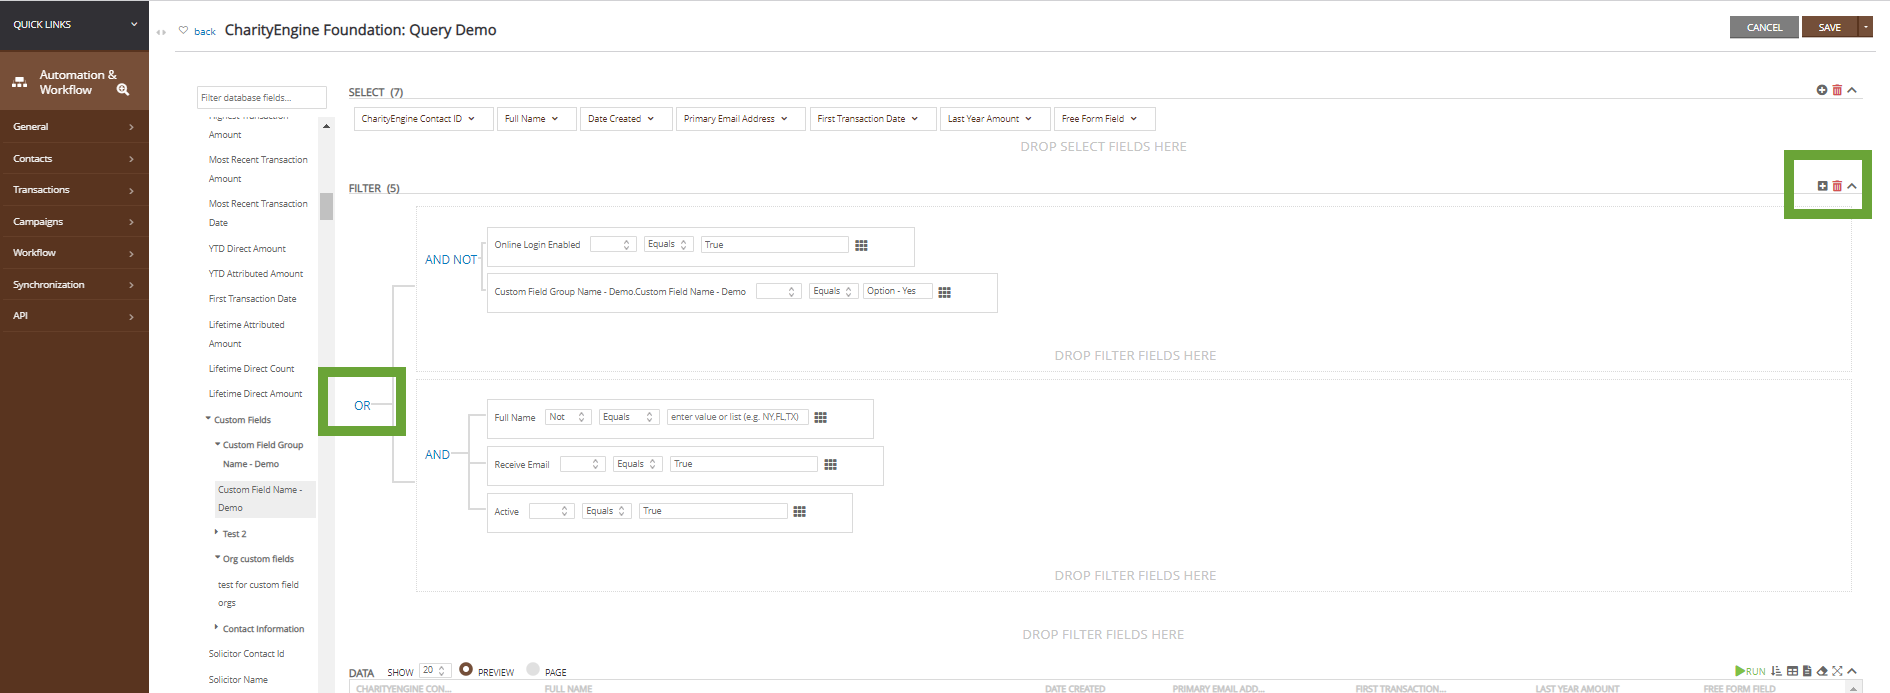
Within the data presented in the FILTER area, there are a series of filtering options available allowing users to create nested filters and complex queries. Filters are not required and this section can remain null. If you do add more than one data element, you will be presented with a blue AND condition. This can be changed by clicking to change to OR, AND NOT, OR NOT.
In addition, you can create nested filters by accessing the plus sign icon at the top of the filters section. This will present a box in which you can drag your data element into the box.
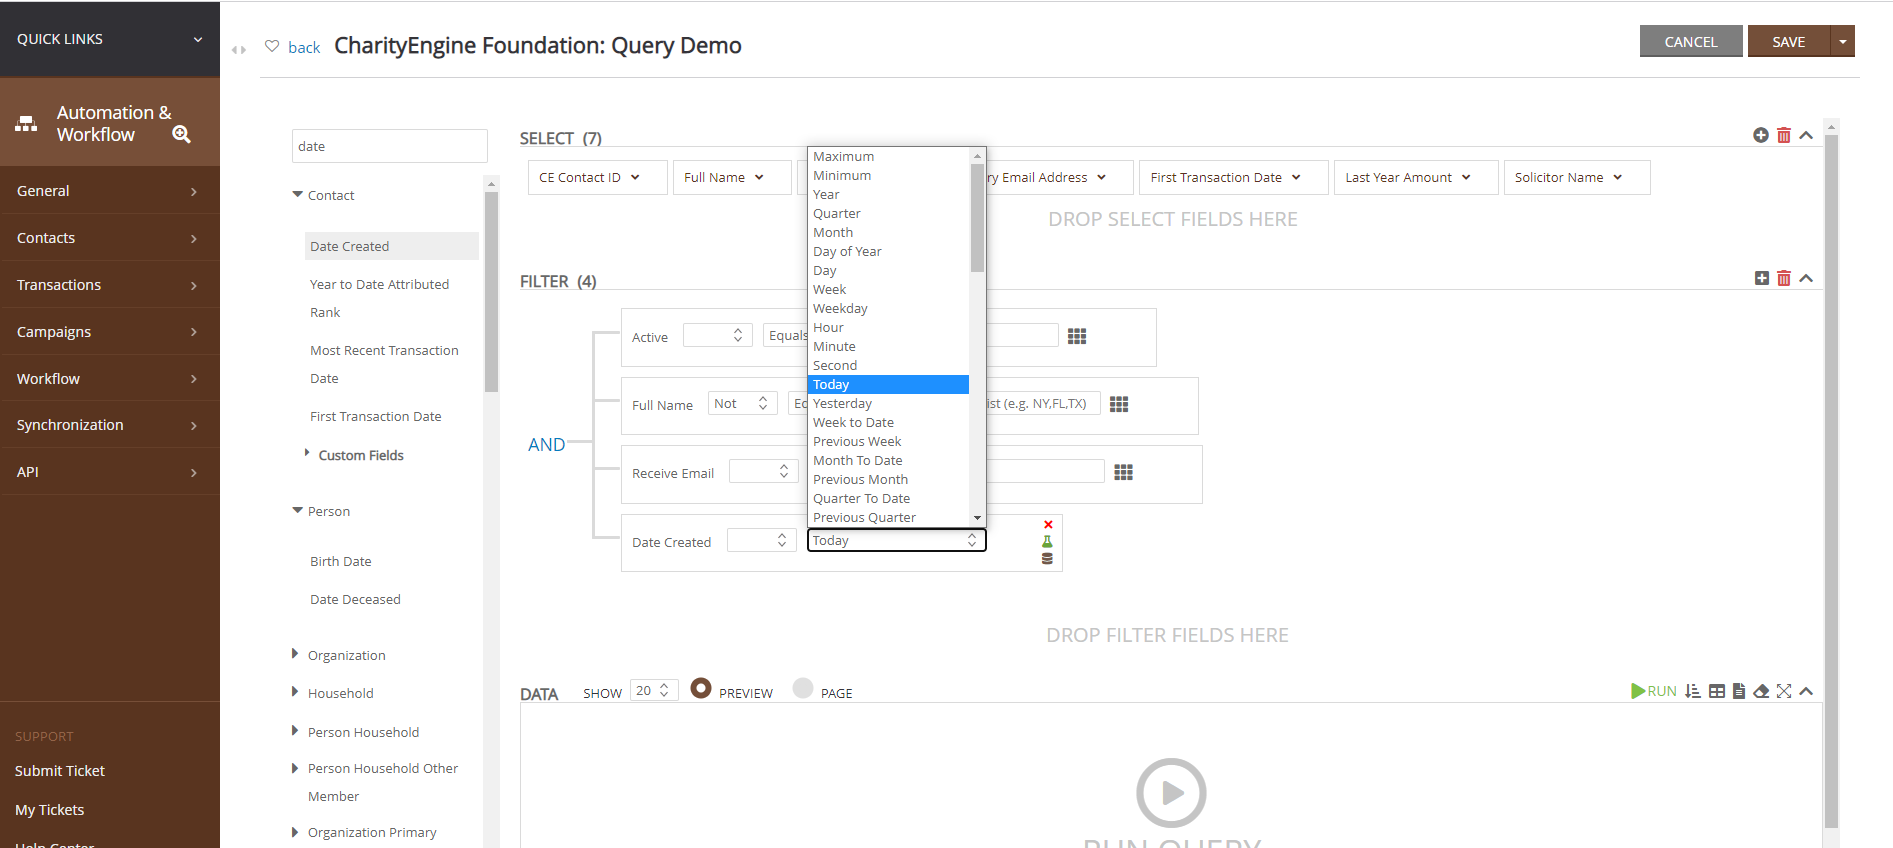
In addition you can leverage the Use Formula function to expose these options. Hover to the right of the field to expose the Beaker icon and click.
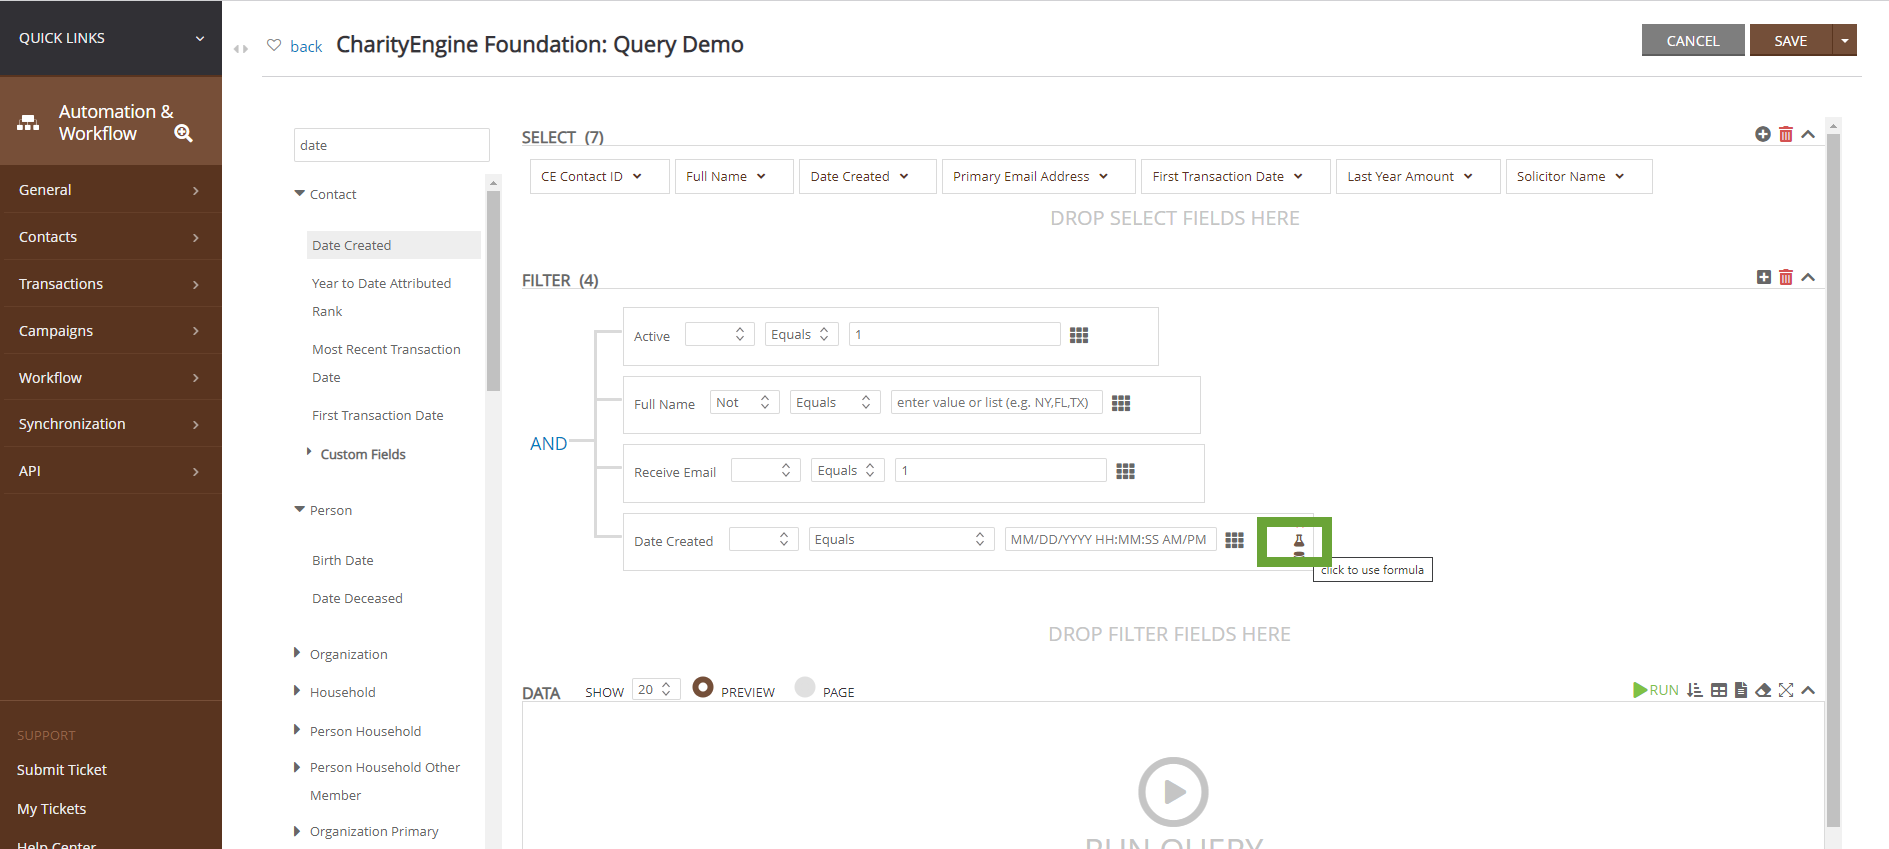
Once clicked, you can review the drop down to further customize more robust, dynamic filters.
Simply click on the beaker icon to remove the filter formula.
Example - selecting Today in this query will select only those on the day in which the query had been run.
Pro Tip: It is highly recommended that you check your data output as you begin to build your query. Queries can become complex based upon the data element selected and any complex usage of filters.
Instructions: Leveraging Fields as Filters
Users can leverage additional filters from the Select fields selected. In this use case, the user needs to locate all donors who have given $100.00 or more in a rolling 12 month period.
The structure for this query groups contacts within the transaction table and then sums all donations and counts all donations. The filter looks for transactions in the last 12 months, the payment is confirmed, and the accounting revenue is > $0.00 (to exclude voids, refunds, etc.).
From the SELECT area, hover over the Sum (Amount Signed) to expose the Filter icon. Upon clicking the field, the value will present in the FILTER section. From here the user can then select to filter the field with total cumulative sum of $100.00 or more.

Instructions: Leveraging "Sort" within Data
The query tool will also allow you to sort your data when running your query or exporting. Navigate to the top right-hand of the DATA section and select the down arrow icon next to RUN. In the pop-up, select the data element you wish to sort by. Click on the number to select ascending or descending.


Instructions: Leveraging "Preview" and "Page" View
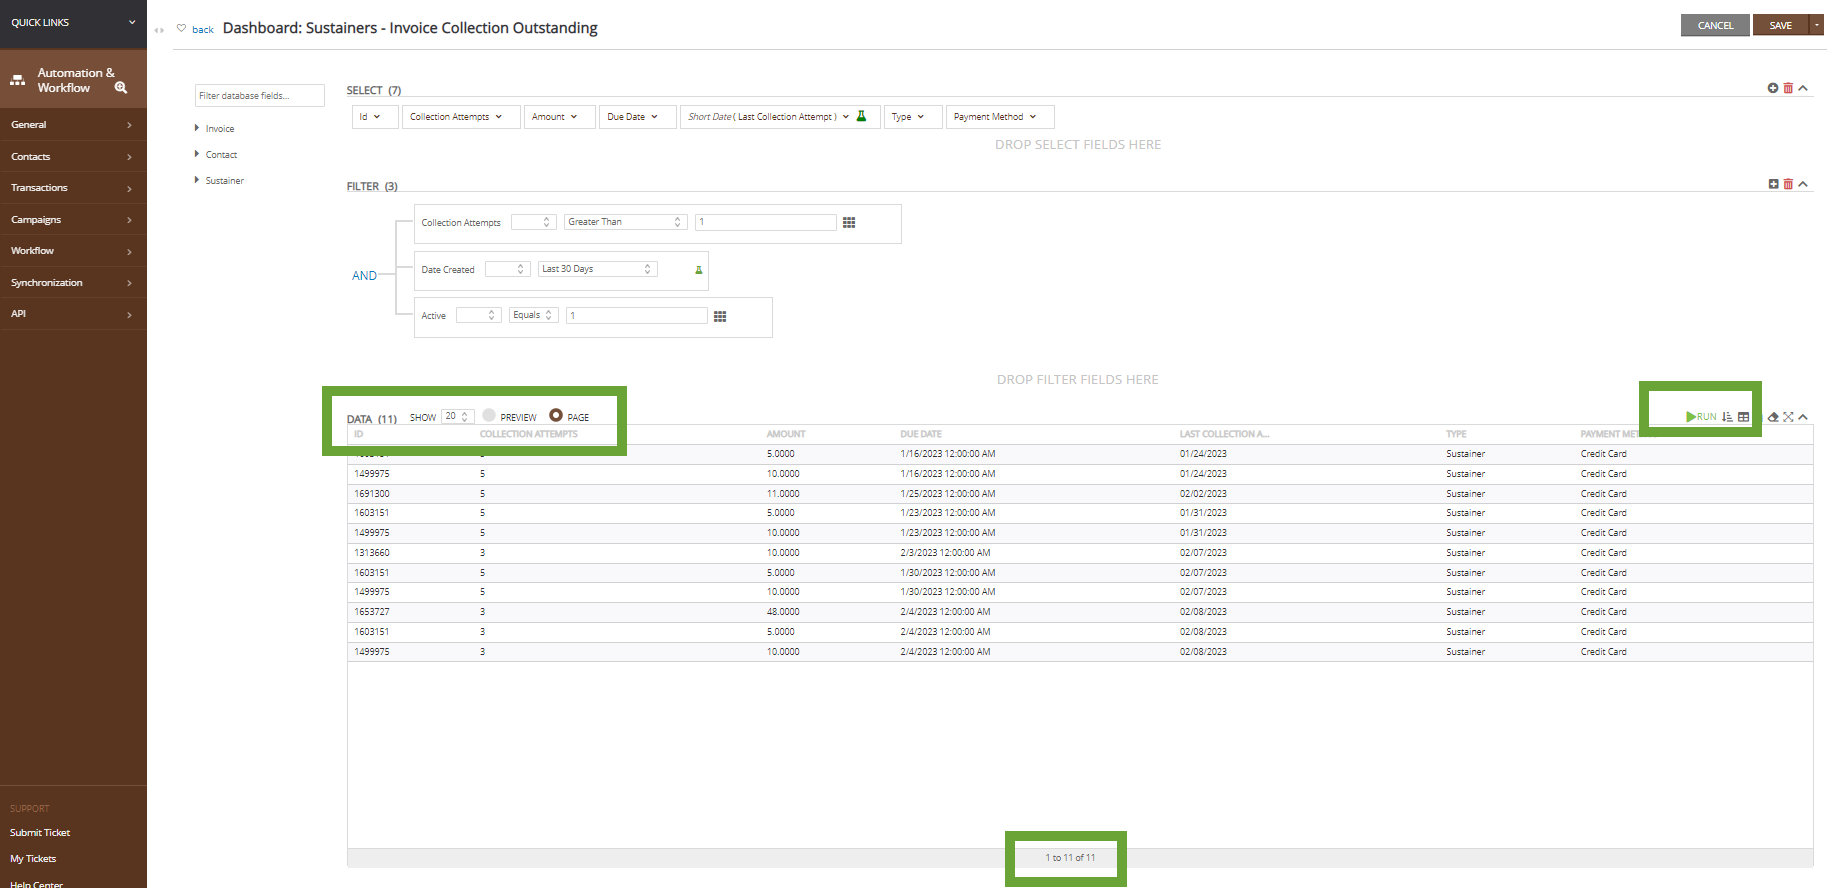
To obtain a view of the data output, click RUN to populate the DATA panel. To preview total record count, toggle to Page in order to see total record count at the bottom of the panel.
Instructions: Save - Additional Options
Navigate to the SAVE drop down to expose various options related to the query:
- Clear All: clear all fields from select and filter
- New Query: Extract your data to an Excel document
- Export Data: ability to extract the query results to Excel
- Schedule Report: Be navigated to the Data Jobs functionality to schedule the export of your job now or in the future
- Mail Initiative: Initiate the Campaigns > Quick Actions > Mail Blast workflow to initiate a mail send
- Email Blast: Initiate the Campaigns > Quick Actions > Email Blast workflow to initiate an email send
- Automated Email:Initiate a job schedule to establish an email communication series; ideal option if your creative uses custom tokens
- Emailable Audience: Obtain a quick preview and estimate of your audience size including a summary of opt outs, duplicates, suppressions, blacklisted emails, and deceased contact records. Note: Queries to be used for email campaigns must contain the CharityEngine Contact ID value.
- Mailable Audience: Obtain a quick preview and estimate of your audience size, see emailable audience above.
- Trigger: Be navigated to the Data Trigger Job feature to automate a trigger job
- Transformation: Be navigated to the Data Transformation Job feature to automate a bulk transformation
- Change History: Access change logs for historical changes
- Create Another One: Initiates a new query

Instructions: How To Export Data from a Query (Basic)
When you need to do deeper research on your CharityEngine Data you can export data pulled from a query. This will allow you to view and share your reports as well as preform a deeper data analysis.
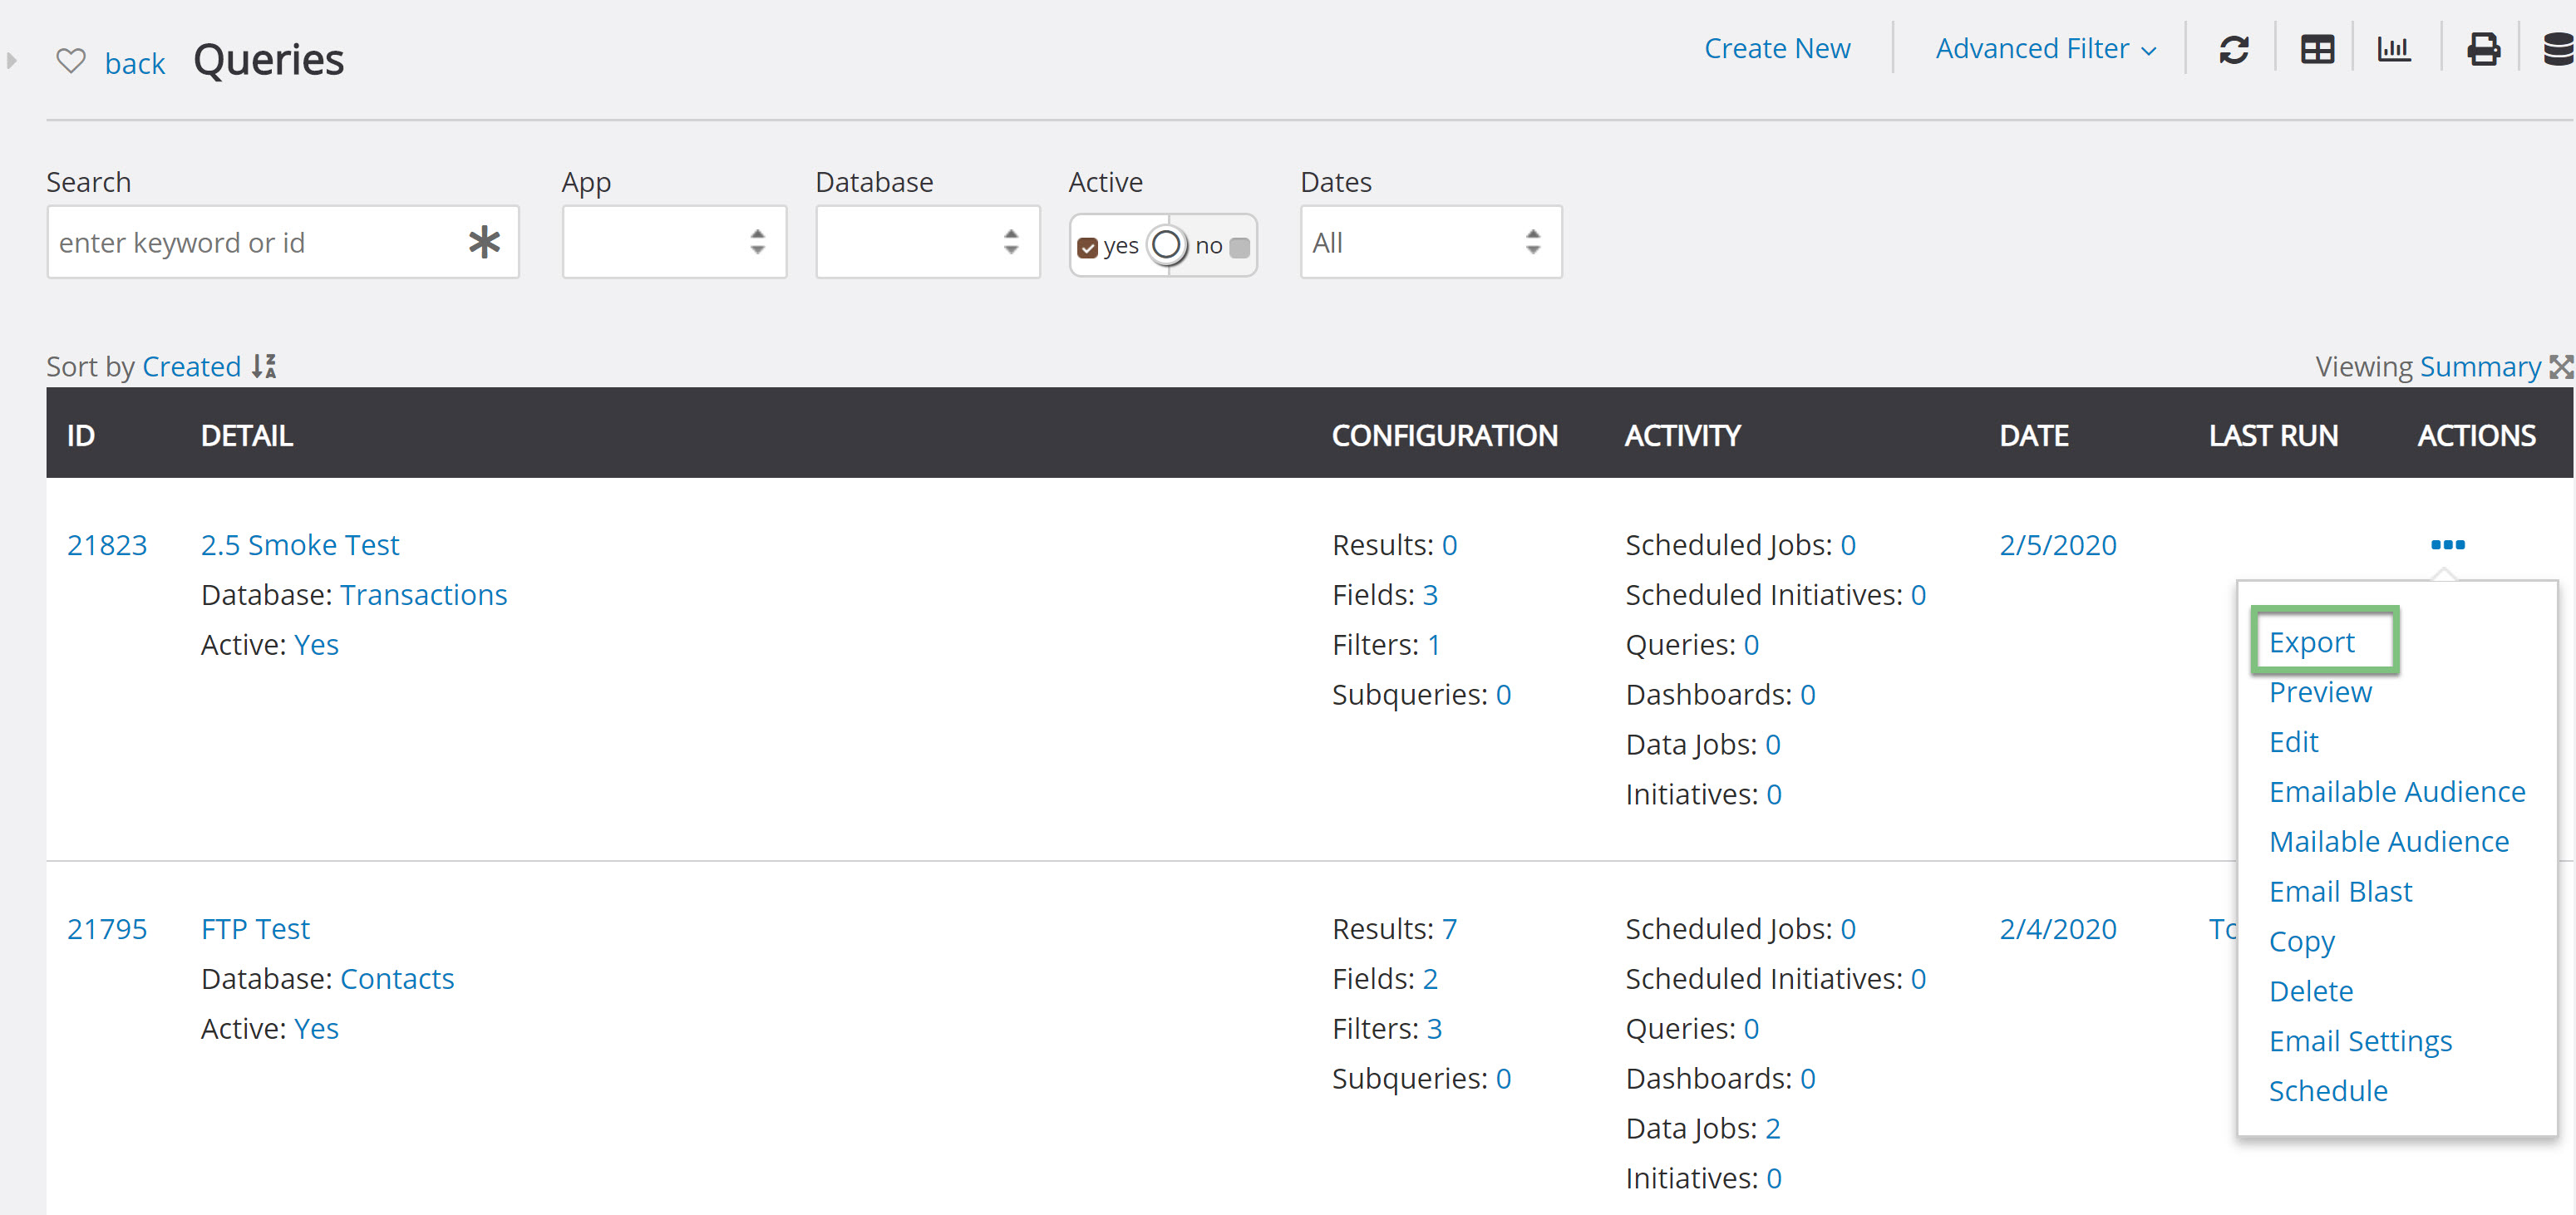
Step 1: create an export data job from Queries by navigation to the Automation & Workflow App > General > Queries > locate your query > ACTIONS > Export
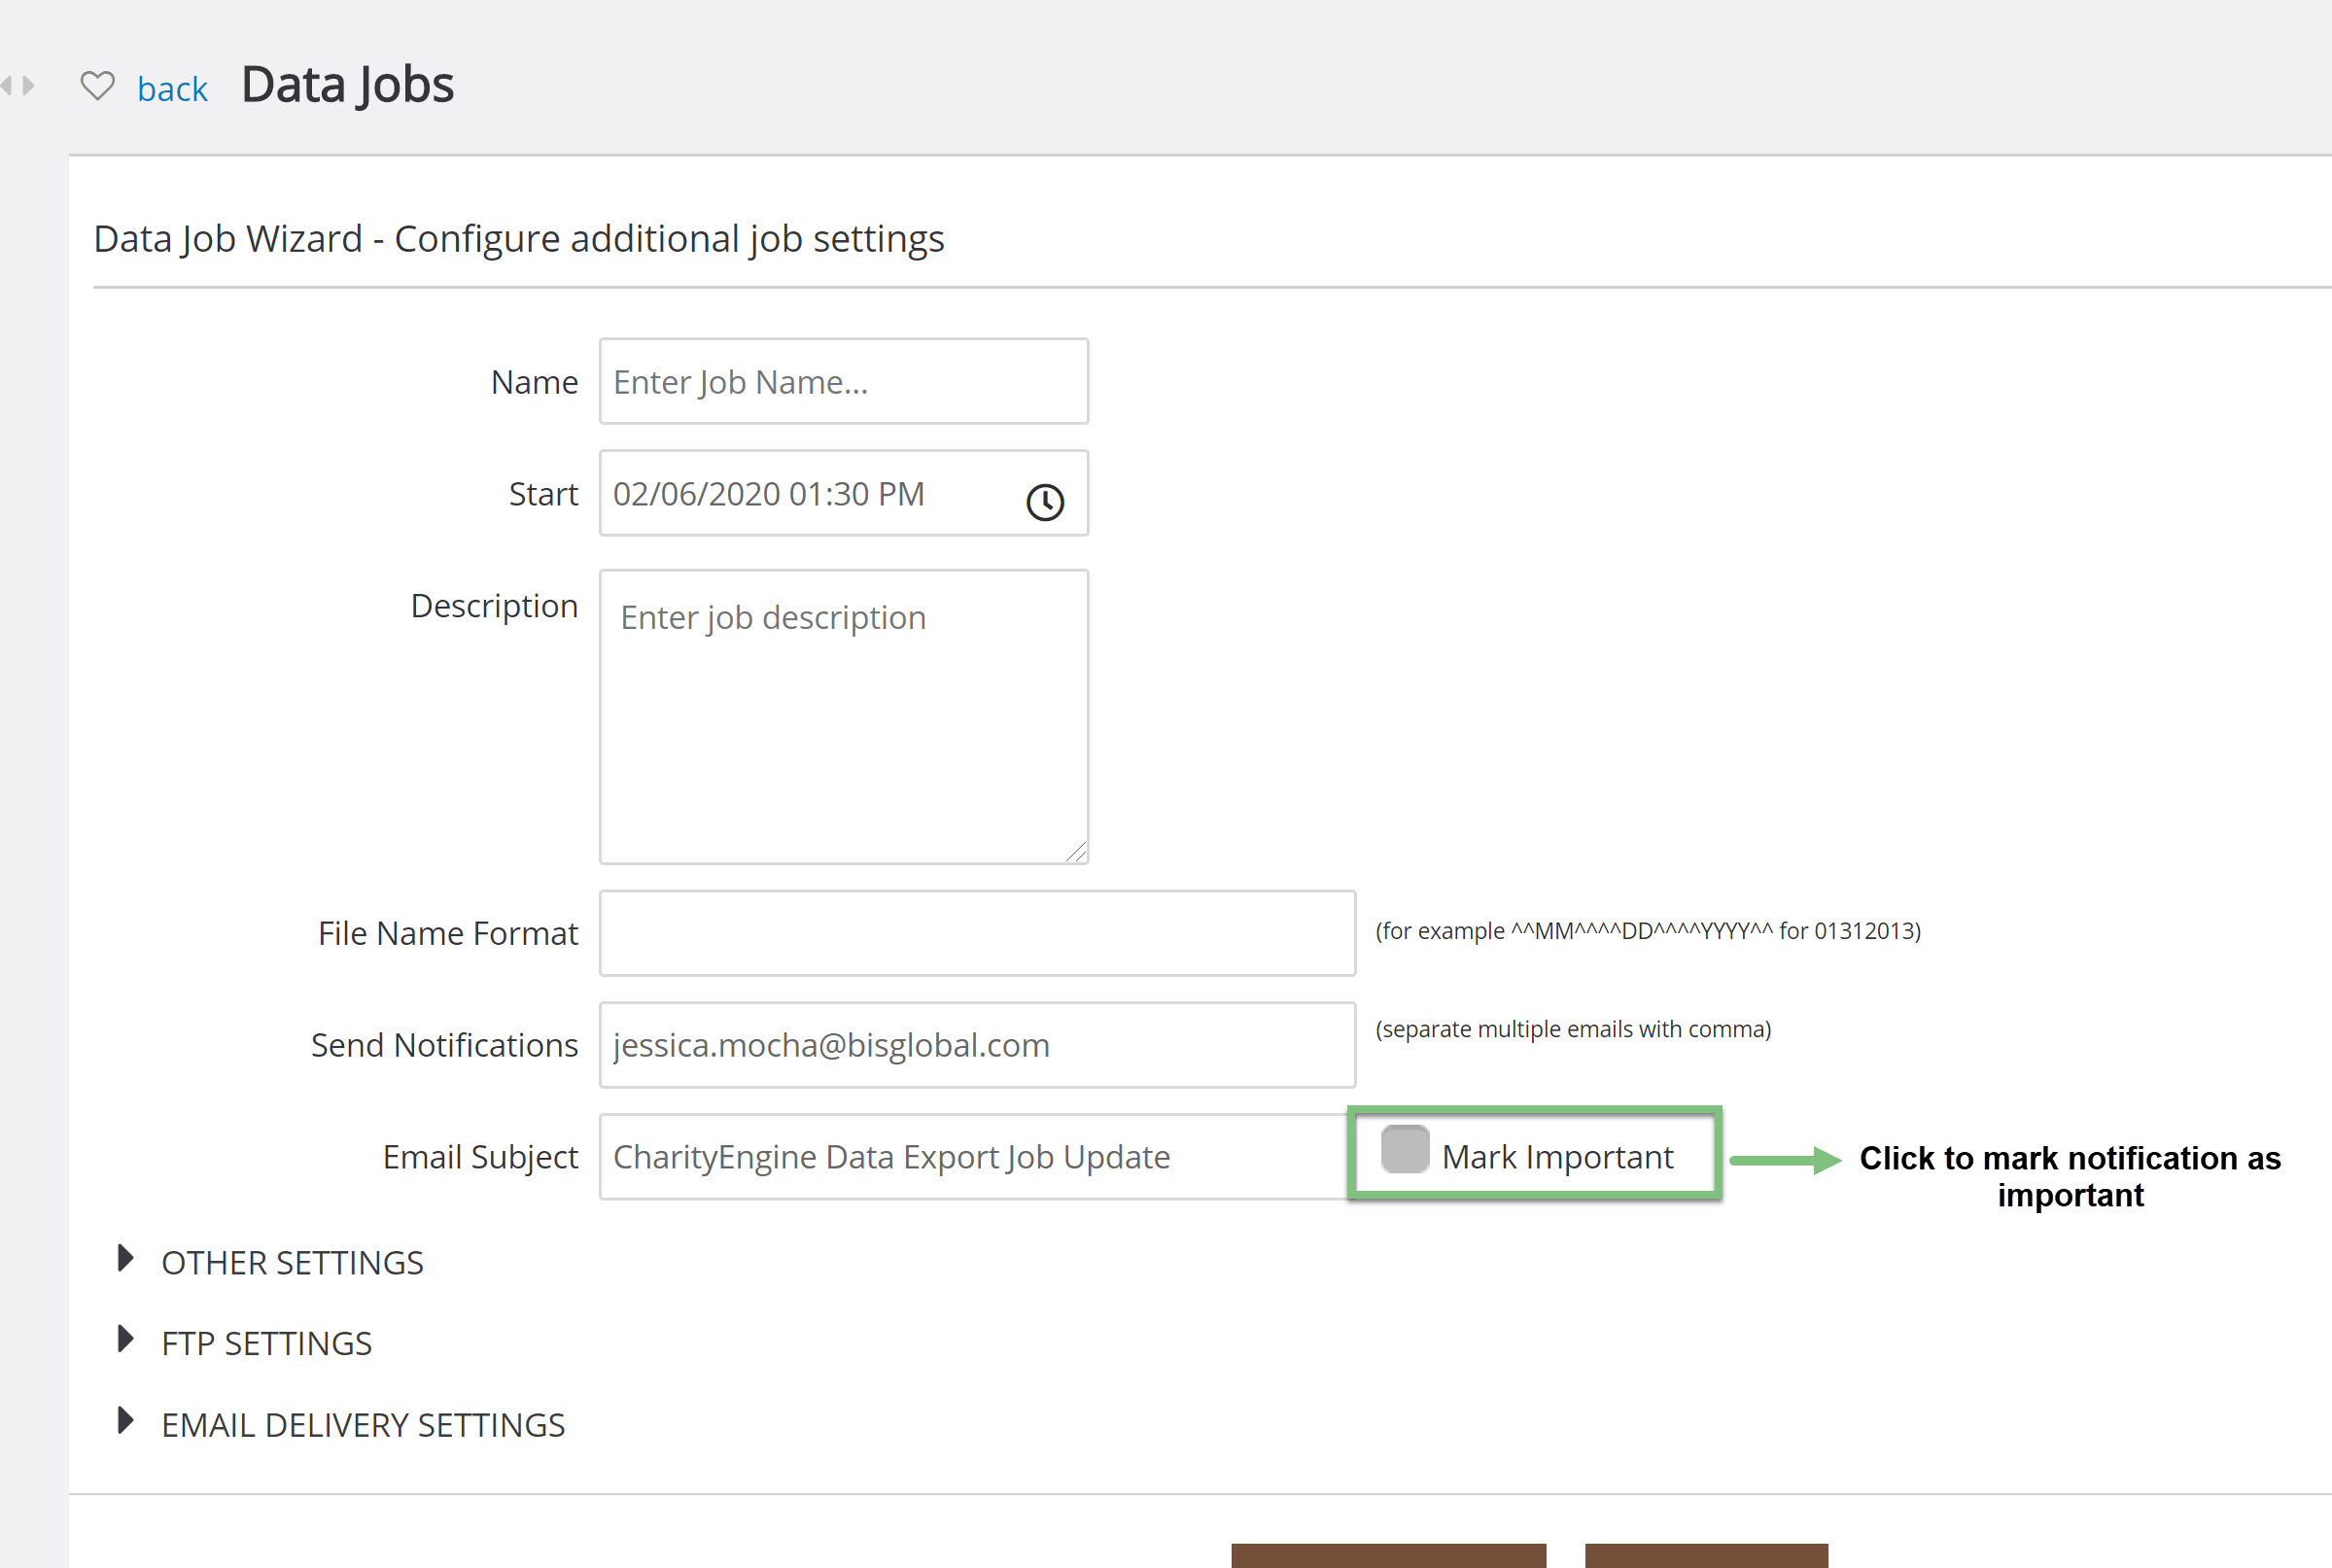
Step 2: From the Data Jobs Wizard, add a Name for your job (required), Start time (default - current date/time), a short Description (optional), the File Name Format (optional), Send Notification for those receiving the notification (note that by default the user who created the data job is set to receive notifications, additional recipients can be added by separating their emails with commas), and the Email Subject.
To mark the notification as important, check the box next to
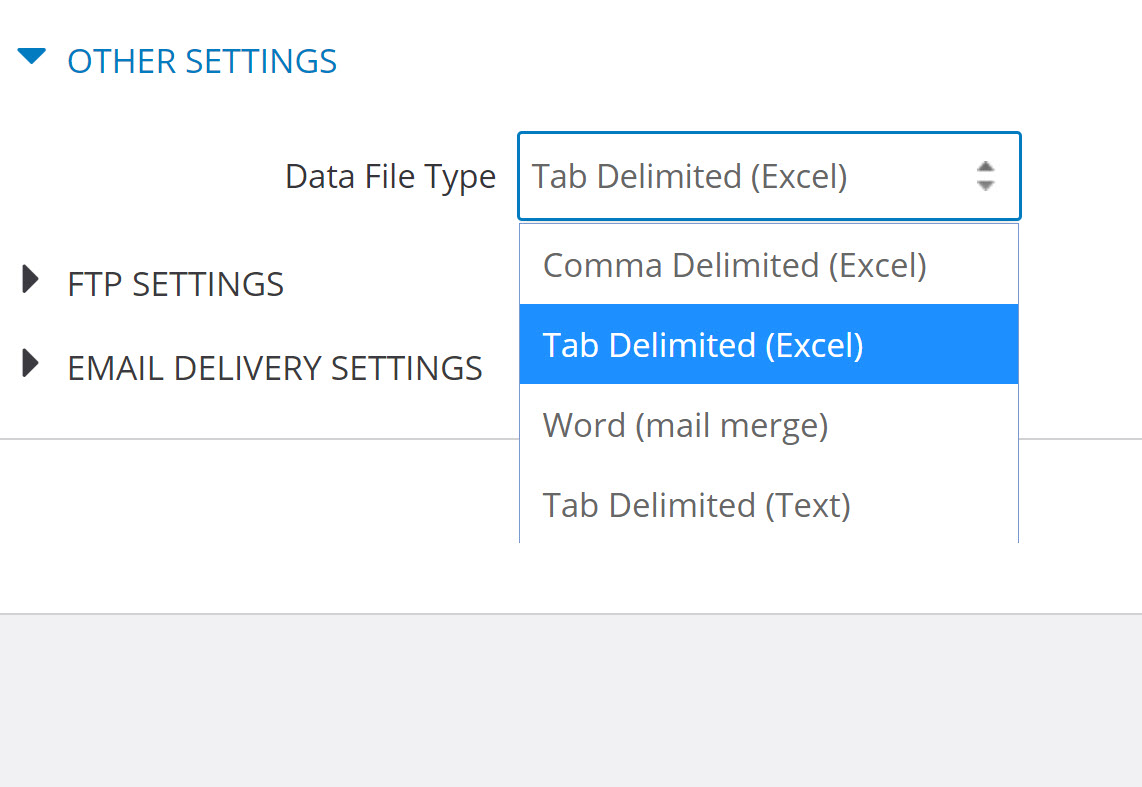
Step 3: Under the Other Settings
Step 4: The FTP Settings can be set under the next drop-down . If you are sending the data job by FTP, the server, username, and password can be set here to ensure the safety of the files.

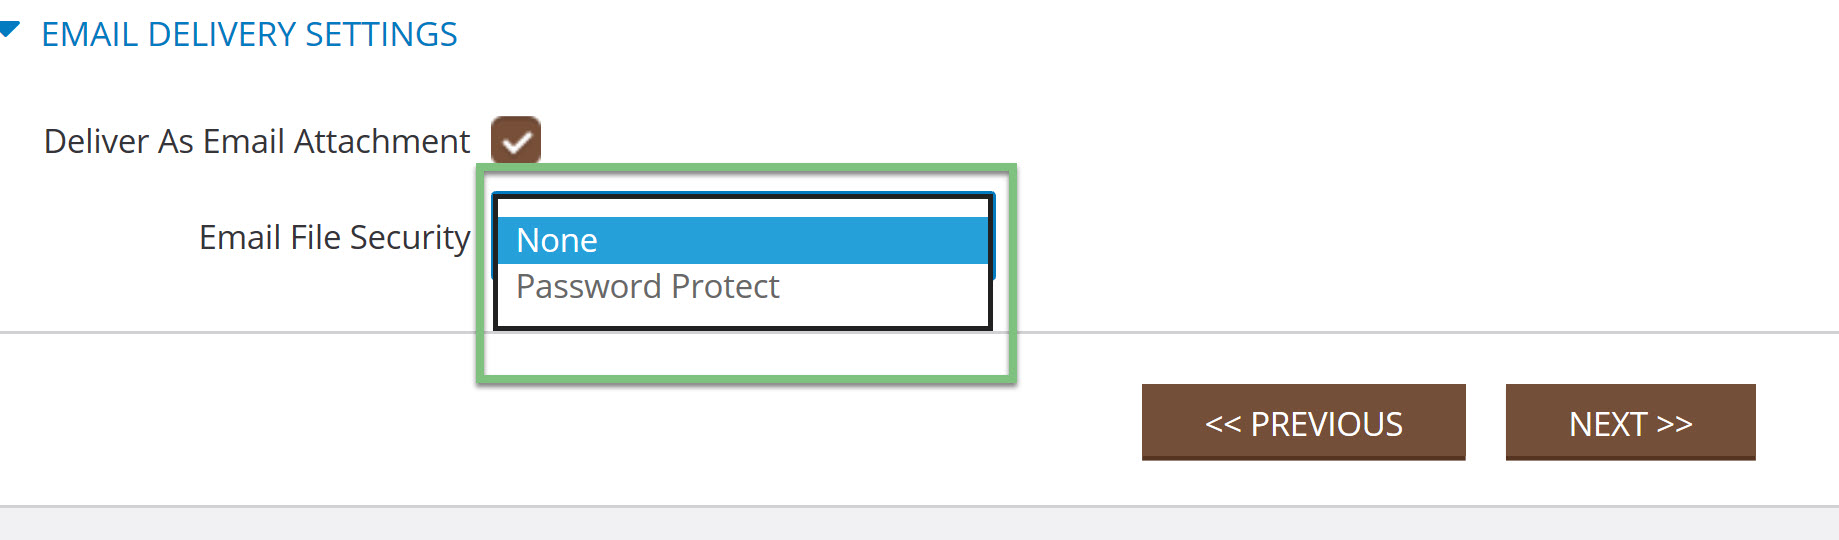
Step 5: On Email Delivery Settings
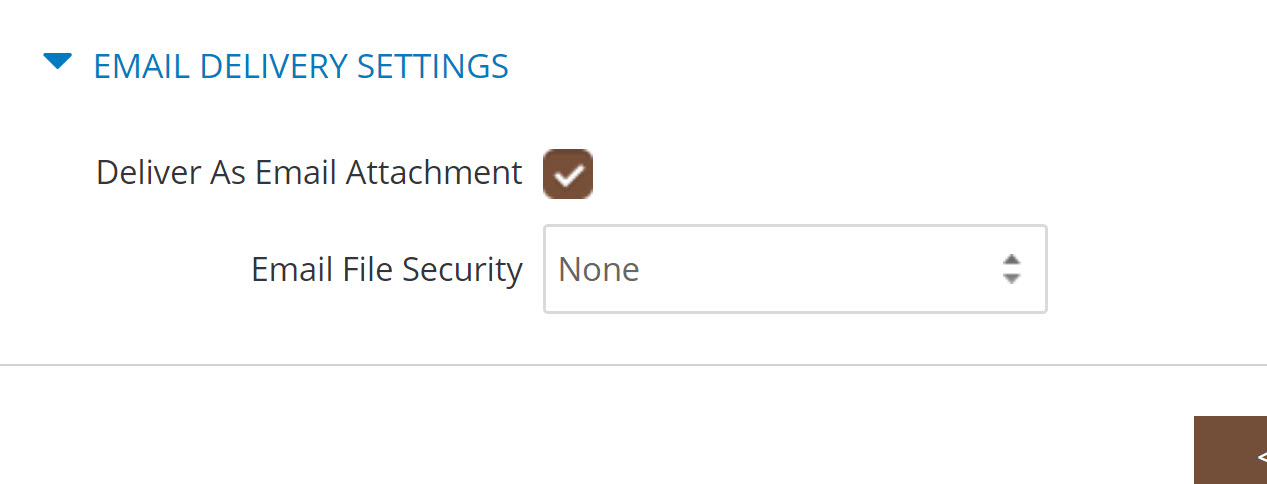
Note: If you wish to encrypt the email and add a password, select Password Protect in the Email file Security
Step 6: Click NEXT
Step 7: Review the confirmation screen and click FINISH to initiate the job.
Step 8: The user(s) will receive an email from CharityEngine once the job is complete with the attached data file (for immediate use) or a link which will lead the recipient to the data job which was created.
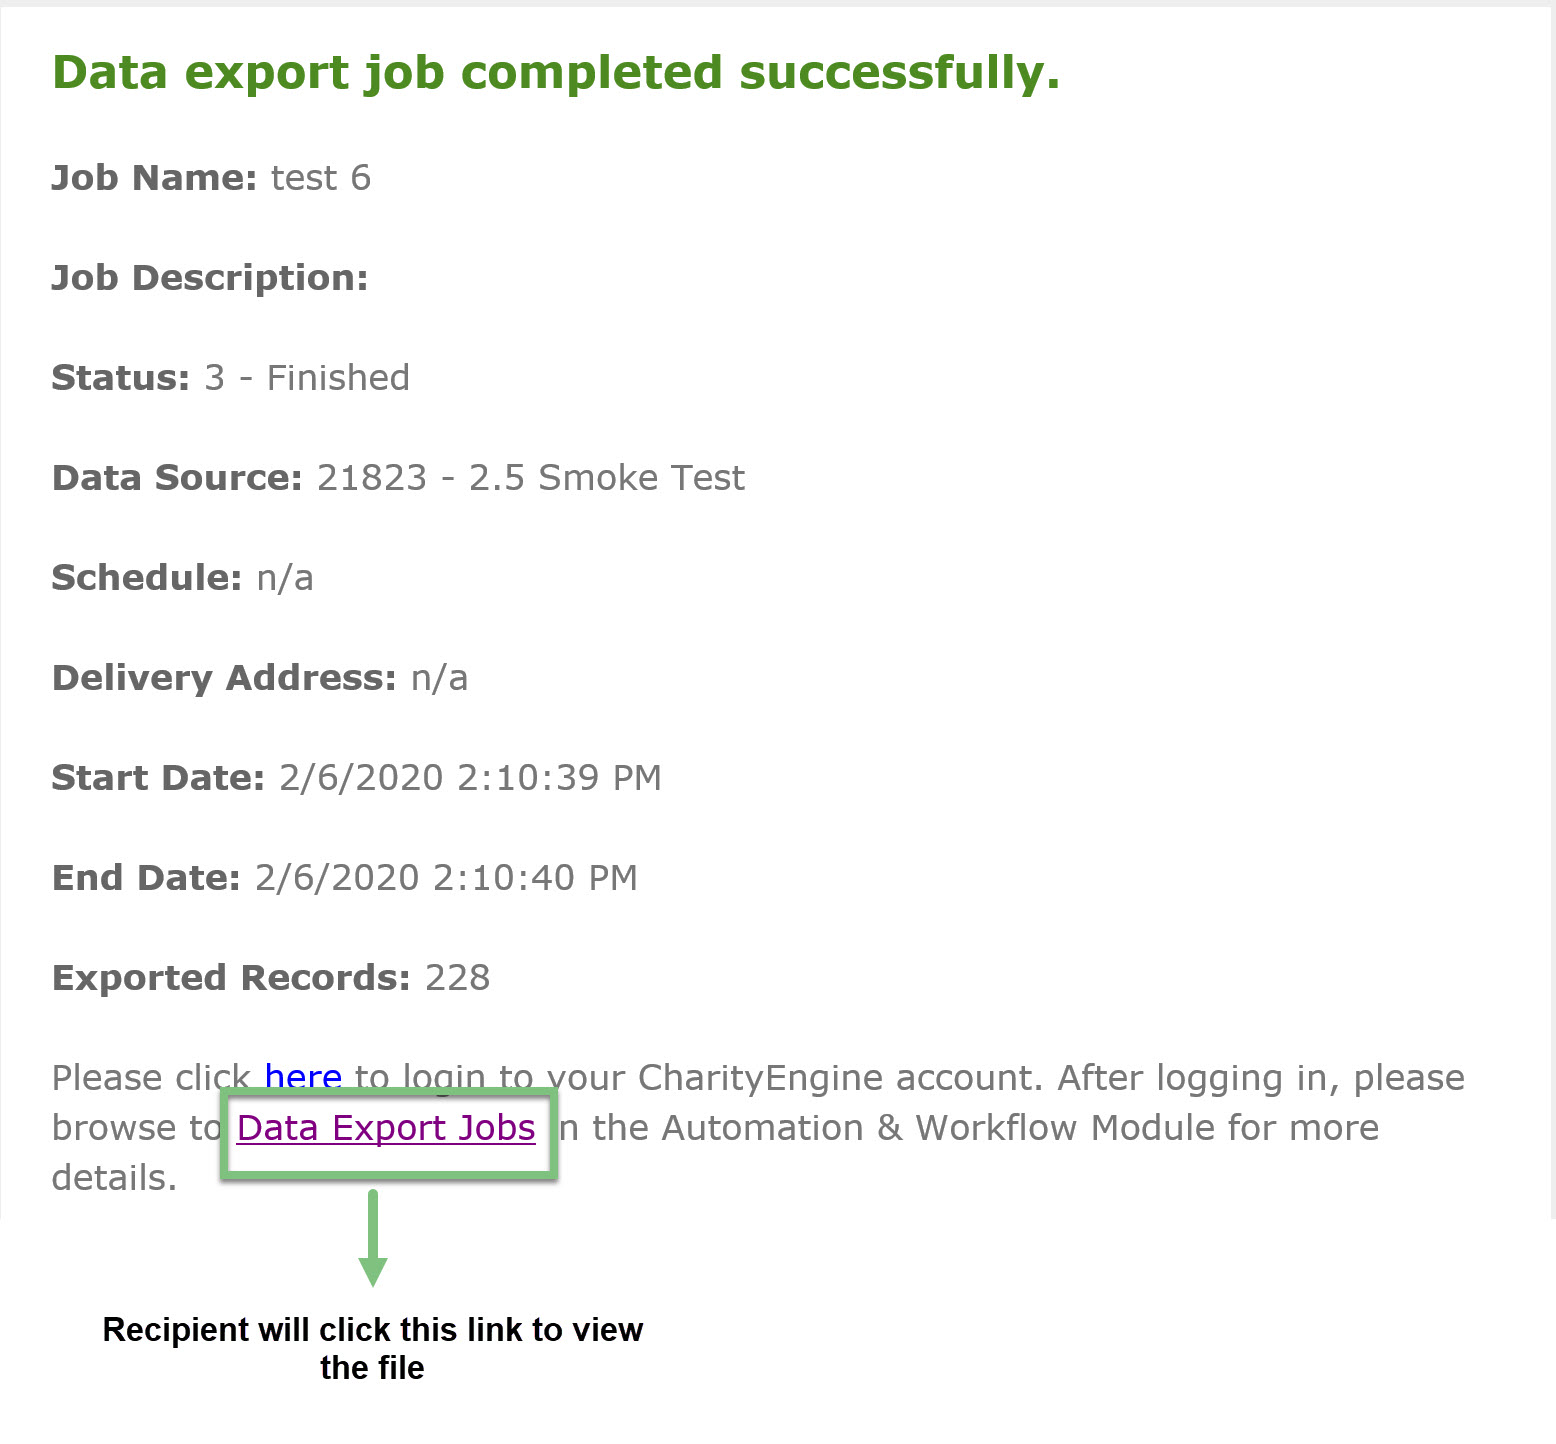
If a link was used, the user will be routed to the Import/Export Jobs > ACTIONS > Download (in preferred format)

Overview: Query Listing Screen
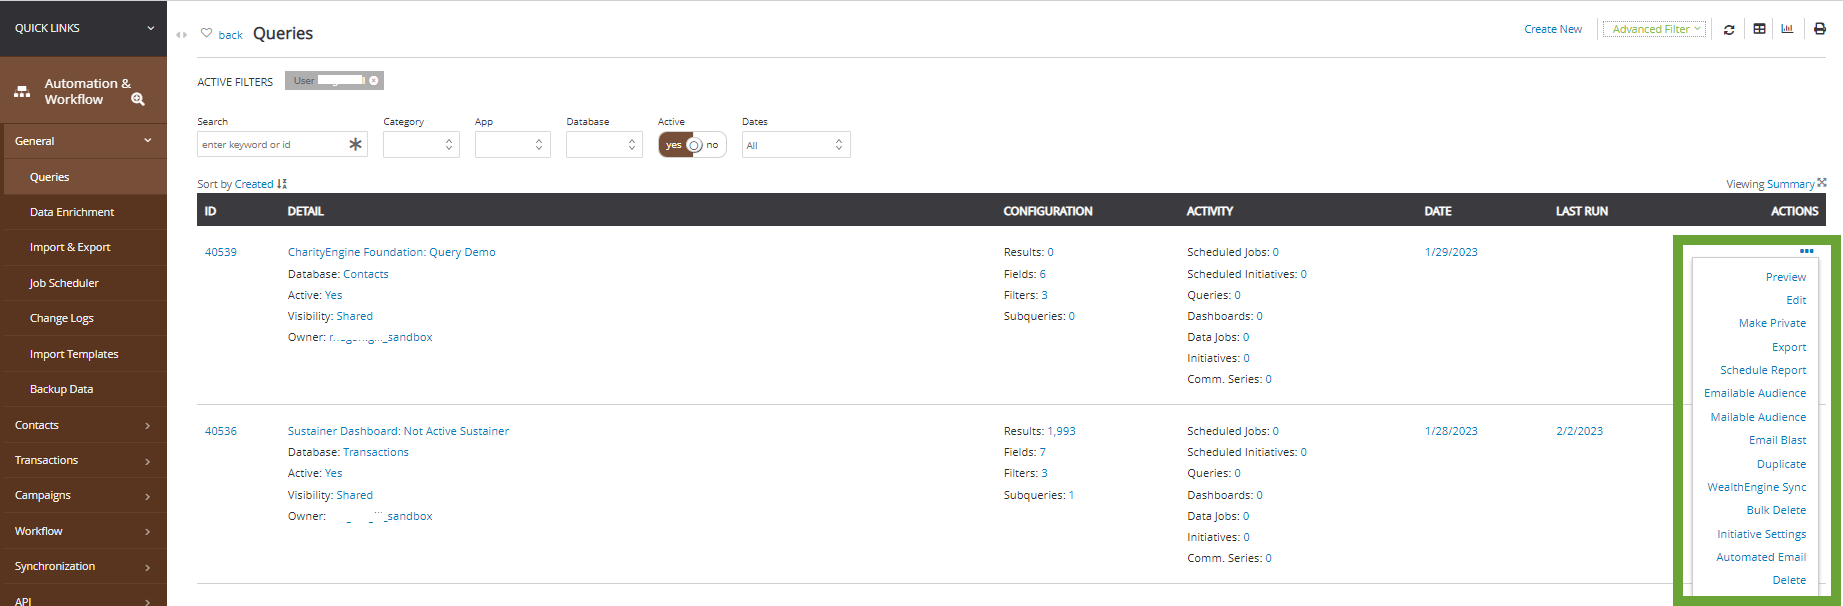
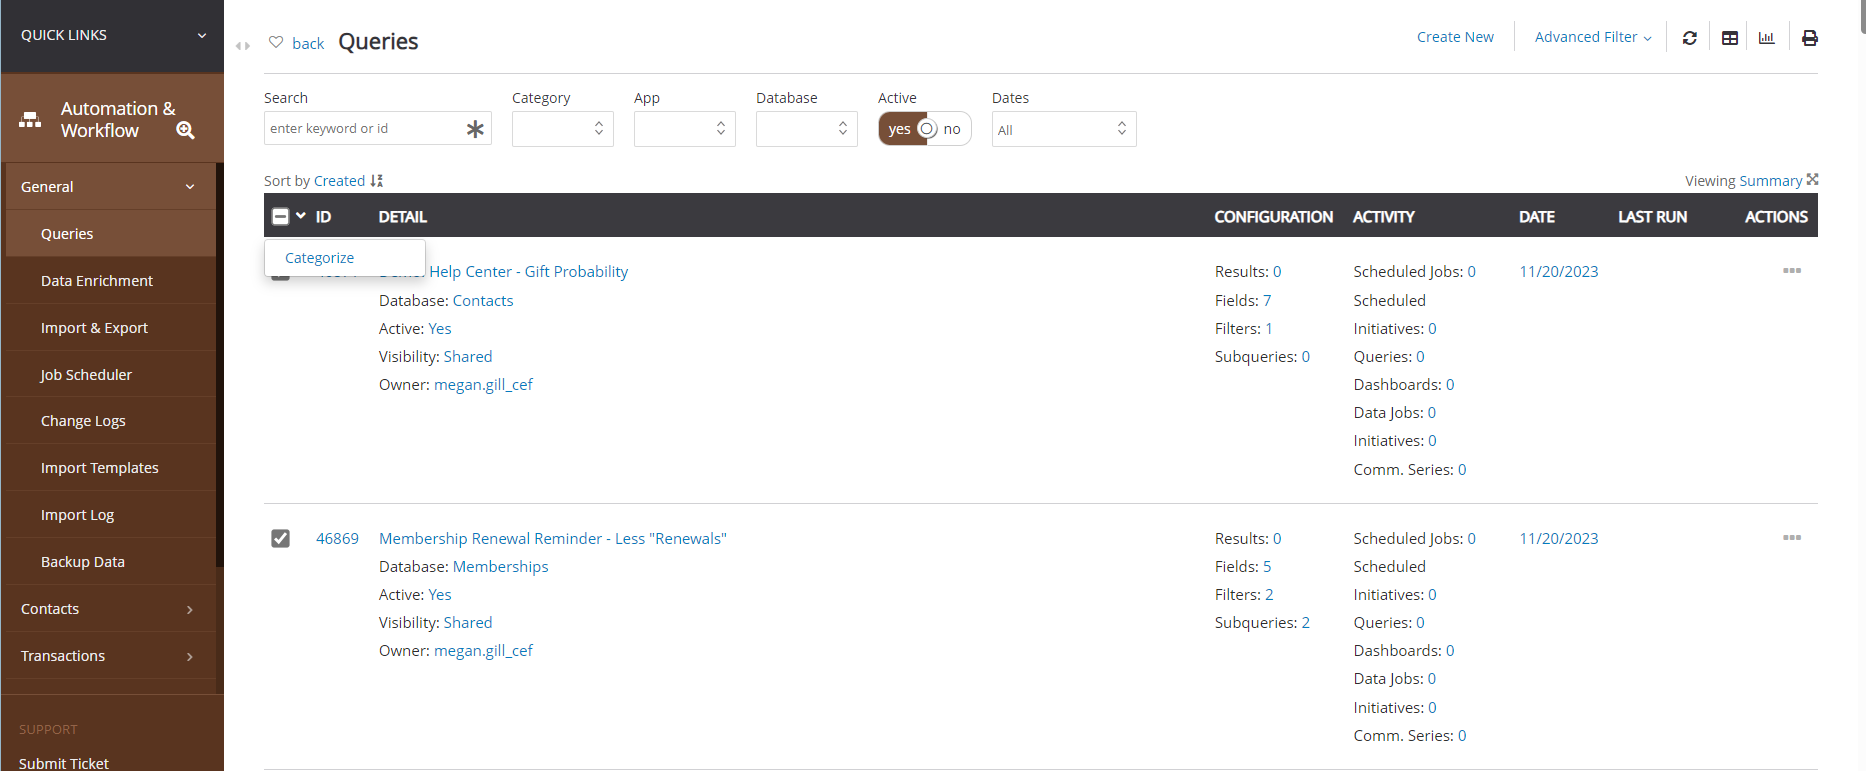
Access the listing screen by navigating to Automation & Workflow > General > Queries. Leverage this screen to locate your query and see a quick snap shot of the database type, overall configuration, associated activity, creation/last run dates, and additional actions.
Click on Active to deactivate a query or Visibility to change from Shared to Private

Instructions: Quick Actions from Query Listing Screen
Access the listing screen by navigating to Automation & Workflow > General > Queries > locate your query > ACTIONS. Hover over the ellipse to expose a few options when leveraging your query:
- Preview: Quick view of query output
- Edit: Access to manage your query
- Make Private: Allows the ability to limit the visibility for others to view your query
- Export: Extract your data to an Excel document
- Schedule Report: Be navigated to the Data Jobs functionality to schedule the export of your job now or in the future
- Emailable Audience: Obtain a quick preview and estimate of your audience size including a summary of opt outs, duplicates, suppressions, blacklisted emails, and deceased contact records. Note: Queries to be used for email campaigns must contain the CharityEngine Contact ID value.
- Mailable Audience: Obtain a quick preview and estimate of your audience size, see emailable audience above.
- Email Blast: Initiate the Campaigns > Quick Actions > Email Blast workflow to initiate an email send
- Duplicate: Copy your query
- WealthEngine Synch: Be navigated to the Data Enrichment Job feature to initiate a WealthEngine synchronization; fees apply per record update
- Bulk Delete: Be navigated to the Data Transformation Job feature to initiate a bulk deletion of queries' associated records
- Initiative Setting: Configure specific initiative settings for email sending
- Automated Email: Initiate a job schedule to establish an email communication series; ideal option if your creative uses custom tokens
- Delete: Removal of your query
Advanced Functionality
Advanced Functionality: Subquery Usage
Subqueries can be leveraged when there is a need to target a specific subset of data from the same or different database type. For example, to create a query that identifies all donors who made a transaction of over $50 last year on the 20th of the month in order to complete a communication out reach to these donors.
Please note, when queries are complex enough that they take longer than a few minutes to run and As a general rule of thumb, if a query takes longer than 5 or 10 minutes by itself (while no other heavy jobs are running) it is a pretty substantial workload. That does not mean it is wrong, incorrect or undesirable, it just means that you need to be aware that it is doing a lot and warrants special consideration. Any queries that take longer than 30 minutes should be looked at by a senior administrator to ensure that there is not a better way to implement them.
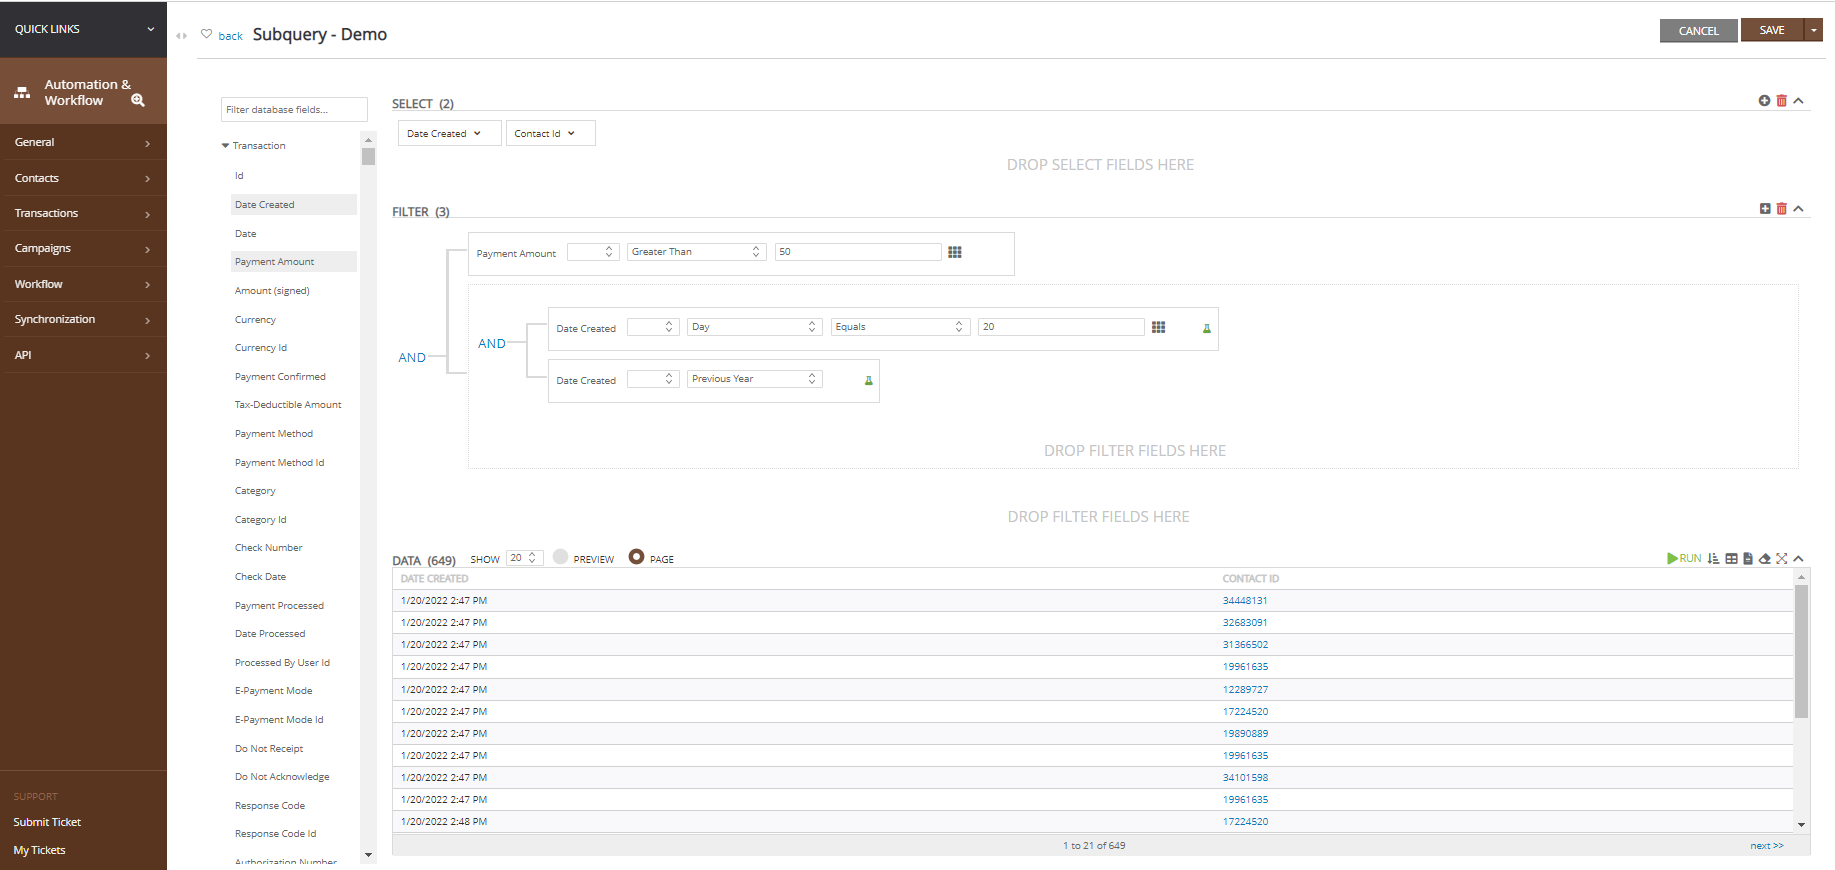
Step 1: Creation of the subquery - all contact ids with a transaction value > $50 AND the transaction was created last year AND on the 20th of each month.
Because this subquery will be used within a Contact query, Contact Id is included in the Select area as the primary key.
Step 2: Creation of the contact query to capture the demographic information for communication out reach. After adding the necessary Select data elements needed for output, for this query, we use Contact Id in the filter which will be the primary key for the subquery created in step 1. Once added, click on the hamburger to connect an external query.
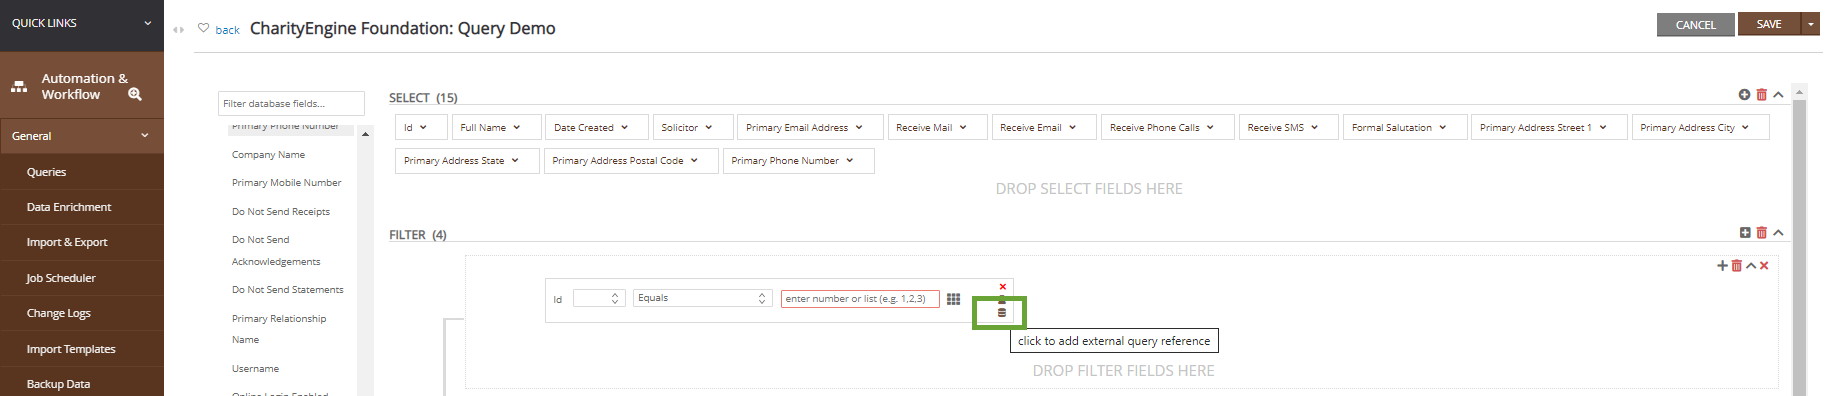
Step 3: Search for your subquery - by name or id

Step 4: Select your subquery

Step 5: The filter will now reference the subquery
Note: if you have multiple id types within your subquery, you will need to use the drop down to select the filtering criteria

Step 6: Run your query and capture the contact details
Note: if the external query does not have compatible fields an error message will appear at the top of your screen. This will happen if the ID that you are trying to place in the field filter is not in the field select of the external query.

Advanced Functionality: Query Category Configuration
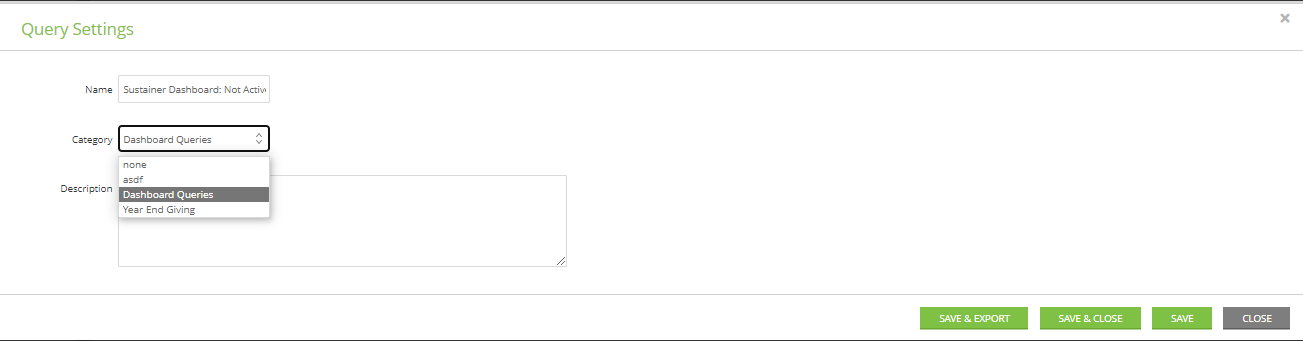
Configuration of a query category can be completed by navigating to the Configuration App > Reporting > Query Categories > Create New > enter Name (required) > SAVE
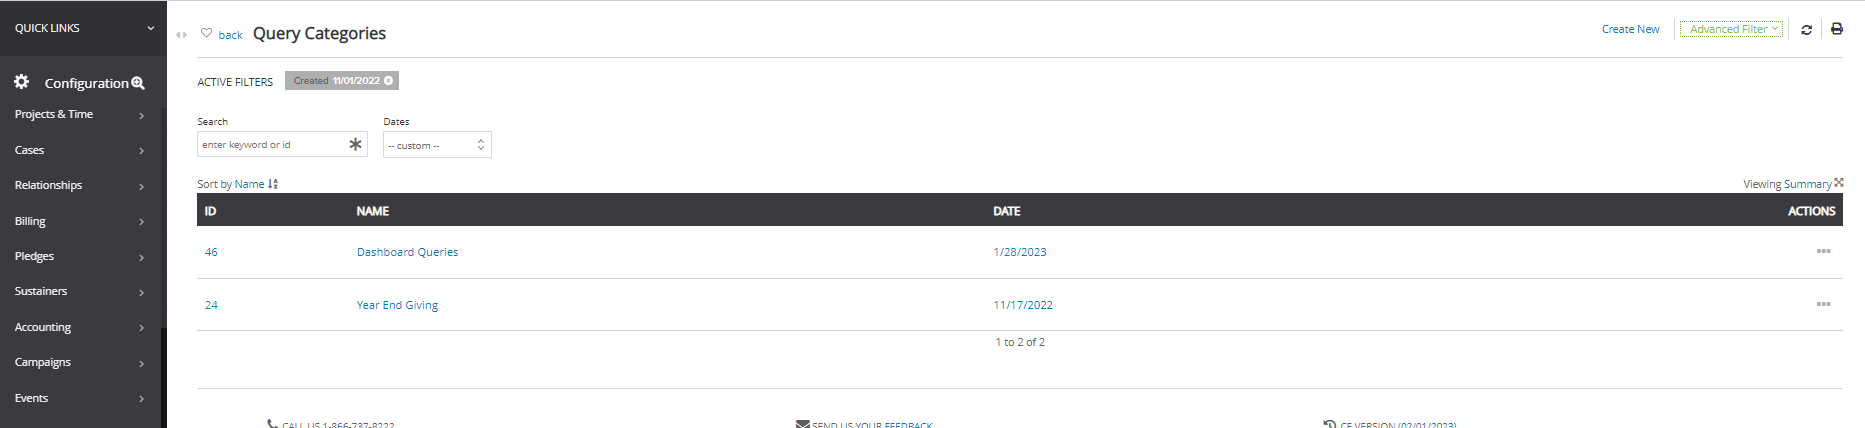
Once created, leverage the category during the SAVE process of a query to select a category and use the Basic Filter option to easily locate in the future.
To bulk add queries to categories, use the check box on the left side of the listing screen to bulk moved.
Scheduling Queries
While using CharityEngine, you may come across the need to schedule reports based of queries to be exported on a regular basis. These reports may be going to a user or third party that does not have access to CharityEngine or does not log into your organizations CharityEngine instance. This will remove the need to manually send the reports out to those who need it and save some time.
Learn more in our article Exporting Data: How to Schedule an Export Data Job
Advanced Level: Dynamic Query Tokens
Within the query tool, users can leverage dynamic query tokens within fields and/or filters. This allows users to wrap functions and pointers to create more complex outputs.
The following dynamic tokens are available for use:
|
Dynamic Token |
Function | Parameter | Example |
| [@NOW] | Returns the current date and time of the system | None | |
| [@MONTHNUMBER] | Returns the numeric month for a date | datetime value | |
| [@DAYOFMONTH] | Returns the numeric day of a month(s) | datetime value | |
| [@YEAR] | Returns the numeric year | datetime value | |
| [@DATEADD] | Add or subtracts periods of time from a date | 1. increment of time - e.g. day, month, year 2. number to add or subtrack - e.g.1 or -5 |
[@DATEADD(month,1,@NOW)] |
| [@SUBSTRING] | Returns a substring of larger value | 1. text 2. integer starting point in text 3. integer length of substring |
[@SUBSTRING(#FIELD,1,2)] 1 represents starting point position for "2" characters |
| [@LENGTH] | Returns the length of a string or text | text | |
| [@FIXED_LENGTH_LEADING_ZERO] | Returns a number converted to fixed length with leading zeros | 1. number 2. integer length of fixed length desired e.g. 4 converts to 0004 |
|
| [@RIGHT] | Returns a certain number of characters from the right side of text | 1. text 2. number of characters to select |
Use Case 1: Fixed length MMYY value for current date:
[@FIXED_LENGTH_LEADING_ZERO(@MONTH_NUMBER(@NOW),2)][@RIGHT(@YEAR(@NOW),2)]
Use Case 2: (Alternative) [@FIXED_LENGTH_LEADING_ZERO(@MONTH_NUMBER(#FIELD),2)][@RIGHT(@YEAR(#FIELD),2)]
Use Case 3: Free form field using [@NOW]
Use Case 4: If tracking code 1 = BS20046AAA output [@SUBSTRING(#FIELD,1,2)], if not equal then present "NA". The 1 represents the starting position for "2" characters
Use Case 6: The following is a wrapped function to create a future date (for purposes of assigning a future activity to be used within Trigger)
Using Contact Table > Contact Create Date > select Conditional Value
Using Date Created Equals Date Created output today's date + 4 days or [@NOW+4]
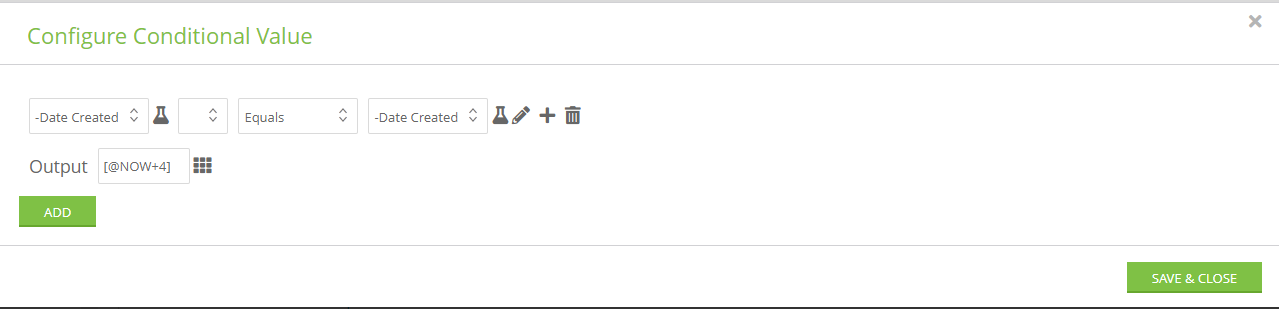
Output as follows:
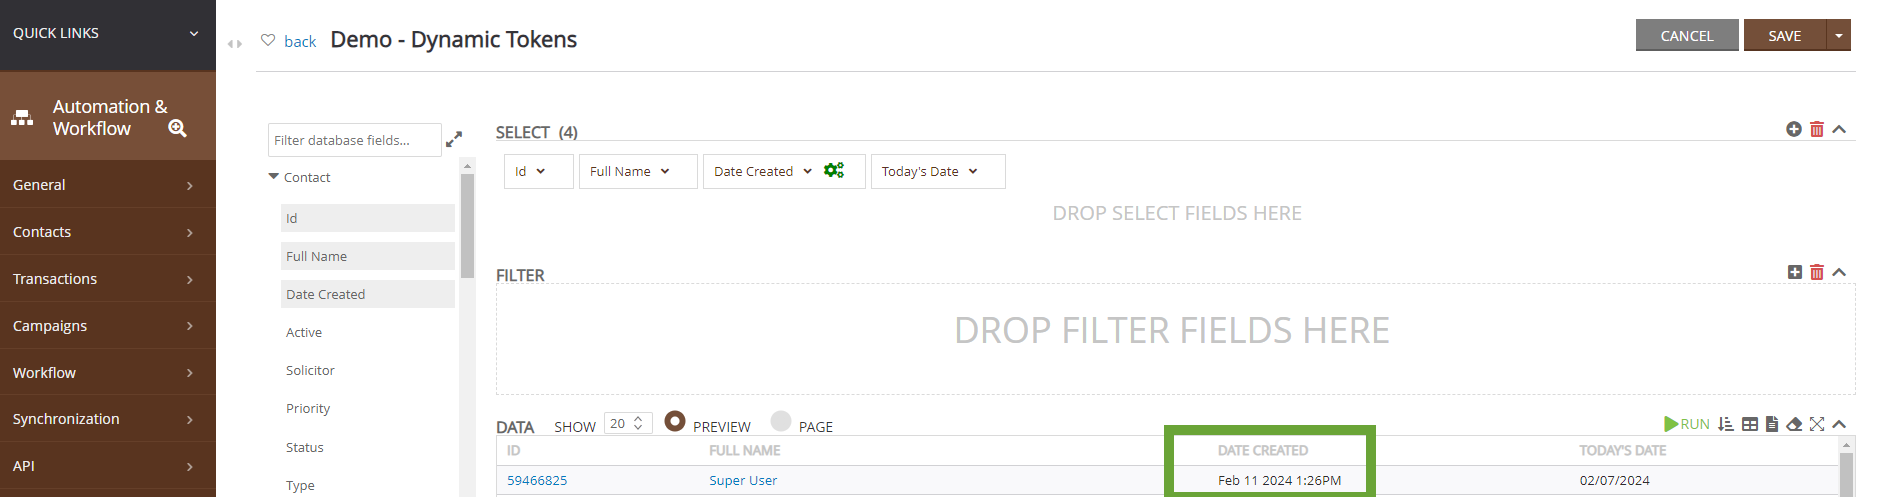
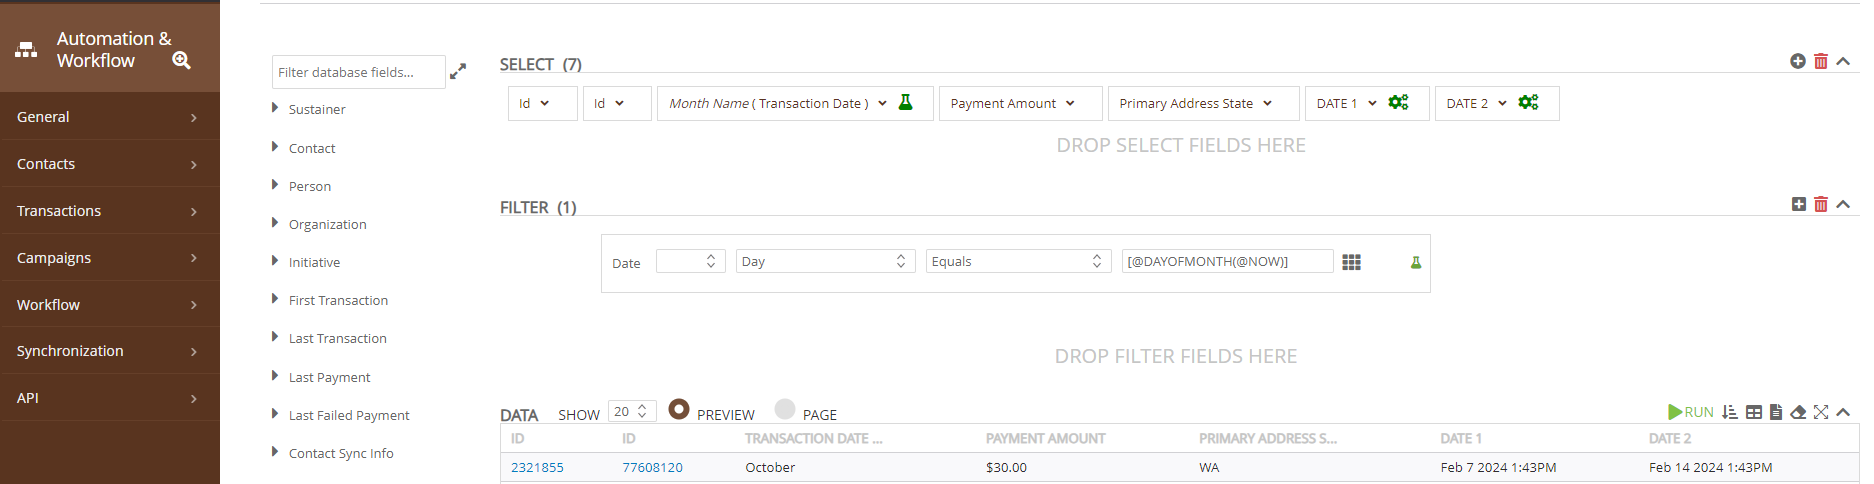
Use Case 8: Using dynamic tokens is also available within the FILTERS section. In this use case, use of [@DAYOFMONTH(@NOW)] locates any sustainer with a subscription create date matching the day of the 7th.
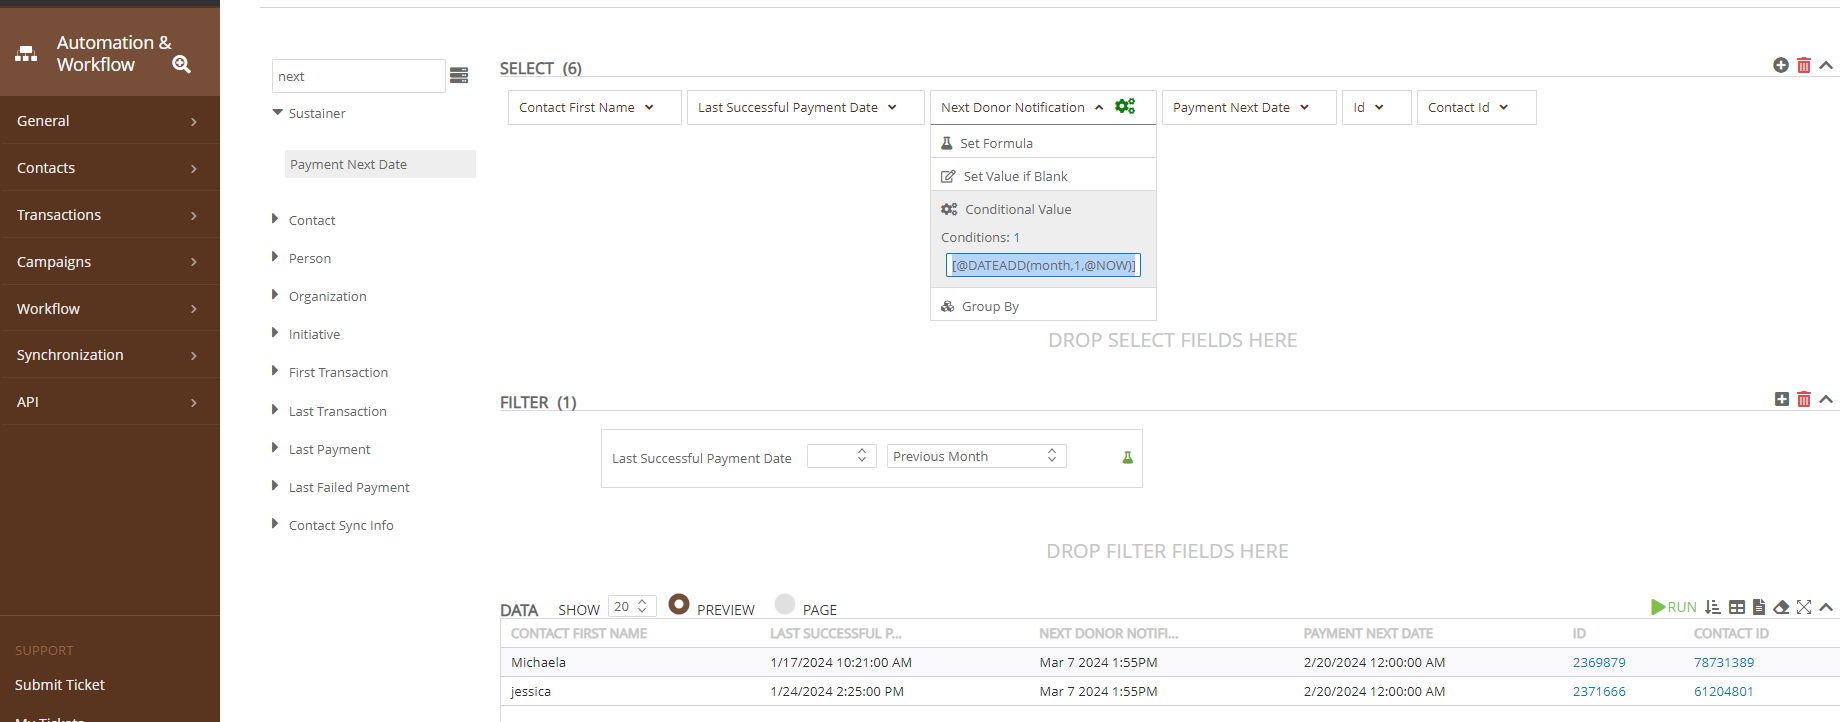
Use Case 9: In this use case, using the dynamic token [@DATEADD(month,1,@NOW)] will present the date of one month from today's date, or Mar 7 2024
Note, dynamic tokens can be utilized within Free Form Fields:

Query Best Practices
When creating queries that will be used with other apps, it is important to consider the application of the query when designing it. For example, if your query will be used to execute a one-time email blast, there are more stringent performance considerations that could impact your outcomes than, for example, a one-time report. While you can re-run both in CharityEngine, email blasts might have time-sensitivity associated with their execution, whereas rerunning a report can usually be done as an internal task with no external impact.
Regardless of the application, it is always recommended users follow database selection best practices in order to avoid slow load times and overwhelming result amounts. Remember, your query is a real-time selection against your database, so the more complex it is, the more load you will be placing on your system. NOTE: This is especially true if you are running jobs in parallel. Whether it be an initiative or a data job, running multiple complex queries at the same time can exacerbate the load on your database and dramatically slow down performance.
If a query runs in the user interface in CharityEngine and produces results, there is usually nothing to be concerned about. When queries are complex enough that they take longer than a few minutes to run and As a general rule of thumb, if a query takes longer than 5 or 10 minutes by itself (while no other heavy jobs are running) it is a pretty substantial workload. That does not mean it is wrong, incorrect or undesirable, it just means that you need to be aware that it is doing a lot and warrants special consideration. Any queries that take longer than 30 minutes should be looked at by a senior administrator to ensure that there is not a better way to implement them.
Common Performance Mistakes
- Too Many Layers: Layers are what are created when you use subqueries. While subqueries are an important and useful component, “layering” occurs when a subquery is created from a subquery, and multi-layer queries like this will cause your database to perform a recursion, which will always cause your query to slow down.
- Unnecessary Selections: While it is nice to see a lot of data on the screen, unnecessary select fields, especially in subqueries where they are not seen, can cause your database to do unnecessary work. We recommend adding extra fields when troubleshooting, but keep the main query free of unnecessary select fields by choosing only the bare minimum fields to run the query with.
- Too Many Subqueries: Like layers, too many subqueries can also lead to performance issues. Each subquery is its own set of database instructions and adds to the complexity of your main query. Do not overuse subqueries.
Helpful Tips - General
Here are some tips to help you optimize your query if it is taking too long to run. Note that when a query is the target of a campaign email message, the speed at which a query is run will impact the delivery of the message. For email marketing messages, the query will time out after 2 hours and your message will fail to send. This timeout is a safety mechanism to ensure that you do not have runaway campaigns or queries that impact your database for too long. When a campaign audience query times out, the email campaign will fail with a message that it could not execute the query.
1. When possible, use IDs
Queries will run faster if you use an ID rather than the name of something to filter. For example, if you want to include contacts who have submitted on a specific form in your query, use the Form ID filter rather than the Form Name.
2. If you want to suppress contacts for email sends, utilize the built-in email suppression features
Here is a good example of a global suppression - if your organization is a provider of social services in your community, and you do not want the clients you support to receive marketing emails, you can build a query that only includes contacts with the client status or group and make that query your global suppression in the Campaigns Configuration section of CharityEngine®.
Additionally, by default, contacts who have opted out of emails, are deceased, or on your blacklist because of prior issues delivering messages to their email address are excluded through the built-in system suppression, so you do not need to filter out contacts who meet this criteria in your email queries.
Global suppression and system suppression filters like “deceased” are applied separately from the rest of the query, which is why it is faster to run when emails are set to send.
3. If your query has multiple filters or subqueries, make sure you are only referencing the same filter one time
It is easy to add a filter to your query criteria, but every time a filter is added, it makes the query itself more complex, and therefore takes more time to run.
For example, let’s say you want to build a query of contacts to send an email blast out to (contacts subscribed to a particular email list). You want the recipients to have given a certain amount, have attended an event in the last three years, and live in a particular area. To minimize slow load times, include the email list in the main query, and include the other requirements (event registrants, donor amounts, and zip code range) in the subqueries. This will create four queries instead of seven (seven queries would come from using the email list filter next to every other query) and will minimize load time.
4. Review your report and email criteria at least once a year
It is always a good idea to review your criteria on a scheduled basis, especially with email marketing lists. You may want to segment your data in a different way based on how your messages are performing, or maybe you need a report to run more frequently.
5. Consider a list if your data does not change often.
As mentioned earlier, queries are a real time look at your database, and if the criteria for your marketing emails does not require that, try using an Opt In list instead.
FAQs & Additional Reading
Q. How do I collapse/expand all of the data fields within the query table?
A. Users can use the "click to show all fields" or, conversely, the "click to hide all fields" to expand or collapse all fields.