Overview
The Trigger feature can be use in a variety of different ways and will help automate actions that would otherwise need to be preformed manually. One of the most common use cases for the trigger tool and to create activities, such as sending an email, scheduling a meeting, or calling a donor. For example, a major gift officer may want to call a new donor when they give make a large donation. Instead of that major gift officer searching for large transactions, a trigger can be created to create an activity to call that donor.
The Trigger feature can be a critical benefit to your organization helping to reduce manual work effort and allow you and your teams to focus on important fundraising activities.
Table of Contents
- Overview
- Prerequisites
- Triggers: A General Overview
- Use Case: Creating and Automating Activities for Volunteer Follow ups
- Use Case: Creating a trigger to automatically create an activity to call a donor for your Development Team
- Use Case: Creating a trigger to automatically create an activity for donor follow ups
- FAQs
Prerequisites
- To leverage the Trigger feature, each type of will require you to first create a source for your job. This is the isolated group of contacts, transactions, etc. that will be targeted for your trigger. This can be achieved by creating a Report Builder Report or a Query.
- Examples: Assign a "Northwest" region attribution to all new contacts with a mailing address of Washington, create an activity for an email outreach for all volunteers who sign up with a Volunteer Sign Up form, or create an opportunity for any contact who gives more than $1,000 for donor cultivation with your development team.
Triggers: A General Overview
The Trigger feature can be located by navigating to the Automation & Workflow App > Workflow > Triggers > Create New
By selecting the Type drop down, expose a variety of jobs available for automation.

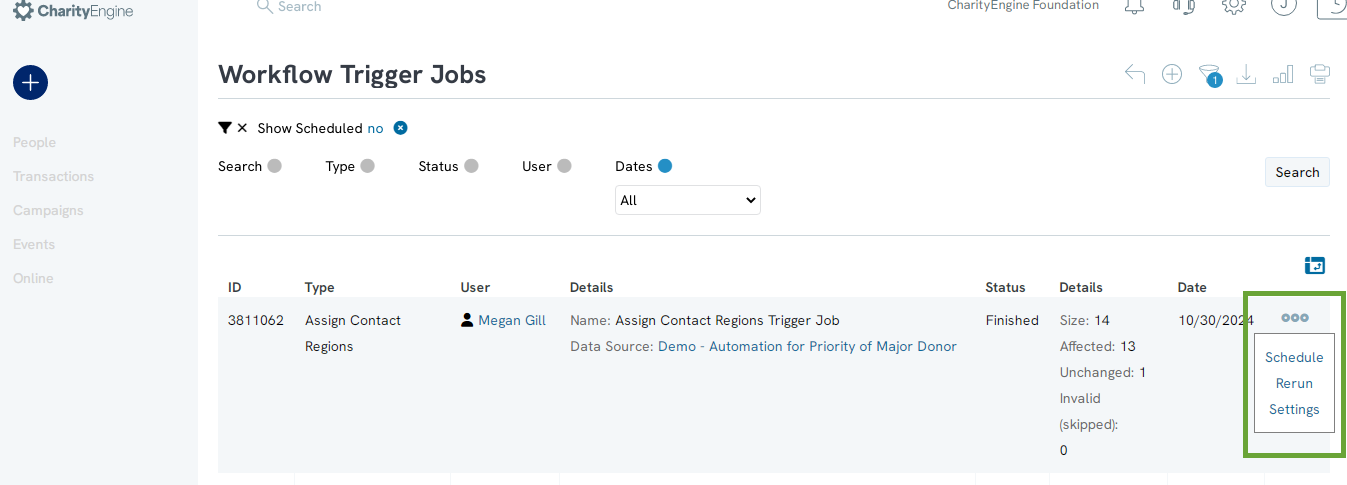
If you require a recurring trigger job, simply access the Trigger Job listing screen (Automation & Workflow App > Workflow > Trigger) and navigate to ACTIONS to expose Schedule and create a schedule for your job.
Note: If you need to modify a previously created Trigger Job, navigate to the Automation & Workflow App > General > Job Scheduler > locate your job > ACTIONS > Manage
Scheduling your data trigger job
If you wish to schedule your data trigger job to automatically run at an assigned time, follow these steps to establish a recurring job - allowing you to further automate the opportunity creation process.
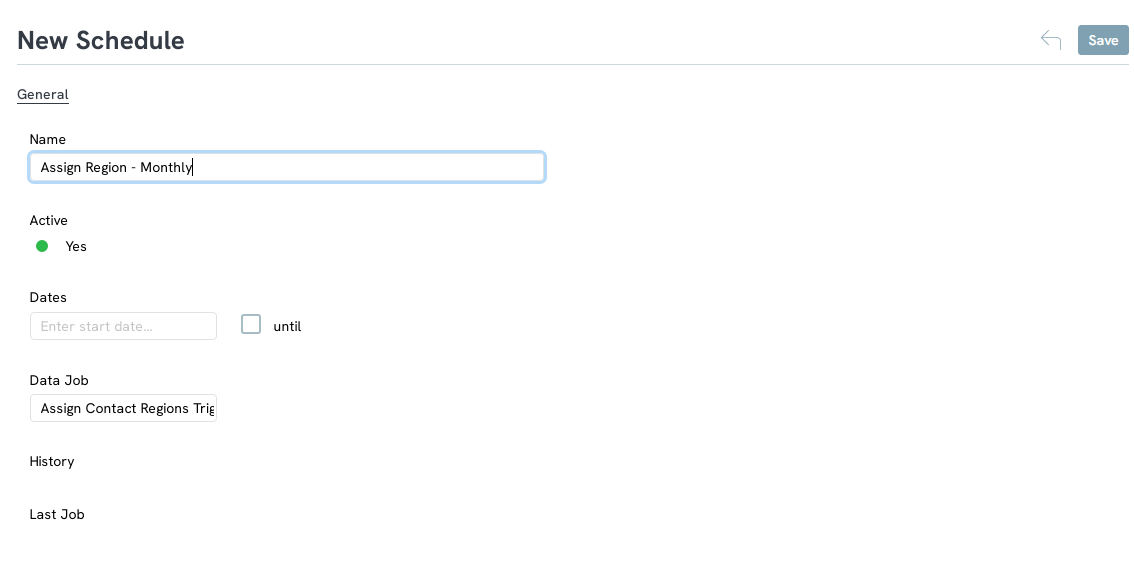
Step 1: Navigate to the Automation & Workflow App > Workflow > Triggers > locate your trigger job > ACTIONS: hover to select Schedule
-
- Name: (required)
- Dates: leaving blank will default to initiate today; user also has the ability to set a future start and end date
- Data job: do not modify - this will default to the trigger job created above
- Click SAVE to secure
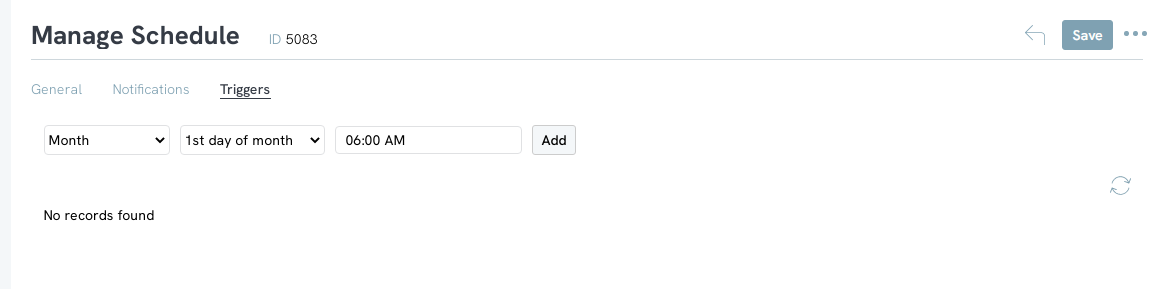
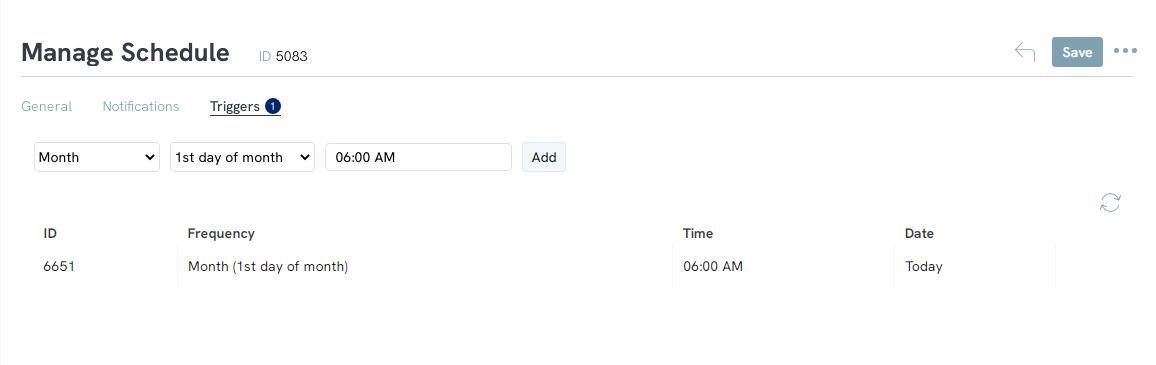
Step 3: Once you select SAVE, you will expose two additional tabs: Notifications and Triggers. Navigate to Triggers to set your automated schedule. From Select, the drop down will expose a variety of frequencies ranging from hourly to annually. Select your preferred frequency. Then select your time of day to initiate the trigger. Click ADD to secure.
Use Case: Creating and Automating Activities for Volunteer Follow ups
In this article you will learn how to create a series of queries and triggers that will automatically create actives and send reports to solicitors and members of your organization to encourage volunteer outreach after volunteers have signed up through one of your web forms.
- Creating a query to identify the volunteers who completed an online web form
- Creating a query to identify the assigned solicitor who will contact the volunteer
- Creating the trigger using the second query as a source
- Creating a recurring schedule to initiate a daily activity
- Creating a scheduled report to be delivered to the solicitor as an extra notification
The first step in creating this workflow is to create 2 queries, one to identify the form submissions, which will display as transactions with 0 dollar amounts in your system and one to identify the contacts and their solicitors.
Step 1: Form Submission Query to Identify Population - To create the form submission query that will be used as a subquery, navigate to the Automation & Workflow App > General > Queries > Create New > Filter: Donations > Select: Transactions
Step 2: In the SELECT section, add the (Web) Form Id, Contact Id, and Date fields under the Transaction field group to the selected fields section.
Step 3: In the FILTER section below, add the (Web) Form Id field. Then, in the open text field, input your Volunteer Form's Id.
Tip: Form Id's are 5-digit numbers located below the name of your form on the web form listing screen.
Step 4: Once you have your criteria set, save and name your query.
Step 5: Contacts Query to Identify Contact and Solicitor - The next query you will create will be used to create the activity trigger and will contain the form submission query you just created. Navigate back to the Automation & Workflow App > General > Queries > Create New > Filter: Contacts > Select: Contacts.
Step 6: In the SELECT section, add Contact Id and Solicitor Contact Id.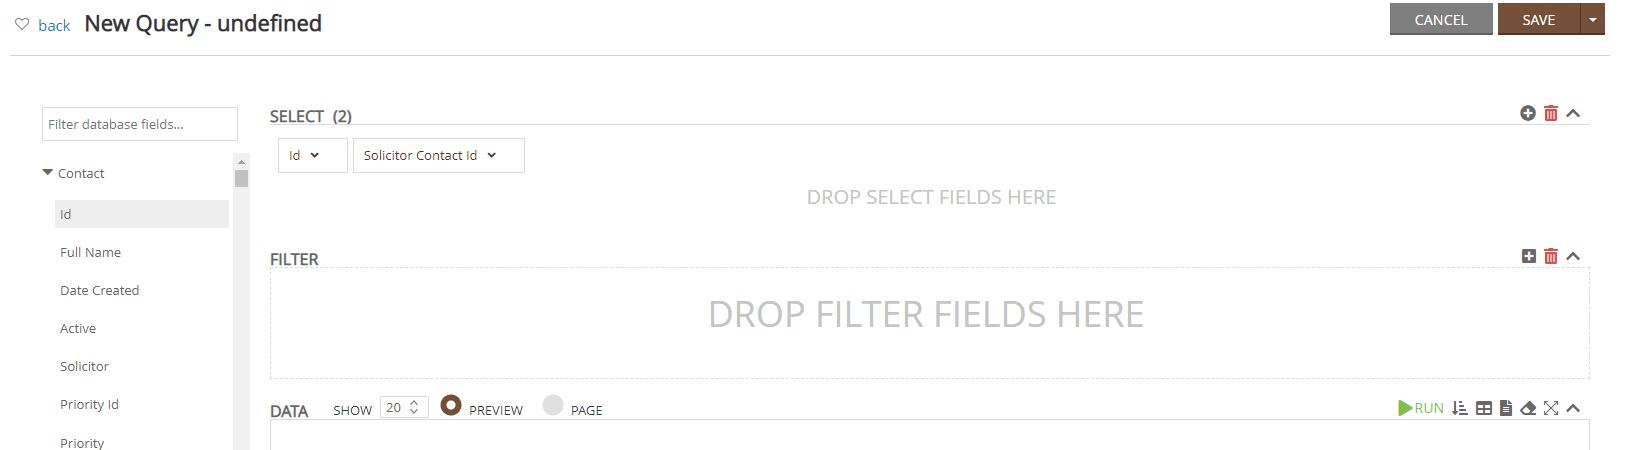
Note: Solicitor must already be assigned to the contact for the activity to be assigned correctly. If you are the only solicitor for this volunteer activity, follow the steps below to set a solicitor contact id default in this query.
1. To assign a solicitor contact id default, select the drop-down arrow next to the Solicitor Contact Id field, then select Set Value if Blank.
2. Click into the Set Value if Blank field and input your own Contact record Id. Then, select the drop-down arrow to collapse section.
Step 7: In the FILTER section, add Contact Id and click on the icon to add an external query.
Step 8: Search for the form submission query you created above and select that query. You will also need to select Transaction Contact. Id from the dropdown as shown below.
Step 9: Click SAVE and name your query.
Step 10: Creating the Trigger Job -Once you have created both queries, you will be able to create the trigger to auto assign the activity. Navigate to the Automation & Workflow App > Workflow > Triggers > Create New > Type: Create Activity > NEXT.
Step 11: From Data Source locate your contacts query as the data source. Select the Contacts.Id as the Participating Contact (the volunteer), and the Solicitor.Contact.Id as the Assigned Contact (the person within the organization who will be assigned the activity). Then, select NEXT.
Step 12: Name the trigger job and under ACTIVITY SETTINGS, Title: Name of the activity, Type: determine activity type, Status: initial status of activity. Click NEXT to proceed.
For example, if your activity is to send an email to the volunteer, you could title the activity “Send Email to New Volunteer”, then select Send Email as type, and status as in process.
Step 13: Click FINISH once you have received and are ready to initiate the Trigger Job.
Step 14: Scheduling the Activity Trigger - Now that the trigger has been created, you can now schedule the trigger to run (1x or recurring). To schedule the trigger to run daily, navigate to the Automation & Workflow App > Workflows > Triggers to view the listing screen. Locate the trigger you just created and under ACTIONS > Schedule.
Step 15: On the General tab, enter in the Name of the schedule, add a start/end date (optional) then click SAVE.
Step 16: Once you click SAVE, the Notifications and Triggers tabs will appear. On the Notification tab, enter the email(s) of the recipients that will receive an email when the job has been run.
Note: The recipients will only receive notification that the job has been run. This will not include information on who was assigned what activities.
Step 17: On the Triggers tab you will be able to set the frequency that the trigger will run. If you want the trigger to run daily, select day from the first dropdown and select the time of day that it will run. Click ADD and then SAVE to secure your changes.
Step 18: Creating and Sending Reports for Solicitors - Now that you have automated your trigger to automatically create an activity for your solicitors, solicitors will be able to see any activities assigned to them on the home dashboard under the Activities widget when they log into CharityEngine.
However, you can also create a report that can be sent out to all solicitors that will inform them of the activities that have been assigned to them. This could be helpful if your solicitors do not log into CharityEngine on a daily basis.
To create this report, navigate to the Contacts App > Activities > Activities and use the filters to segment the activities. For example, you can use the date filter to only show activities assigned for all solicitors for a specific time period.
Or you can use the advanced filter to segment by solicitor by entering in the solicitor in the assigned text box.
Step 19: Using the Report Builder, you can then create a report that contains any fields necessary and schedule the report to be sent to the solicitors. For help in using the Report Builder and scheduling reports, read our article Reports & Analytics: How to Use the Report Builder Tool.
Use Case: Creating a trigger to automatically create an activity to call a donor for your Development Team
One of the most common use cases for the trigger tool is to automatically create activities, such as sending an email, scheduling a meeting, or calling a donor. These are critical activities for donor cultivation and the use of automation ensures that you don't miss a donor. Instead of that Major Gift Officer searching for large transactions, a trigger can be created to create an activity to call that donor.
For this use case, our flow will include:
- Creating a query to identify the donor population
- Creating the trigger using the query as a source
- Creating a recurring schedule to initiate weekly
Step 1: The first step in creating this trigger is to create our source. Navigate to the Automation & Workflow App > General > Queries > Create New.
Step 2: To find donors who donated a large amount to the organization, select Filter: Donations and Select: Transactions.
Step 3: Next, in the SELECT section, add the transaction Id, Date (of transaction), Payment Amount, contact Id, contact Full Name, and Solicitor Id.
Step 4: Next, in the FILTER section add Payment Amount Greater than 1000 AND add Date - in this example we will look for transactions weekly.
Step 5: Click SAVE and name your query.

Step 6: Once your query is created, we will create the trigger job. Navigate to the Automation & Workflow App > Workflow > Triggers > Create New > Type: Create Activity.
Step 7: Use the dropdown to select the data source, which is the query you just created above. Select a Start Date. Select Transaction Contact.Id for the Participating Contact (this is the donor id). Use Solicitor ID as the Assigned Contact (the organizational solicitor who will engage with the donor). Click NEXT to proceed. 
Step 8: Name your job, create a starting date, add a description (optional), and add emails for those who should receive notification of the job completion. And update the email subject as needed.
Step 9: Expand ACTIVITY SETTINGS to create the details of the activity to be created.
- Title: The name of the activity that will be created from this job
- Type: to assign the type (i.e. phone call, send email, in person meeting)
- Status: of the activity (i.e. Pending, Open, Closed)
Step 10: Click NEXT. Review the summary and click FINISH to initiate the job.
Step 11: Once you save the trigger, you will then need to schedule the trigger to run on a cadence, once a week for this example. To do this, navigate to the Automation & Workflow App > Workflow > Triggers > ACTIONS > Schedule.
Step 12: Name the job and select a Start and/or End date. Click SAVE.
Step 13: Once you save the schedule, a new tab will appear where you can select the frequency. Use the dropdown to select when the trigger will run. For example, if you wanted the trigger to be run once a week on Mondays at 8:00 am, it would look like the below.
Click ADD to add the trigger schedule and click SAVE to secure your trigger schedule.
Your trigger will now automatically assign the activity "Call Major Donors" to the assigned solicitors every Monday at 8 am for any donor who made a donation > $1,000 the week prior.

FAQs
Q. I need to change the schedule and frequency of a previous trigger. Can I modify the schedule?
A. Yes. If you need to modify a previously created Trigger Job, navigate to the Automation & Workflow App > General > Job Scheduler > locate your job > ACTIONS > Manage
