Automation & Workflow: An Introduction to Queries
Queries allow you to locate specific records and data in CharityEngine. You can use a query to:
- Find donors who gave more than a certain amount.
- Identify sustainers who meet specific criteria.
- Create an audience for an email or mail campaign.
- Export records for additional analysis.
- Support automated jobs, transformations, and triggers.
CharityEngine includes more than 90 out-of-the-box reports and a customizable Report Builder. Use those tools for most reporting needs. Use Queries when you need more advanced filtering, data selection, automation, or campaign audiences.
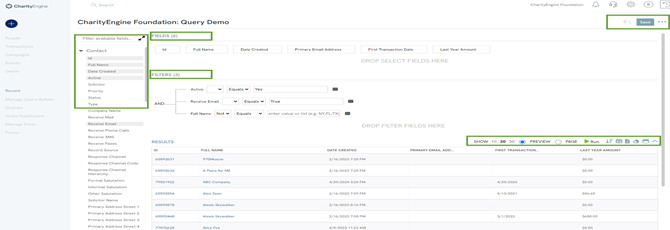
Table of Contents
Prerequisites
Before creating a query, decide what information you need and how you plan to use it. This will help you select the correct Module, Table, fields, and filters.
- Start simple. Add only the fields and filters you need.
- Run the query often. Check the results as you build.
- Use Reports or Report Builder first when they meet your needs.
- Use Queries for advanced needs such as complex audiences, automation, or database-level reporting.
Performance note: Queries run against your database in real time. Complex queries, multiple subqueries, and jobs running at the same time may slow performance. A query that takes more than 5–10 minutes is performing a substantial amount of work. A query that takes more than 30 minutes should be reviewed by an experienced administrator.
Related articles:
Understanding Query Structure
Go to Automation > General > Queries > Create New.
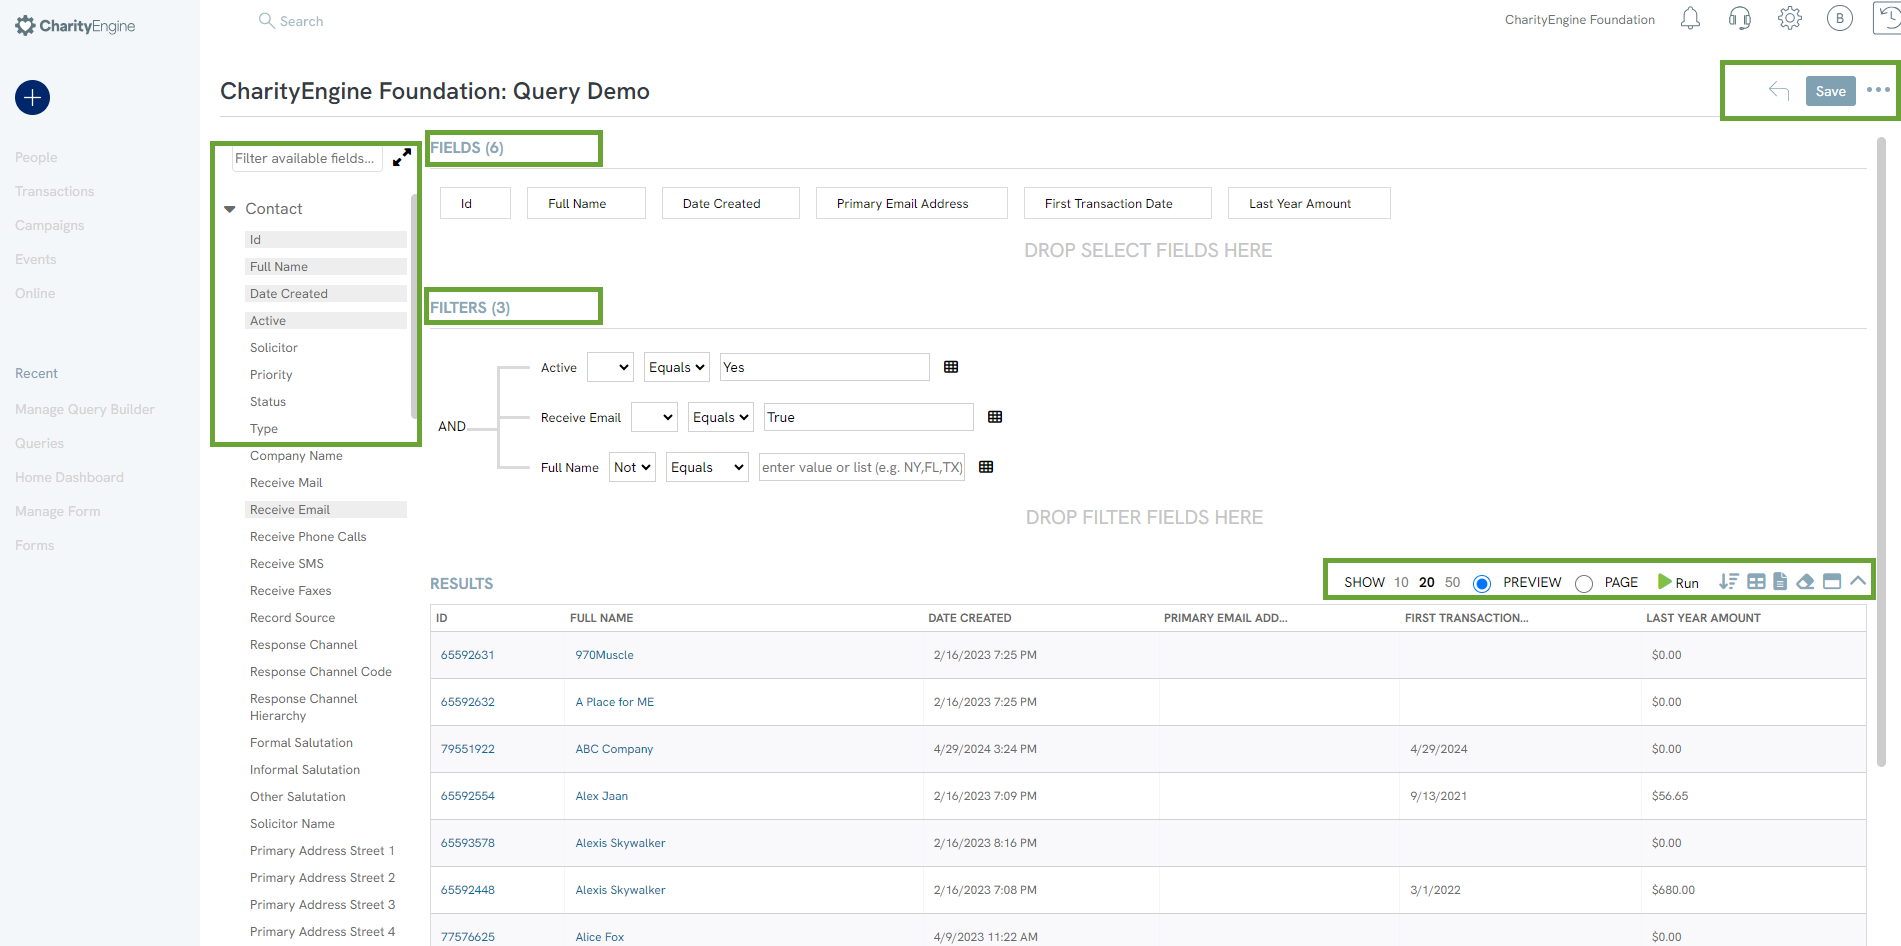
A query follows this basic process:
- Choose a Module.
- Choose a Table.
- Add fields to SELECT.
- Add criteria to FILTER.
- Click RUN to review results.
- Save, export, or use the query in another CharityEngine feature.
| Area | Purpose |
|---|---|
| SELECT | Determines which columns appear in the results. |
| FILTER | Determines which records appear in the results. |
| RUN | Displays a preview of the current results. |
| SAVE | Saves the query and provides additional actions. |
Modules and Tables
A Module is a major area of CharityEngine data, such as Contacts or Donations. A Table is a specific type of information stored within that Module.
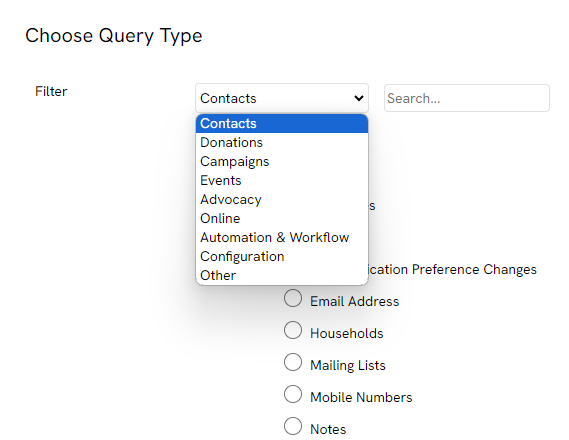
Choose a Module
Use the Filter drop-down to choose the Module. For example:
- Contacts contains contact-related information.
- Donations contains transaction, sustainer, and invoice information.
Choose a Table
After selecting a Module, choose a Table using the Select option. The Table determines which fields will be available.
Examples:
- The Contacts Module includes Tables such as Contacts, Households, and Email.
- The Donations Module includes Tables such as Transactions, Sustainers, and Invoices.
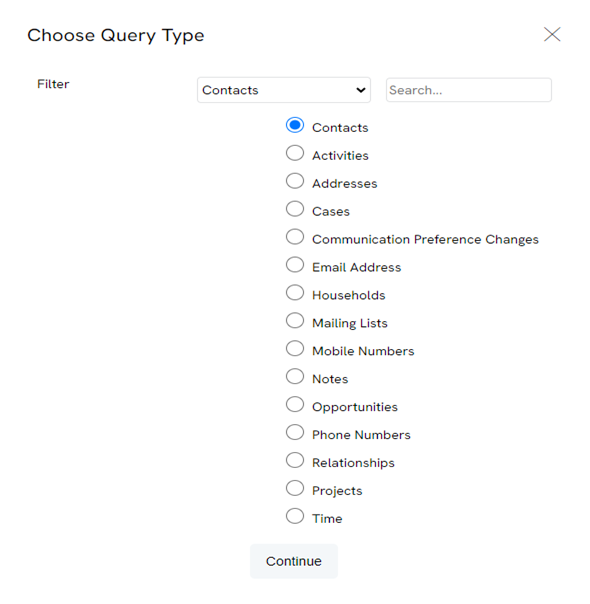
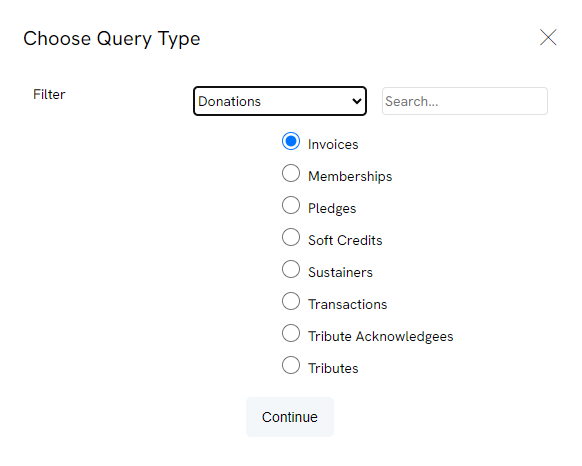
Click CONTINUE to open the available fields for the selected Table.
Build a Query
Add Fields to SELECT
Expand the field categories or use the search box to locate a field. Drag and drop the field into the SELECT area, or double-click it.
Only add fields you need. Unnecessary fields can slow the query and make the results harder to review.
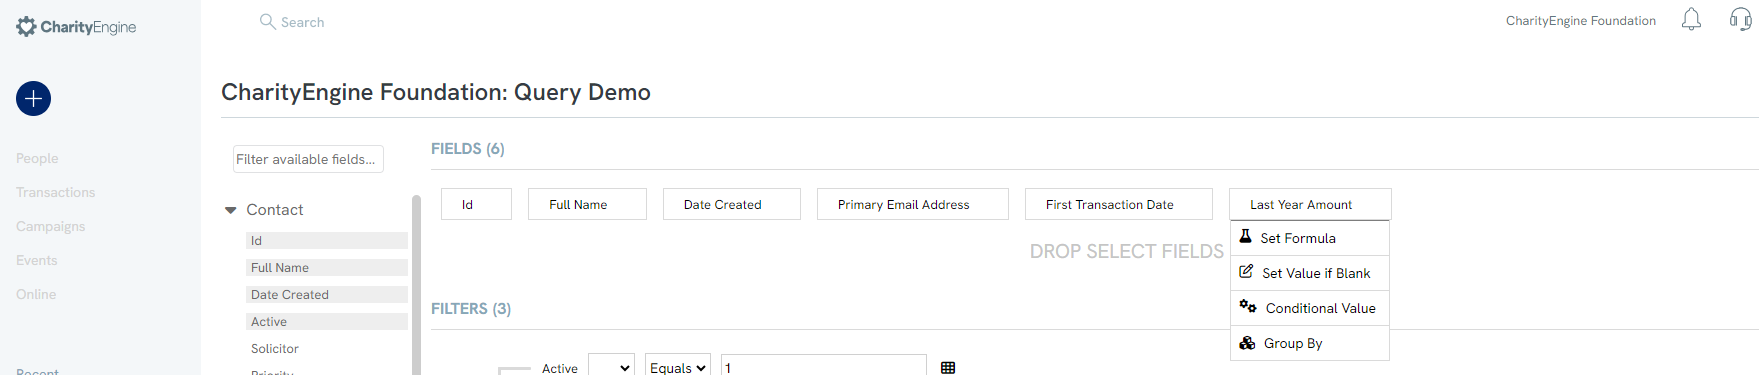
Rename a Selected Field
Click the field label and type a new name. This changes the column heading in the results. Hover over the field to view its original database name.
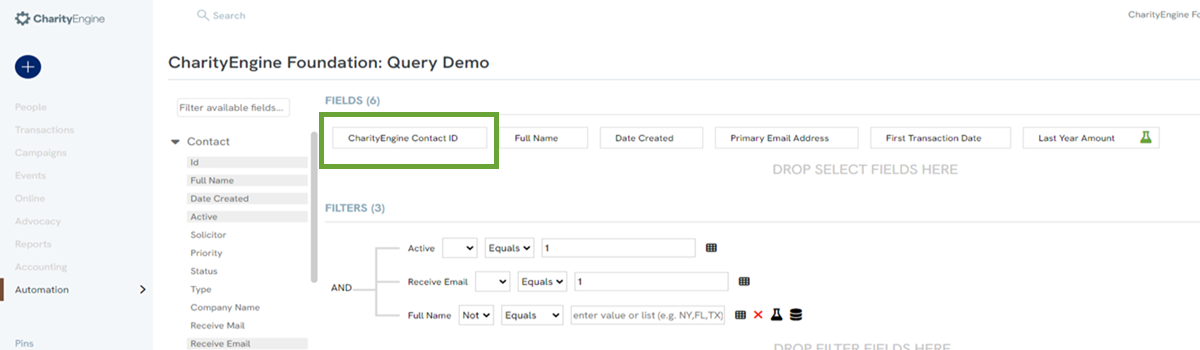
Create a Free-Form Field
Click the + icon in the SELECT area to add a free-form field. Open the field menu and enter the value you want the query to display.
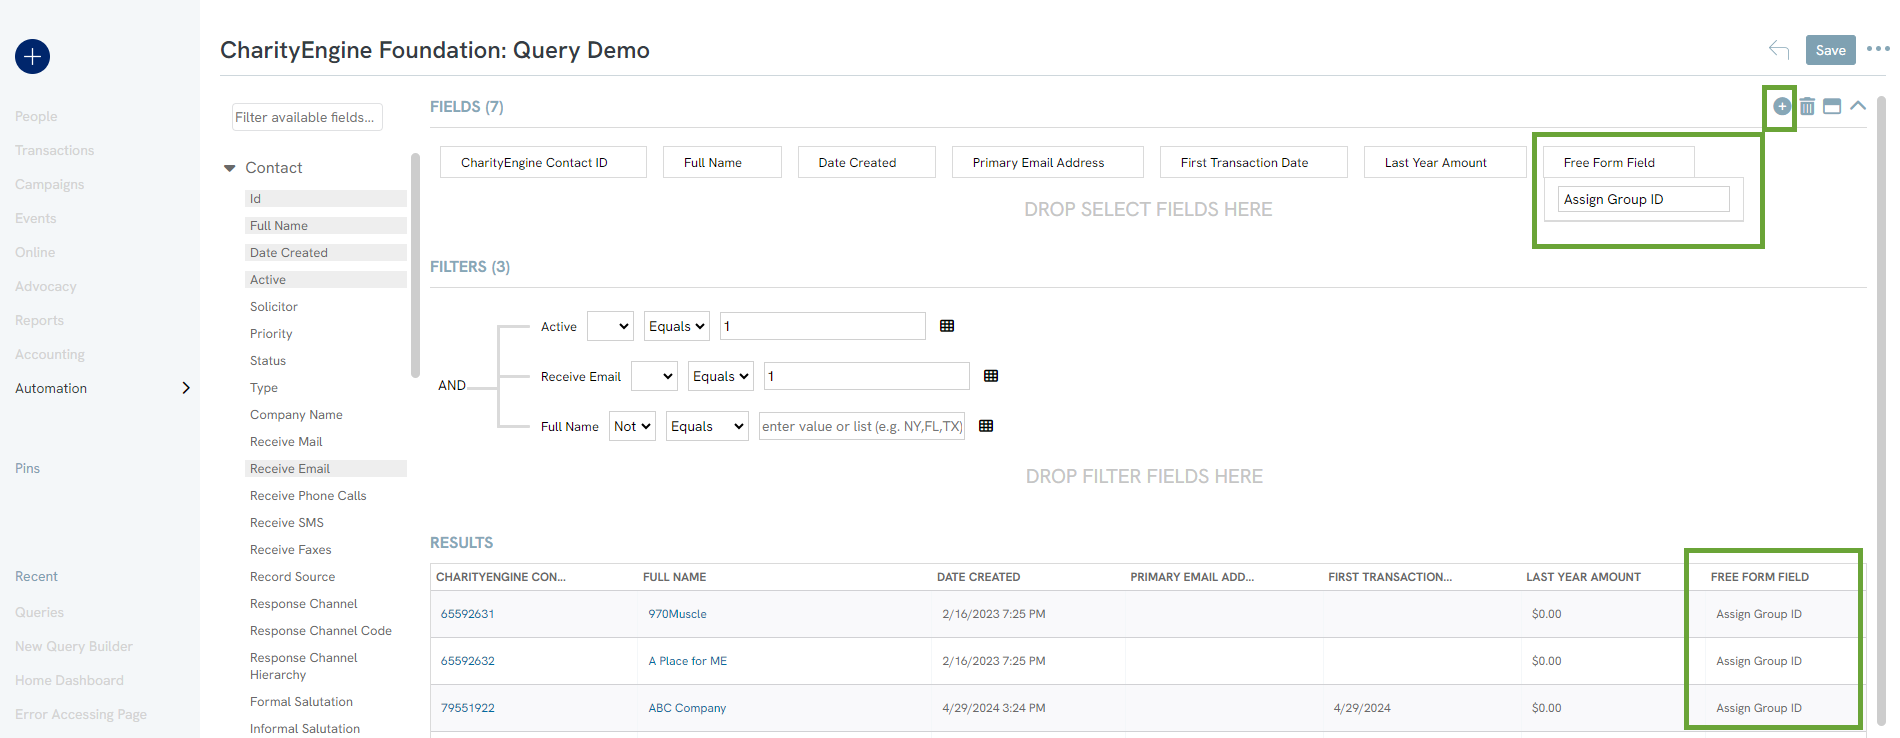
Customize Selected Fields
Click the down arrow on a field in the SELECT area to view its available options. Options vary by field type.
- Set Formula: Apply a calculation such as Average, Count, Sum, or Multiply.
- Set Value If Blank: Display a default value when the field is empty.
- Conditional Value: Return a customized value when specified conditions are met.
- Group By: Group records by the selected field.
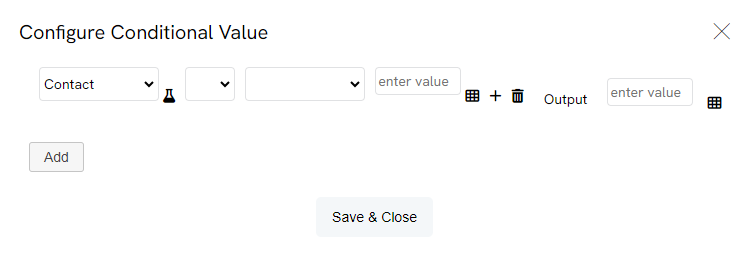
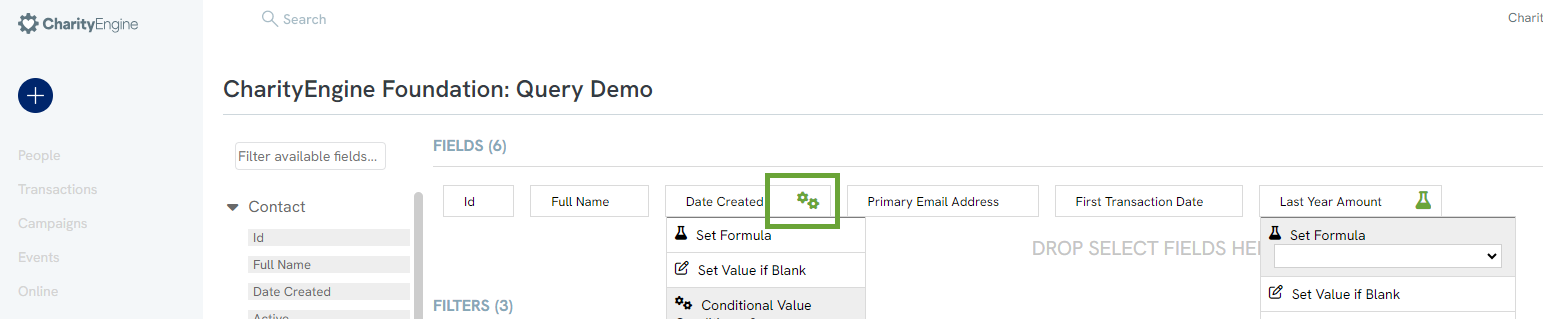
Click the applicable icon again to remove a formula, condition, or grouping.
Add Filters
Filters limit which records appear. Filters are optional, but most queries use at least one.
Add a Basic Filter
Drag a field into the FILTER area or double-click it. Select the operator and enter the value.
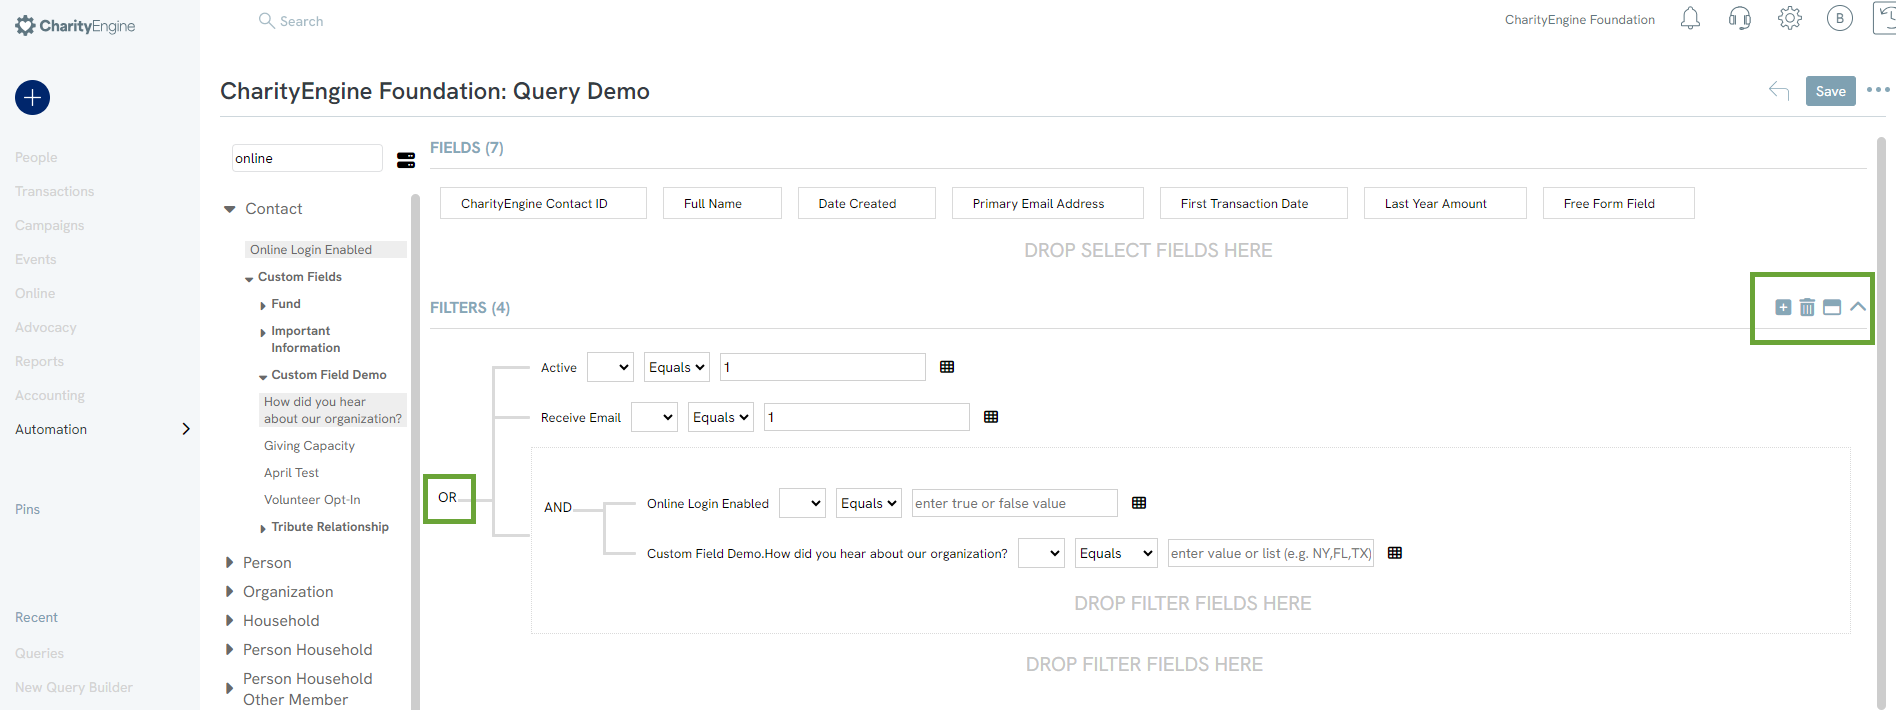
When you add more than one filter, CharityEngine connects them with AND. Click the condition to change it to OR, AND NOT, or OR NOT.
Create a Nested Filter
Click the + icon at the top of the FILTER area. Drag related filter fields into the new group. Nested filters are helpful when you need combinations of AND and OR logic.
Use a Filter Formula
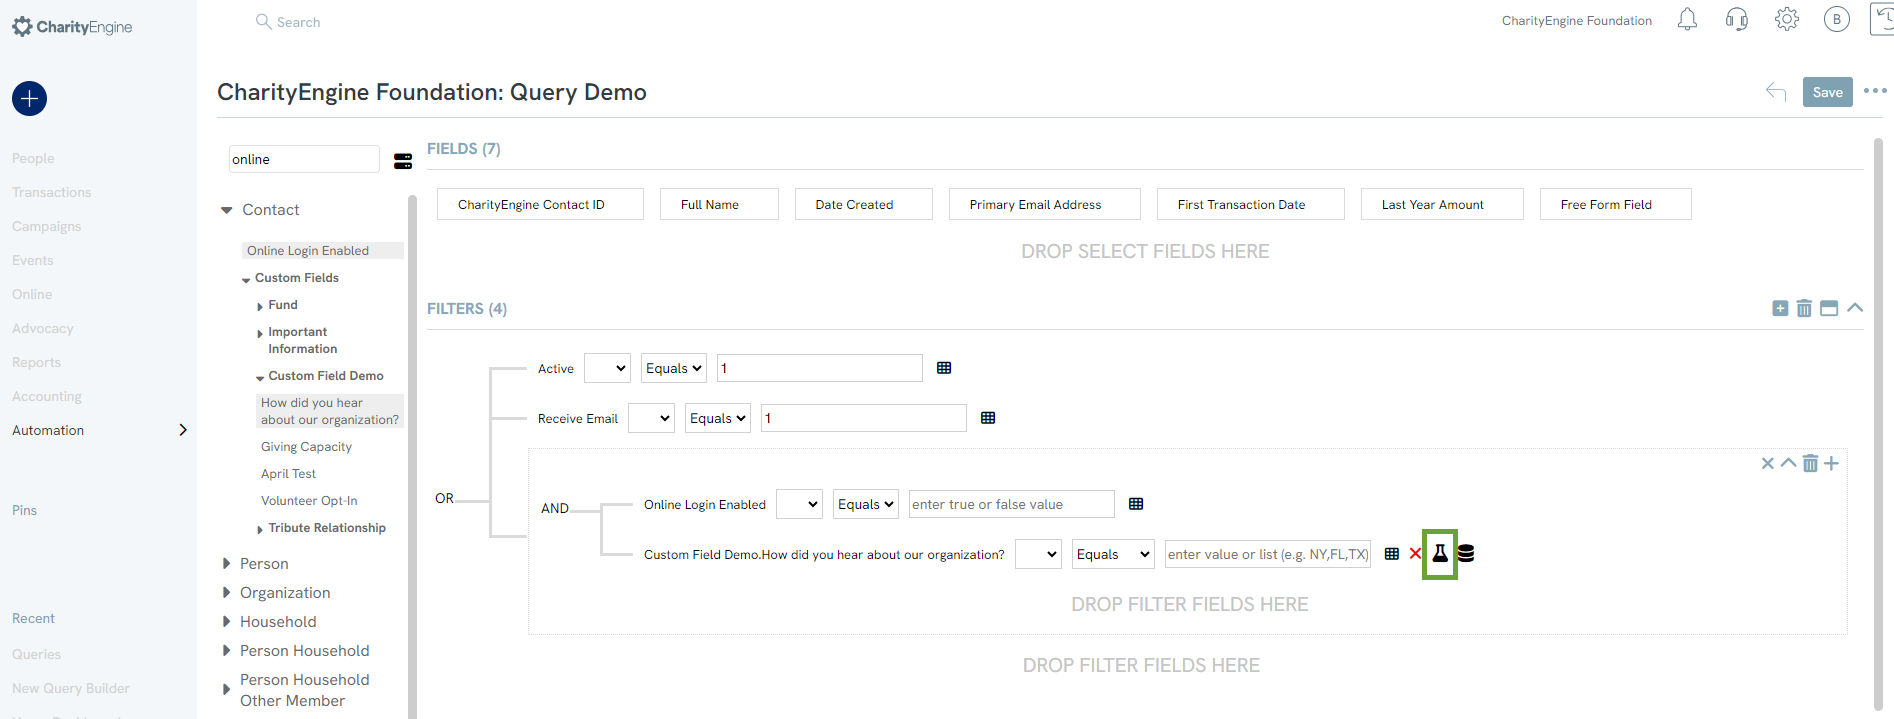
Hover to the right of a filter field and click the beaker icon. Choose a formula or dynamic date option from the drop-down. Click the beaker icon again to remove the formula.
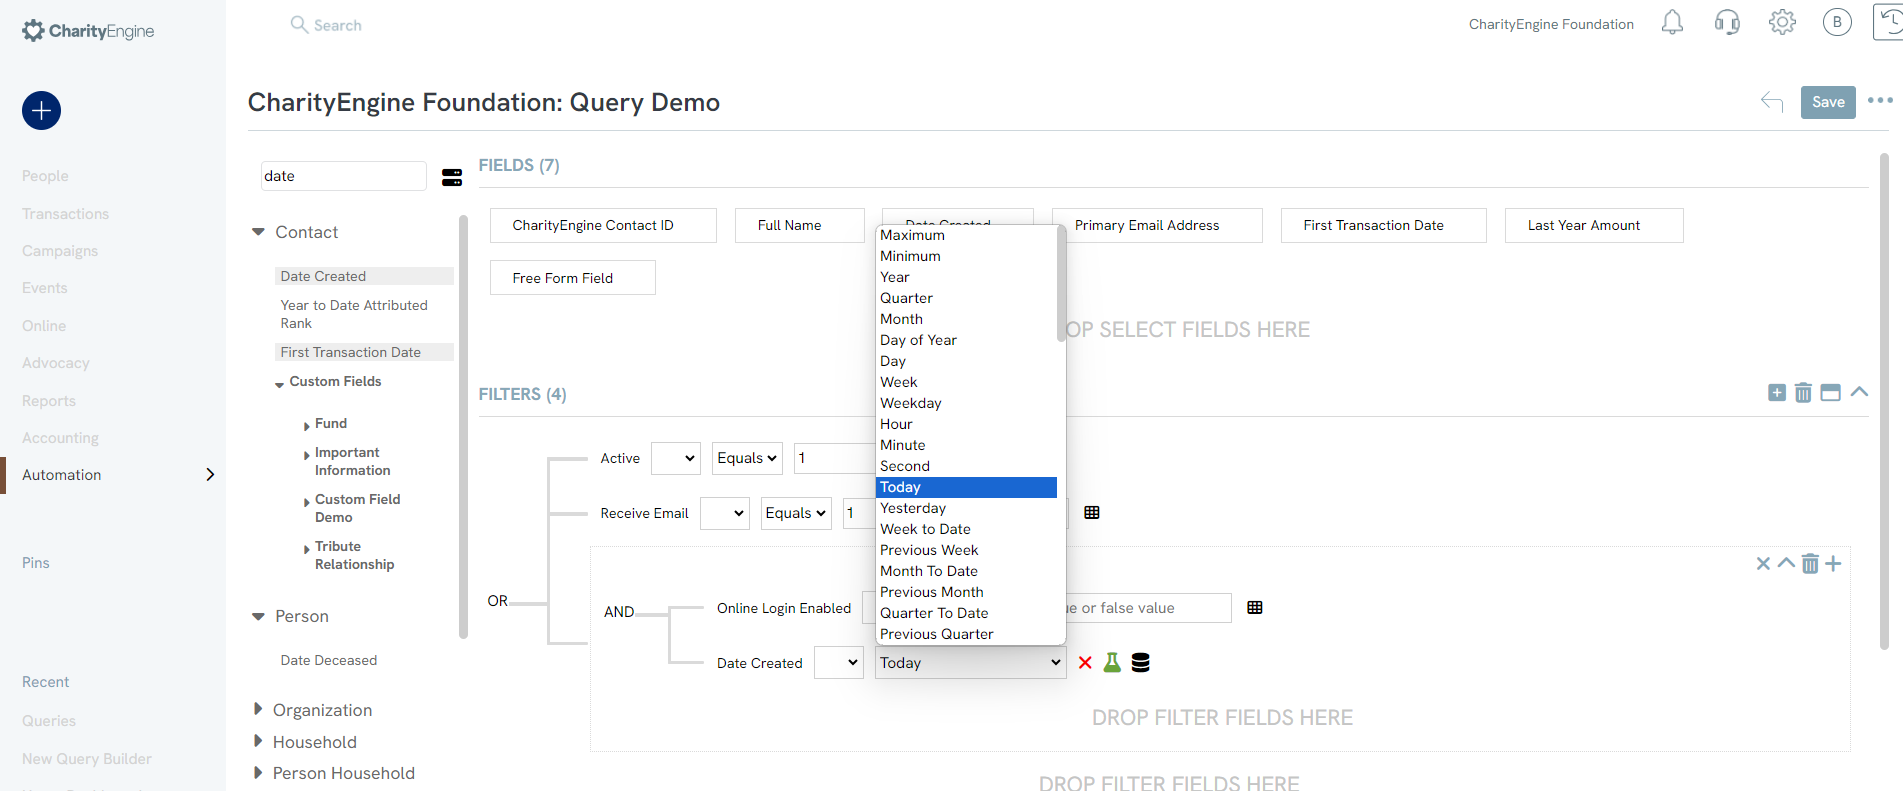
Pro Tip: Click RUN after adding each major filter. This makes it easier to identify which condition changed the results.
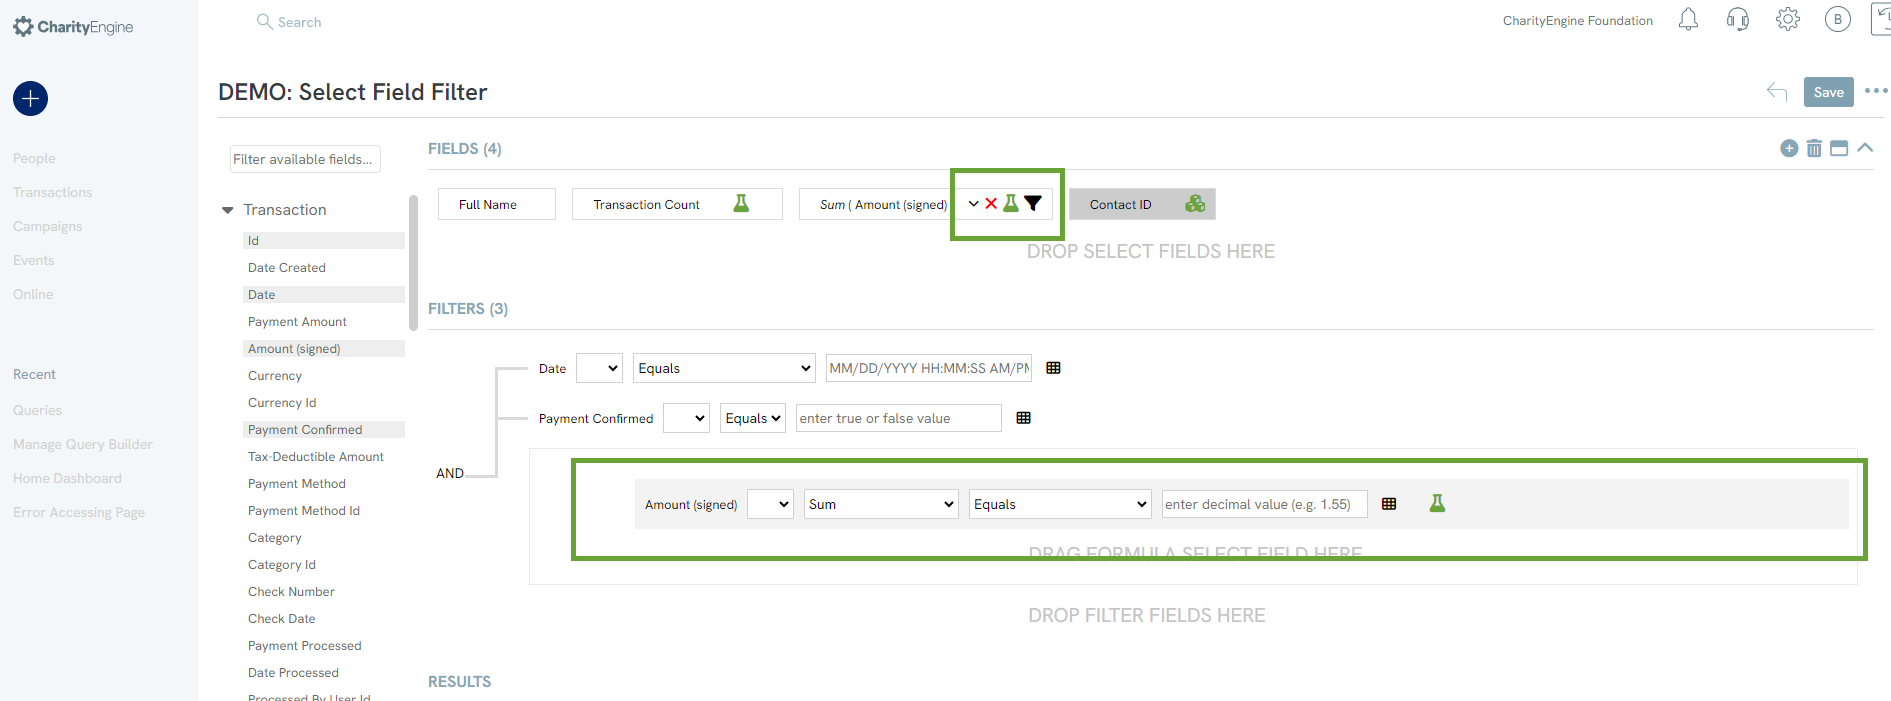
Filter Using an Aggregated SELECT Field
You can also filter by a calculated field in the SELECT area. For example, to find donors who gave at least $100 during the last 12 months:
- Group the results by Contact.
- Apply Sum to the signed transaction amount.
- Filter transactions to the last 12 months.
- Include confirmed payments and positive accounting revenue.
- Hover over the summed amount and click the Filter icon.
- Set the summed value to greater than or equal to $100.
Sort and Preview Results
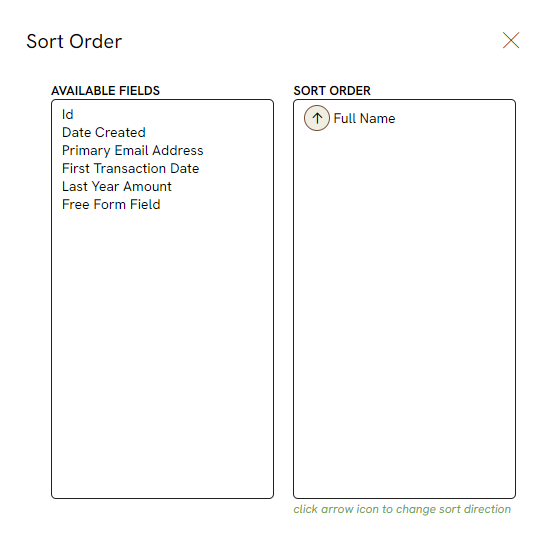
Sort Results
In the upper-right corner of the DATA area, click the down arrow next to RUN. Select the field to sort by, then choose ascending or descending order.

Preview Results and Record Count
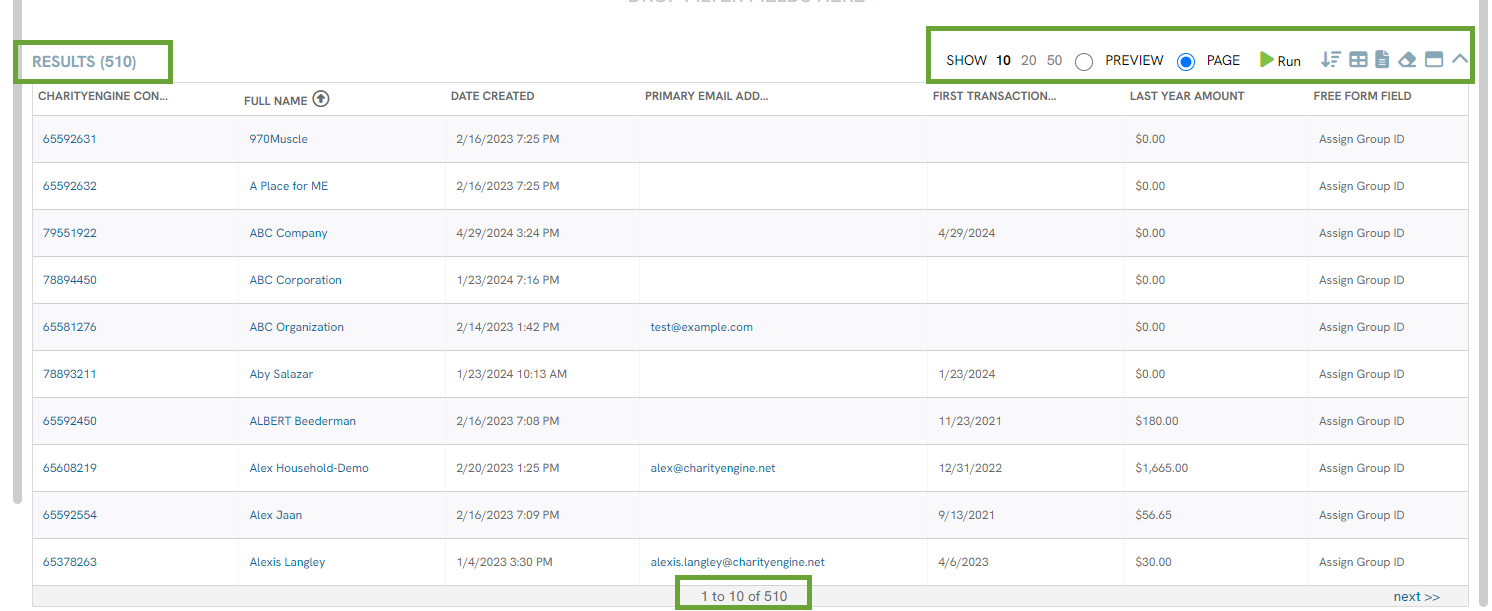
Click RUN to populate the DATA panel. Switch to Page view to see the total record count at the bottom of the panel.
Save and Use a Query
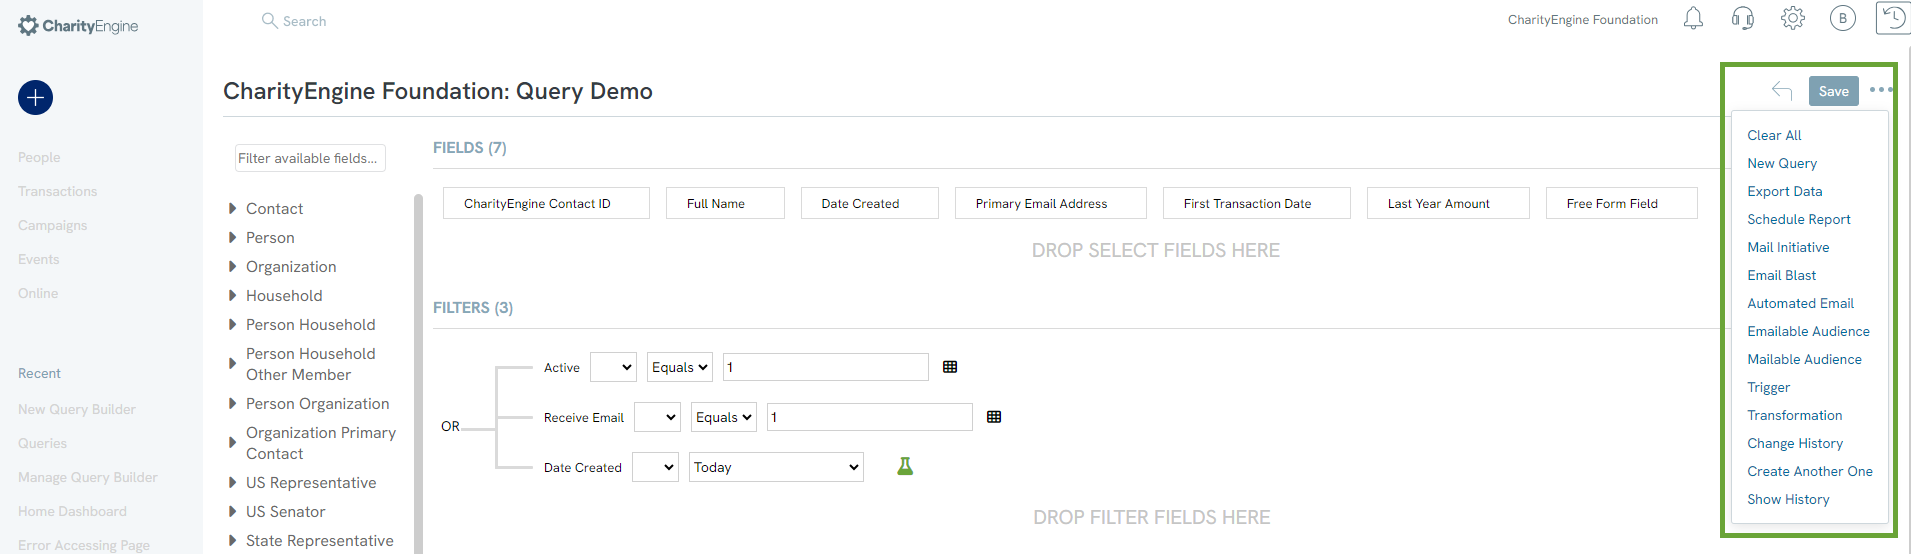
Click the SAVE drop-down to access available actions. The exact options may vary based on your permissions and the query configuration.
Query Management
- Clear All: Remove all SELECT and FILTER fields.
- Create Another One: Start a new query.
- Change History: Review historical changes.
Exporting and Scheduling
- Export Data: Export the query results.
- Schedule Report: Create a Data Job that exports the query now or on a schedule.
Campaign Audiences
- Email Blast: Start an email blast using the query audience.
- Mail Initiative: Start a mail initiative using the query audience.
- Automated Email: Schedule an automated email series.
- Emailable Audience: Preview emailable records and exclusions such as opt-outs, duplicates, suppressions, blacklisted addresses, and deceased contacts.
- Mailable Audience: Preview the estimated mailable audience.
Important: A query used for an email campaign must include the CharityEngine Contact ID in the SELECT area.
Automation
- Trigger: Create a Data Trigger Job.
- Transformation: Create a Data Transformation Job.
Export Query Results
Exporting allows you to view, share, or analyze query results outside CharityEngine.
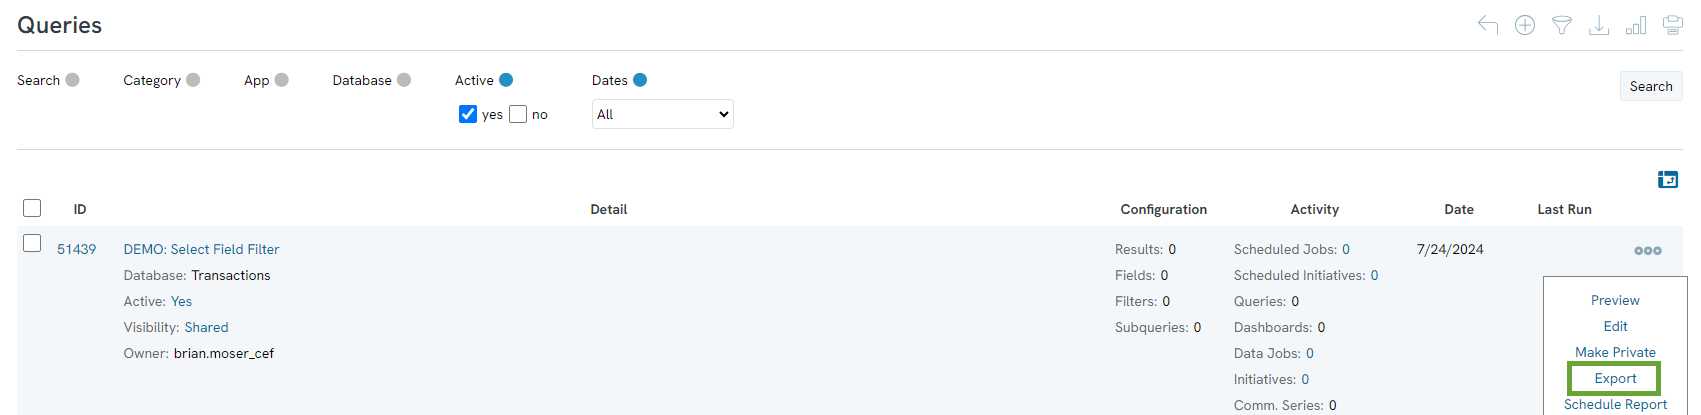
- Go to Automation > General > Queries.
- Locate the query, open ACTIONS, and select Export.
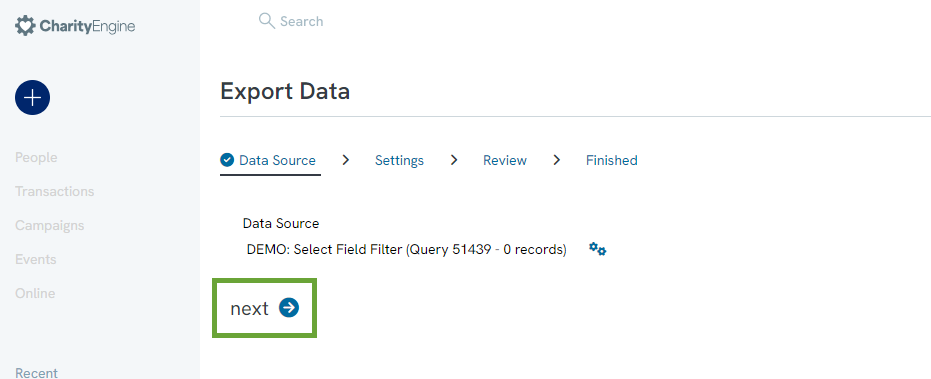
- In the Export Data Wizard, click NEXT to confirm the data source.
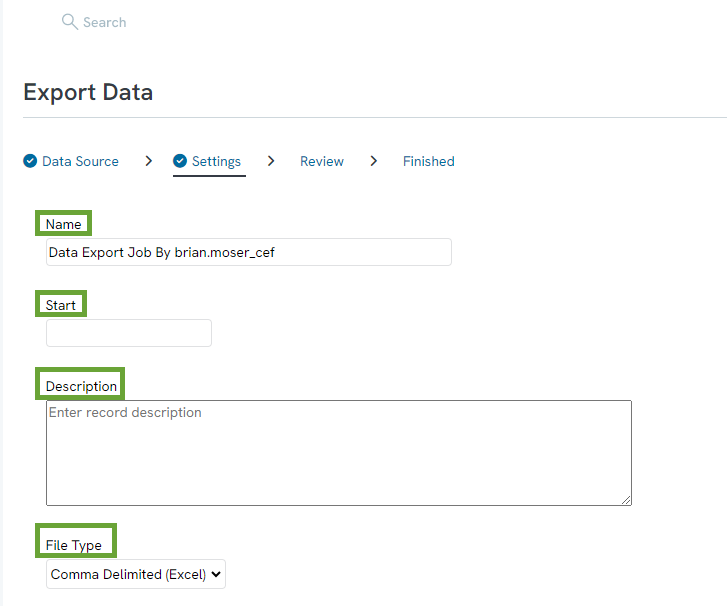
- Accept or update the required Name.
- Optionally enter a future Start time and a Description.
- Select the File Type. The default is Tab Delimited (Excel).
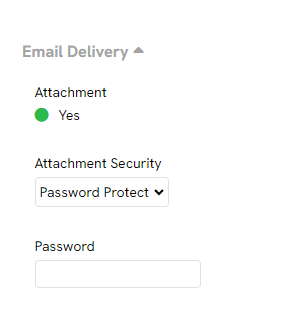
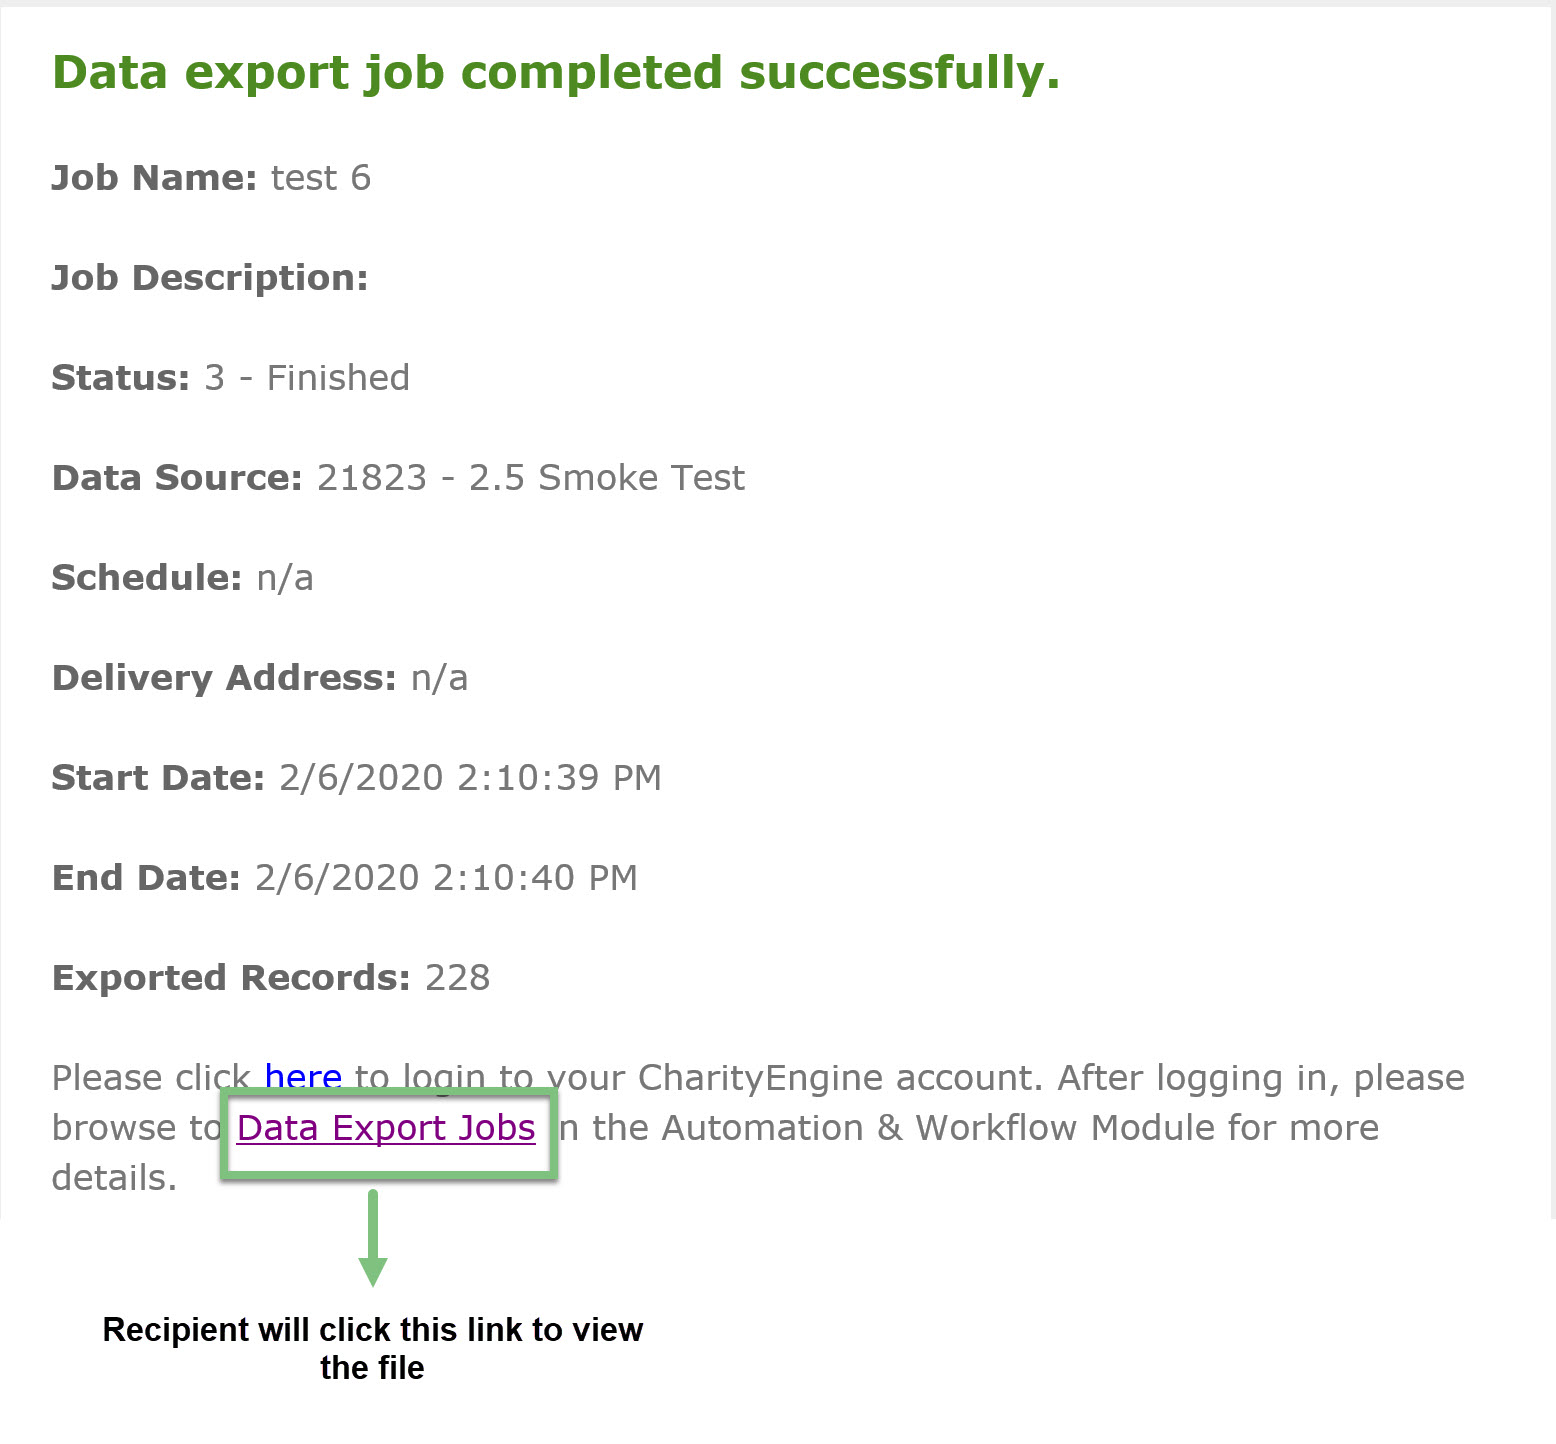
- Open Email Delivery. Select Attachment to attach the file, or leave it unselected to send a link to the Data Job.
- Use Attachment Security to password-protect an attached file, when needed.
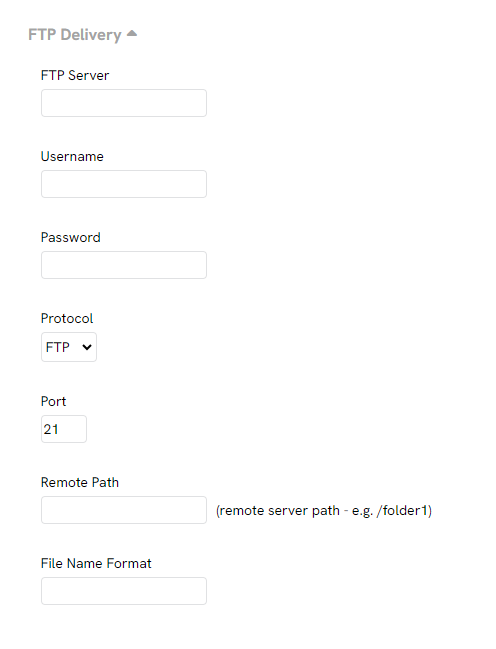
- Configure FTP Settings only when the file will be delivered by FTP.
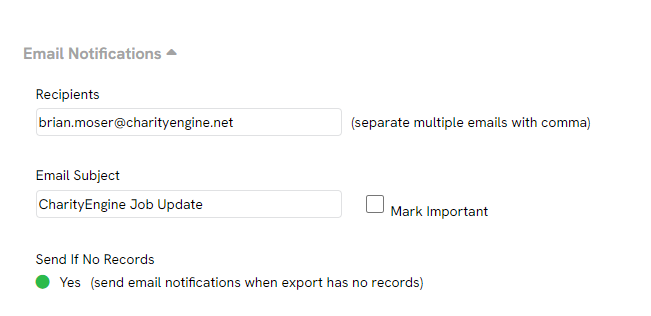
- Open Email Notifications.
- Enter recipient email addresses separated by commas.
- Update the email subject, if needed.
- Select Mark Important or Send if No Records, when appropriate.
- Click NEXT.
- Review the confirmation screen and click FINISH.
CharityEngine will send the completed file as an attachment or provide a link to the Data Job, depending on the delivery settings.
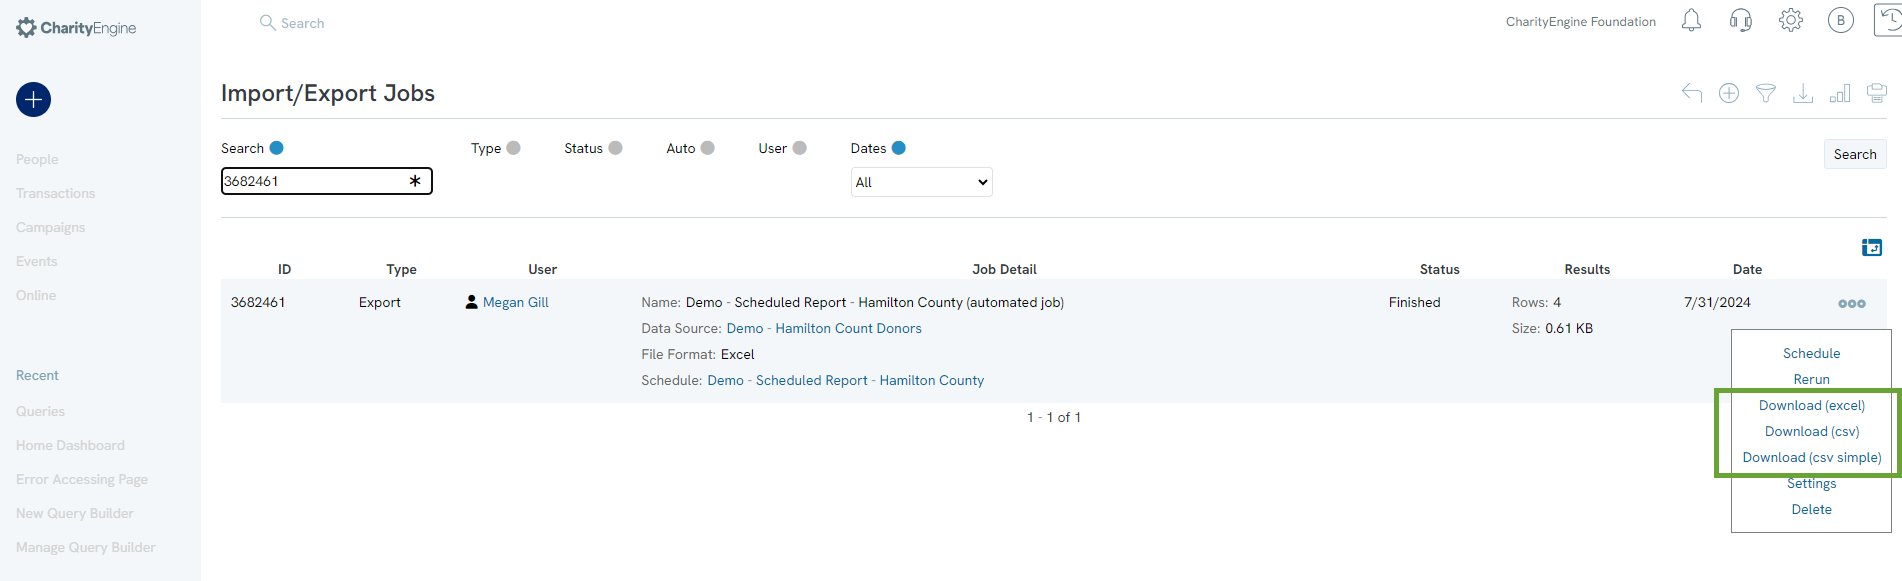
Manage Saved Queries
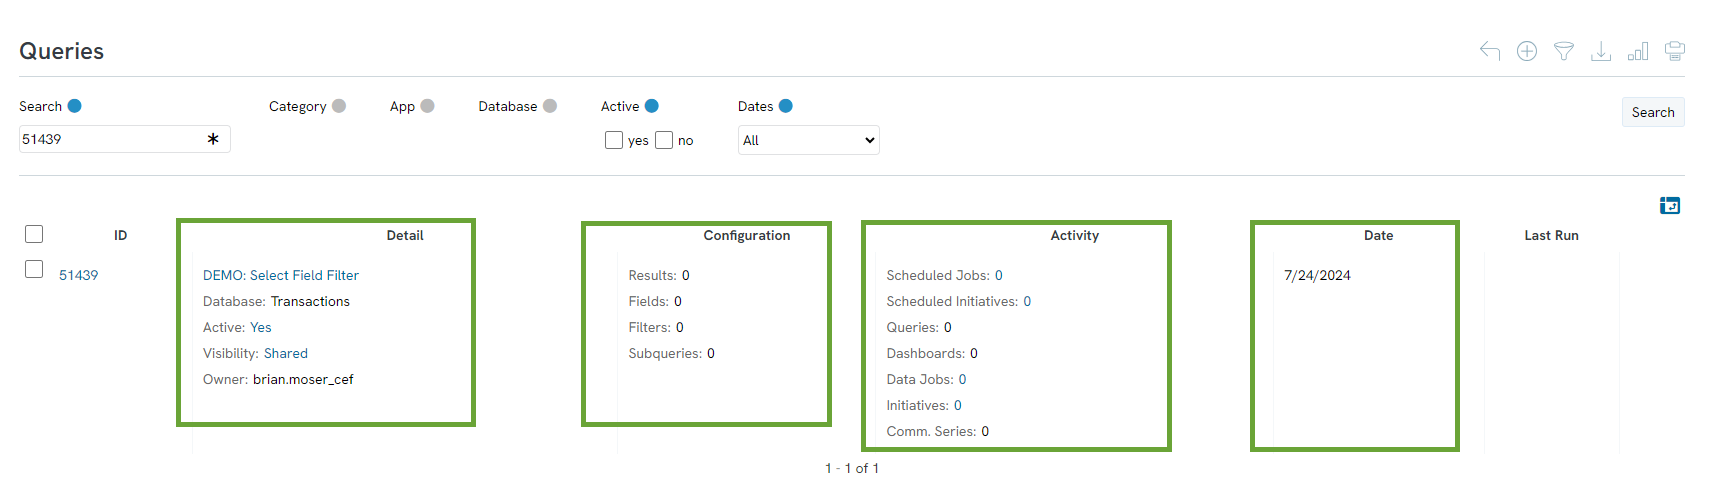
Go to Automation > General > Queries to view saved queries. The listing screen displays the query type, configuration, activity, creation date, last-run date, status, visibility, and available actions.
Use the Active setting to activate or deactivate a query. Use Visibility to change a query between Shared and Private.
Quick Actions
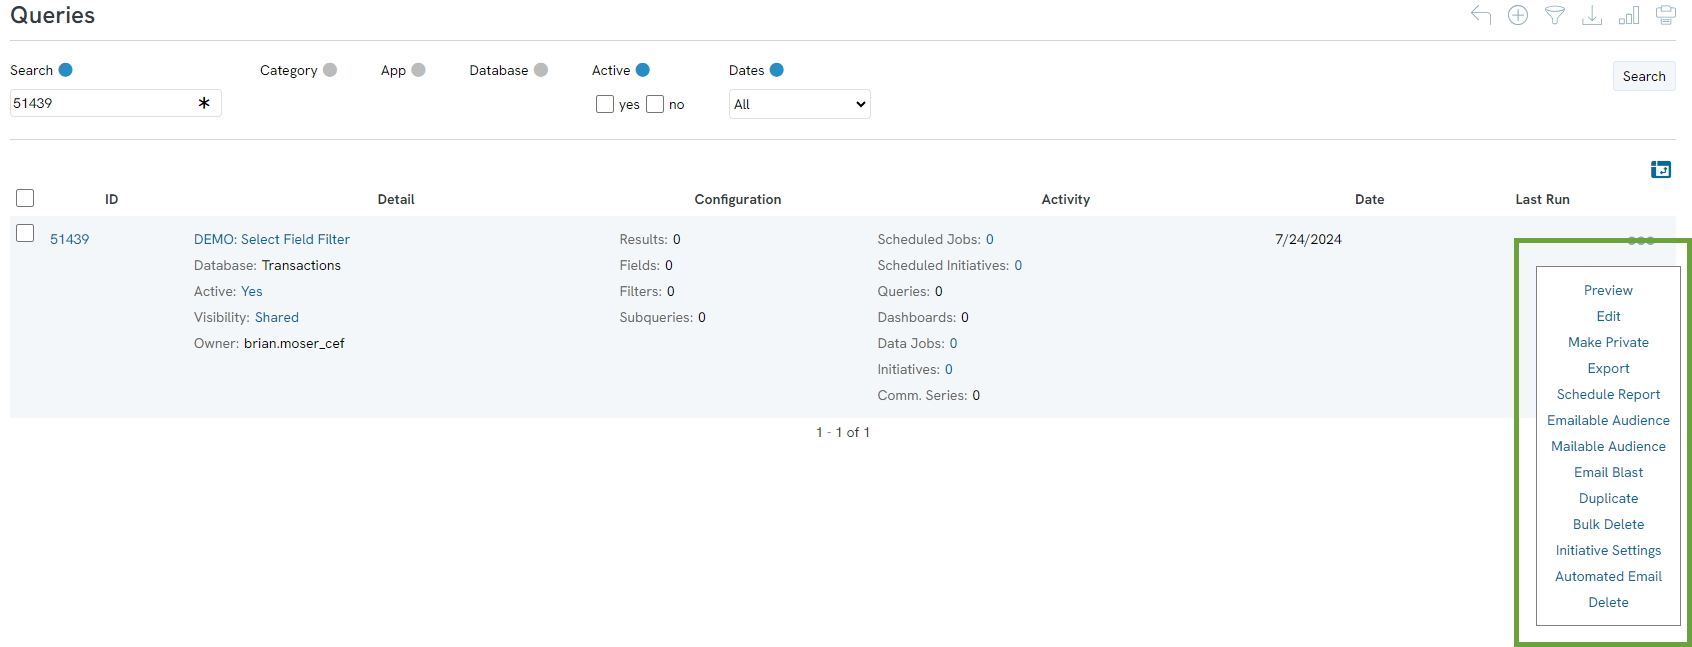
Open the ellipsis menu for a saved query. Available actions may include:
- Preview: View query output.
- Edit: Modify the query.
- Make Private: Restrict visibility.
- Export: Export query results.
- Schedule Report: Schedule recurring or future exports.
- Emailable Audience / Mailable Audience: Preview campaign audience eligibility.
- Email Blast: Start an email blast.
- Duplicate: Copy the query.
- Bulk Delete: Start a transformation that deletes associated records.
- Initiative Setting: Configure settings for an email initiative.
- Automated Email: Create an automated email schedule.
- Delete: Delete the query.
Advanced Query Features
The features below are intended for experienced users. Test advanced queries carefully before using them with campaigns, transformations, triggers, or scheduled jobs.
Subqueries
A subquery identifies a subset of records that is then used as a filter in another query. The queries must share a compatible ID field.
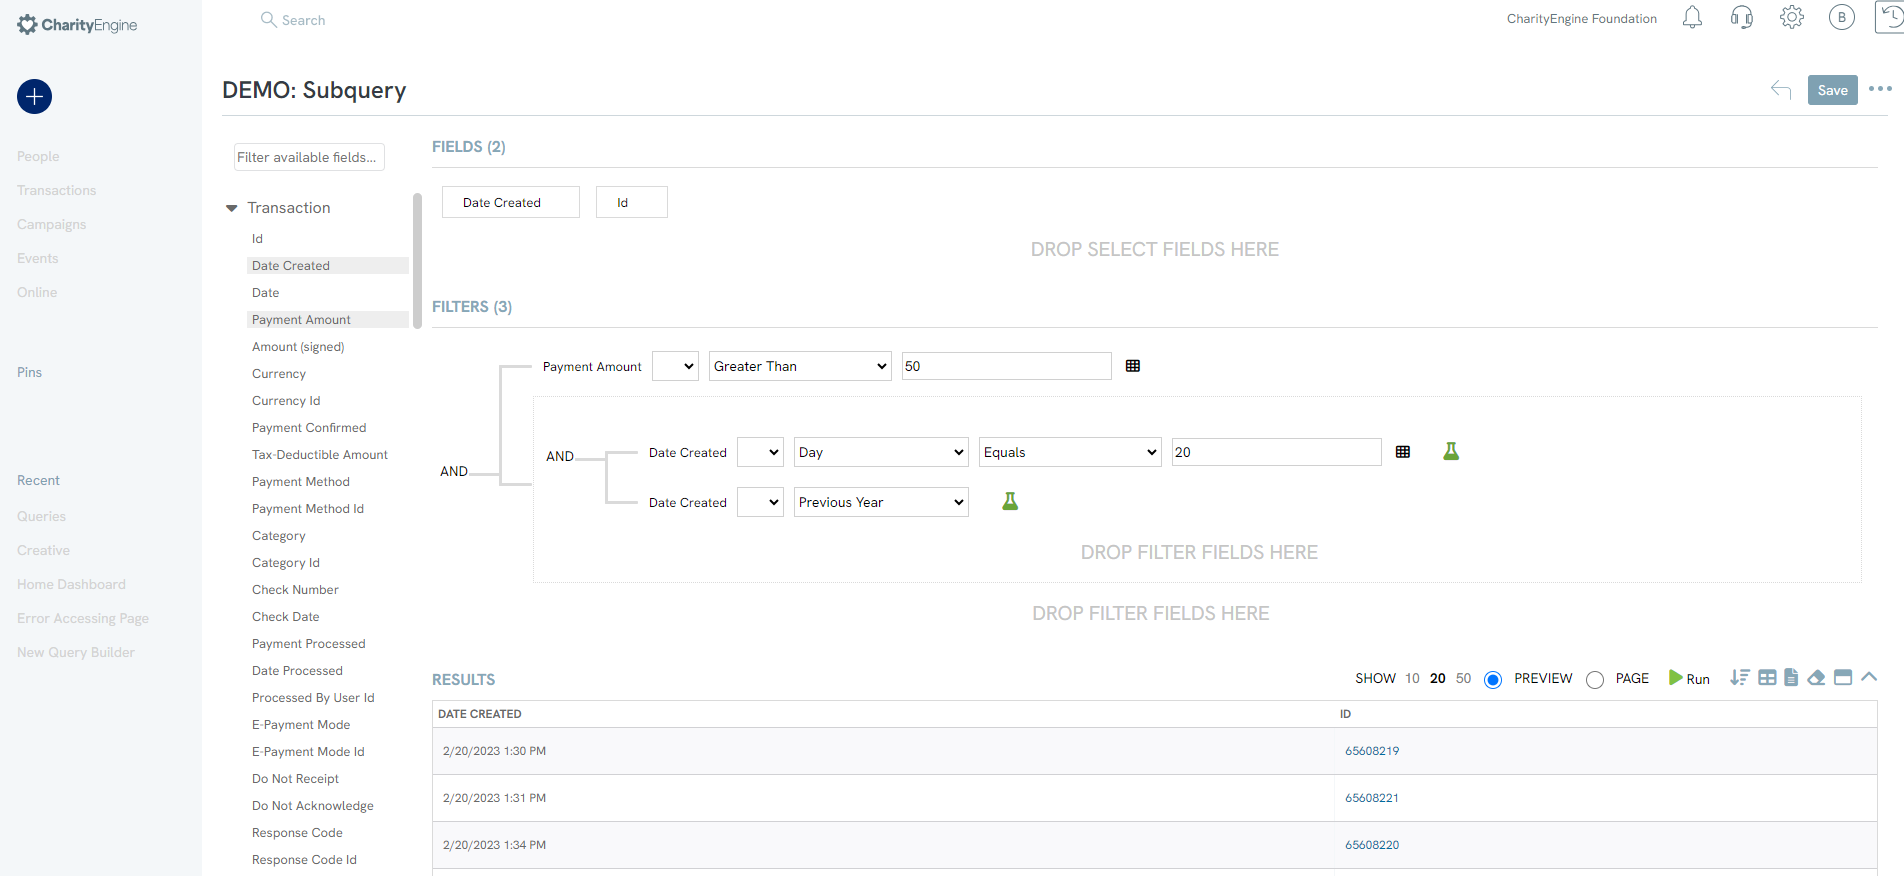
Example: identify contacts who made a transaction greater than $50 last year on the 20th day of a month, then return their contact details.
- Create the transaction subquery and include Contact ID in SELECT.
- Create a Contact query and add the desired contact fields to SELECT.
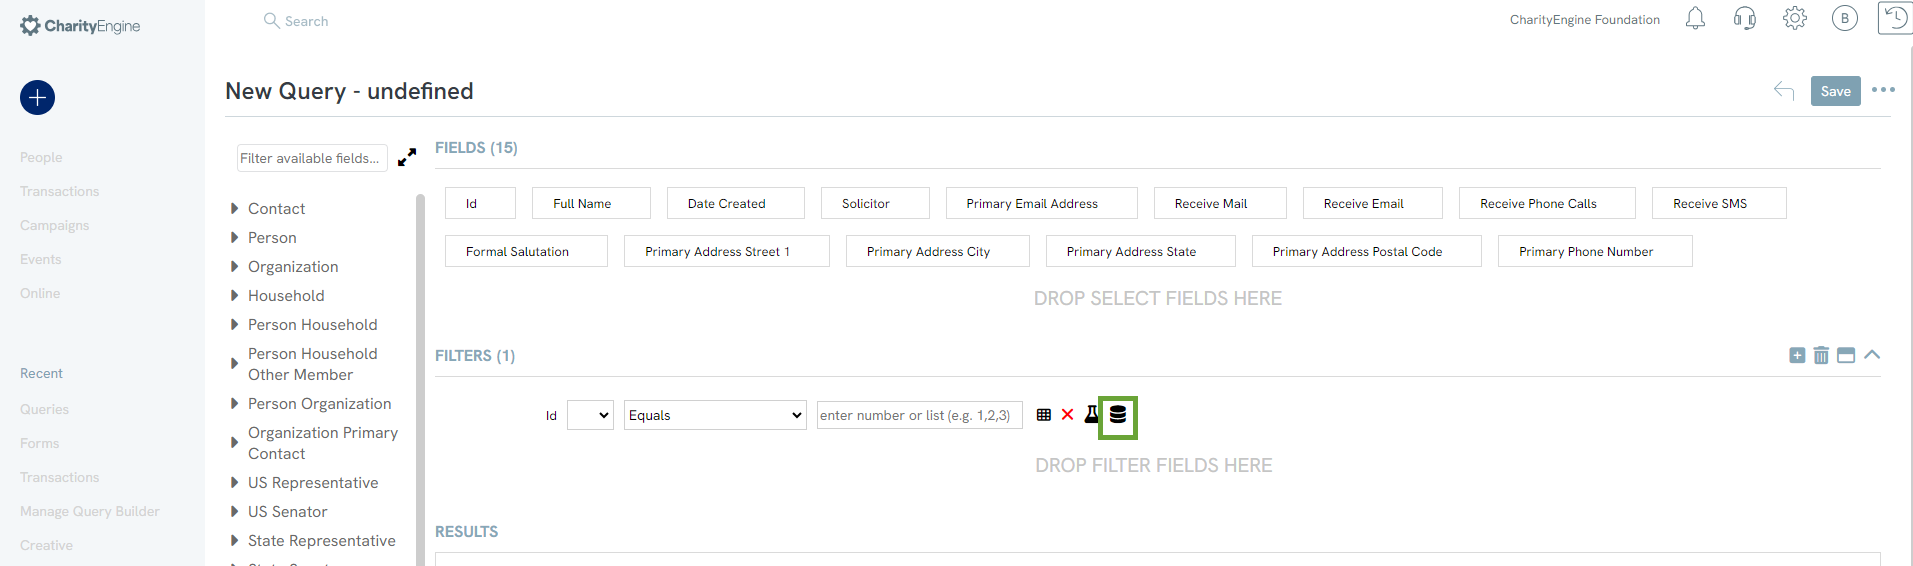
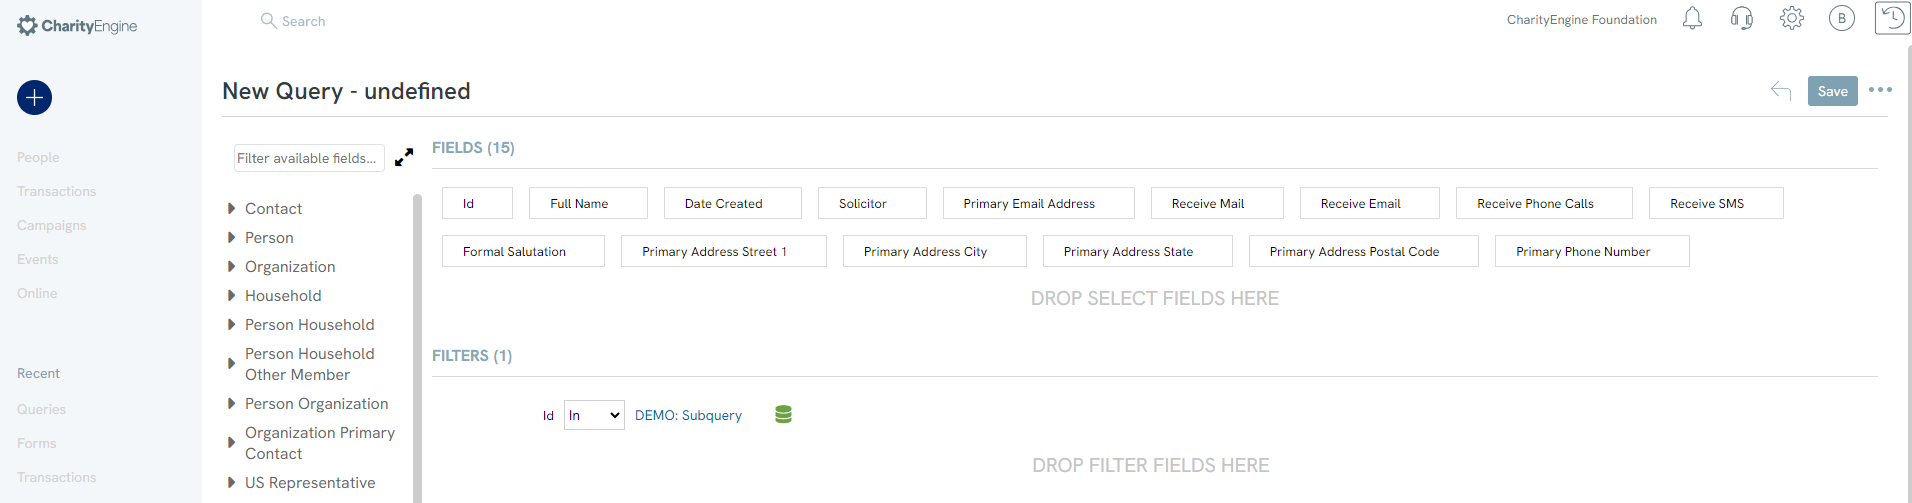
- Add Contact ID to FILTER and click the database icon to connect an external query.
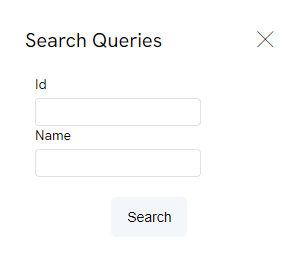
- Search for the saved subquery by name or ID.
- Select the subquery.
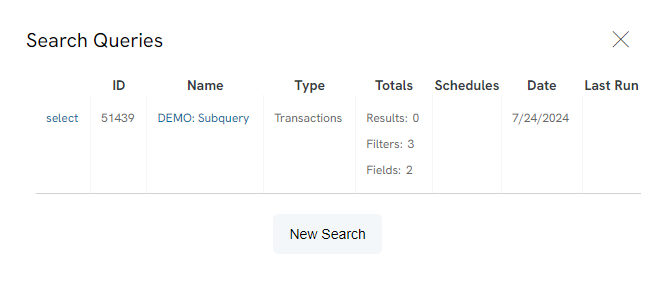
- Confirm the compatible ID field when more than one ID type is available.
- Run the query and review the results.
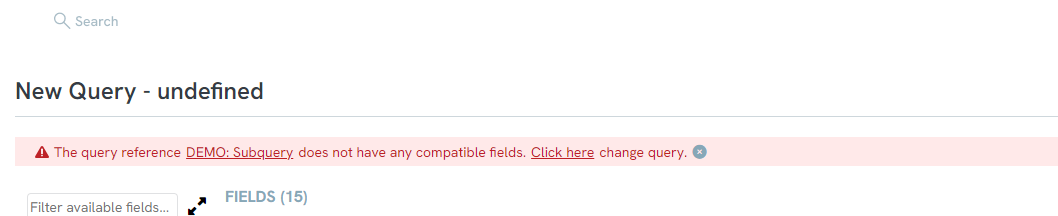
Note: If the external query does not include a compatible selected field, CharityEngine will display an error. The ID used in the main query's filter must also appear in the subquery's SELECT area.
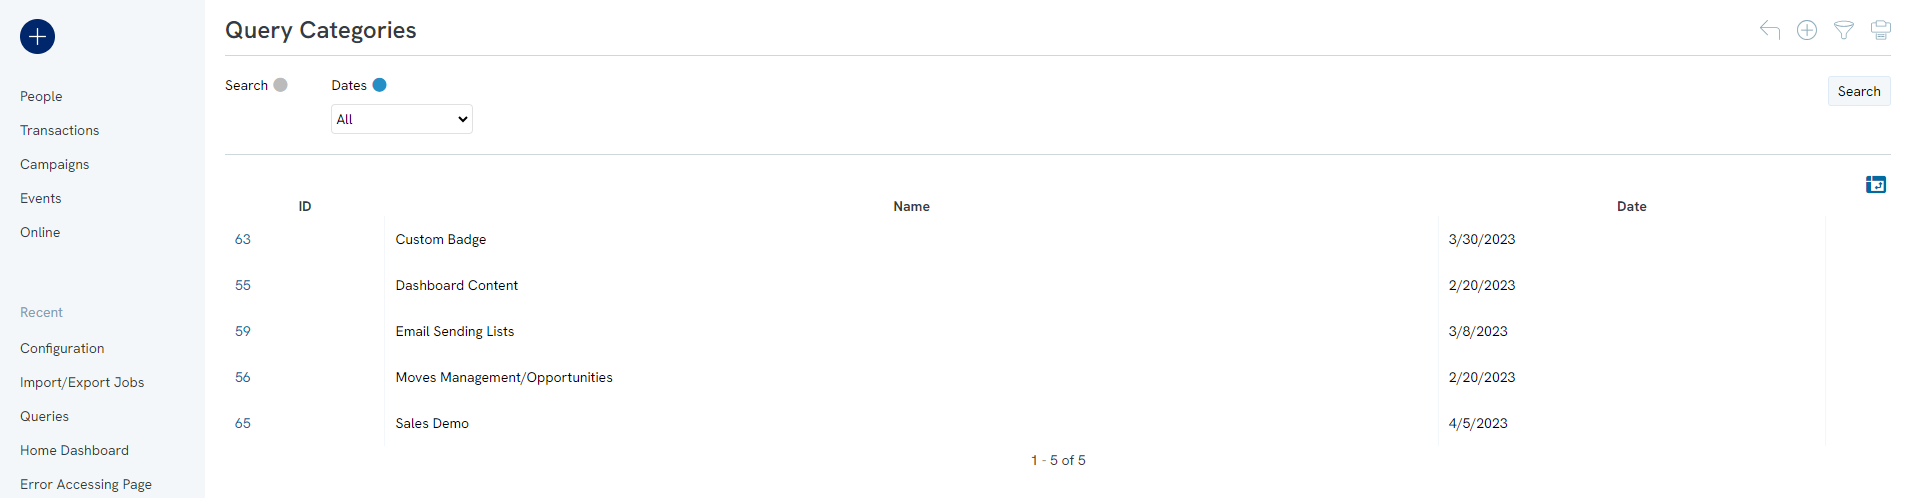
Query Categories
Go to Configuration > Reporting > Query Categories > Create New. Enter a required name and click SAVE.
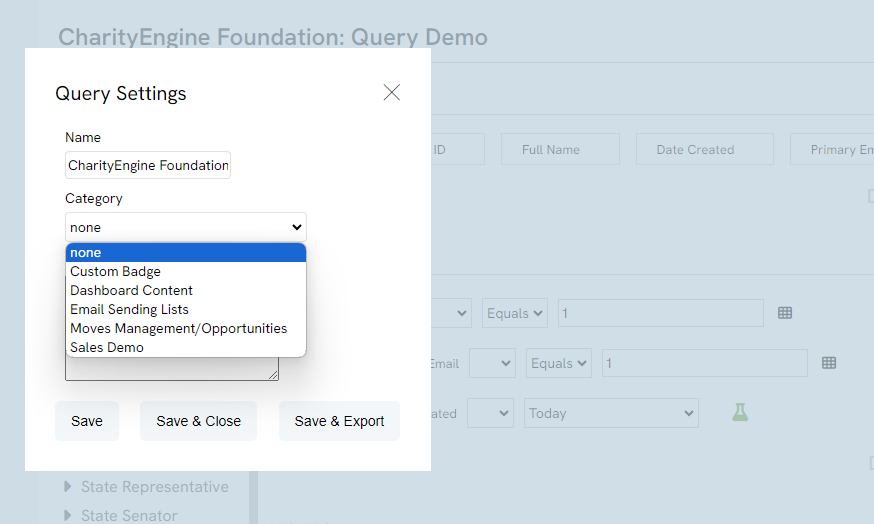
Select the category when saving a query. You can then use the Basic Filter on the Query listing screen to locate queries in that category.
To assign categories in bulk, select the checkboxes beside the applicable queries and use the bulk category action.
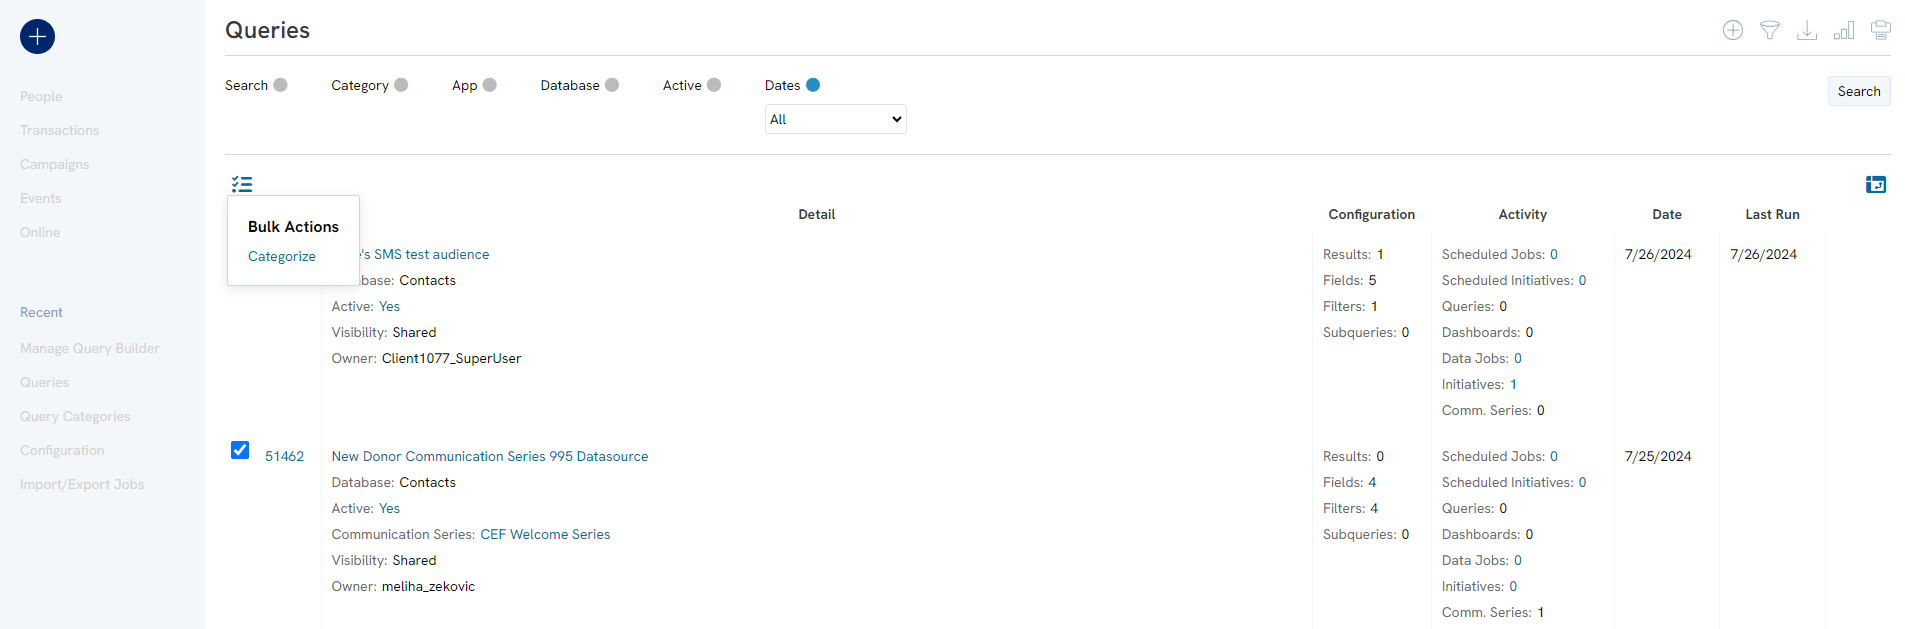
Scheduling Queries
Schedule a query export when a user or third party needs the same report regularly. This can be useful for recipients who do not have access to CharityEngine.
See Exporting Data: How to Schedule an Export Data Job.
Dynamic Query Tokens
Dynamic tokens can be used in fields or filters to create calculated values and date-based logic.
| Token | Purpose | Parameters | Example |
|---|---|---|---|
| [@NOW] | Returns the current system date and time. | None | [@NOW] |
| [@MONTHNUMBER] | Returns the numeric month from a date. | Date/time value | [@MONTHNUMBER(@NOW)] |
| [@DAYOFMONTH] | Returns the numeric day of the month. | Date/time value | [@DAYOFMONTH(@NOW)] |
| [@YEAR] | Returns the numeric year. | Date/time value | [@YEAR(@NOW)] |
| [@DATEADD] | Adds or subtracts time from a date. | Interval, amount, date | [@DATEADD(month,1,@NOW)] |
| [@SUBSTRING] | Returns part of a text value. | Text, starting position, length | [@SUBSTRING(#FIELD,1,2)] |
| [@LENGTH] | Returns the length of a text value. | Text | [@LENGTH(#FIELD)] |
| [@FIXED_LENGTH_LEADING_ZERO] | Converts a number to a fixed length using leading zeros. | Number, desired length | [@FIXED_LENGTH_LEADING_ZERO(4,4)] |
| [@RIGHT] | Returns characters from the right side of text. | Text, number of characters | [@RIGHT(#FIELD,2)] |
| [@FISCAL_YEAR_START] | Returns the current fiscal-year start date. | None | [@FISCAL_YEAR_START] |
| [@LAST_FISCAL_YEAR_START] | Returns the previous fiscal-year start date. | None | [@LAST_FISCAL_YEAR_START] |
| [@NEXT_FISCAL_YEAR_START] | Returns the next fiscal-year start date. | None | [@NEXT_FISCAL_YEAR_START] |
Examples
Current month and year in MMYY format:[@FIXED_LENGTH_LEADING_ZERO(@MONTHNUMBER(@NOW),2)][@RIGHT(@YEAR(@NOW),2)]
Month and year from a selected field:[@FIXED_LENGTH_LEADING_ZERO(@MONTHNUMBER(#FIELD),2)][@RIGHT(@YEAR(#FIELD),2)]
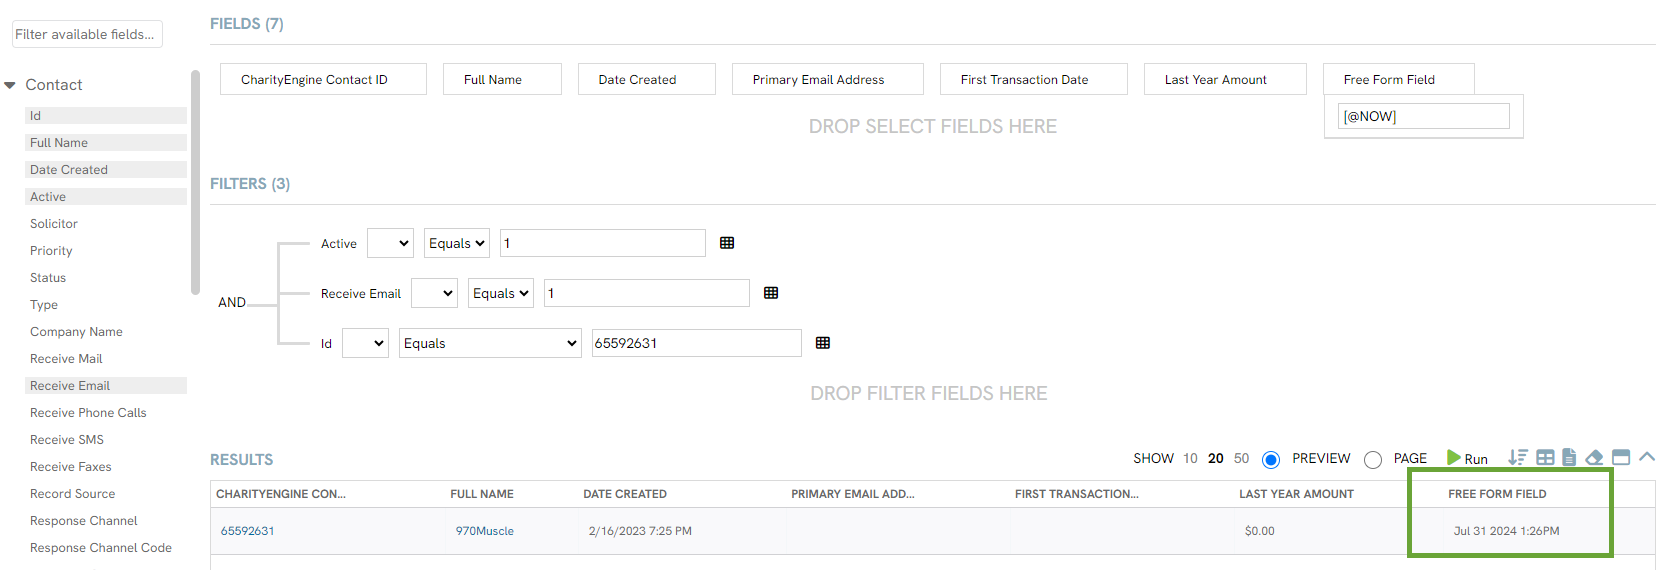
Free-form field using the current date and time:[@NOW]
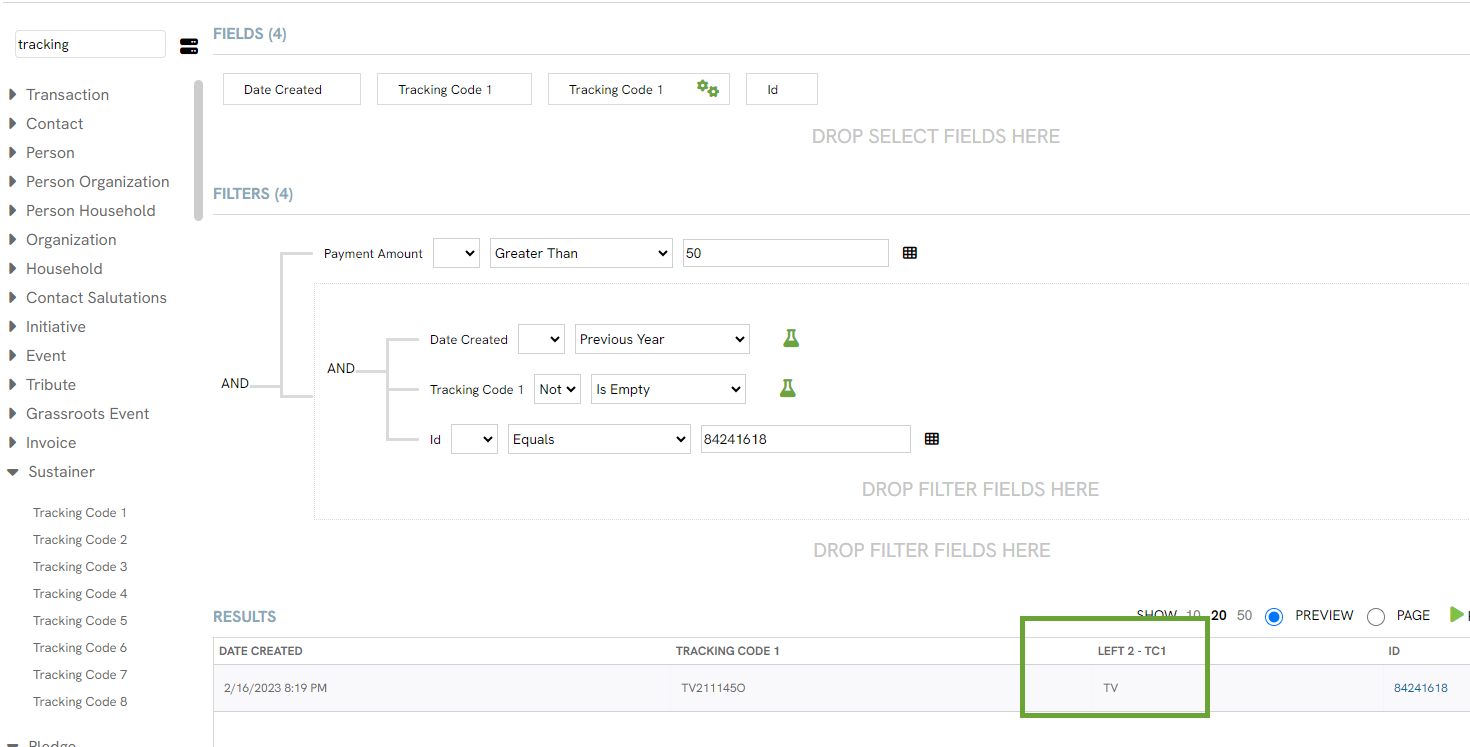
Substring example: Use [@SUBSTRING(#FIELD,1,2)] to return the first two characters from a field.
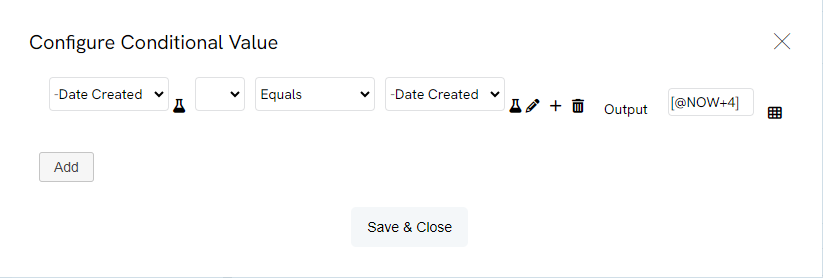
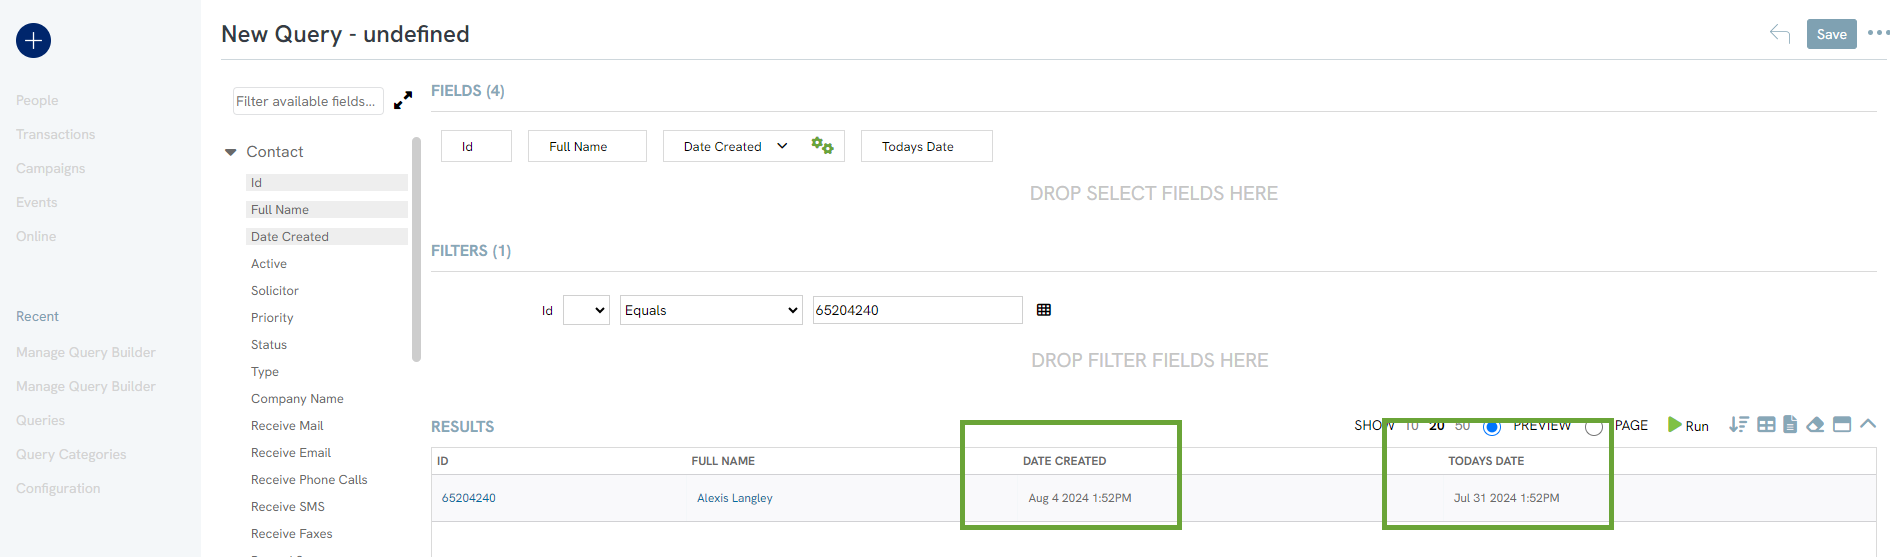
Future-date example: Use a Conditional Value on Contact Create Date to return a future date for a trigger or activity.
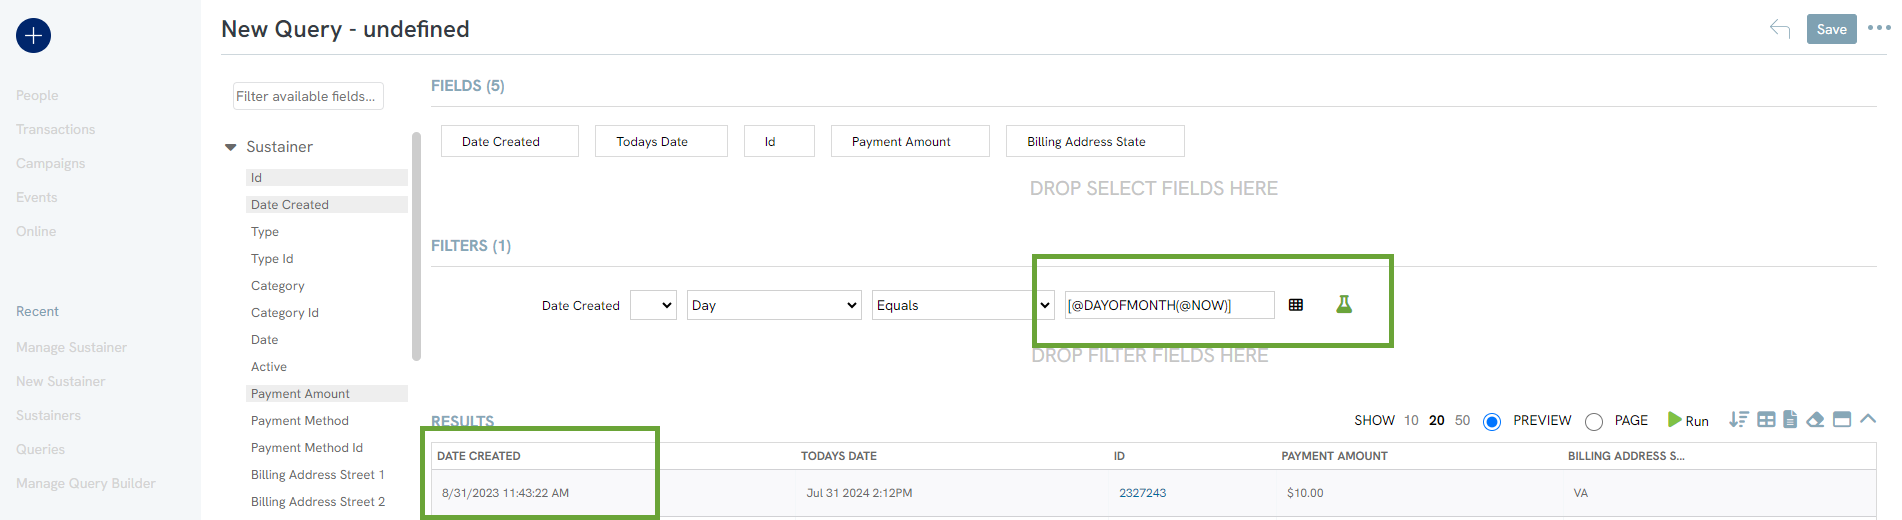
Filter example: Use [@DAYOFMONTH(@NOW)] to compare a date field with the current day of the month.
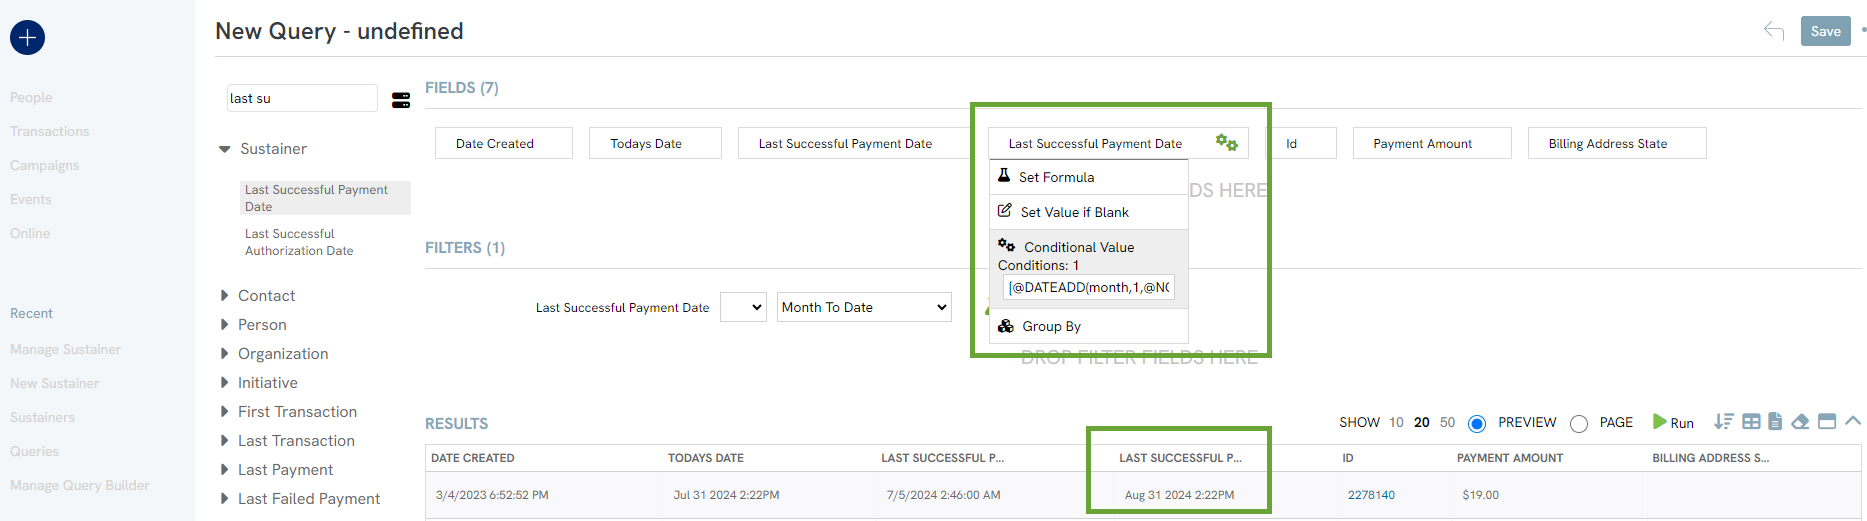
Date-add example: Use [@DATEADD(month,1,@NOW)] to return a date one month from today.
Best Practices and Performance
Build Efficient Queries
- Use IDs instead of names when possible.
- Select only the fields you need.
- Limit the number of subqueries.
- Avoid creating a subquery from another subquery.
- Do not repeat the same filter unnecessarily.
- Run and validate the query as you build it.
- Review recurring report and campaign criteria at least once a year.
- Use an Opt-In List instead of a Query when the audience does not need to update in real time.
Common Performance Mistakes
- Too many layers: Subqueries built from other subqueries create additional database work and may substantially slow performance.
- Unnecessary SELECT fields: Extra fields require additional processing, especially inside subqueries.
- Too many subqueries: Each subquery adds another set of database instructions.
Email Campaign Considerations
Campaign audience queries are time-sensitive because the query must run before the message can be sent. An email audience query that runs for more than two hours will time out and the campaign will fail.
Use CharityEngine's built-in email suppression features instead of manually excluding standard suppressions in every query. Contacts who are opted out, deceased, or blacklisted are excluded through system suppression. You may also configure a global suppression query for organization-specific exclusions.
Example: Avoid Repeating Filters
Suppose you need an email audience made up of contacts who:
- Belong to a specific email list.
- Have given a certain amount.
- Attended an event in the last three years.
- Live in a specified area.
Keep the email-list requirement in the main query and place the donor, event, and geographic requirements in separate subqueries. This avoids repeating the same email-list filter and reduces unnecessary database work.
FAQs and Additional Reading
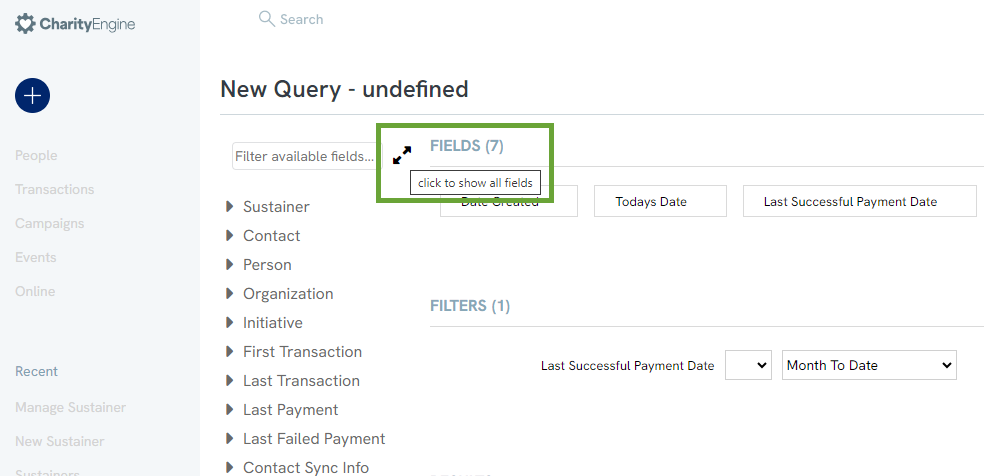
Q. How do I expand or collapse all fields in the Query Table?
A. Use Click to show all fields or Click to hide all fields.
Additional reading:
