Introduction
Pledges can be created very easily and are a great way to manage future pledged donations from donors. Pledges are donations promised by a donor for payment in the future. The donor may decide to make multiple payments over an agreed upon period of time. CharityEngine offers a pledge feature to assist fundraising of pledge donation types.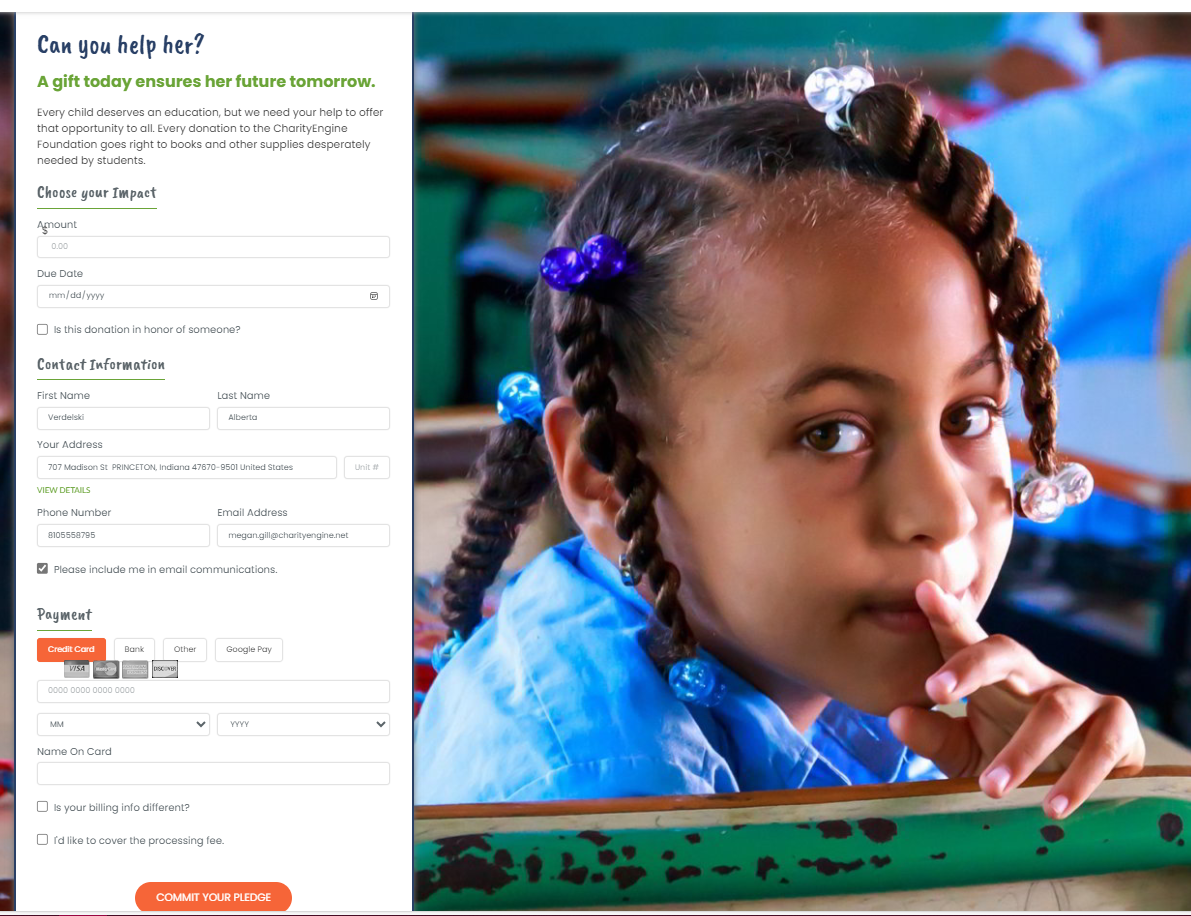
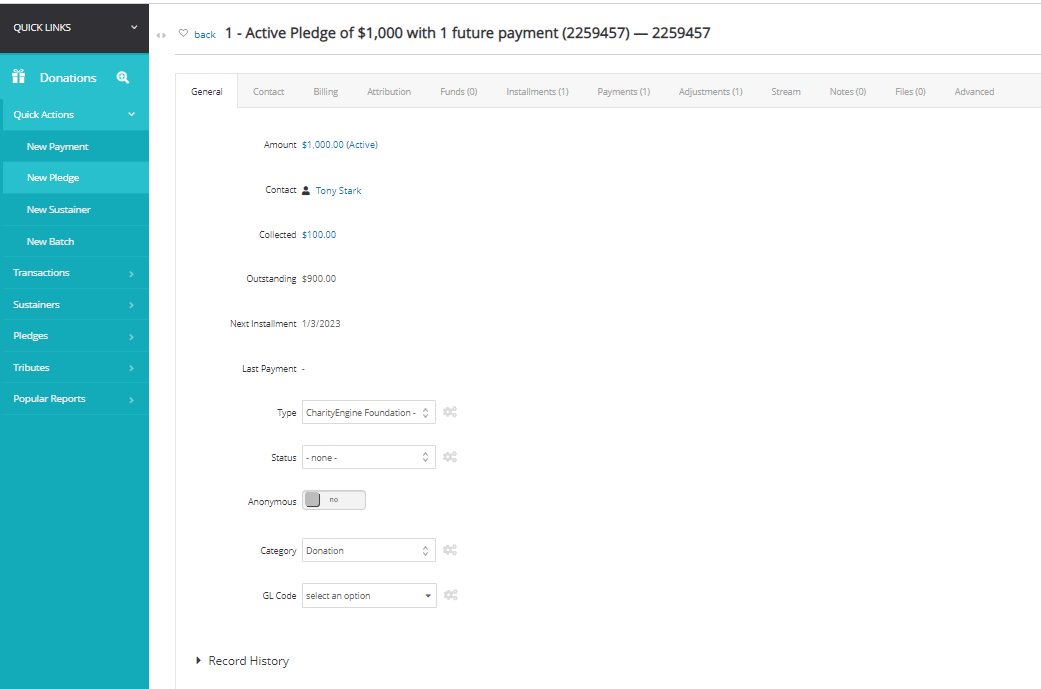
Table of Contents
- Introduction
- Prerequisites
- Introduction - A Basic Understanding of Pledge Structure within CharityEngine
- Instructions - Creating a New Pledge
- Instructions - Managing an Existing Pledge
- Instructions - Managing Installments
- Instructions - Viewing Pledges on the Contact Record
- Instructions - Configuring Pledge Types, Statuses, Cancel Reason for Customization
- Instructions - Sending Communication to Pledges
- Instructions - Creating a "Pledge" Type Web Form
- FAQs & Additional Reading
Prerequisites
- To establish custom pledge names/types see the Instructions - Configuration Pledge Types, Statuses, Cancel Reason for Customization section below.
- Please note, pledge invoice/installments are not automatically created through the Pledge web form feature. This is an intentional design as most organizations will work with a donor to create a single or multi payment schedule. If you wish to create a 'short term' recurring payment cycle (i.e. $10/month for 12 months), consider using the sustainer web form feature and customize the sustainer accounts for max collection (i.e. $120 collected).
Introduction - A Basic Understanding of Pledge Structure within CharityEngine
Similar to Sustainers, Pledges are structured first by creating a 'pledge account'. Pledge accounts are typically used in instances in which a promised gift has been arranged with the non-profit organization for a one-time, time limited gift (one year, less than a year, or multi-year). The donor and the non-profit organization will arrange a planned payment schedule which may be monthly, semi-annually, or customized to the donor's needs. The pledge account is the basis of capturing the donor, their 'pledged' amount, start/end dates, frequency of payment, and payment amounts. Other attributes can be assigned to the pledge record including funds, initiatives/campaigns, solicitor, associated opportunity, etc.
Once a pledge account has been established, invoices/installments will be generated (either manually or automatically based upon the assigned set up). invoices/installments allow CharityEngine end users to determine if payment has been received or payment is outstanding. Note: invoices are also referred to as "installments".
Once an invoice/installment is open, a transaction will connected to the open invoice/installment. If payment is successfully received, the invoice/installment will be closed. If payment is not received - or the payment was declined (i.e. declined credit card or ACH payment), the invoice/installment will remain open to allow CharityEngine users to track outstanding balances.
As payments are collected with a unique transaction ID, the pledge account will reflect the total collected and will reduce the total outstanding balance.
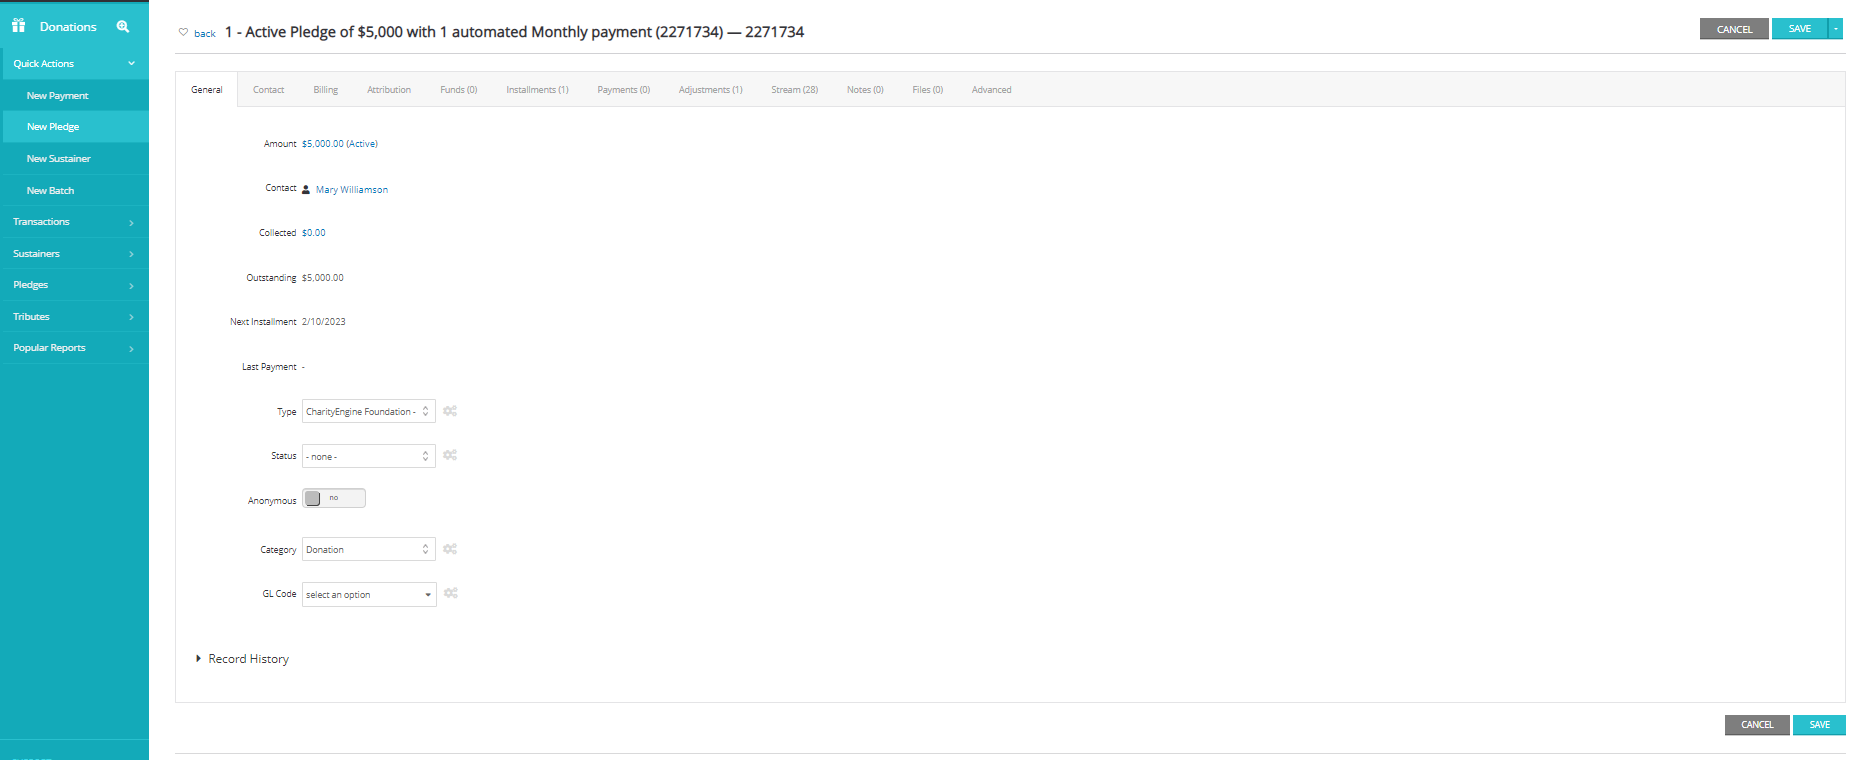
In this example, the donor "Demo Pledge" has committed to a $13,000 pledge. To date, $6,000 has been collected leaving an outstanding balance of $7,000. The donor's next installment is scheduled for May 1st based upon an agreement for a monthly payment schedule. The prior 6 payments can be located on the Payments tab and will reflect the specific transaction ID associated with this Pledge Account - 2286891. 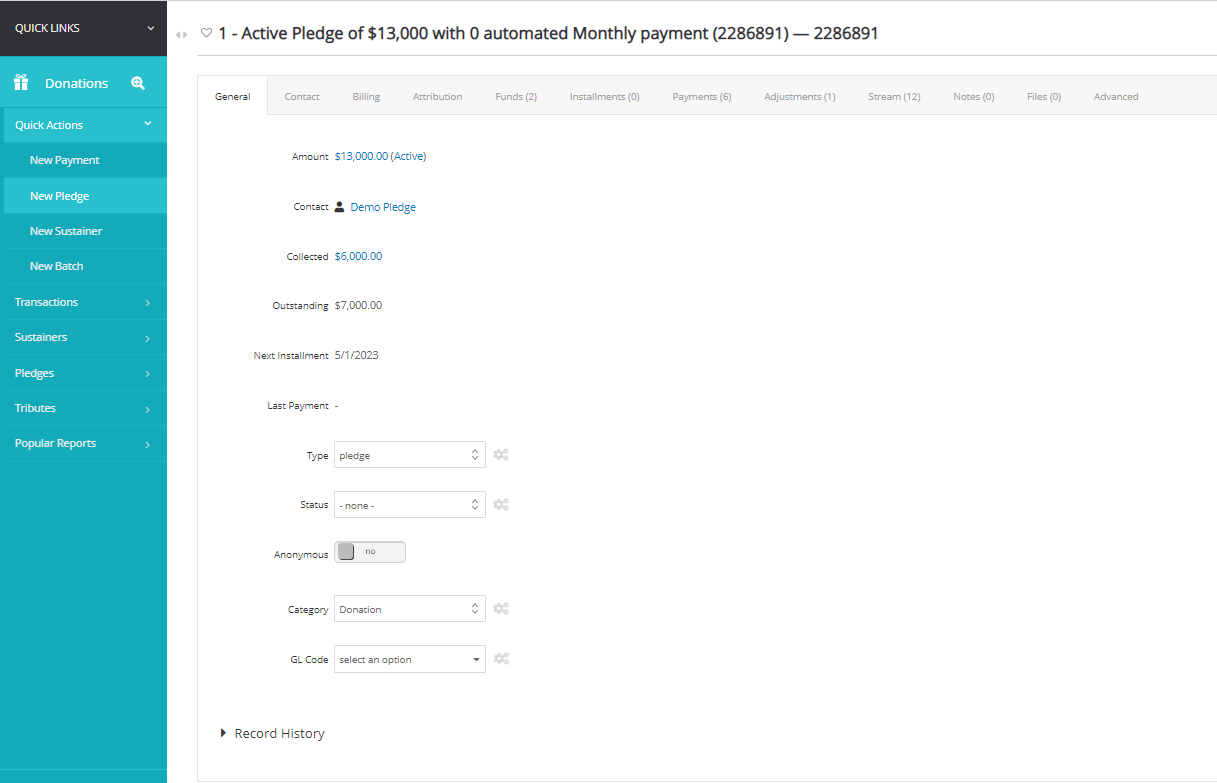
Instructions - Creating a New Pledge
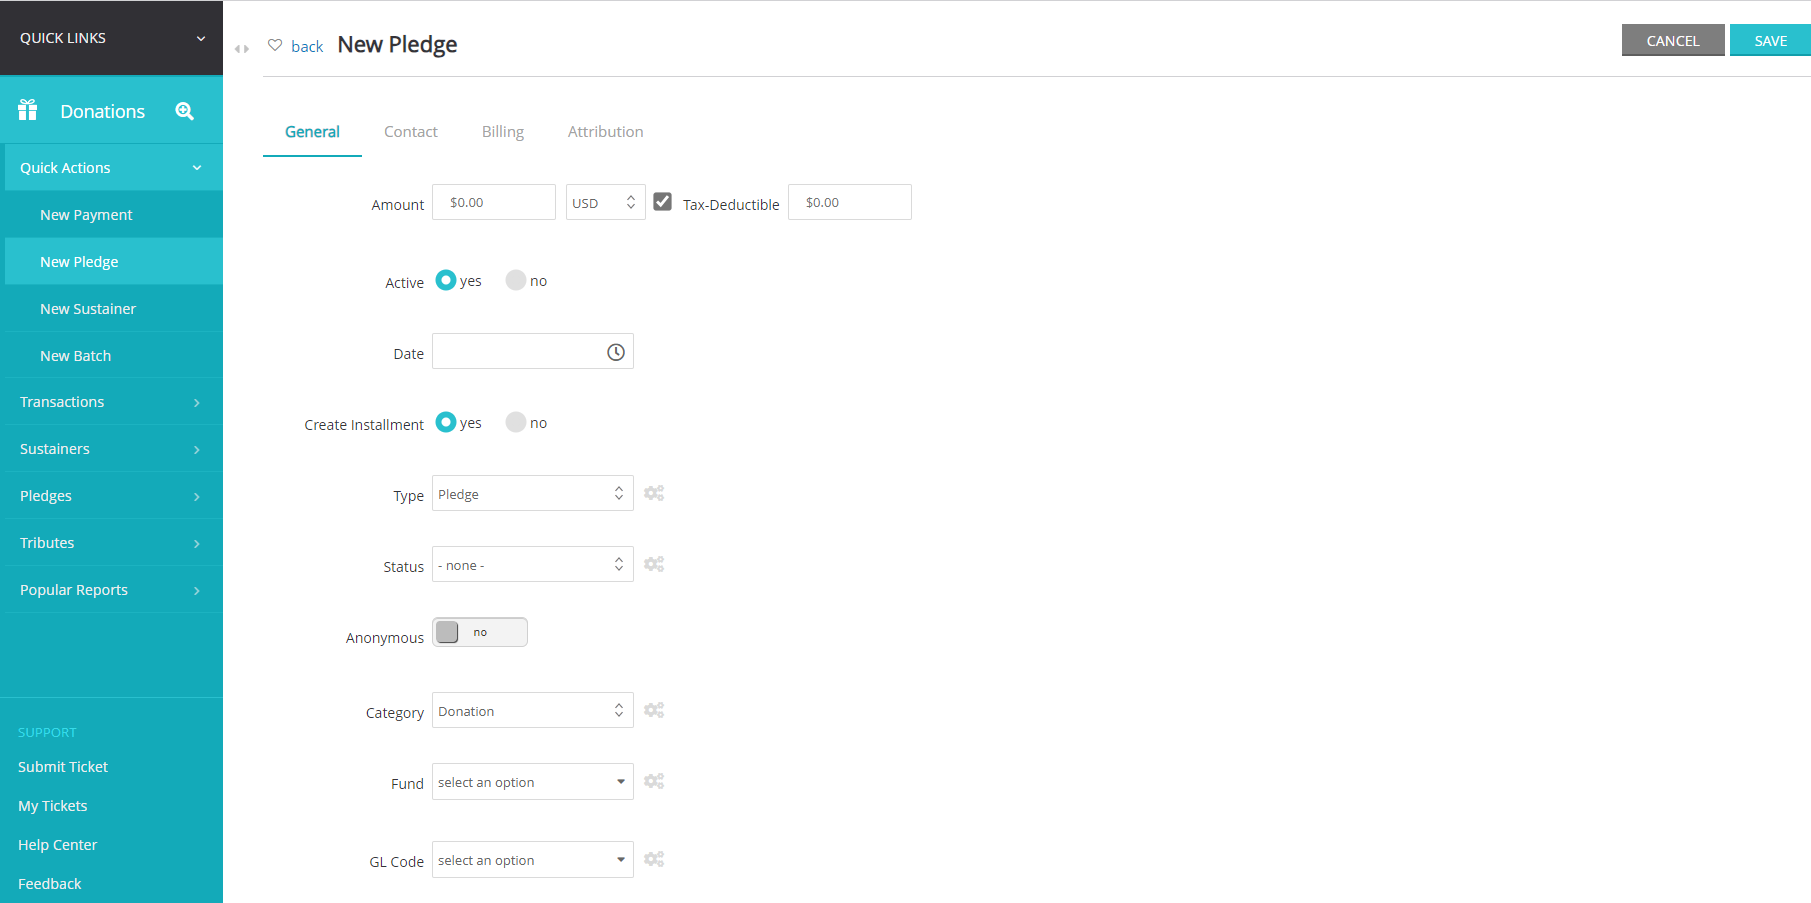
Step 1: To create a pledge, navigate to the Donations App > Quick Actions > New Pledge
Step 2: You will be navigated to the New Pledge screen where you will need to enter the following information:
- Amount: (required) - amount of total pledge
- Active: default - yes
- Date: Allows user to place retroactive or future date for start of pledge
- Create Installment: default - yes (for creation of payment plan)
- NOTE: by selecting Yes, an invoice for the total pledge amount will be created
- Alternatively, select No and at the billing step, select the option for manual creation or automatic frequency
- Status: if applicable
- Anonymous: default no
- Category: default to type as donation
- Fund: select fund value if applicable
- GL Code: select for general ledger code if applicable
Step 3: Navigate to the Contact tab and locate a person, organization, or household
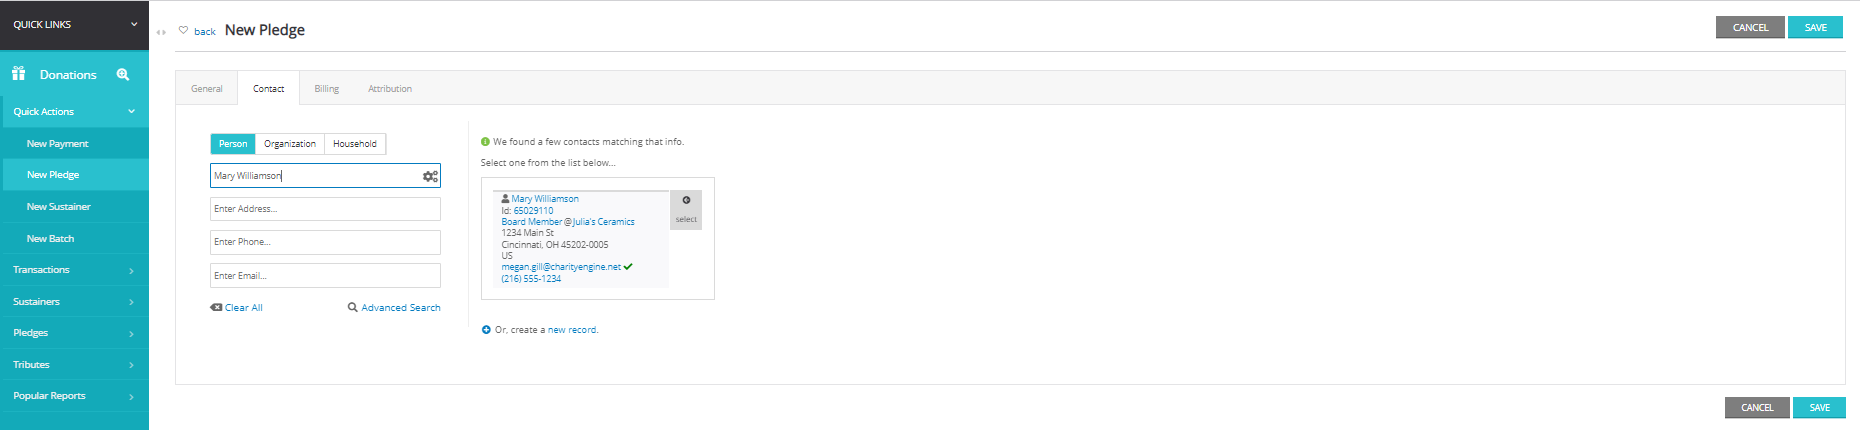
Step 4: Navigate to the Billing tab. Default is set as Manual. This is the default as you will likely need to determine a customized invoicing schedule for each donor. This may be required as you are negotiating the payment schedule or know that you will require some flexibility in the pledge collection. However, if your organization also supports a recurring payment schedule, select Auto and move to Step 5.
Note: If the user selected Create Invoice: Yes from the General tab, the full pledge amount will be automatically invoiced
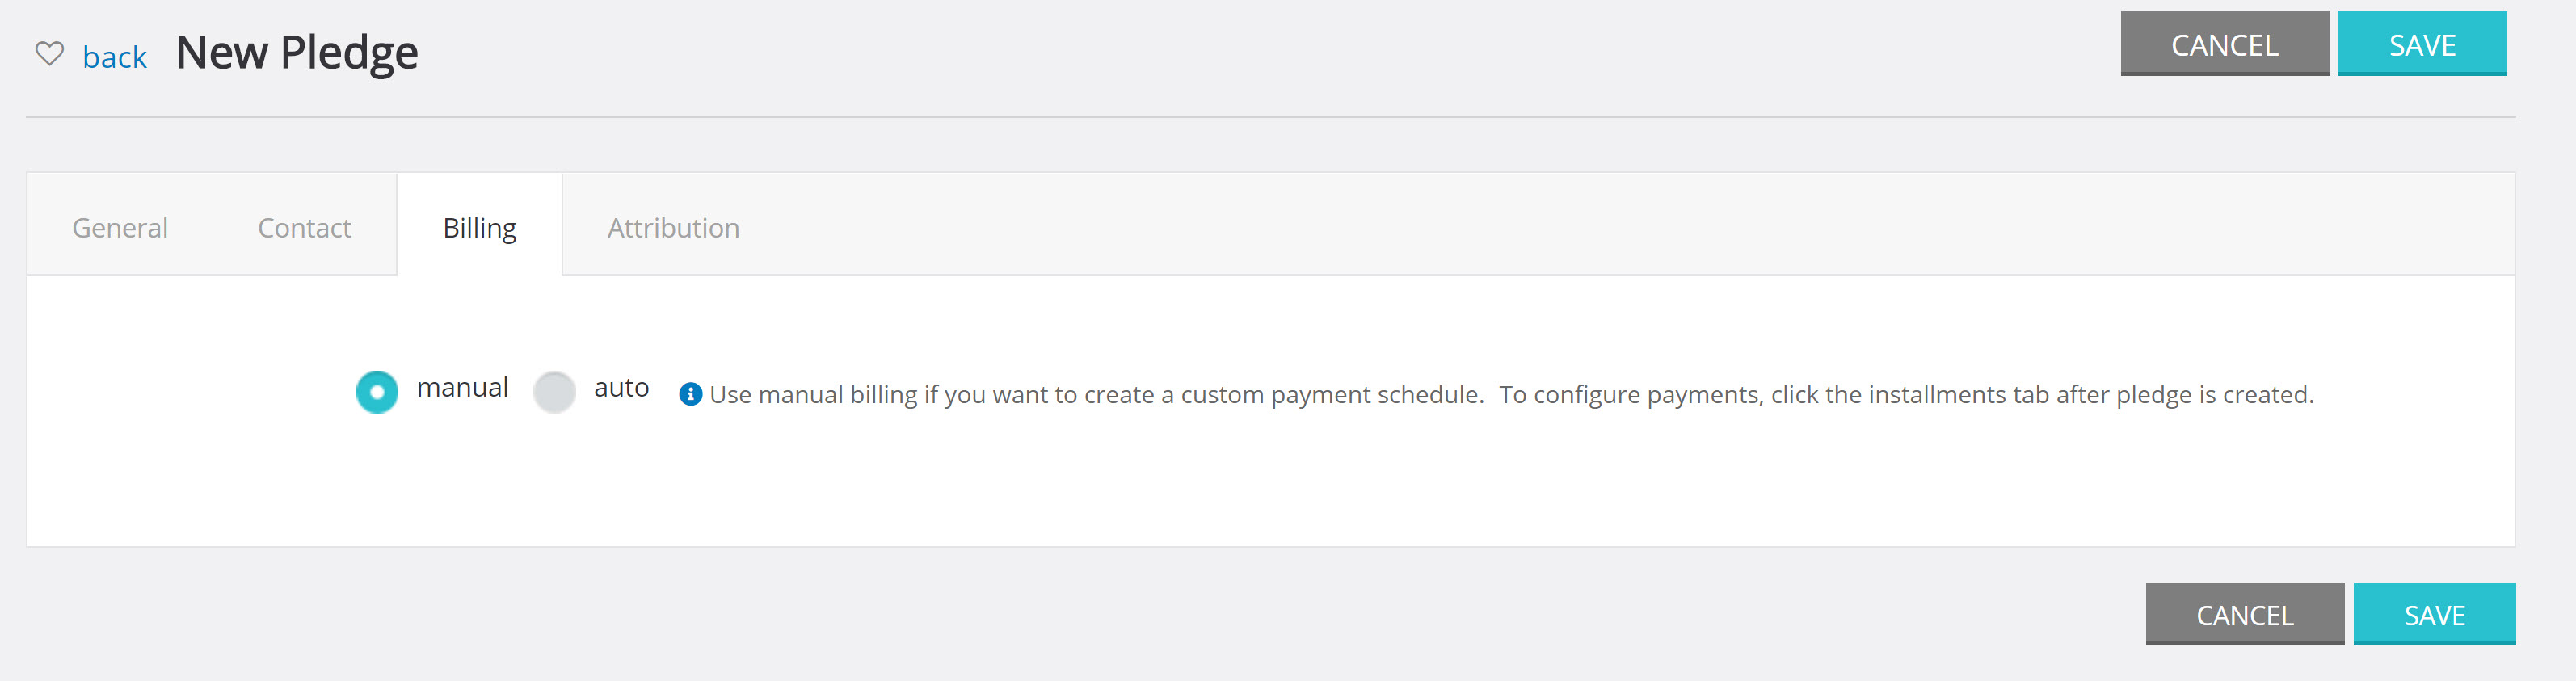
a. If you are proceeding with a Manual Billing schedule, click SAVE. This will expose the Installments tab.
b. Click Add New and you will be navigated to create a new installment.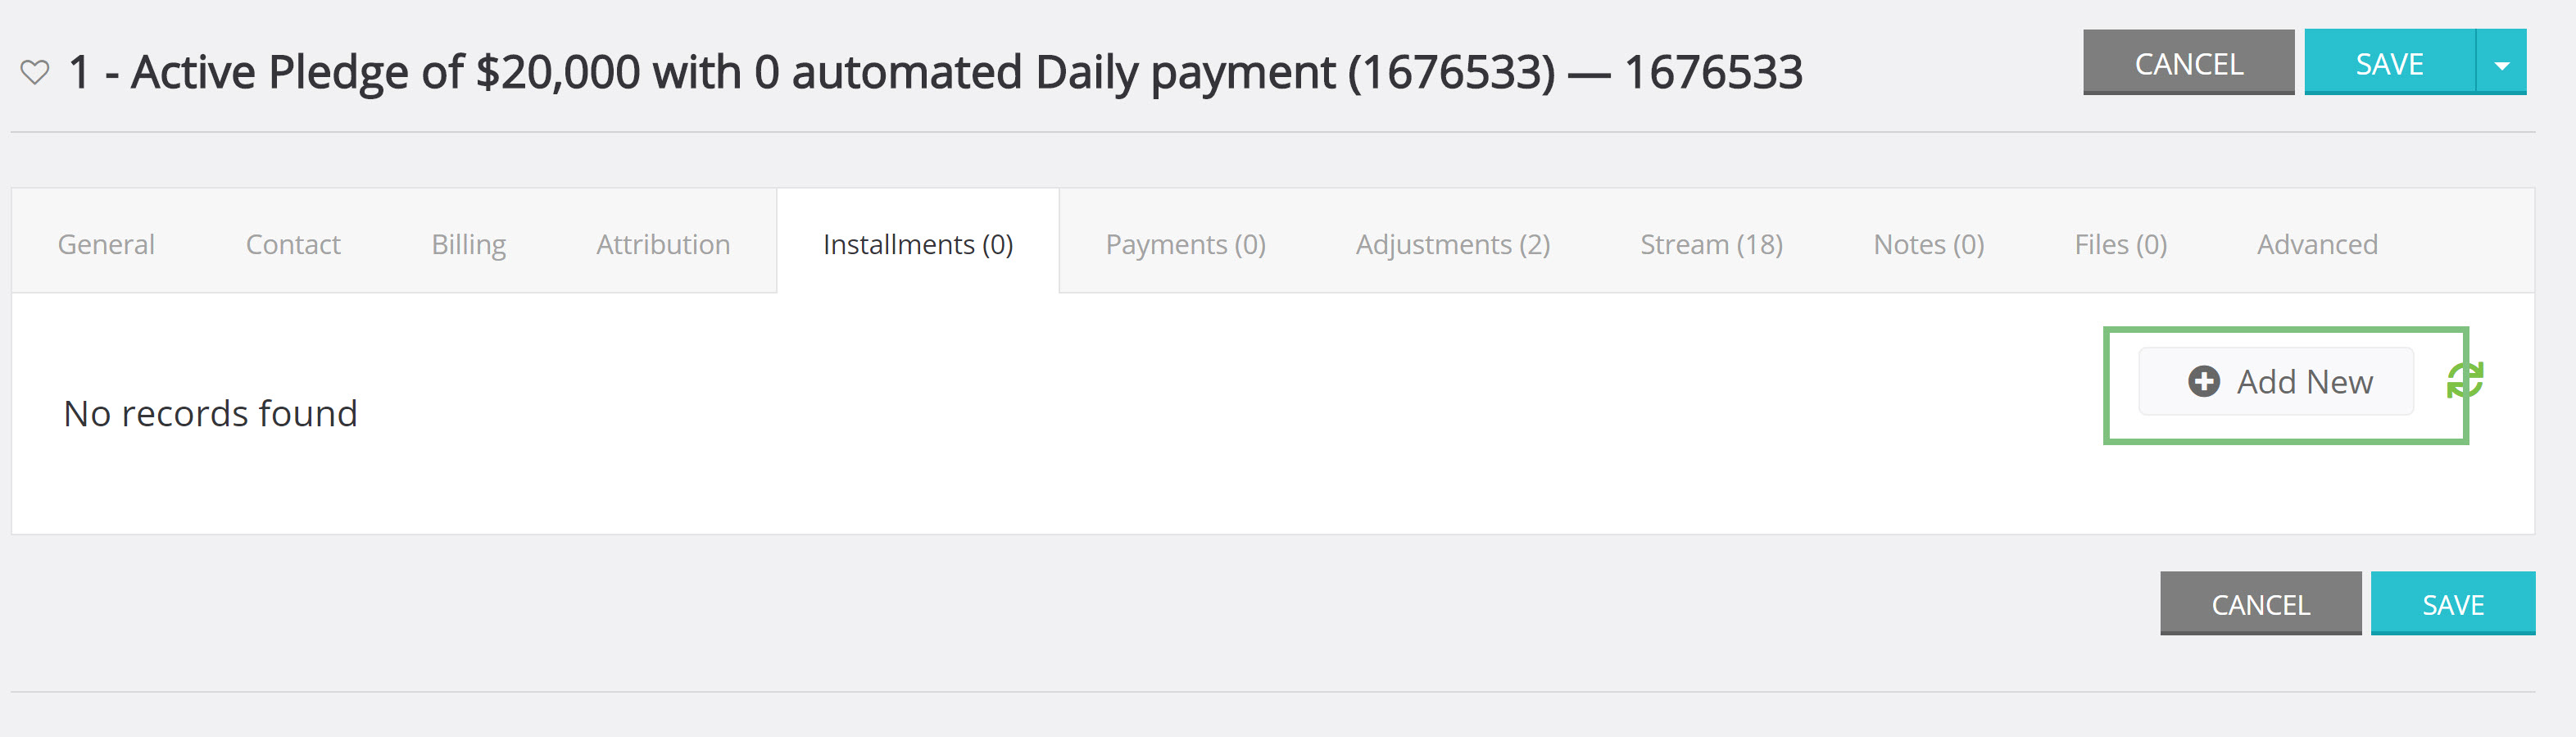
c. Enter the Amount of the installment and enter Due Date and click SAVE. This will secure the first invoice/installment. If you wish, add additional installments based upon a customized billing plan. 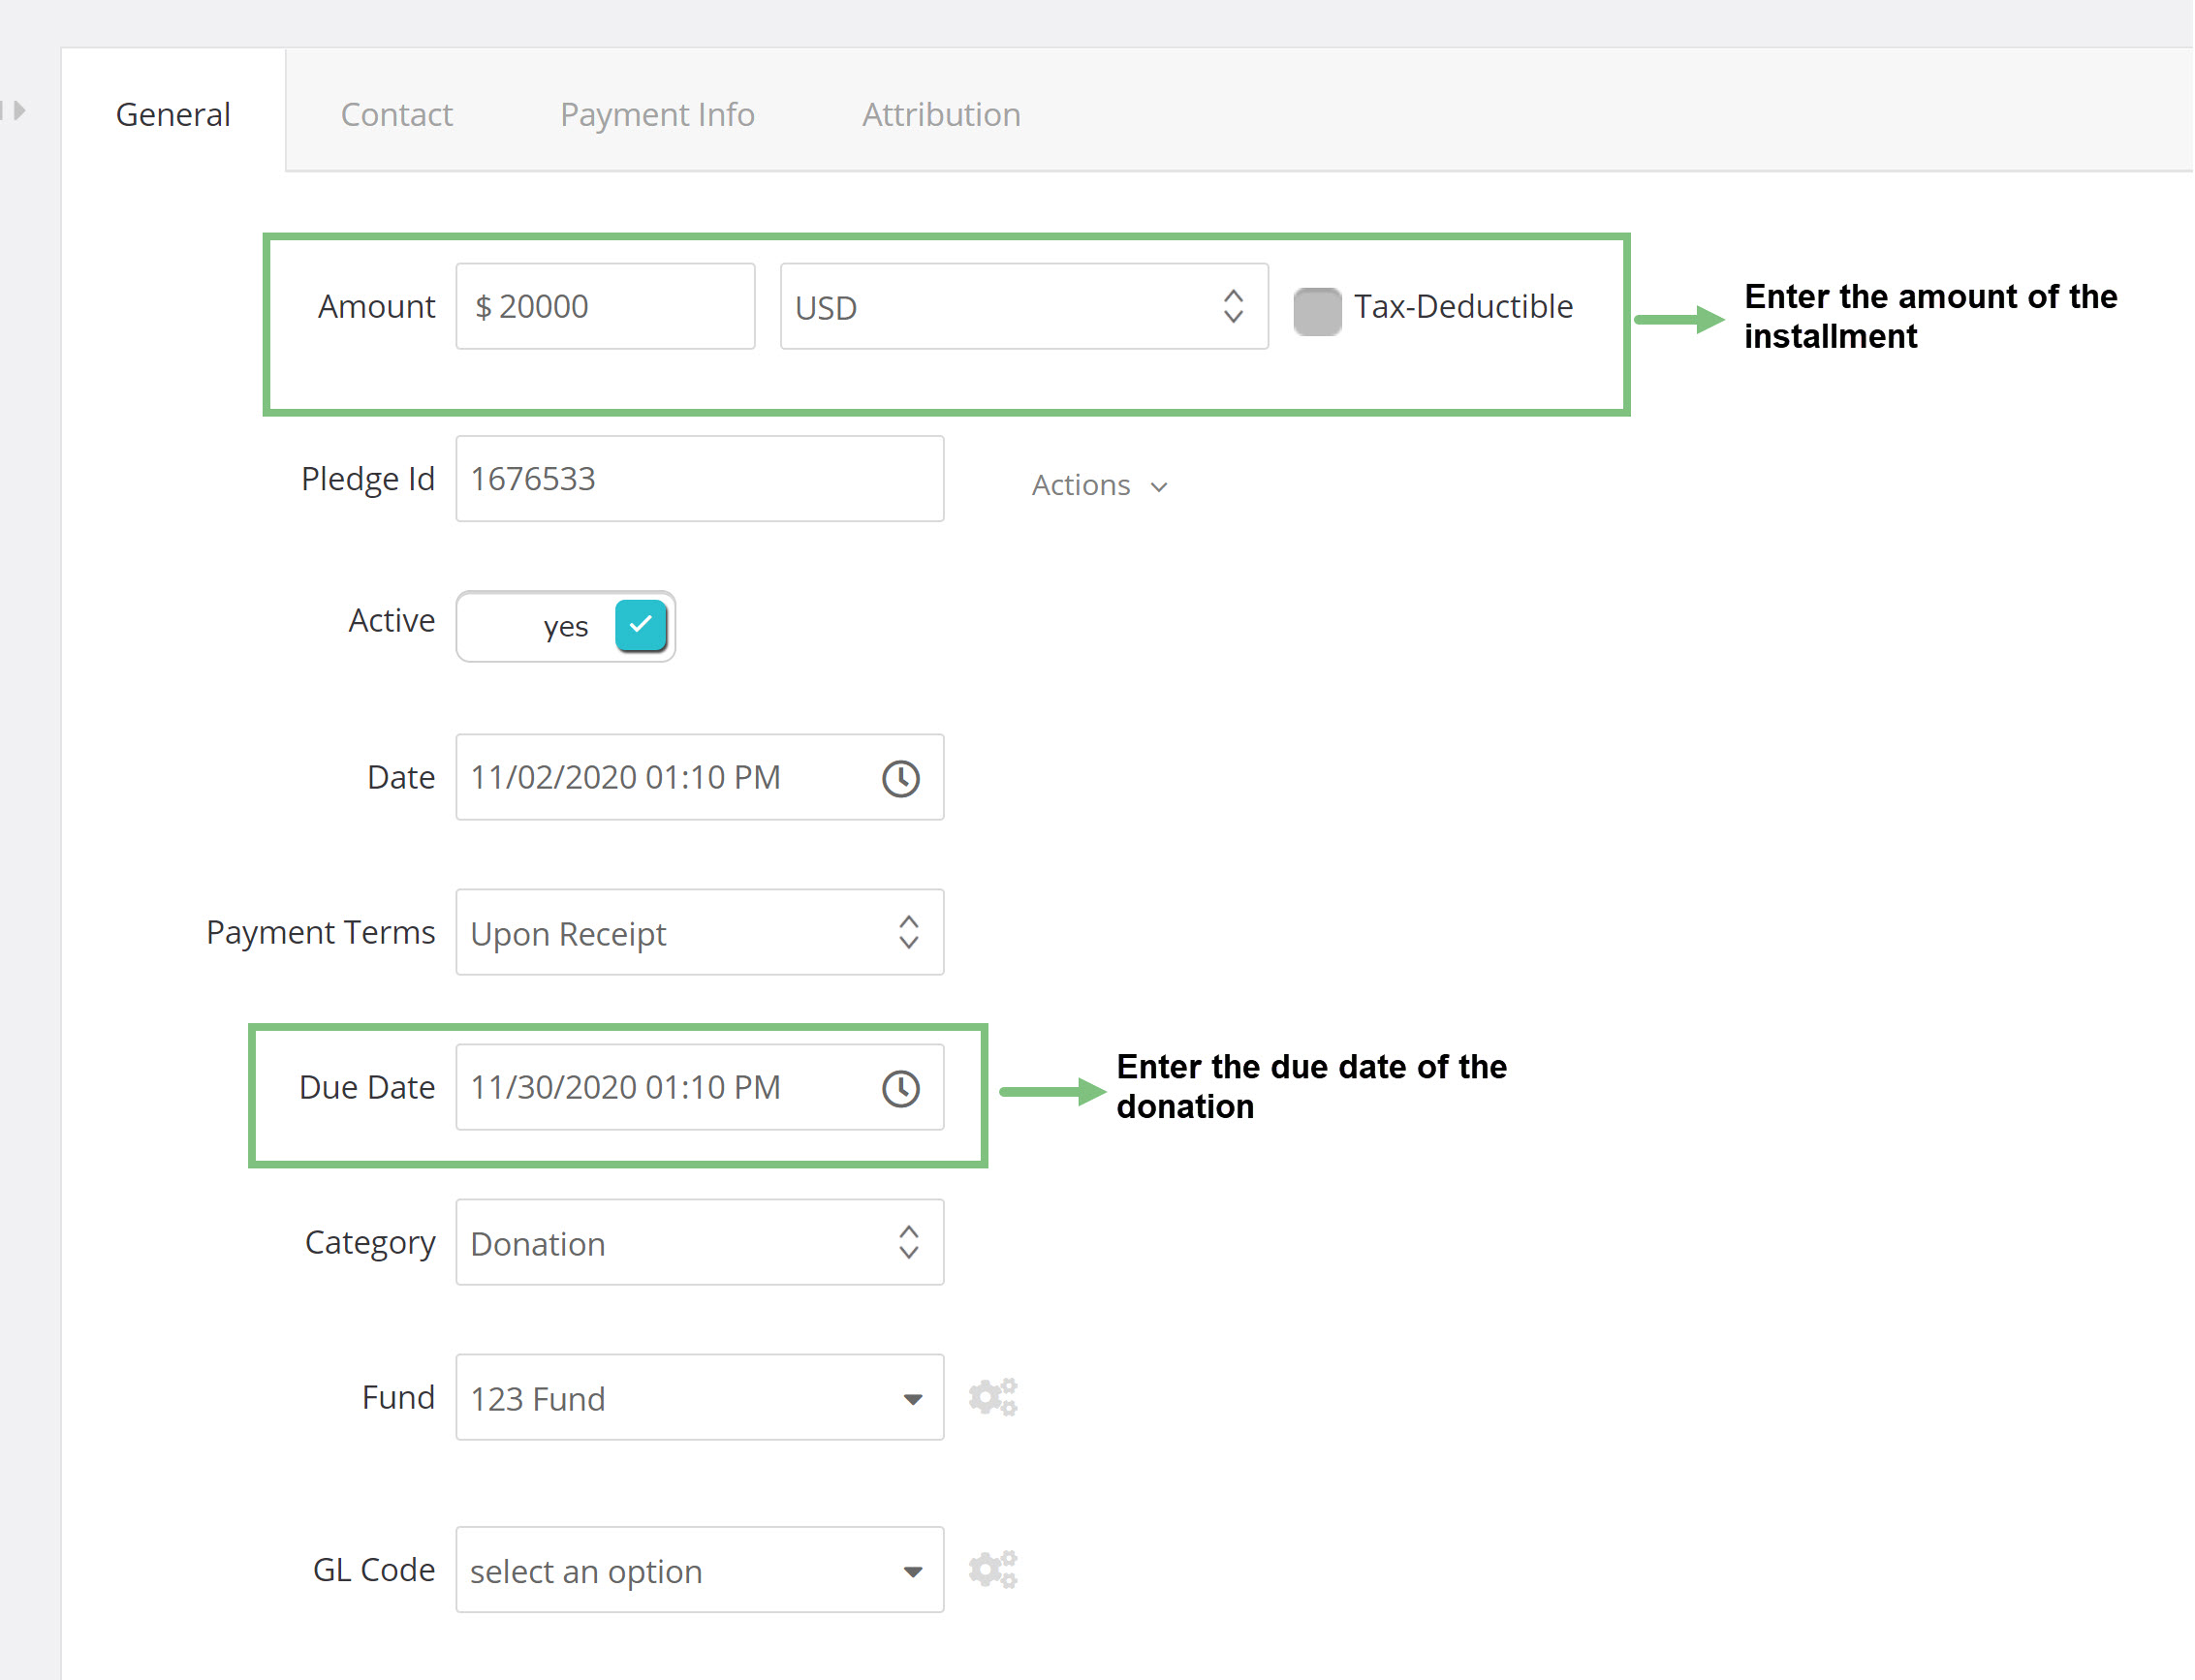
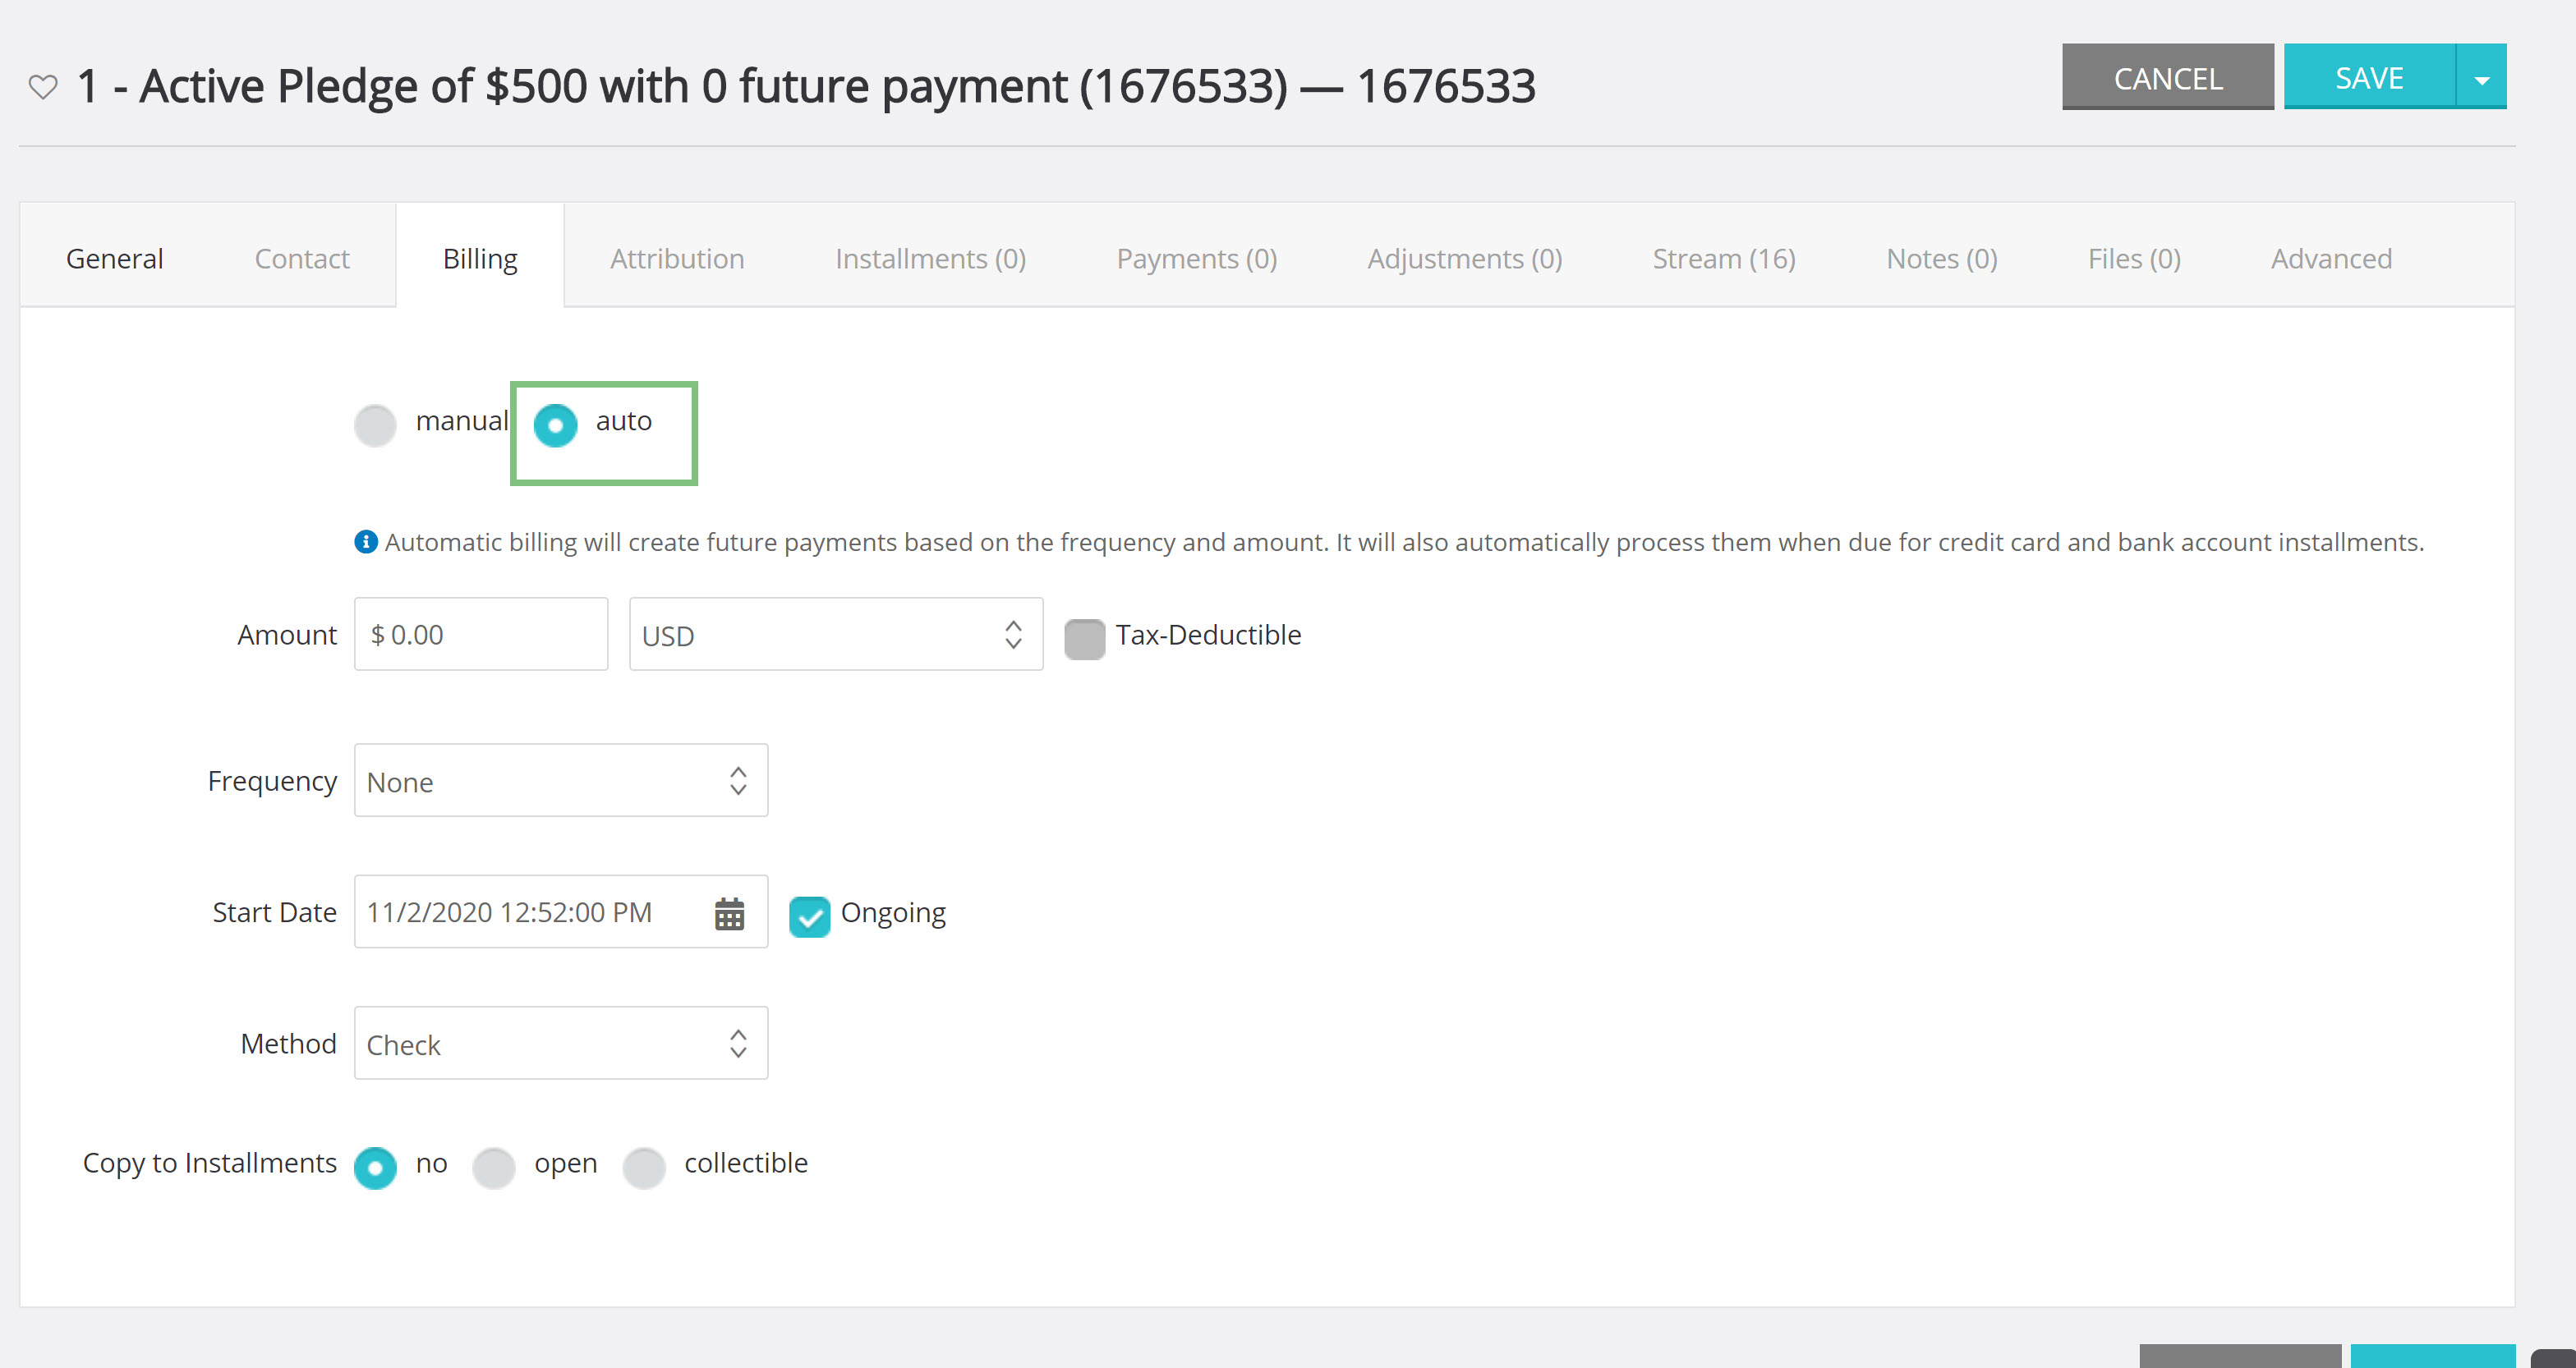
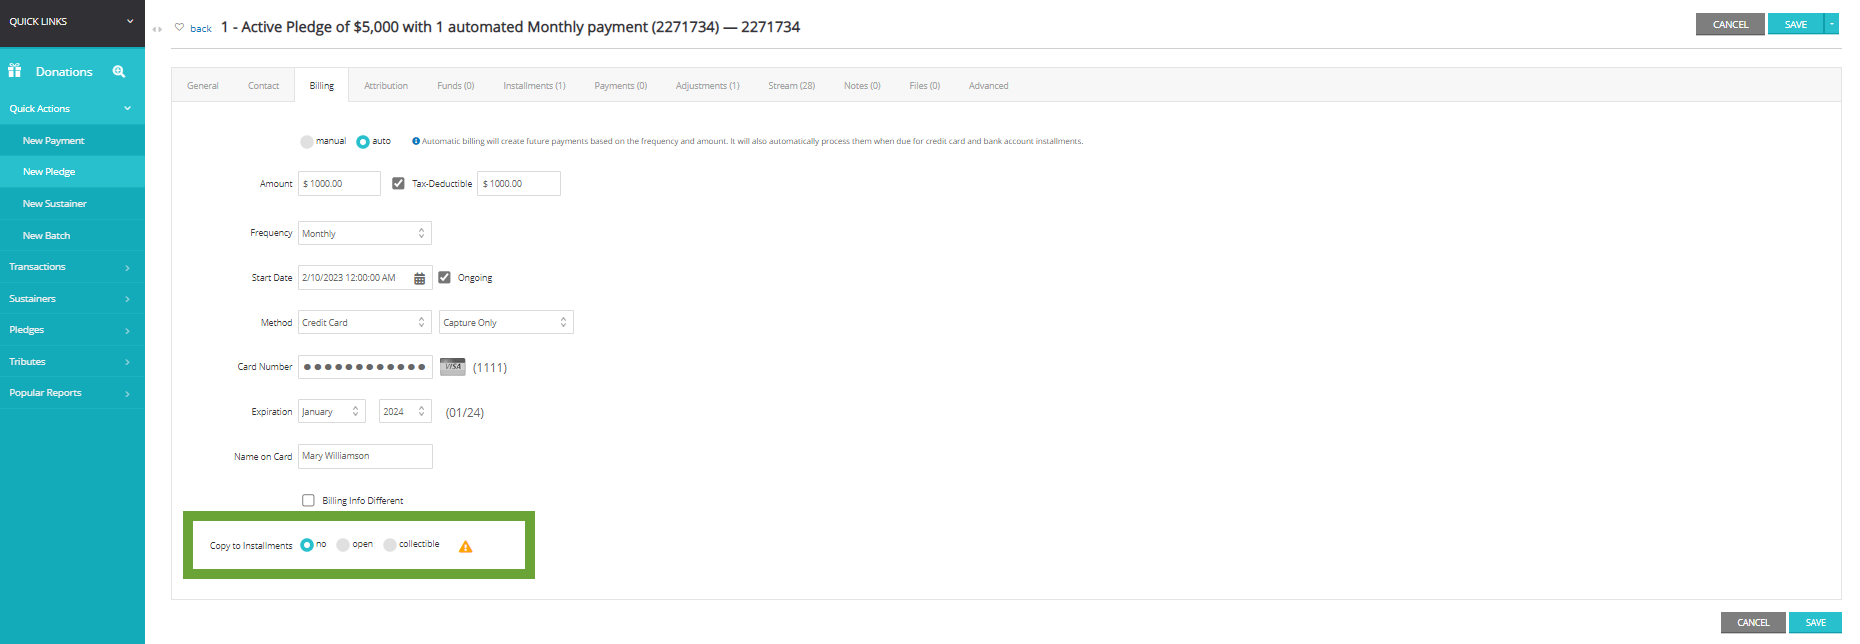
Step 5: To configure automatic billing of the pledge donation, click the auto radio button to configure the payment from the Billing tab.
Note: If the user selected Create Invoice: Yes from the General tab, the full pledge amount will be automatically invoiced and may create 2 invoices (full amount plus the frequency selection)
Note: Subsequent invoices will be generated based upon the frequency selected. (I.e. If the user selects monthly with a start date of 01/01/2024, the 01/01/2024 invoice will be generated. Once billing is completed for that invoice, the 02/01/2024 invoice will be generated)
-
- Enter the:
- Amount: the installment amount that will be automatically billed
- Frequency: How often the donor will be billed
- Start Date: The date of the first installment billing
- Note: If you do not want to bill the amount upon creation of the pledge, change the start date to reflect the appropriate start date.
- Method: tender type
- Note: If Bank Account or Credit Card are selected, you will need to enter the payment information and on the start date the account will be billed. If the payment method is not electronic, i.e. cash or check, the payment will not process and the transaction will have to be manually entered and processed.
- Credit Card: Select Capture Only (capture for future dated installment), Process Now (if first payment is to be initiated at time of pledge creation, Processor will be default or select change - ideal if your organization supports a 501c and 501c4 gateway), Authorization Only (to ensure valid credit card value for future dated installment)
- Bank Account: Select Capture Only (capture for future dated installment) or Process Now (if first payment is to be initiate at time of pledge creation)
- Cash/Check/Other: The transaction will be created, however no payment will be processed until the payment has been received. The collection detail for cash/check/other pledge will always require a manual payment entry
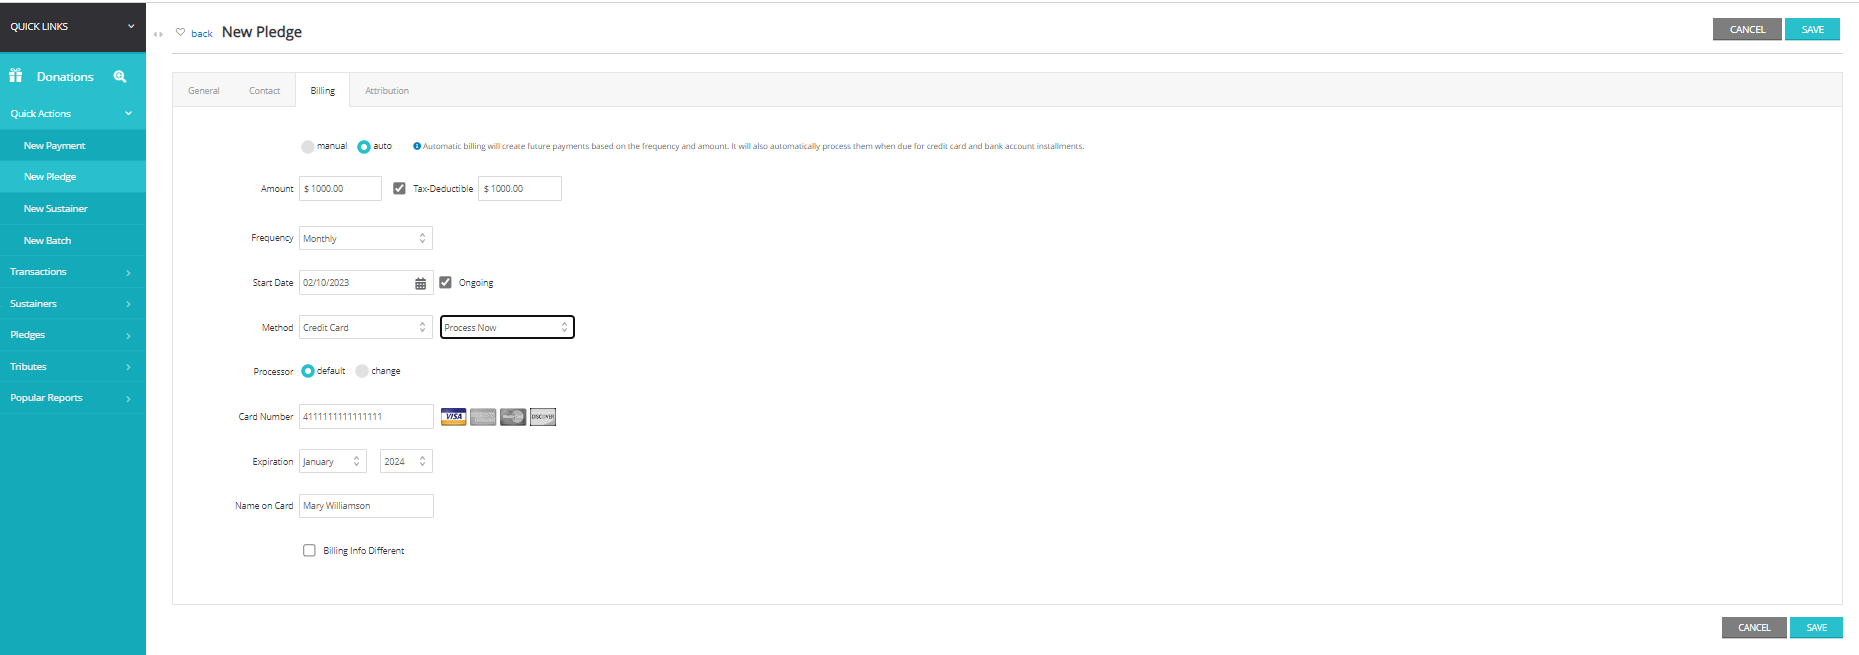
- Click SAVE secure payment
- Enter the:
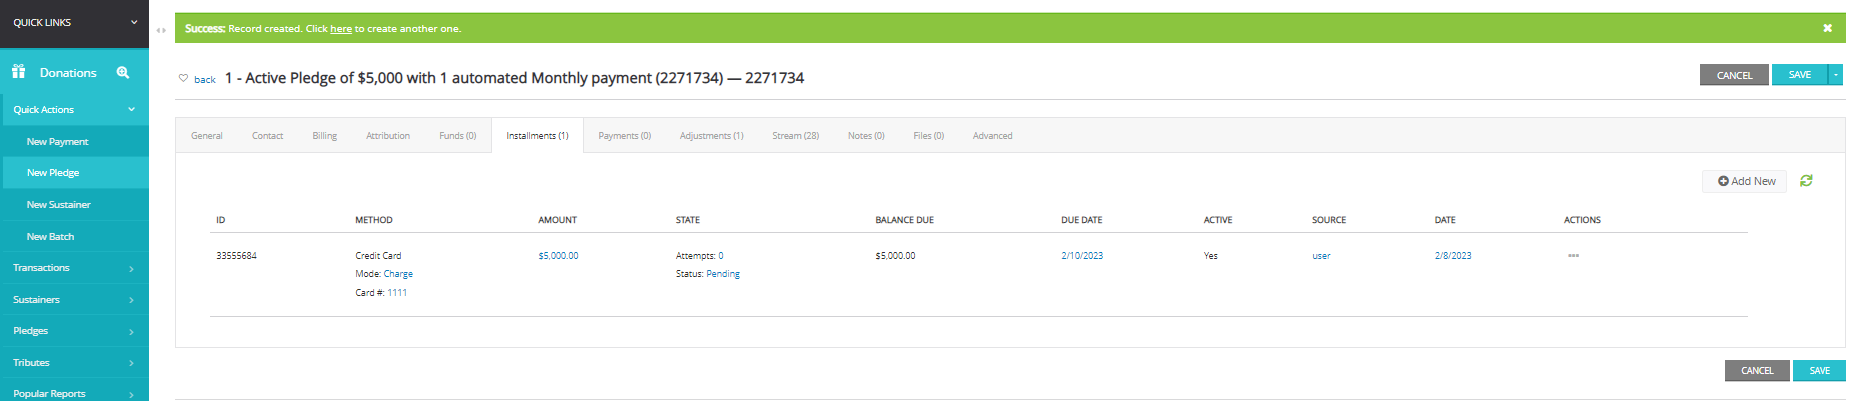
Step 6: The Payment tab will provide a summary of all payments associated to the Pledge Account (manual and/or automatic)
Step 7: The Pledge Account is now established and will initiate automatic installments - or will be available to enter manual installments
Instructions - Managing an Existing Pledge
If you need to performance maintenance on a pledge record, this can be achieved easily through the Pledge feature.
Step 1: Navigate to the Donations App > Pledge > Search & Manage > locate the pledge record > ACTIONS > Manage
Note: From the ACTIONS list, you can also Pause Until to pause installment payments, change the billing date through Billing Date, Cancel the pledge, access Payments, or Delete the pledge account.

Step 2: From the General tab to:
- Amount: click to change the pledge amount
- Active: click to make the pledge record inactive
- Contact: click to change the contact name
- Type: to change the pledge type
- Status: to change status
- Anonymous: to make anonymous
- Category: to change the type
- GL Code: to add a general ledger code for accounting

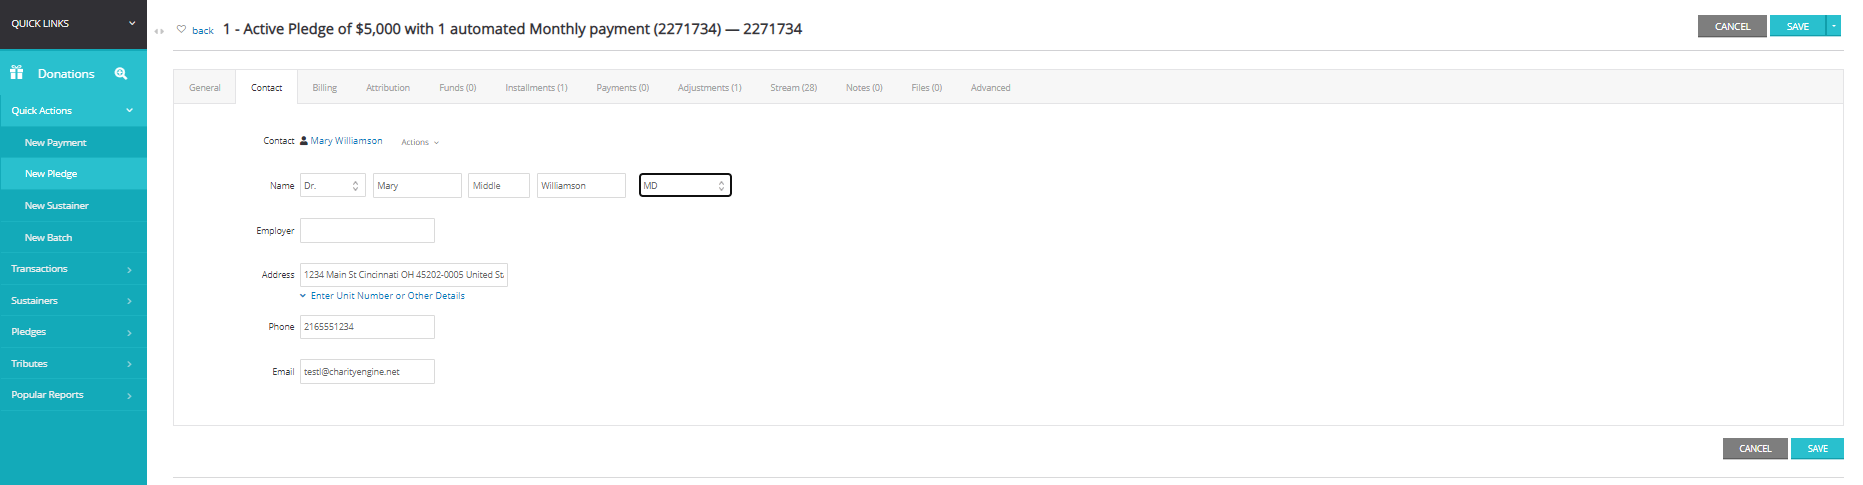
Step 3: From the Contact tab, modify the name, employer, address, phone, and/or email
Step 4: Adjust billing details including amount, frequency, method, update card number/bank account (for automatic payments), etc.
Important: When any billing detail is modified, the user must determine to Copy to Installments electing no change on an open installment invoices/installments, collectible installment invoices/installments, or no adjustments to open/collectible installment invoices/installments.
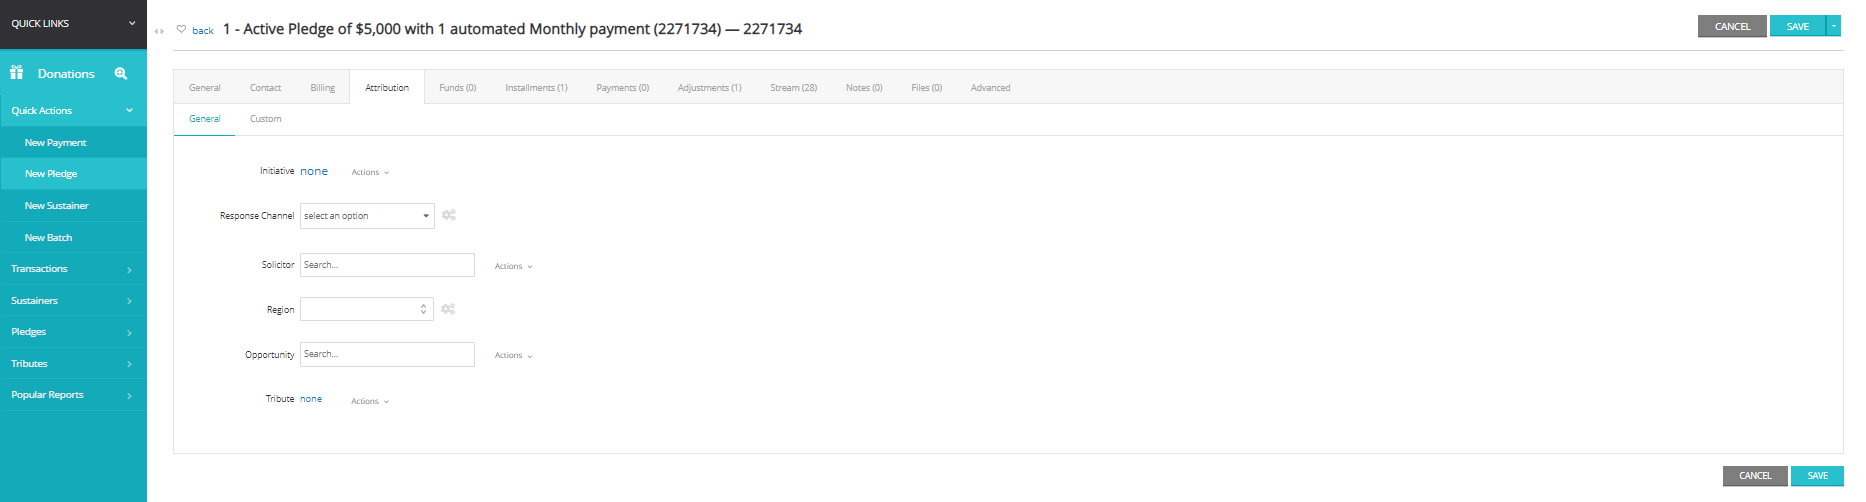
Step 5: Navigate to the Attribution tab to add/modify other account attributions or transaction custom fields (via custom sub tab)
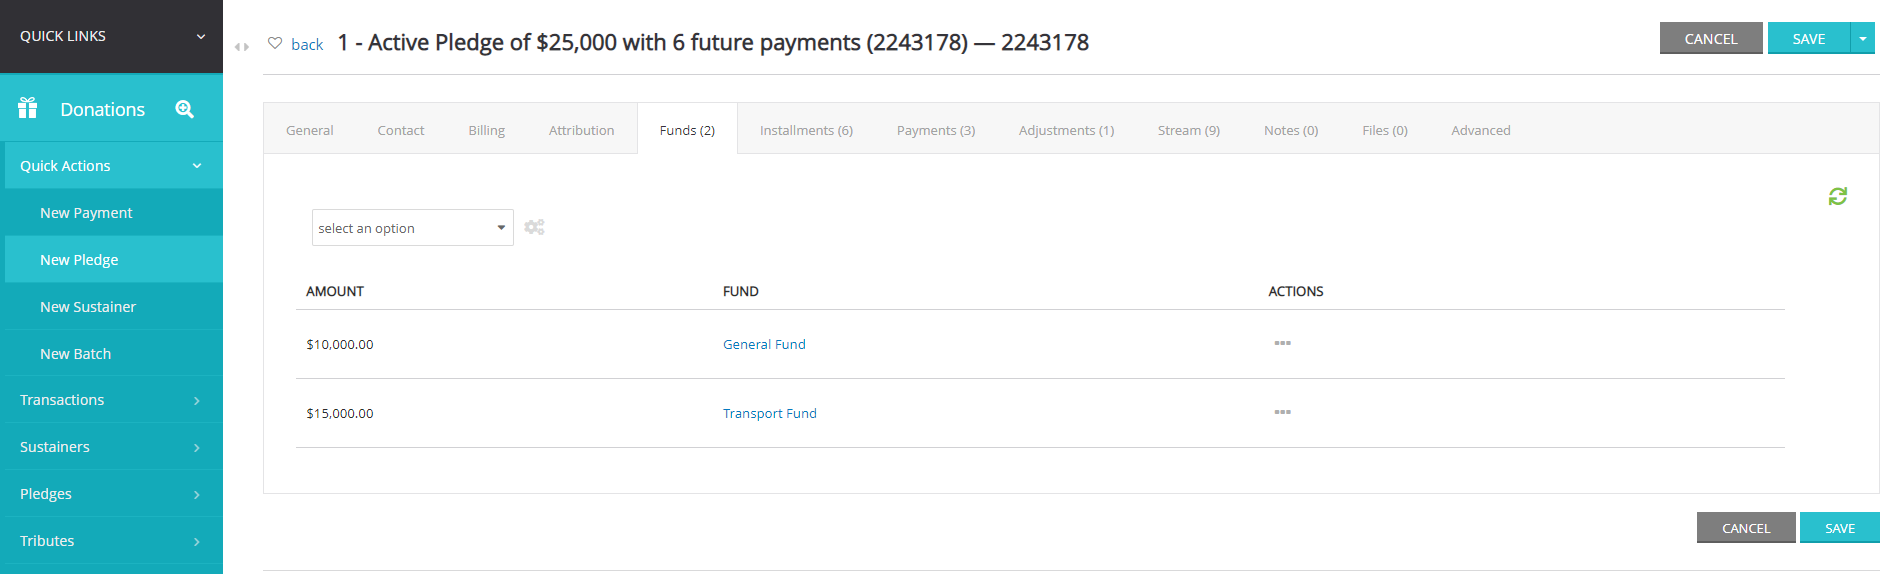
Step 6: Navigate to the Funds tab to add/edit funds attributions

Step 7: Navigate to the Installments tab to review past and current installments. Create a new installment by clicking Add New.
Note: If the pledge account is manual, the user will need to use the Add New to customize new installments

Step 8: Navigate to the Payments tab to review past payments. Create a new payment by clicking Add New.
Note: If processing manual pledge payments, the user can use Add New to create a payment. Pledge payments can also be created through the Donations App > Quick Actions > New Payment (see next image)

If manually entering a pledge payment from Donations App > Quick Actions > New Payment > Payments: Pledge and select Type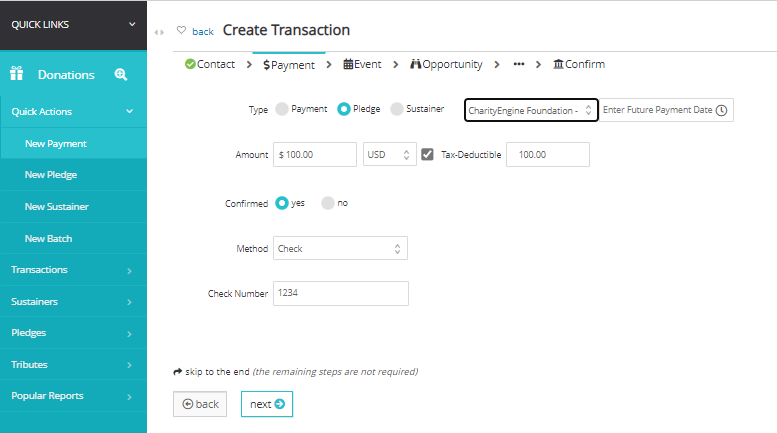
Step 9: Navigate to the Adjustments tab to see historical adjustments to the pledge account

Step 10: The Stream tab will provide a summary of all adjustments associated with the contact record
Step 11: The Notes tab can be used to create new notations for the pledge account
Step 12: The Files tab can be used to attach files to the pledge account
Step 13: Use the Advanced tab for adjustments to the Payment Processor to override the default processor. This is beneficial if your organization manages more than one processor.
Instructions - Managing Installments
Leveraging the Installments option will provide easy access to all past, current and future pledge installments/invoices. Leverage this section to conduct a series of tasks related to installments.
Step 1: Navigate to the Donations App > Pledges > Installments
Step 2: From the listing screen leverage the quick filters and advanced filters to identify the target installments
Step 3: Use the options from the top right hand corner to:
- Create New installment record
- Advanced Filter for additional filtering options
- More > Send Messages to bulk send message to the identified population (such as invoices/installments or payment reminders)
- Export listing screen details

Step 4: Navigate to ACTIONS to expose individual installment options including
- Manage to view the installment details
- Send Message to initiate an email/letter to the donor
- Pay Online to initiate the Online Bill Pay app - this link can be sent to the donor for secure online payment
- Pay Now to initiate payment with the payment on file
- Copy & Pay Now
- Copy Payment Info
- Transactions to view all transactions associated with the invoice/installment
- Delete the installment/invoice/installment

Instructions - Viewing Pledges on the Contact Record
Pledge accounts can be located in the Pledge panel by navigating to the Contacts App > Organizations & People > Contact > locate your contact > Manage the record > Go To (top right hand corner) > Pledges

Instructions - Configuring Pledge Types, Statuses, Cancel Reason for Customization
If you require customization of pledge account options, use the Configuration App to create various pledge types.
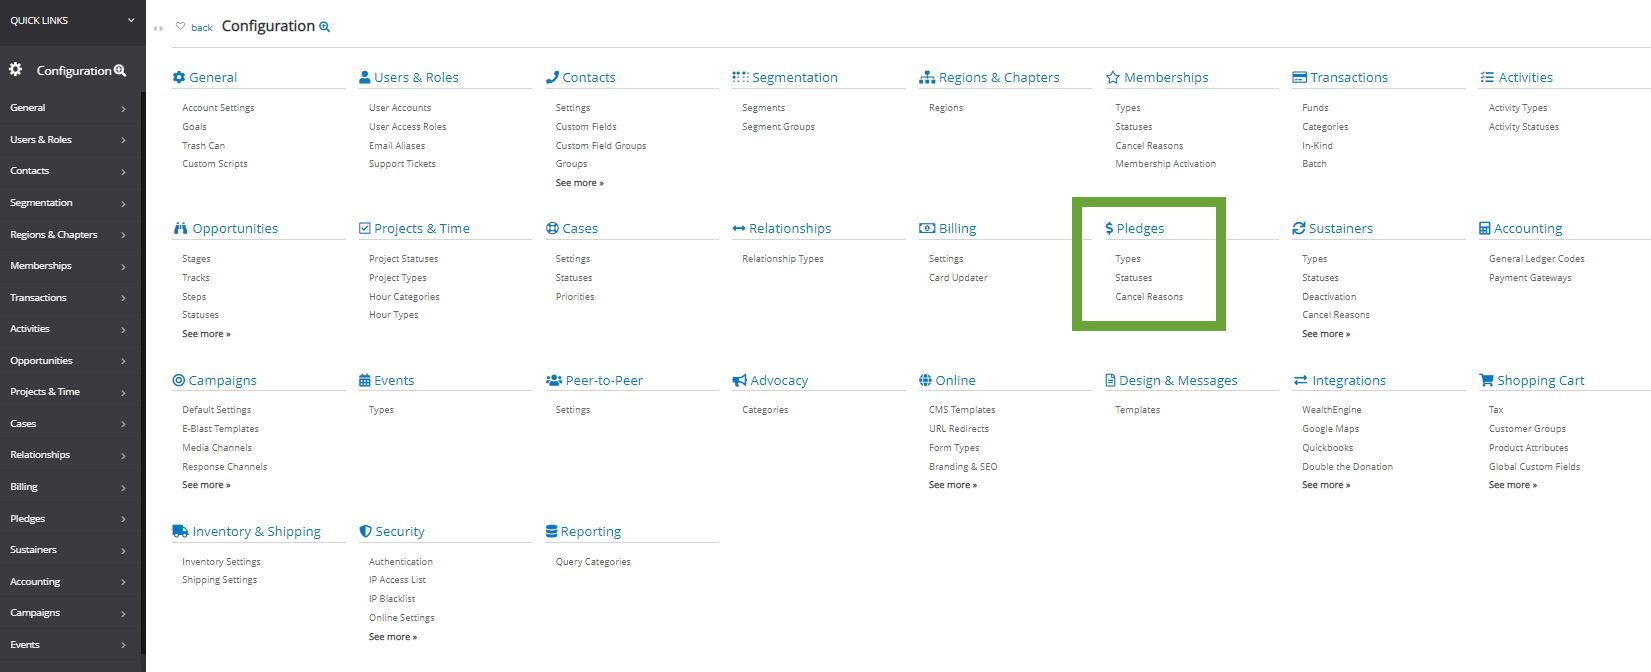
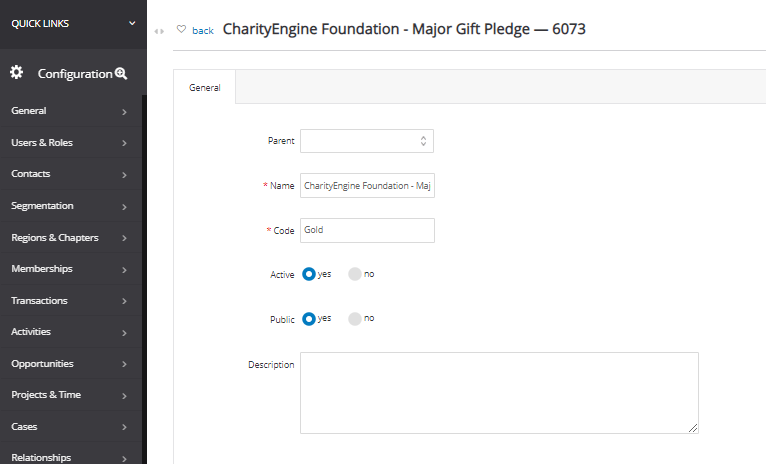
Step 1: Navigate to the Configuration App > Pledge Type > Create New to create a Name (required - internal reporting) and Code (required - external for Pledge feature and/or on Pledge Web Form).
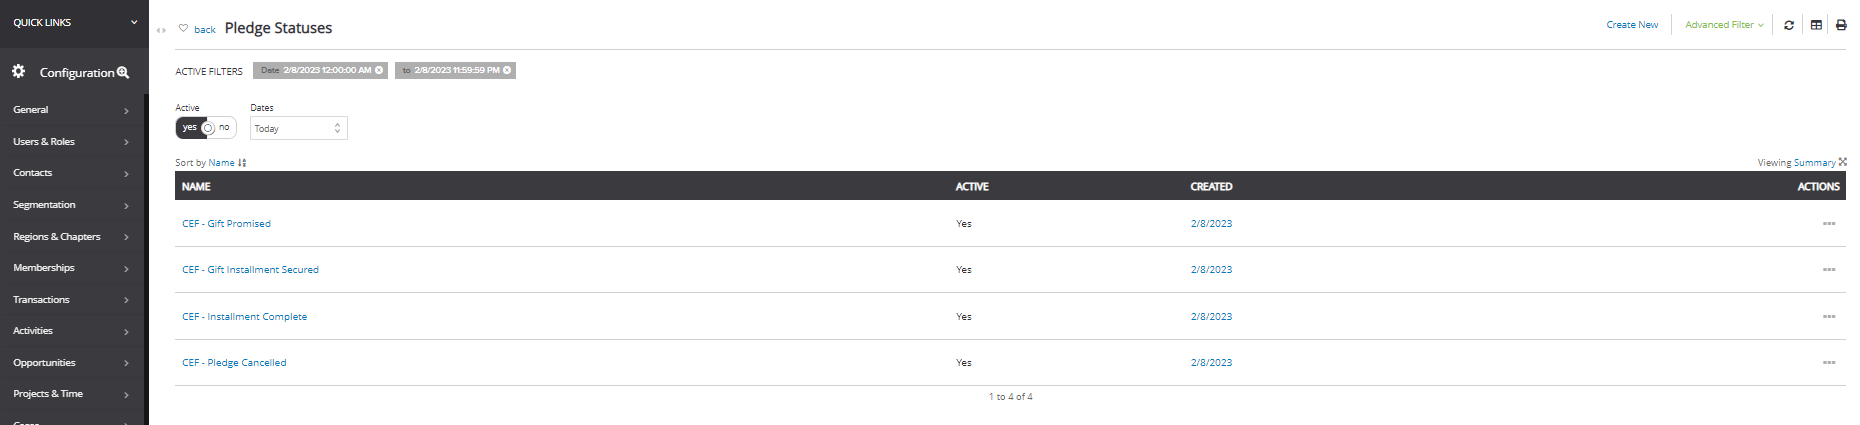
Step 2: Create custom status codes to be used on a pledge account for reporting/filtering needs. Click Create New to create a custom code.
Step 3: Create custom cancellation codes to be used on a pledge account for reporting/filtering needs. Click Create New to create a custom cancel reason.

Instructions - Sending Communication to Pledges
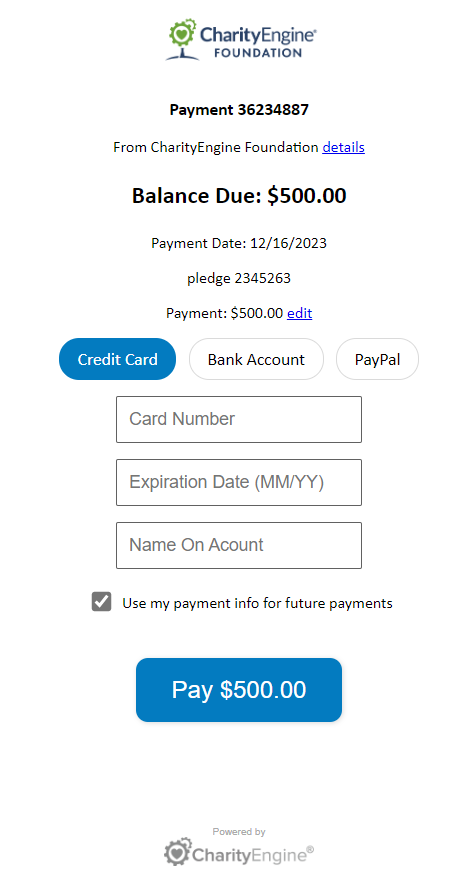
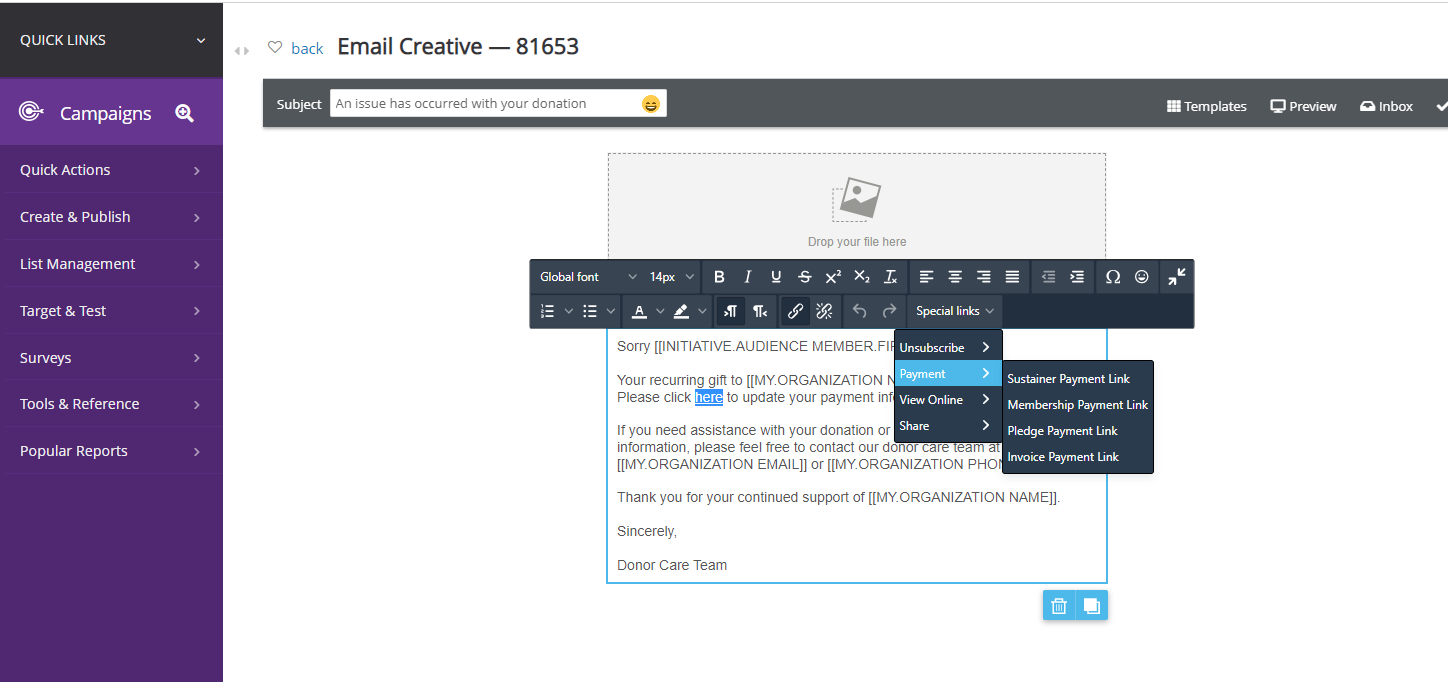
If your organization utilizes pledges, you may want to send communication to them reminding them of their upcoming pledge due date or if their payment has been declined. When creating messages, CharityEngine makes it easy by using a Special Link: Invoice Payment Link that can be inserted as a link which routes the donor directly to the BillPay application.(This is not a link to the User Center.)
It is important to note that only pledges that are paying with electronic methods, such as Credit Card or ACH will be able to utilize this link and any other methods, such as Cash or Check will still have to be manually sent it and entered into CharityEngine.
To add the Special Link: Invoice Payment Link, you can utilize the special links that CharityEngine has made accessible for you. If you want to use the button format, add your button to the message and in the content properties, click on Special links.
Select Payment, then Select Invoice Payment Link.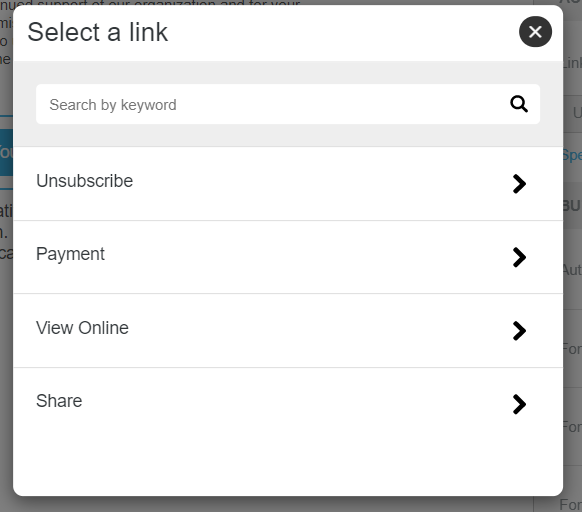
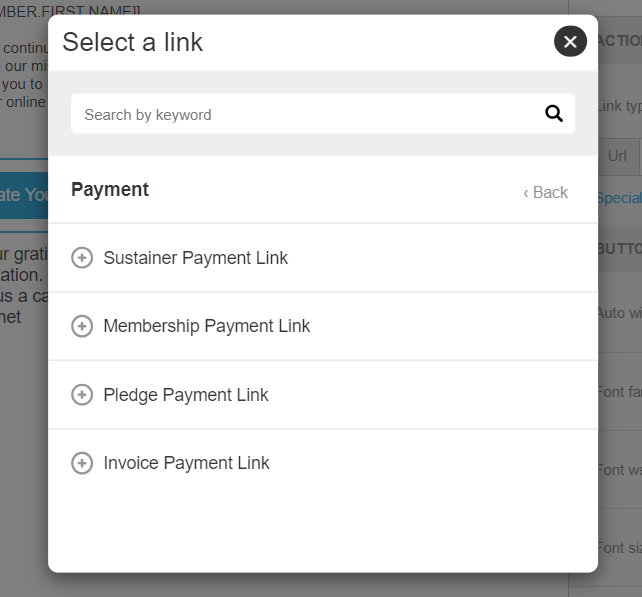
The token will then appear in the URL text box.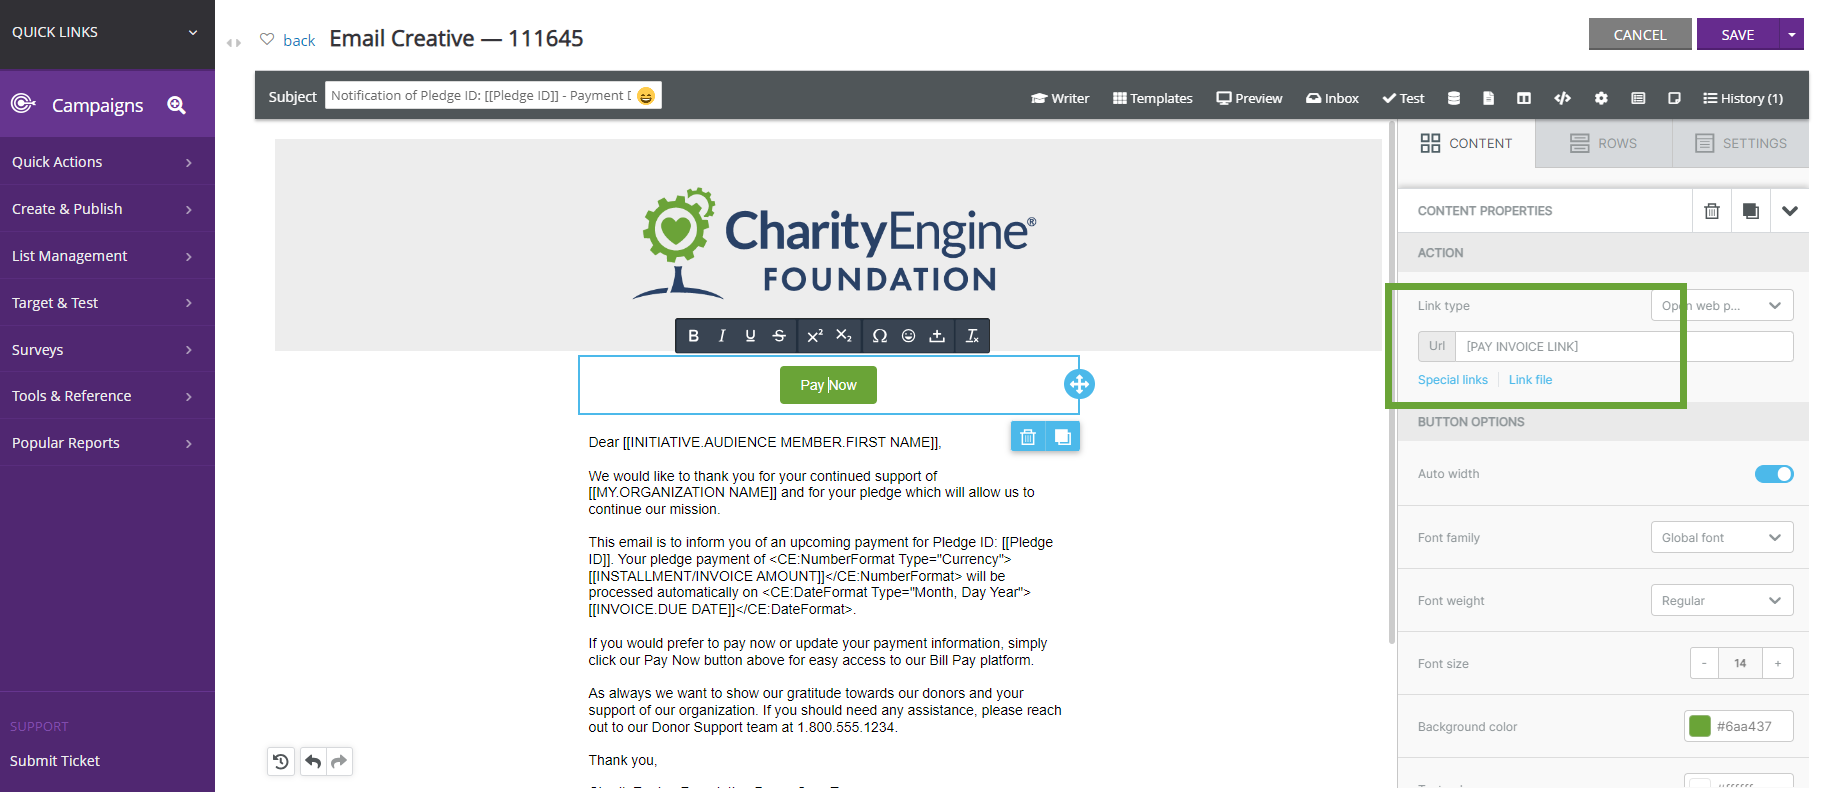
Donors will be routed to the CharityEngine BillPay feature allowing for easy review and update of payment options:

Decline Pledge Email
If one at any time the billing engine experiences a payment decline for a pre-scheduled payment on a pledge record, the user may wish to automatically notify the donor in an attempt to collect the donation and avoid potential revenue loss. Users can achieve this by creating an email message and utilizing our communication series tool.
Prerequisite: Please complete a new creative with the Special Link: Pay Invoice within the email content.
Step 1: To create a communication series, navigate to the Campaigns App > Create & Publish > Communication Series.
Step 2: Click on Create New in the upper right corner.
Step 3: Select Failed Payment as the type of series to be created.
Step 4: Select Add Email Step to the work flow and click select message to append the previously built creative.
Step 5: Click SAVE to secure. (Adjust name as needed to organization's naming conventions)
Step 6: Creating/Modifying the Audience.
- By selecting one of the out of the box options for the communication series, your query has already been created. However we will need to make a minor adjustment to the query to ensure we are only targeting Pledge type declines.
- To modify the query, click on Audience Settings from the Communication Schedule workflow
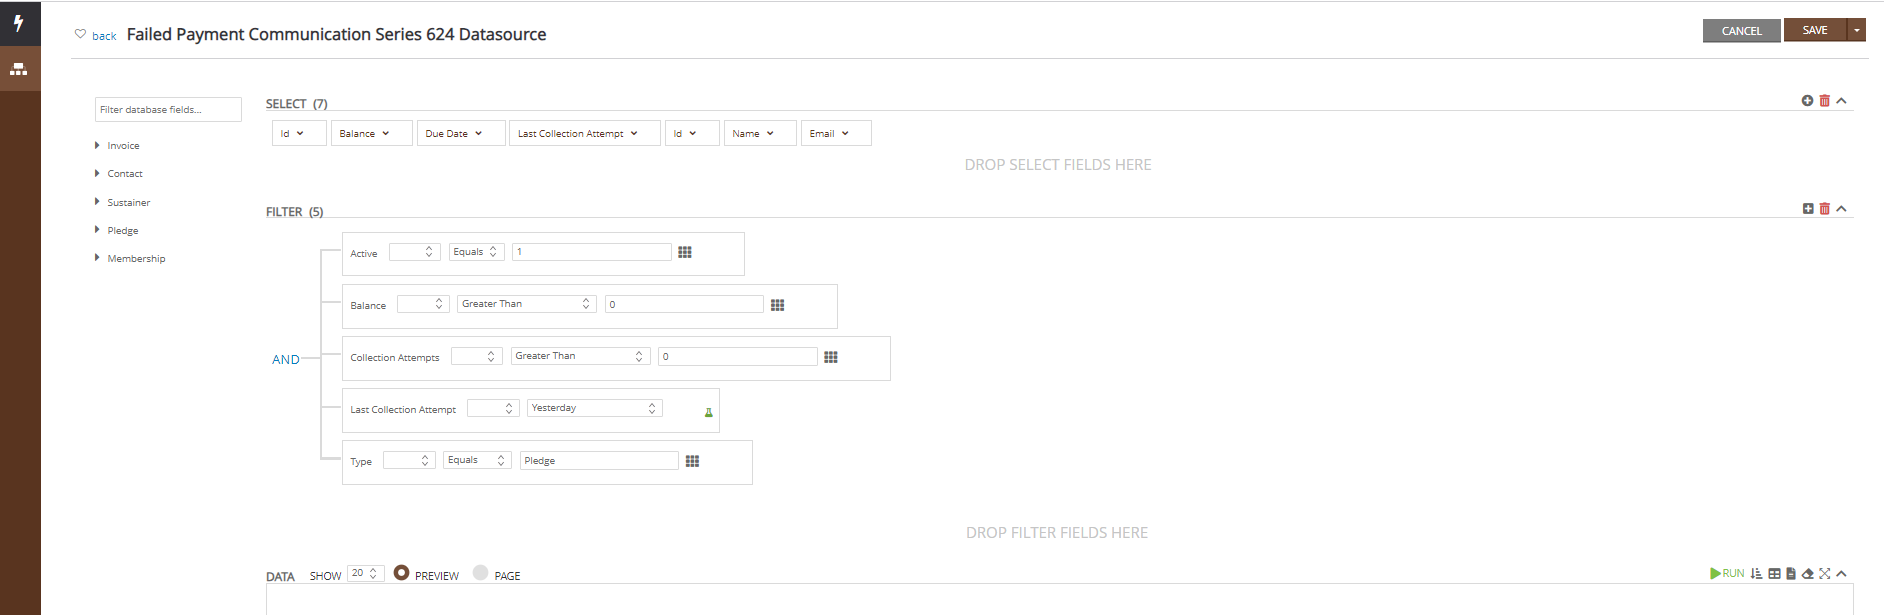
Step 7:Click on ADVANCED and OK to view the query details.

Step 8: Within the Invoice sub-table, select Type and add to the Filter section. Set the Filter to read Type Equals Pledge
Note: In this use case, the organization will schedule the Communication Schedule to fire daily capturing any -
- Active Invoices
- With a balance > $0.00
- With a previous collection attempt (1 or more)
- With a last collection attempt of Yesterday
- And an invoice type = pledge
Step 9: Click SAVE to secure the changes.
Step 10: The last step in the communication series creation is to launch the series. Navigate back Campaigns App > Create & Publish > Communication Series > locate the comm series
Step 11: Navigate to ACTIONS > Launch to the communication series listing screen and under the Actions ellipsis click on Launch.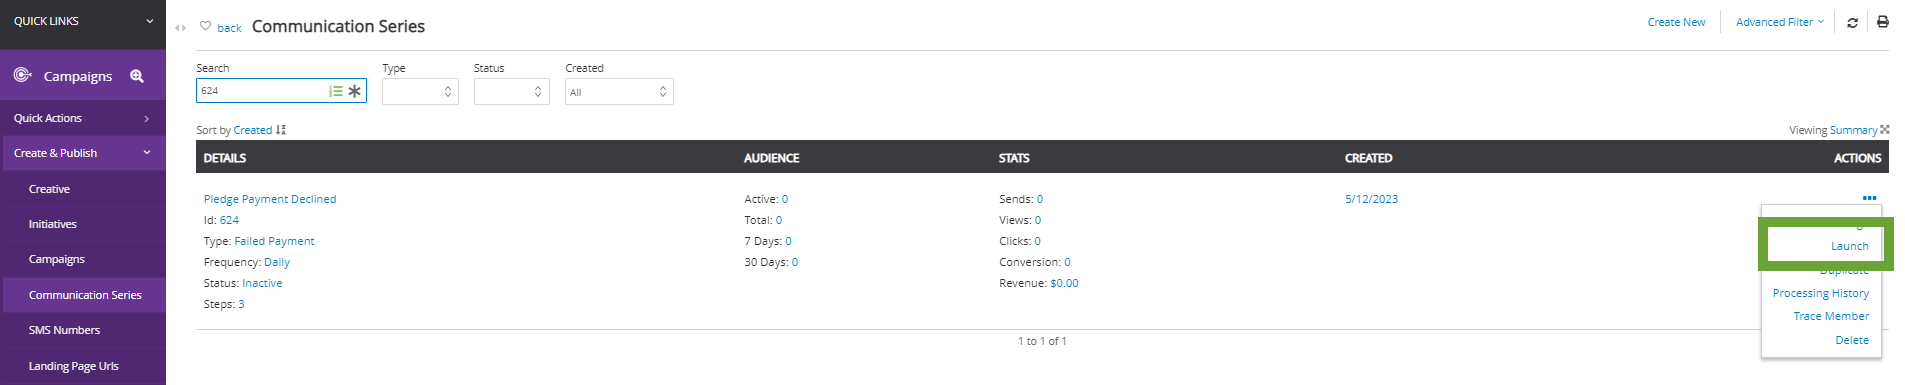
Note, users can monitor audience and conversion activity by accessing the Campaigns App > Create & Publish > Initiatives. Filter by the communication series name to see each sending result. (Note, if Status = Failed, this may be a result of no available records for the recorded send. The Initiatives listing screen will provide the user with a record of all attempted runs - even in instances where there is no qualifying population (i.e. no past due payments))
Advanced Notification of Payment Installment for Pledge Invoice
In this use case, leverage the invoice query to identify future dated installments and create a scheduled email to proactively remind and notify donors or automatic payment withdrawal or payments due.
Create the audience
Step 1: Access the Automation & Workflow App > General > Queries > Create New > Filter: Donations > Select: Invoices
Step 2: Select necessary fields for email blast including required Contact Id. Include other data that may be needed for custom tokens
Step 3: Select fields for future pledge invoices. In this use case, the query identifies pledge type invoices which are active and have a balance. With the use of "Due Date" as a nested filter, the user can identify future due dates in conjunction with the "Before Next 30 Days" to specifically target those due in 30 days or less.
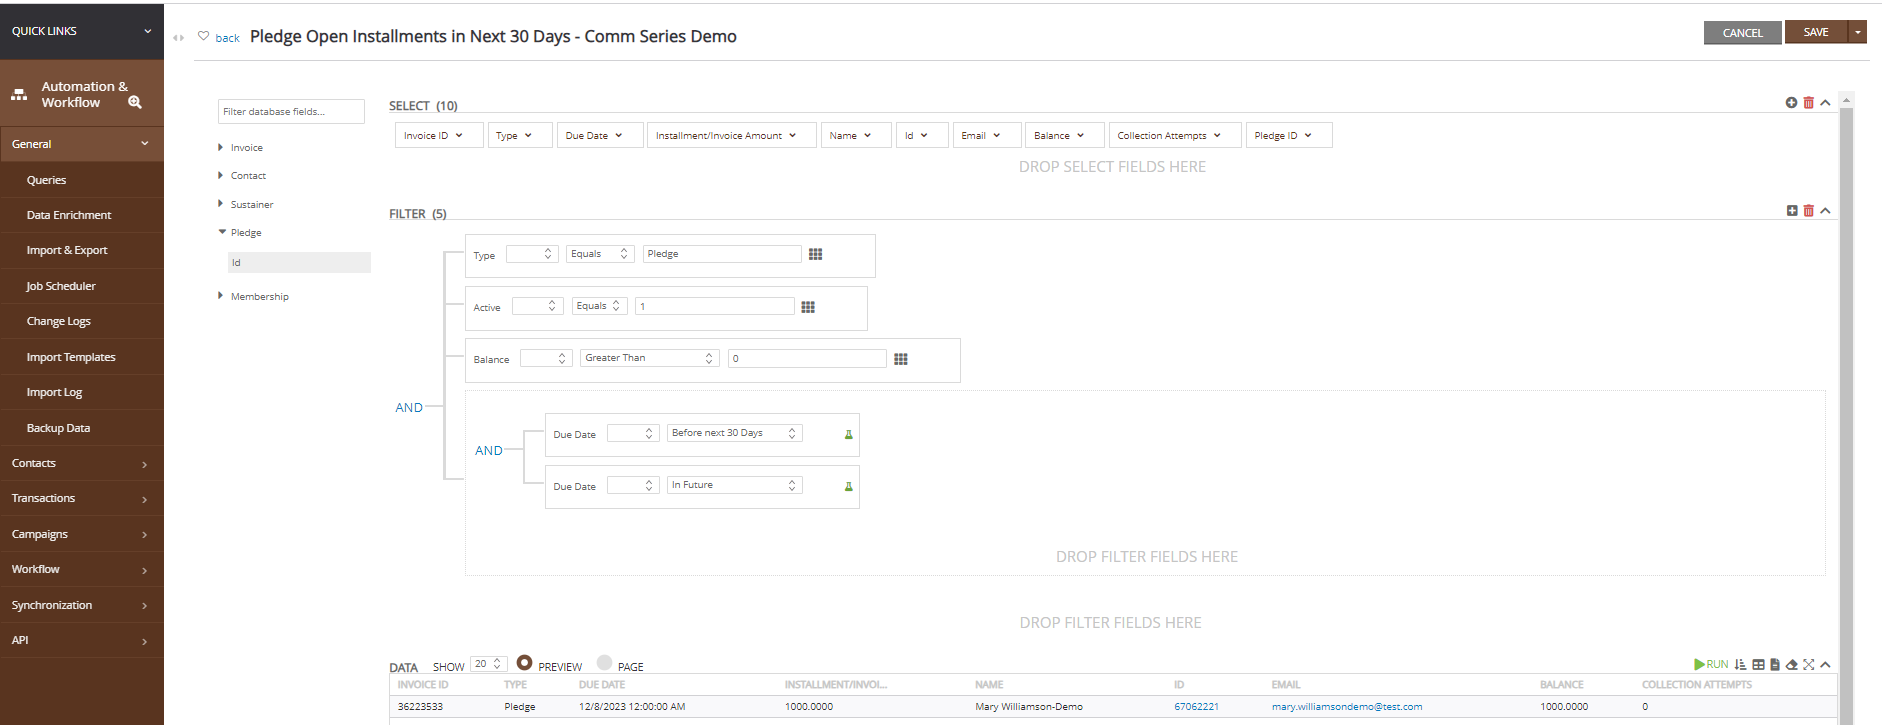
Step 4: Save the query.
Create the message
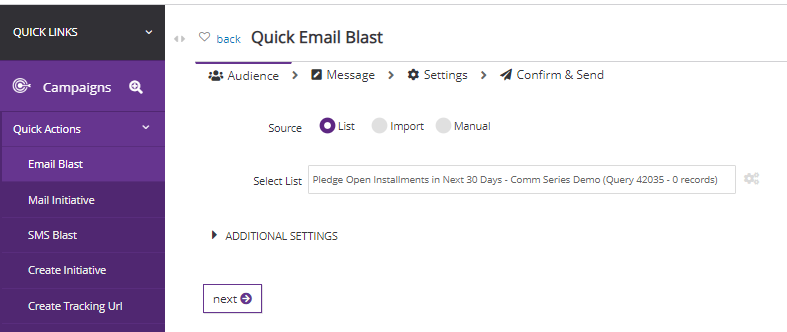
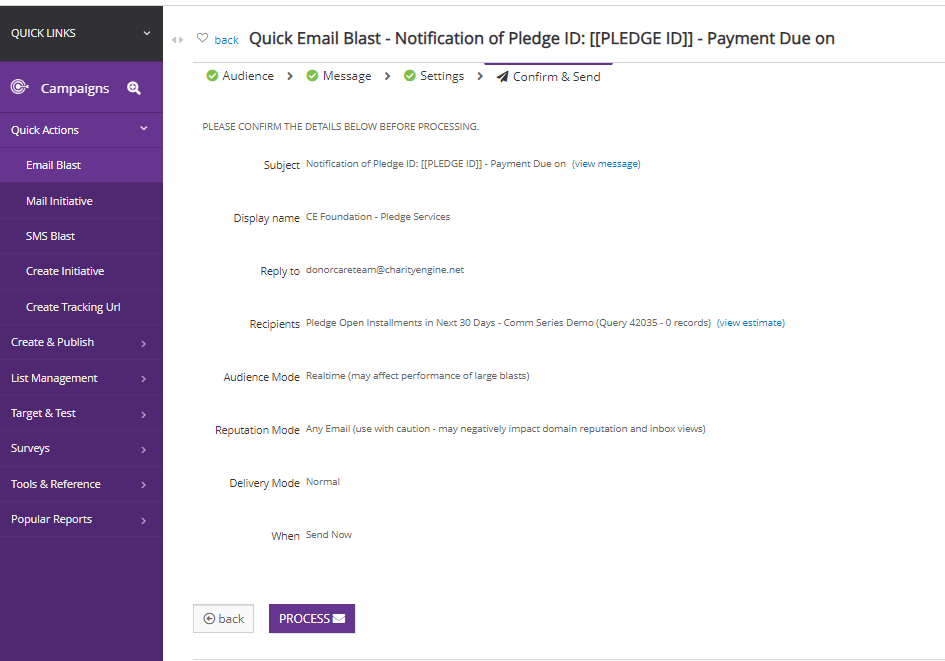
Step 5: Initiate the email blast by accessing the Campaigns App > Quick Actions > Email Blast
Step 6: From the Audience step, select Source: List and locate the query as created above and apply additional setting as needed and click next
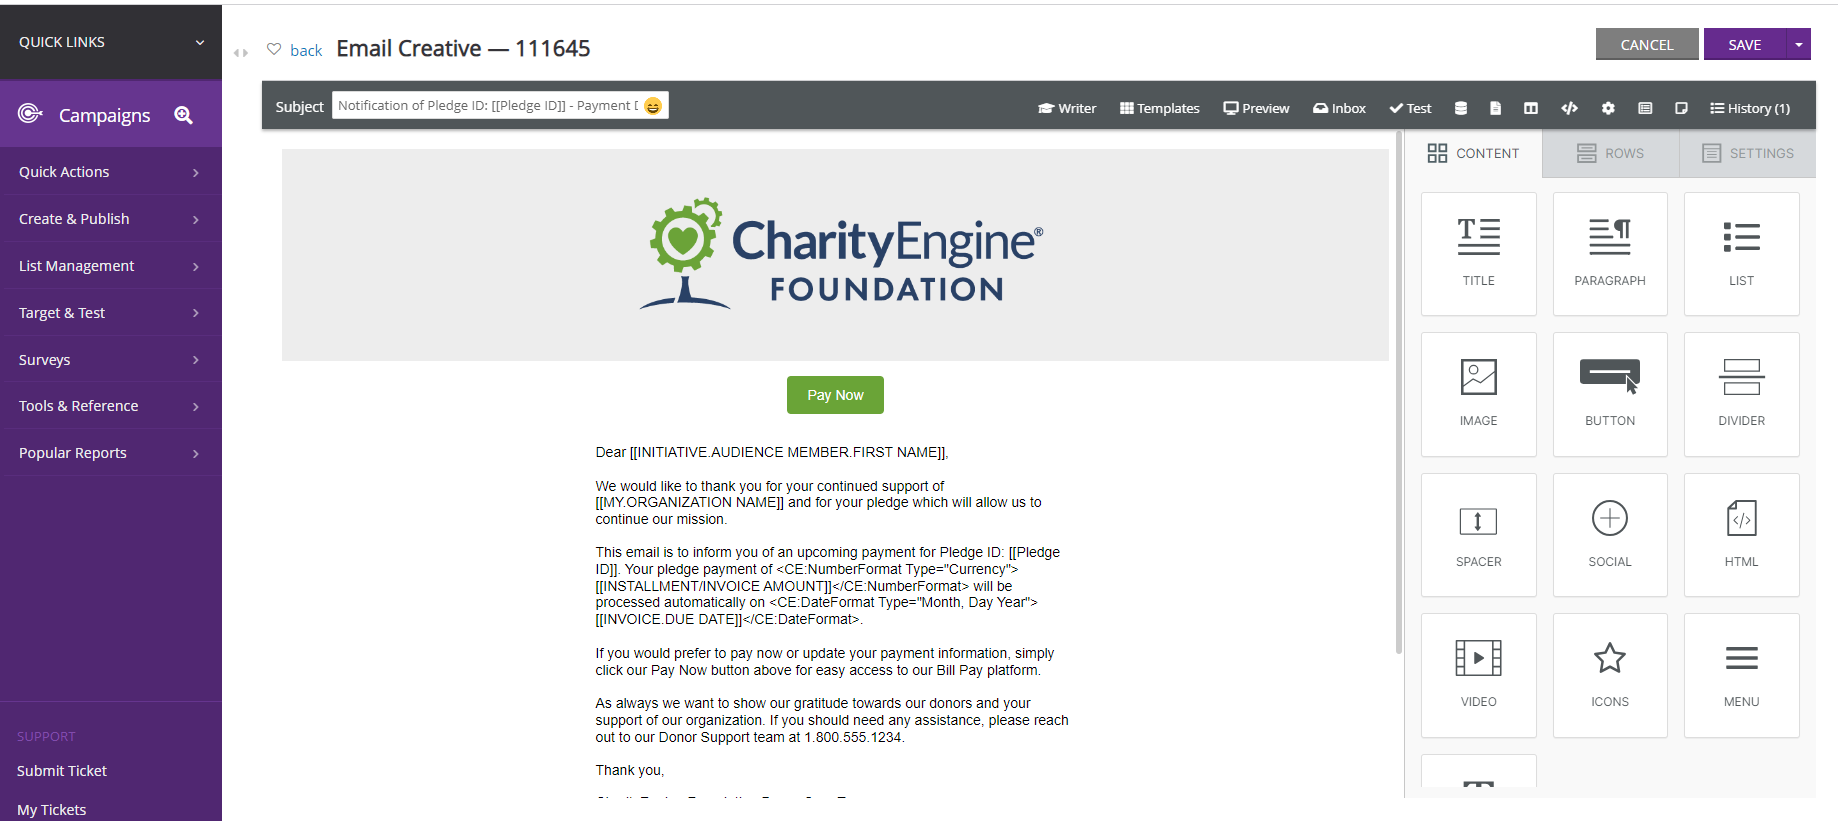
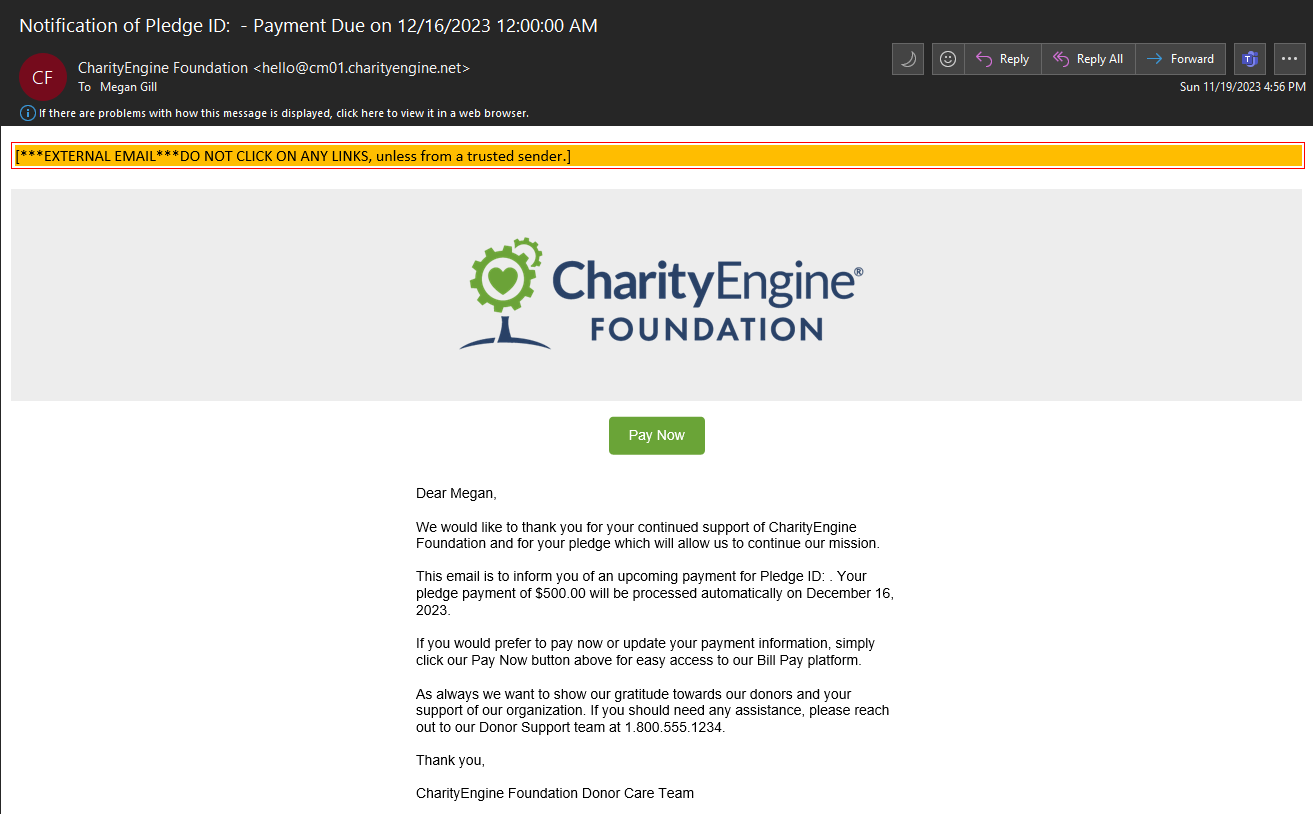
Step 7: Construct the message including any custom tokens (from the query), formatting widgets (for currency, dates), and/or inclusion of the Special Link: Pay Invoice to allow donors to pay now. Click next once complete.
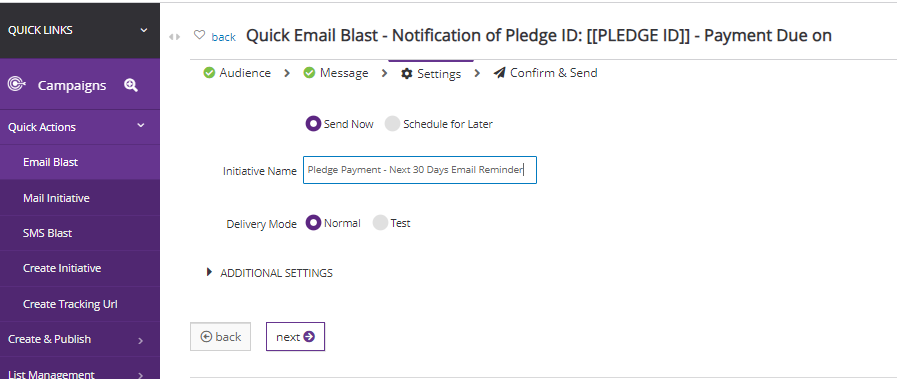
Step 8: Review and adjust settings including sending the first notification now or scheduling in the future. Once complete, click next
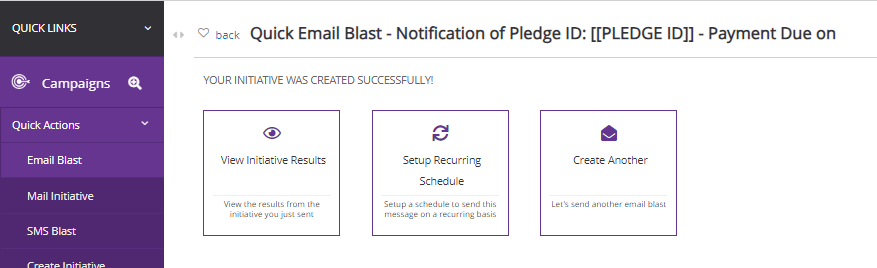
Step 9: Review for final adjustments and click PROCESS to initiate
Set recurring schedule
Step 10:Click on Setup Recurring Schedule to be routed to the Automation & Workflow function
Step 11: Name the job schedule and set start date and other attributions. Click SAVE
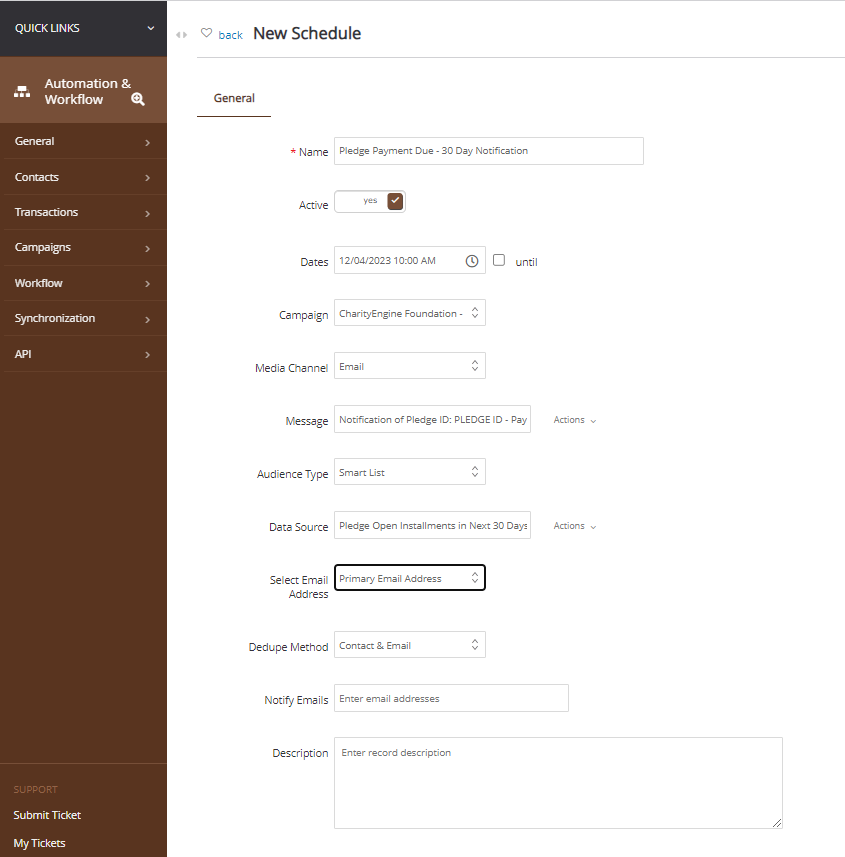
Step 12: Navigate to the Triggers tab to select recurring send frequency. In this use case, the organization will send email notification to pledge donors with invoices due in 30 or less days on the 5th of each month at 1000am EST.

Users can modify job schedules at any time by accessing the Automation & Workflow App > General > Job Scheduler
Note: In the above use case, the usage of the CharityEngine BillPay feature was integrated using the Special Link: Pay Invoice. This will allow the donor to quickly access a web based billing update to capture new payment information. Note, this is separate from the CharityEngine User Center feature.
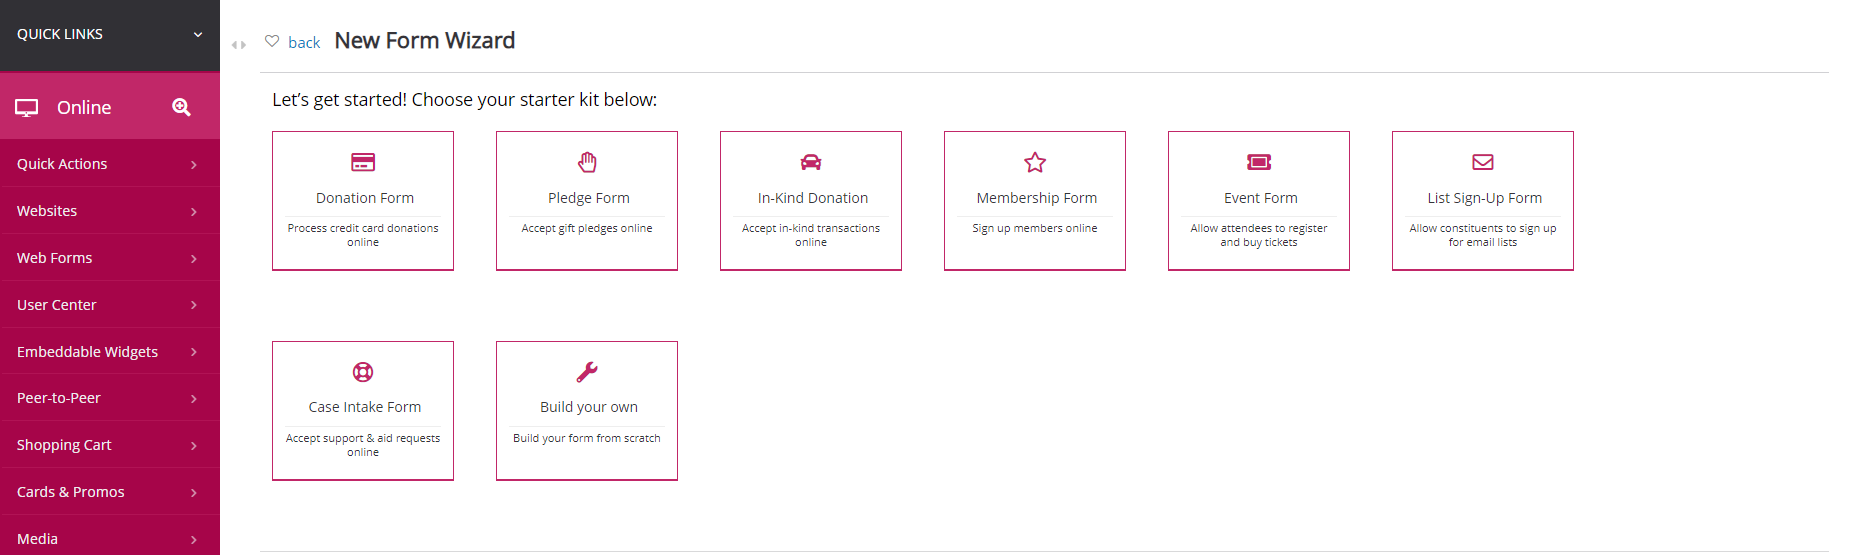
Instructions - Creating a "Pledge" Type Web Form

Step 1: Navigate to the Online App > Quick Actions > New Web Forms
Step 2: Select Pledge Form from the start kit
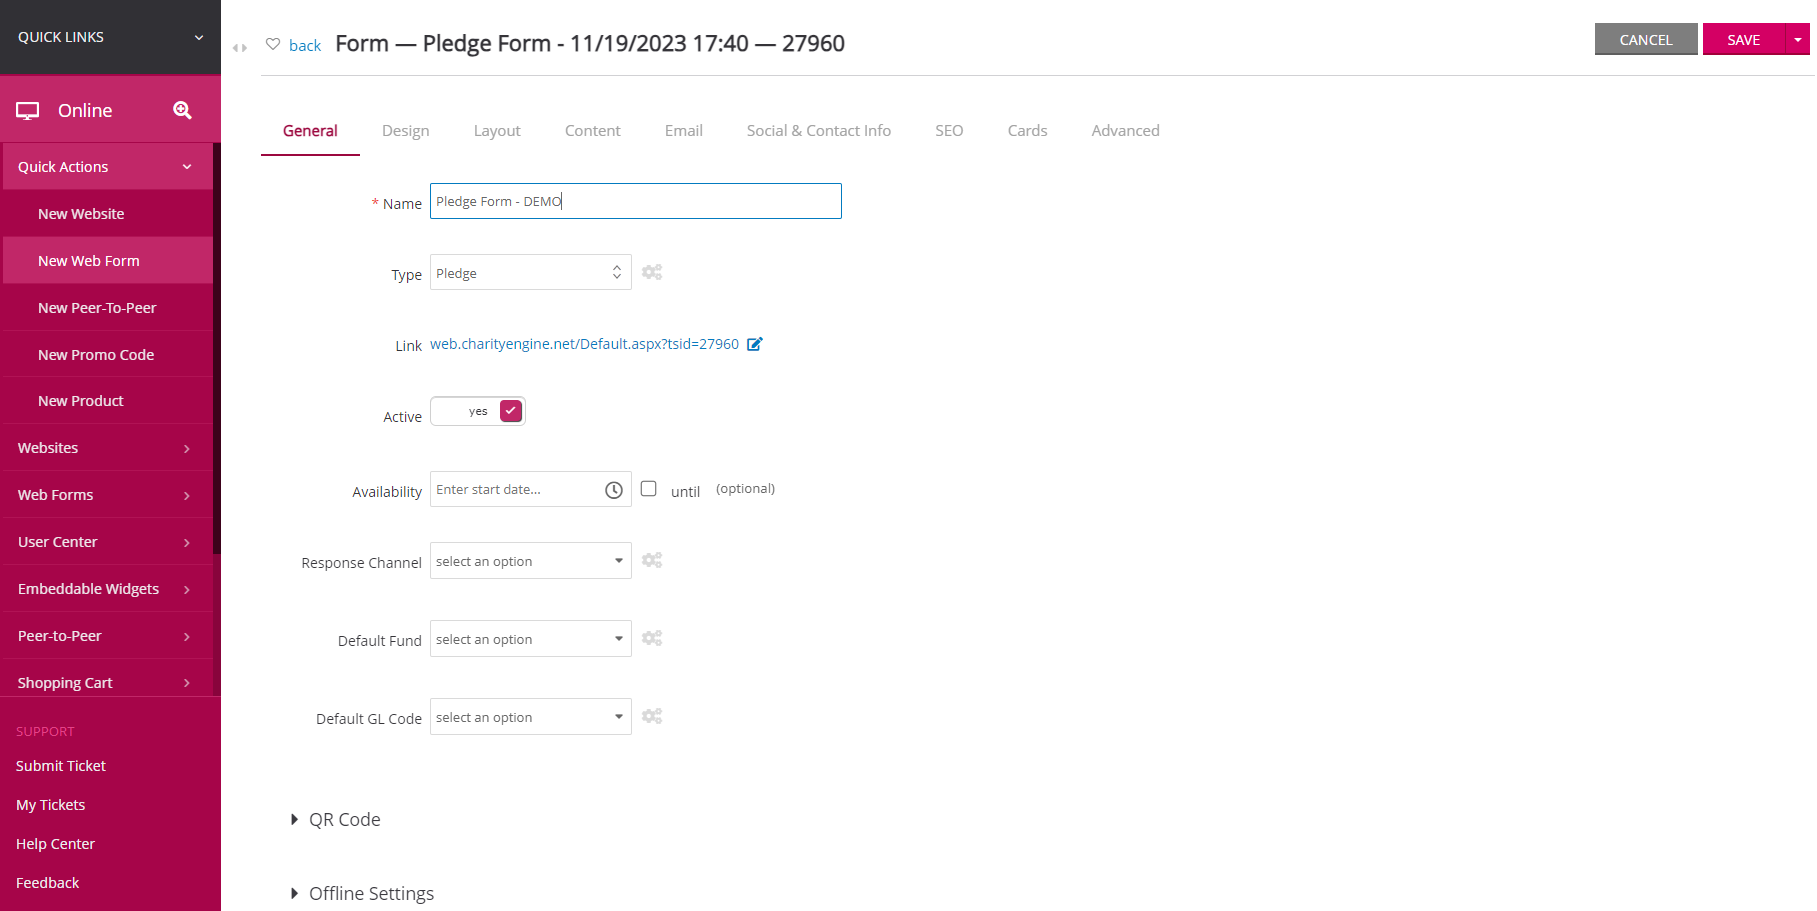
Step 3: Modify the name to meet the organization's naming conventions. Note, the type will default to Pledge. Complete any additional attribution as needed from the General tab and click SAVE to secure changes.
Note: To access the live pledge form link, click on the URL next to the Link section under the General tab. Once viewing the pledge web form, the user will have better insight into the out-of-the-box form fields created for the pledge form, like Pledge Amount and Pledge Date. These fields are required for any donor completing the form.
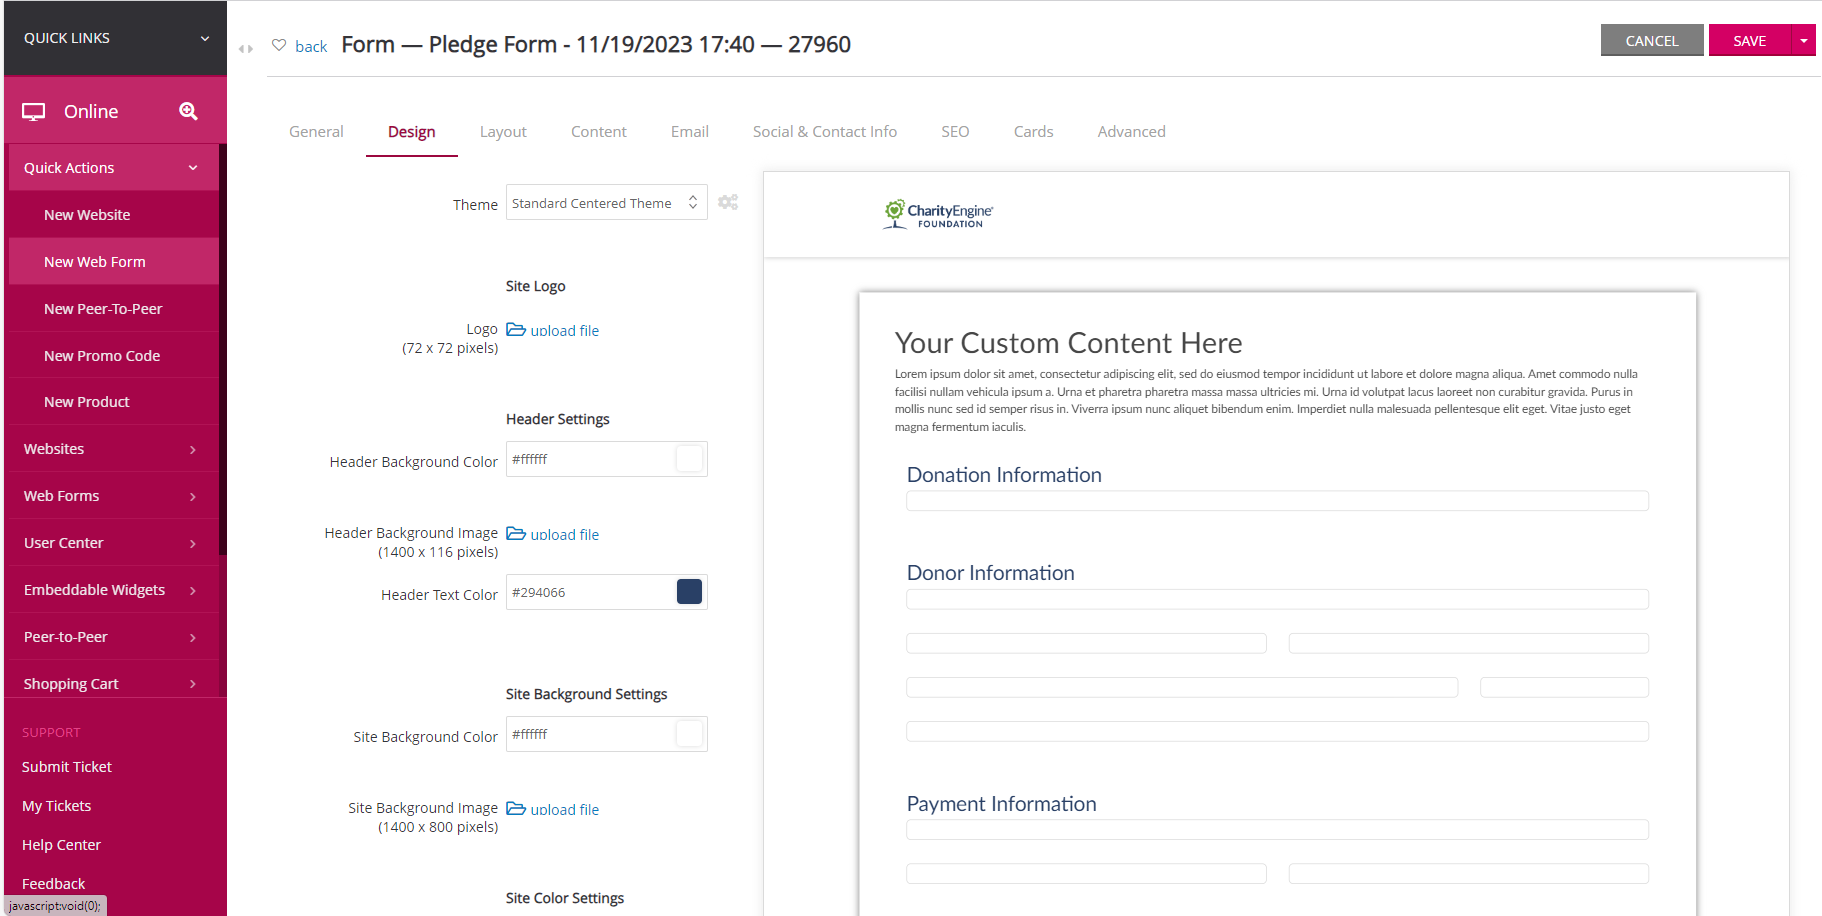
Step 4: Access the Design tab to apply any organizational branding requirements or pre-configured web templates.
Step 5: Access the Layout tab to customize required fields for the donor when capturing a pledge record. Also use this tab to remove and move pre-configured blocks.
For more details on configuration and customization options, see Web Forms: Creating a Donation Form - What’s Out of the Box?

Step 6: Complete updates to the Content tab for customization on language related to headers, footers, and customized pages.
Step 7: Complete updates to the Email tab, including selecting a customized acknowledgement and/or receipt message. This is also the location in which carbon copy can be applied for internal notification.
Note: Please use the token:[[transaction.pledge.amount]] if the user would like to display the pledged amount.
Step 8: Complete updates to the Social & Contact Info tab for customized social media sharing.
Step 9: Complete updates to the SEO tab to support search engine optimization needs.
Step 10: Complete assignment of eCards where applicable using the Cards tab.
Step 11: Use the Advanced tab for special attribution needs (i.e. initiative/campaign, funds, tags) and ensure a Payment Processor has been assigned.
Note: If the user allows the donor to initiate a pledge payment using the web form, the credit card/ACH will authorize immediately for the full amount. Alternatively, an organization can configure the web form to collect an initial interest allow the organization to create a custom payment schedule following pledge interest.
Under the Advanced tab, within the Pledges subtab, you have the option to associate Default Pledge Statuses and Default Pledge Types to the submissions on your pledge form.
FAQs & Additional Reading
Q. I would like to set up a monthly recurring payment that is ongoing. Should I use the Pledge functionality?
A. For ongoing, recurring payments CharityEngine recommends the usage and set up of a Sustainer Account (Donations App > Sustainers > Search & Manage). This is an ideal solution for automatic/recurring donations.
Q. Am I able to create a Pledge Web Form?
A. Yes - learn more about the Pledge Web Form Creating Pledge Forms.
Q. Are you able to import Pledge Accounts in bulk?
A. Yes - learn more about importing Pledge Accounts, establishing installments, and importing historical pledge transactions by accessing our Help Center Article Data Importing: How to Import Pledge Accounts & Historical Pledge Transactions
Q. Are you able to create a split fund on the pledge account record?
A. Yes. Navigate to the pledge record and select the Funds tab. Use the drop down to select the fund split along with type/name and dollar allocation. Please note, this will not influence subsequent transactions. Transactions can be assigned independently with one or more funds.
Q. I am using an email creative and am using the Special Link feature. Which option do I select to allow the donor to make a payment or update their payment details?
A. Using the appropriate special link requires alignment with your audience source (query or report). Please follow these guidelines when using payment special links:
| Special Link | When to Use | Audience Source |
| "Sustainer Payment Link" | Donor updating sustainer account payment details | Automation & Workflow > General > Queries > Create New > Filter: Donation > Select: Sustainers Ensure "Sustainer ID" is within query for reference in communication series |
| "Membership Payment Link" | Donor updating membership account payment details | Automation & Workflow > General > Queries > Create New > Filter: Donation > Select: Memberships Ensure "Membership ID" is within query for reference in communication series |
| "Pledge Payment Link" | Donor updating pledge account payment details | Automation & Workflow > General > Queries > Create New > Filter: Donation > Select: Pledges Ensure "Pledge ID" is within query for reference in communication series |
| "Invoice Payment Link" | Donor updating an invoice/installment for sustainer, pledge. Donor has option to update payment for one invoice/installment with an option to apply payment details to all future invoices/installments. |
Automation & Workflow > General > Queries > Create New > Filter: Donation > Select: Invoices Ensure "Invoice ID" is within query for reference in communication series |
Q. Can a user overcharge a donor when adding a new invoice?
A. No. There are fail-safes in place to ensure that a donor is not charged for more than that total value of their pledge commitment.
