Table of Contents
User Account Policy for Admin Users
CharityEngine® security policy dictates that no user can be created, deleted, or re-activated without consent from a client-designated administrative user. All requests to CharityEngine® for user creation, re-activation, or deletion will be forwarded to the designated administrator for resolution.
User Account Requests to CharityEngine Support
If the request for a user change/add/delete is within working hours for the support department (8:30am – 6:30pm EST Monday-Friday) and for any reason, neither designated administrator is available to make the change, the designated administrator can compose an email to support@charityengine.net asking for the user change to be made. This email needs to be sent from the email address that has been specified to CharityEngine® as the designated administrative email address on file. Client Support will create a ticket and follow through to resolution. If a member of CharityEngine support team does not already have access to your account, we will ask that you provide our team with temporary access by creating a user account. Important: After your ticket has been resolved, the CharityEngine support team requests that you switch the recently added CharityEngine support user account to Inactive. See steps on deactivating users in your account in the below article.
Below, find steps on how to successfully create a new user account, reactivating/deactivating accounts, as well as resetting passwords yourself within the CharityEngine® application.
Creating a New User Account & Setting a User Role
Creating a new user account within your CharityEngine instance requires only a few quick steps. For security reasons, always be aware of who you are giving access to your account and consider the specific role/access they have within your account. Be sure to deactivate or delete any users that are no longer with your organization. For instructions on how to create a new user account and assign them a user role, watch the video or follow the steps below.
As you bring in new employees and your organization continues to grow, it's important to monitor your user licenses to ensure you stay within the limits of your current contract. If you exceed your contract limit for users, simply reach out to your account representative to purchase additional licenses. This will help ensure seamless access for your expanding team while keeping everything aligned with your contract and usage needs.
Follow the Steps
Navigate to Configuration > Users & Roles > User Accounts.
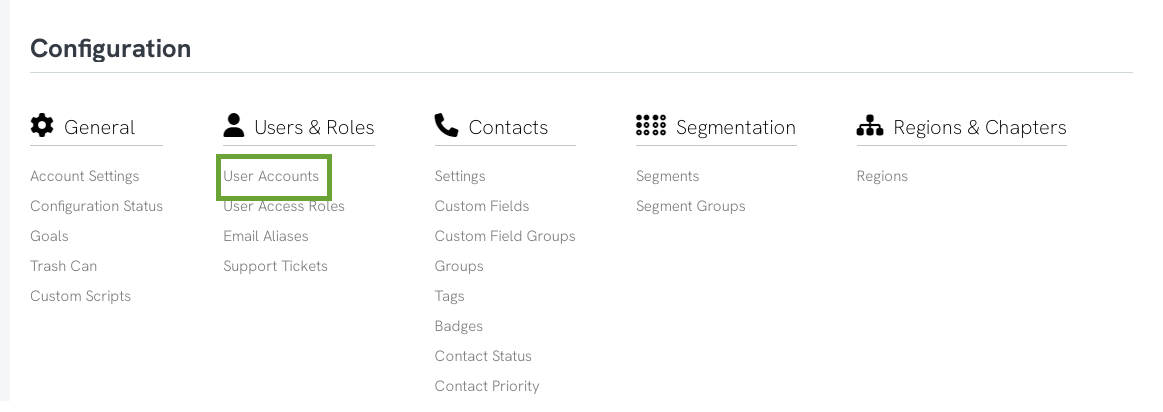
Select Create New at the top right of the screen.
Once you selected Create New to create a new record, you will be brought to a screen where you can apply general user related information such as the contact record associated with the user account as well as a username.
Under the General Tab, click Assign Contact.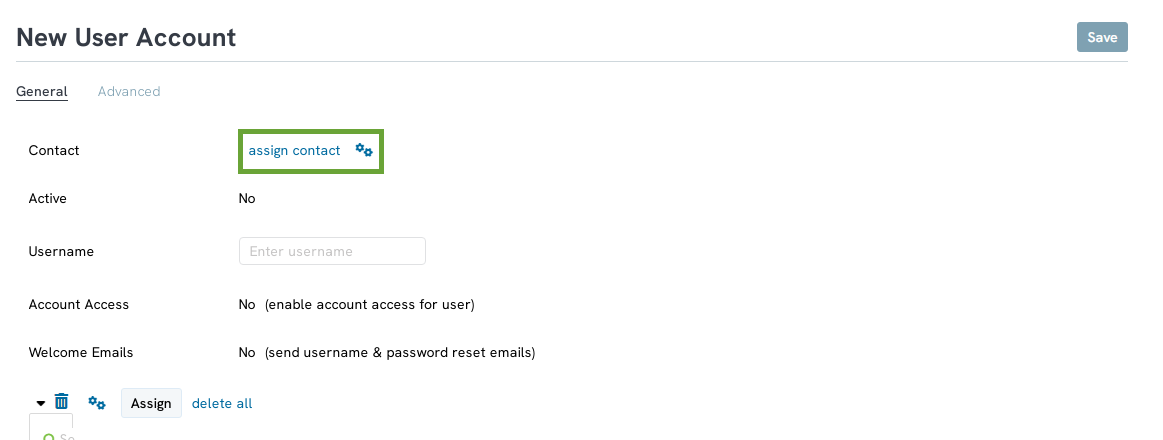
In order to create a new user account, you must have a first name, last name, and email address readily available for this new user's account.
Enter the first name, last name, and email address in the corresponding fields. If a contact record already exists within CharityEngine that matches the information for your new user account, you may select directly from the screen. If the contact does not already exist, the system will prompt you to create a new record. Select the existing contact if available or click New Record to create a new one. Select OK to the pop-up window. 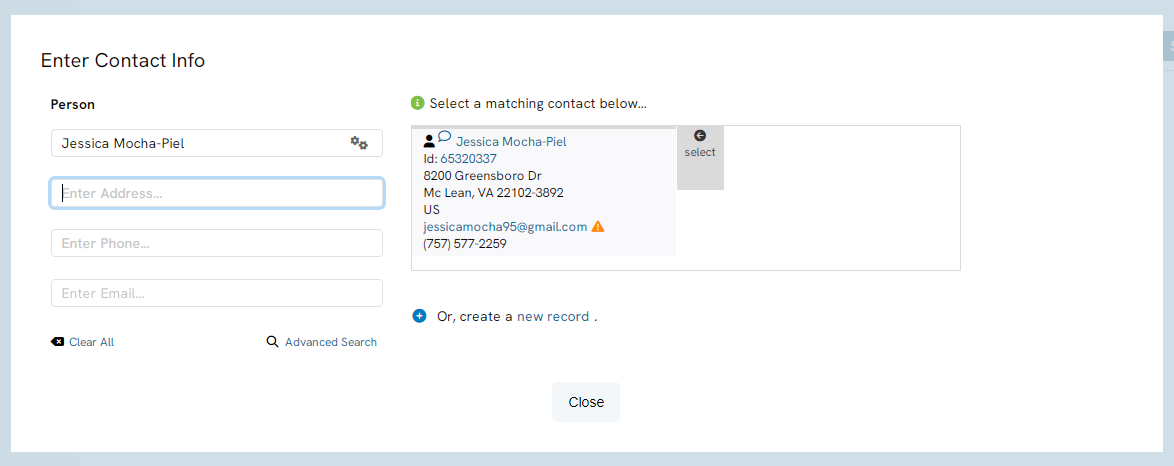
Select Continue after the record has been created.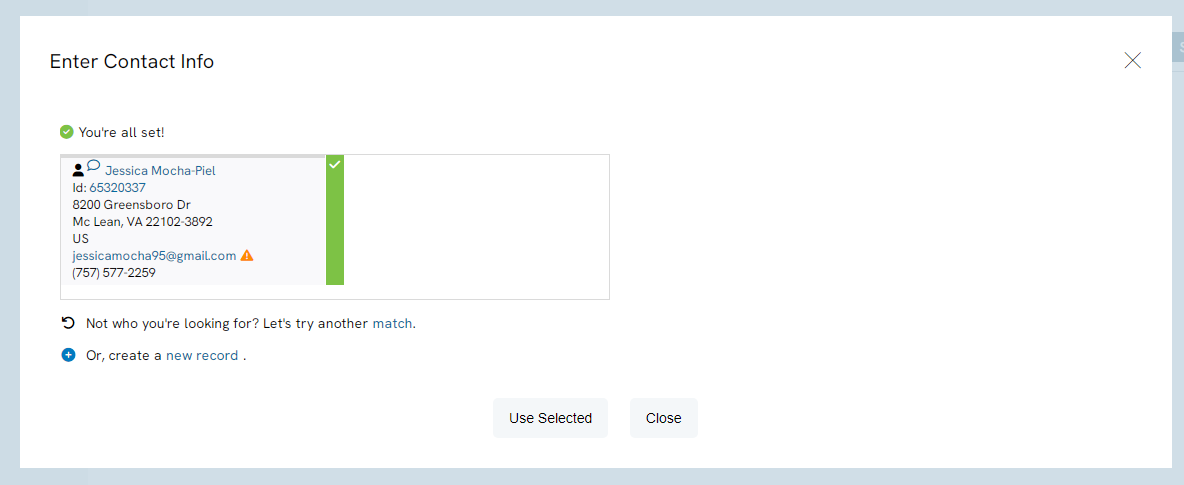
Next, input a username in the corresponding field. Usernames are often the full name of the user or something memorable. Ensure the Welcome Emails switch is toggled to Yes. This is a required step when first creating a new user account, as it is necessary for the new user to receive the series of generated emails containing their login information. The first email will include the user's username and the second email will include a password reset link. It is necessary for the user to reset their password within 24 hours of receiving the first email. 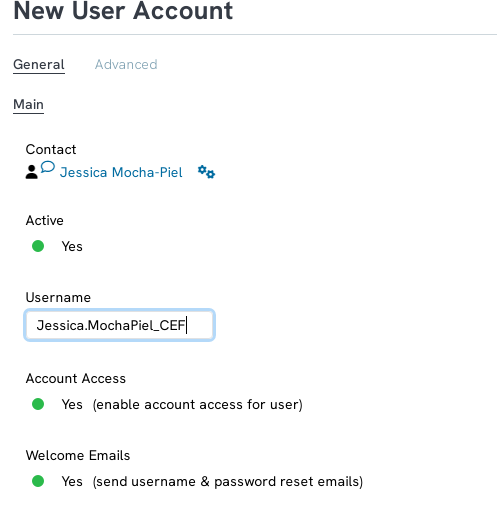
Now it is time to select Save at the top right. Once you select save, the welcome emails will automatically send, and you will see additional tabs populate on the screen.
Navigate to the Roles & Access tab. Now it is time to designate a specific role for the new user account. With no role assigned, the user will not have access to crucial areas of the system. We recommend designating specific roles to your users based on their role within your organization. For example, if you are allowing your organization's accountant into your CharityEngine account, designate the Accountant role to this specific user's account. If you want a member of your organization to have access to the entire system, designate the Super User role to this specific user's account. You can also have multiple role assignments applied to one user account if desired. These decisions should be discussed and decided internally within your organization.
For more information on user roles, visit this article: User Role Permission Levels.
Under the Roles subtab, choose the appropriate role for the new user in the drop down and then select Assign. 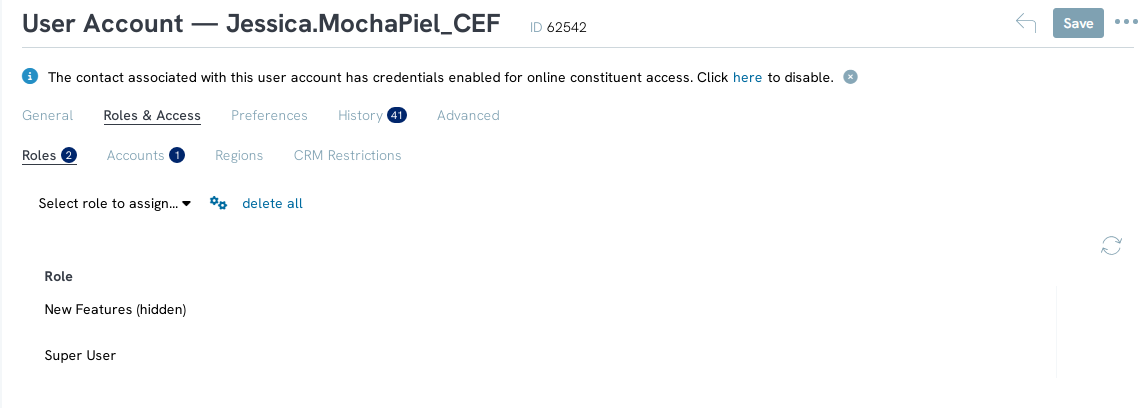
Then select Save at the top right.
If necessary, at any time, you can easily delete the role assigned by hovering over the ellipsis under the Actions section next to the role and selecting Delete. Or by selecting Delete All at the top of the role assignment box if you wish to delete multiple role assignments.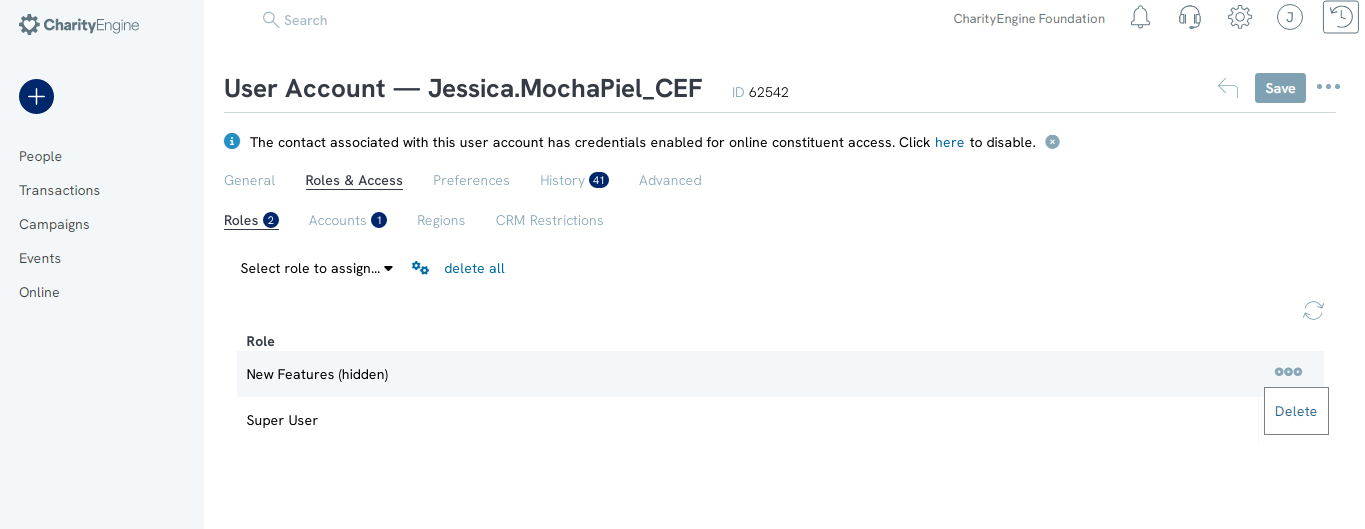
Reactivating & Deactivating a User Account
Your CharityEngine account may become automatically Inactive if you have not logged into your system for 30 days. Reactivating or deactivating users in your account is as quick as the click of a button and can be completed by any user within your account. Before you reach out to a member of CharityEngine support for reactivation of your account, check with a colleague that may have access to see if they can quickly reactivate you first. Ensure that you are deactivating user accounts for former employees or members of your organization--they should never remain active in your system! For instructions on how to reactivate or deactivate a user account, watch the video or follow the steps below.
Follow the Steps
Navigate to Configuration > Users & Roles > User Accounts.
Locate the user you would like to reactivate by searching for their name in the Search bar or utilizing the Advanced Filter at the top and inputting their username or email address. Within the title bar at the top of the page, you will see sections like Username or Roles. Locate the Status section. You will notice two different statuses for the different user accounts in your system, Active or Inactive. To reactive a currently inactive user, click on the Inactive status of the user. To deactivate a currently active user, click on the Active status of the user.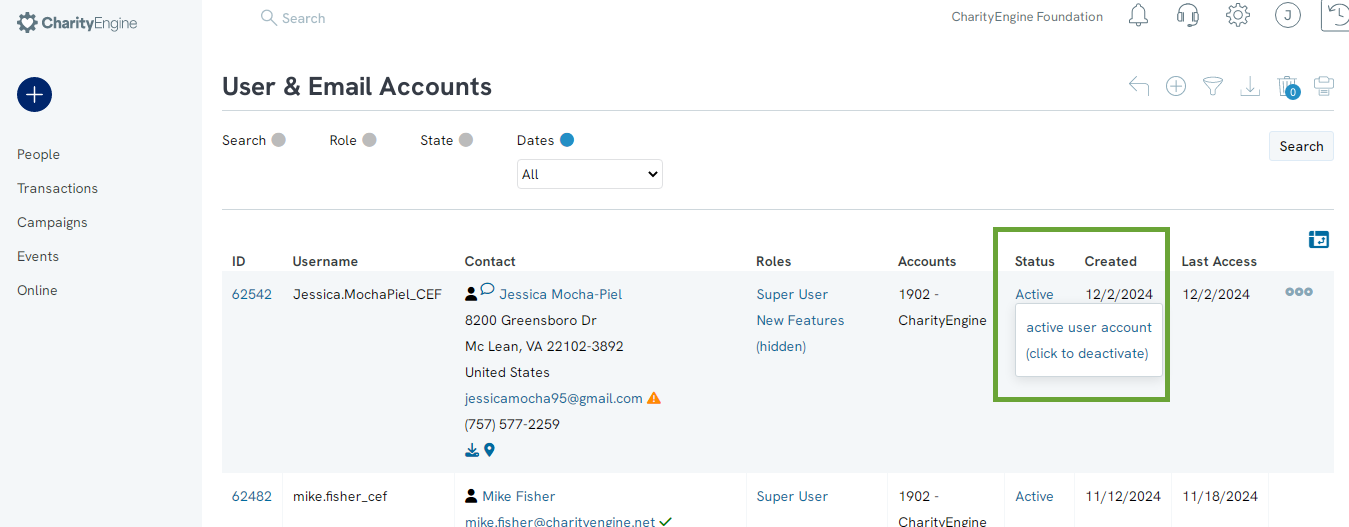
Once you click, you will see a pop-up window asking you to confirm your next action. Select OK.
Changing a User Account Password
At times, you or your colleagues may forget your CharityEngine password--it happens to the best of us! Luckily, it's quick and easy to reset your account password. In order for your password to be reset, at least one of your colleagues will need to have access to their CharityEngine account and have a status of Active. Before you reach out to a member of CharityEngine support for a password reset, check with a colleague that may have access to see if they can quickly reset your password for you first. For instructions on how to change an account password, watch the video or follow the steps below.
Follow the Steps
Navigate to Configuration > Users & Roles > User Accounts.
Locate the user whose account requires a password reset and hover over the ellipsis next to the Actions bar in the same row. Then, select Manage.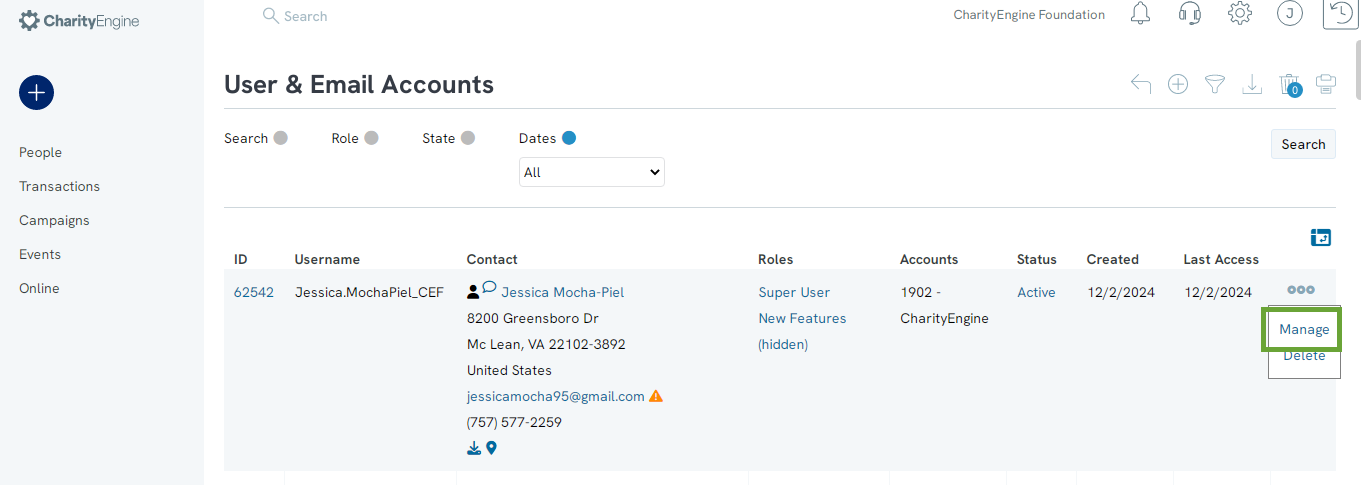
Next, select the green Reset button next to Password in the bottom section. 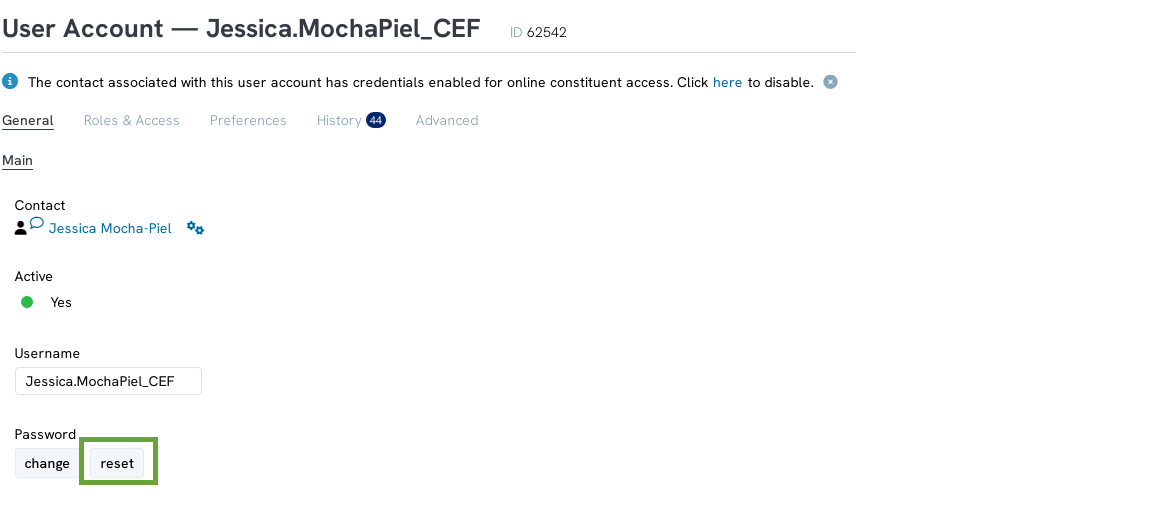
Once you click the button, you will see a pop-up window asking you to confirm your next action. Select OK. Once you select OK, an email will be sent to the user prompting them to reset their password with a link.
Deleting a User Account
CharityEngine recommends as a best practice to delete the user account of any prior employees or volunteers that should no longer have access to your CharityEngine account. For instructions on how to delete a user account, watch the video or follow the steps below.
Follow the Steps
Navigate to Configuration > Users & Roles > User Accounts.
Locate the user whose account requires a password reset and hover over the ellipsis next to the Actions bar in the same row. Then, select Delete.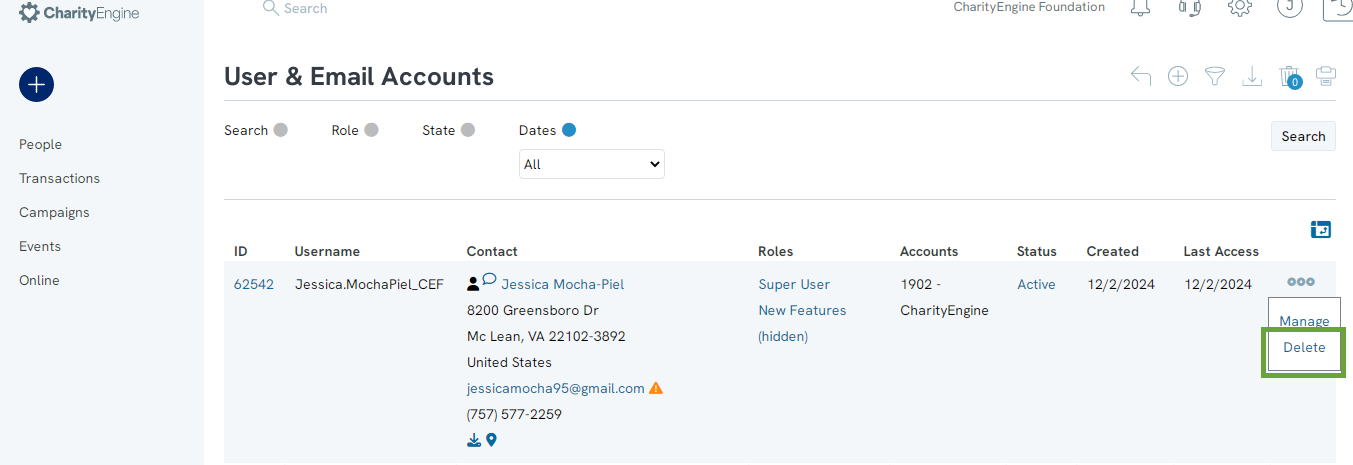
Once you click delete, you will see a pop-up window asking you to confirm your next action. Select OK. Once you select OK, the user account will be deleted.
Restoring a Deleted User Account
If you delete a user account by accident, you have the option to restore the user's account. For instructions on how to restore a user account, watch the video or follow the steps below.
Follow the Steps
Navigate to Configuration > Users & Roles > User Accounts.
Navigate to the top right of the screen and locate the trash bin icon. Select the trash bin icon.
To restore a previously deleted user account, you will need to reference the user account's id. Once located, hover over the ellipsis next to the Actions bar in the same row. Then, select Restore.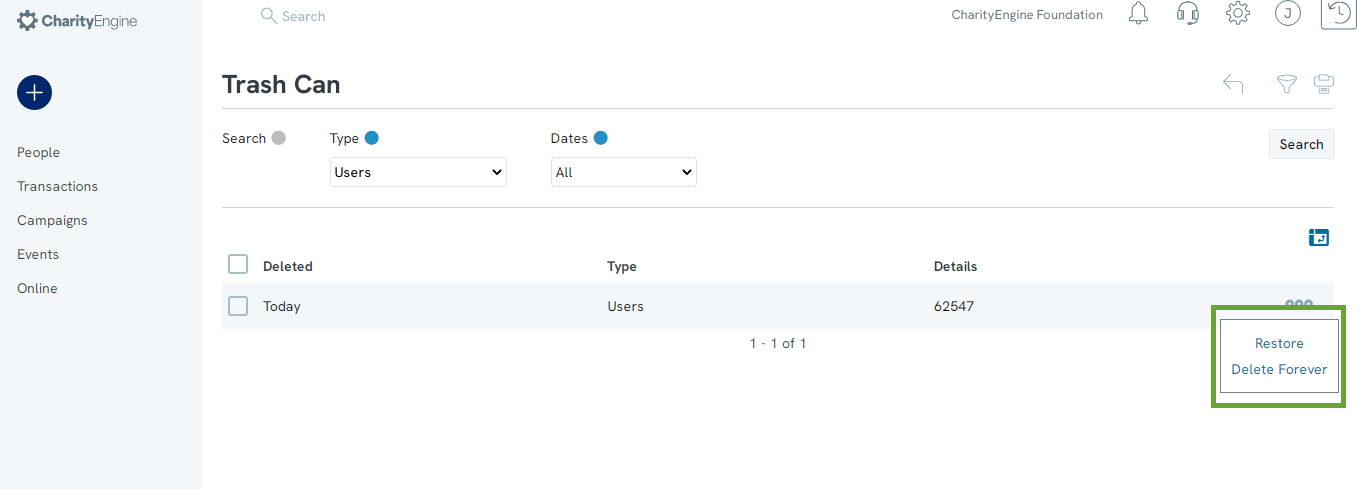
Once you click restore, you can navigate back to the User & Email Accounts listing screen and you will find your newly restored user account.
FAQ
Q. Are there any security protocols related to auto-logging out to prevent unauthorized users from accessing our CharityEngine accounts?
A. Yes, CharityEngine has an auto-log out framework that will log users out after 45 minutes of inactivity. Users will have to log in again once this time as lapsed.
Q.Is there a way to stay signed in without having to enter credentials everytime?
A. If two-factor authentication is enabled, you can toggle "Stay signed in" to yes when logging in to allow users to log in without entering credentials. Please note that users will be asked to log in after an extended period of time - several days - for security purposes.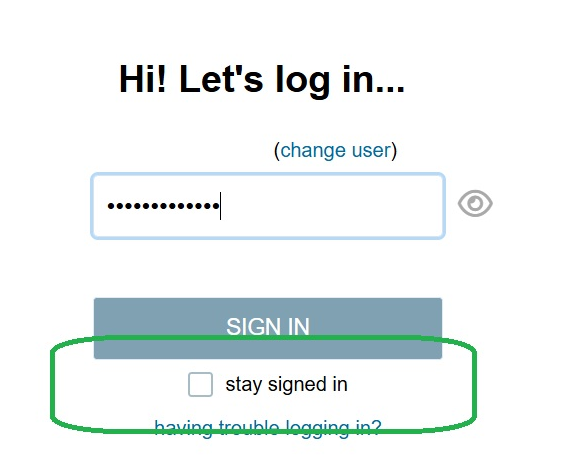
Q. How will I know if someone logged into my account without me knowing?
A. Any time someone logs into your account on a new device, you will receive an email. If this was not you, you will be able to change your account information to keep your organization data safe.
Q. If I log out, but keep the tab open, when I log back in will I be on the same page I was on previously or will I be navigated to the home screen.
A. To ensure a seamless workflow, when logging back in to an opened tab, you will be navigated to the page you were last on.
