Introduction
When duplicating an existing web form, whether it be a donation, event, or opt-in form, you always want to ensure you are updating and modifying assets associated with the existing form being duplicated. If you have certain tags or funds associated with an existing donation form, when you duplicate, those elements will be carried over to your new form copy. It's particularly important to update existing event registation form assets, such as tickets or sessions. In this guide, you will learn how to duplicate both a donation form as well as an event registration form.
Disclaimer: CharityEngine recommends not replicating event related registration forms, as it can create downstream issues with ticket mapping and further, transactions. Ensure that you are ALWAYS performing the appropriate testing steps prior to going live with your form, and pay extra attention to your tickets mapping, location of event, etc. For more information, follow the steps under the Smoke Testing section below.
Table of Contents
Prerequisite
Create or locate an existing form for duplication. For event registration form duplication, ensure that your new event and tickets have been created in the Events application. See New Event Creation step for further details.
Duplicating an Existing Donation Form
Once you have located an existing donation form on your Web Forms listing screen, hover over the ellipsis under the Actions tab to the right of the form and select Duplicate.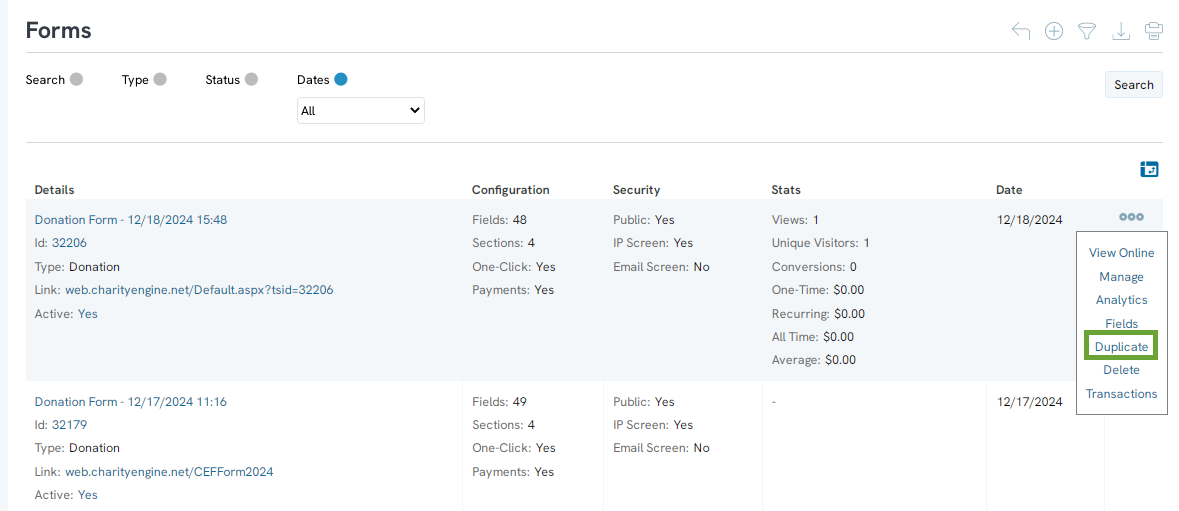
Then enter the name for your new form and select Duplicate Now. 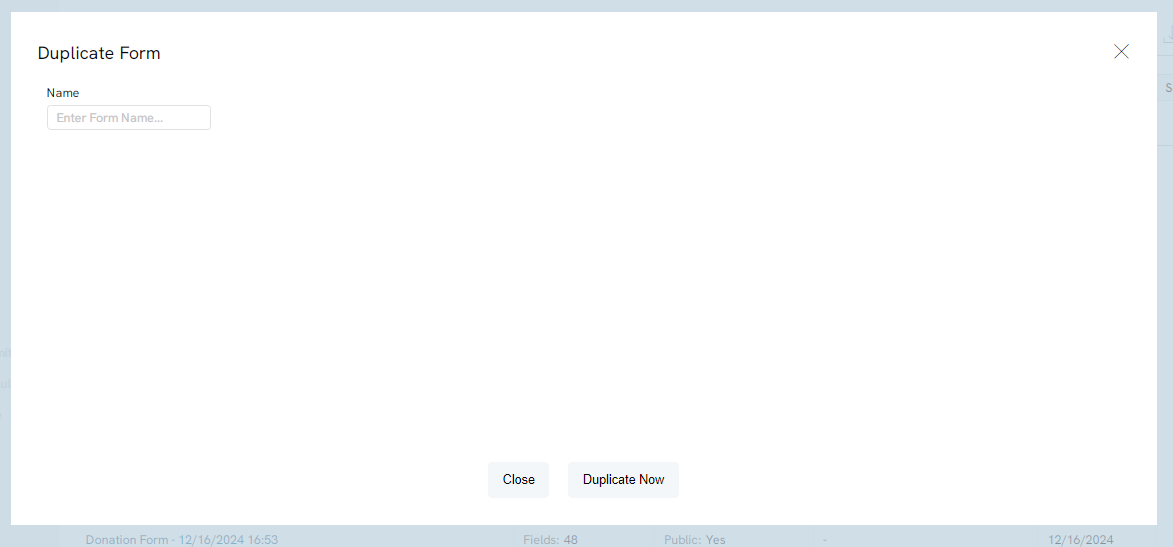
From the listing screen, open your new copied form to manage. Make any necessary changes or adjustments. This is the time to update any associated Funds or Tags from your previous form. Navigate to the Advanced tab > Data sub tab and make adjustments as needed.
New Event Creation
The first step to duplicating an event registration form is to create a new event and create all of the relevant tickets related to this event within the Events & Volunteers Application.
Steps for Creating a New Event:
- Navigate to the Events
- Under Events, select Search & Manage.
-
- At this step, determine whether your new upcoming event can be duplicated from an existing event in your system.
- Ensure tickets for this event are exactly the same, otherwise, it’s best to create a new event and new tickets from scratch.
- Locate the event you would like to duplicate, then hover over the ellipsis to the right and select Duplicate Now.
- Once the duplicate event is created, it will show (Copy) in the name. Select the event name to open and manage.
- Rename your event. Then, select Save.
Tip: You should not have multiple events with the same name in your account. Create an internal naming system that helps you keep track of your multiple events.
- Be sure to update the Location and Dates sections to align with your new upcoming event dates and locations.
- Navigate to the Tickets tab and ensure all of the existing ticket information is accurate. All tickets from your previous event will have copied over to your new duplicated event.
-
- If your ticket information needs changed for your new event: Locate the ticket, hover over the ellipsis next to the ticket and then select Manage to open and make edits to your ticket.
New Ticket Creation
If you are adding an additional ticket for your upcoming event, you must create the ticket under the event itself.
Steps for Creating a New Ticket: Optional
- Create a new ticket under the Tickets tab of the event, by selecting Add New at the top right.
- On the next page, determine the ticket type in the Type dropdown box.
- Input a name for your ticket in the Name field
- Input the price of your ticket, whether the ticket is tax-deductible, as well as the total available number of tickets and the number of guests included with the ticket.
- Once all relevant data is input in the fields, select the Save button to create the ticket.
- Then, select back at the top left. Your new ticket should now display under the Tickets tab of the event.
Duplicate Event Registration Form
The second step in this process is to duplicate the previous event registration form within the Online Application.
Steps for Duplicating an Event Registration Form:
- Navigate to the Online Application.
- Under Web Forms, select Search & Manage.
- Locate the registration form you would like to duplicate, then hover over the ellipsis to the right and select Duplicate Now.
- Once the duplicate registration form is created, it will show (Copy) in the name. Select the registration form name to open and manage.
- Rename your registration form. Then, select Save.
Tip: You should not have multiple registration forms with the same name in your account. Create an internal naming system that helps you keep track of your multiple forms.
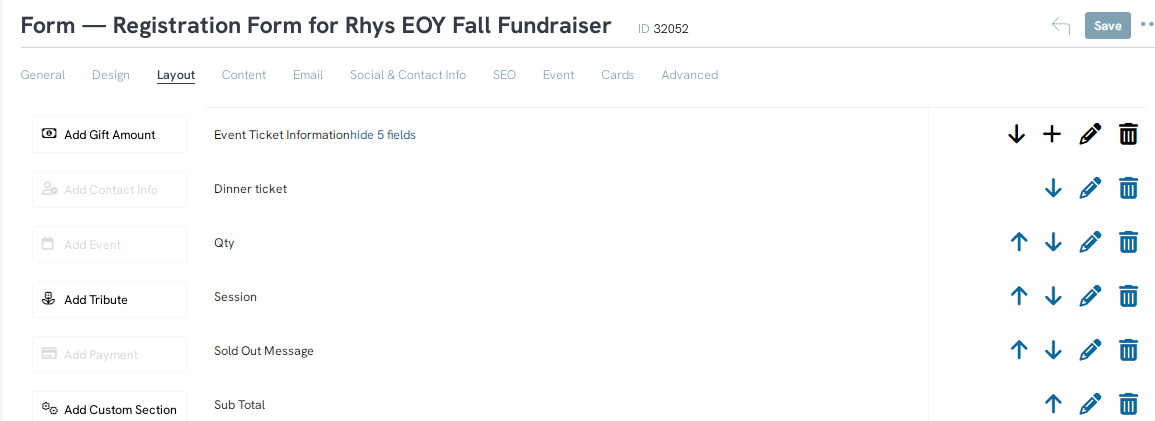
- Navigate to the Layout
- Under the Event Ticket Information section, select show # fields to expand the fields for this section.
- Ensure the correct number of and details of your event tickets are listed in this section.
Ticket Field Adjustment & Mapping
Important Note: Because you have copied the previous registration form from a previous event, the event ticket information on the copied form will have the old ticket Element ID’s associated. You must change these ID’s on the form field level for your form and transactions to be accurate and function successfully.
Steps for Adjusting Ticket Fields: Required
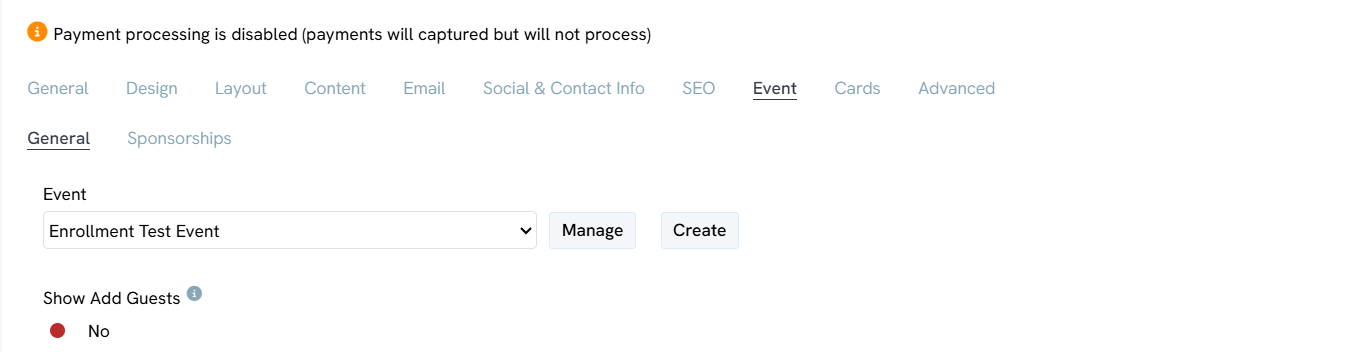
- First, navigate to the Event tab, and select the new event from the Event drop-down field at the top. Select the Save button once complete.
- Then, navigate to the Layout tab, and locate the ticket name field under the Event Ticket Information section. Then, select the pencil icon to the right of the field to edit.
- Under the Basic tab > General sub tab, ensure the Ticket field is mapped to the correct ticket field you are editing.
- Important Note: When copying registration forms, all ticket fields (including Qty, Sub Total, etc.) below the first grouping tend to revert to the first grouping ticket details. You must ensure each field related to the ticket grouping are aligned with this field setting.
-
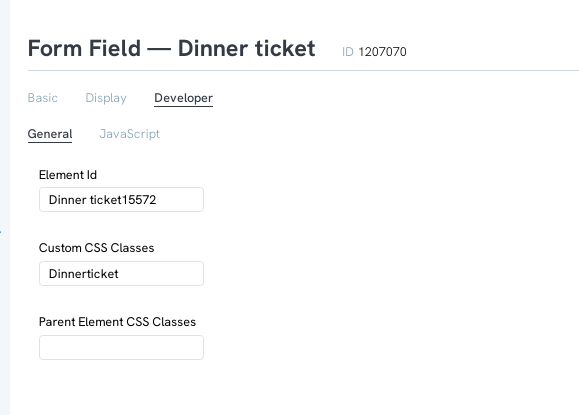
- Navigate to the Developer tab. Under the General sub tab, locate the Element Id field. In this field, you will see the ticket name combined with the ticket Id.
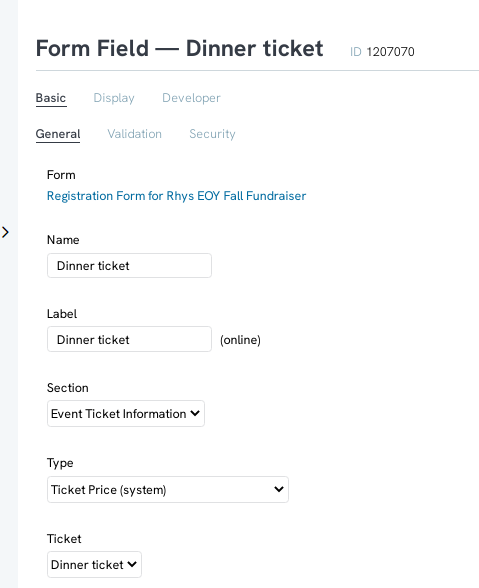
-
- The current ticket Id in the field is the Id from your previous event/event registration form. You must update this id to the new event ticket Id.
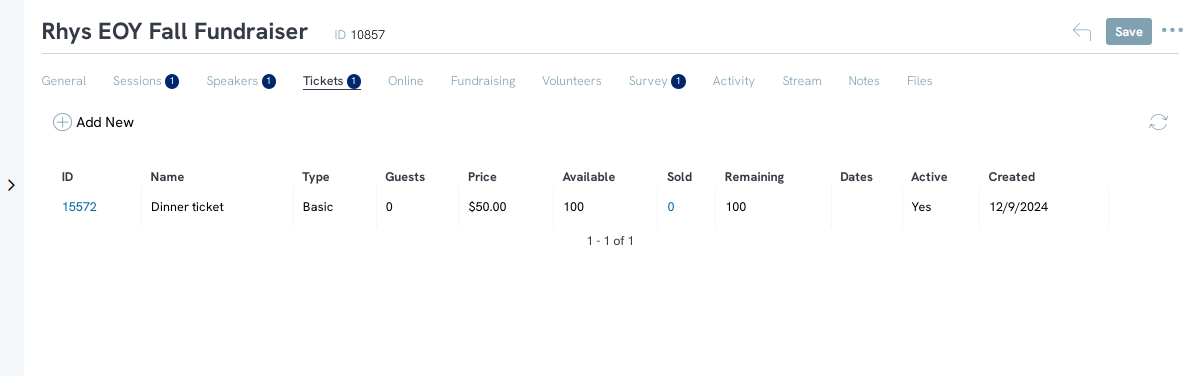
- You can locate the new ticket Id by navigating to Tickets tab under your new Event. The ID column to the left of Name will indicate ticket Id’s.
- Update the ticket form field Element Id. Select the Save button once complete. Then, select back at the top left to navigate back to your form.
- Do the same for every single field Element Id related to that particular individual ticket, including the Qty, Session, Sold Out Message and Sub Total
- This step must be completed for EVERY ticket that remained the same from previous events and is copied with the event registration form. This way, you are ensuring your constituents are purchasing the correct ticket mapped to the new event.
Smoke Testing
Once you have successfully completed the above steps and are ready to test your registration form, you will need to disable payment processing and once complete, remove your test registrations.
Steps for Smoke Testing the Event Registration Form:
- Open your Event Registration Form and navigate to the Advanced
- Under the Payments tabs, General sub tab, de-select the toggle for Payment Processing.
- Next, select the form Link under the General tab to open your form.
- In the top Tickets section of your form, input a number in the quantity field under one or two of the tickets.
- Ensure the Sub Total fields under each ticket section and the Ticket Total field are all populating total amounts accurately.
- Next, fill out the remaining information, including Contact Info. When you are at the Payment section, input the test credit card information below:
- Card Number: 4111111111111111
- Expiration Month: Month in future
- Expiration Year: Year in future
- Name on Card: Your Full Name
- Once you're finished filling out all fields on the form, select the submit button at the bottom of the page.
- Navigate back to your event and under the Tickets tab, refresh the page and ensure the number of tickets purchased in your test registration transaction are reflecting under the SOLD
- Next, navigate to the Donations application, and select Search & Manage under Transactions.
- Locate your recent event registration test transaction and ensure the amount is displaying correctly. Then, hover over the ellipsis to the right of the transaction and select Tickets.
- Ensure the tickets/registration records associated with your event registration test transaction are accurately displayed.
- Once review is complete, hover over the ellipsis to the right of each registration and select Delete to remove your test transaction records. Select the Process button in the pop up window.
- When complete with deleting test registration records, navigate back to the event and select the Tickets Refresh the page and ensure that the number of tickets under the SOLD section have reverted to 0.
Potential Issue Awareness
Important Note: If the steps above are not followed with precision, the likelihood for errors with transactions and tickets is high. Attention to detail with duplicating registration forms is a must.
Your first indicator that an issue has occurred with your ticket field mapping is an additional $ symbol in the Sub Total field displays on the form. The second indicator is often the presence of the error message $-NaN.NaN next to the Ticket Total field. You will know something is wrong when you attempt to smoke test your form and it displays like the image below.

If the above errors are occurring on your registration form, you must check each form field Ticket mapping and Element Id and ensure accuracy.
If you are unable to resolve, sometimes the next best step is to delete the registration form and re-duplicate to start over.
