Introduction
CharityEngine has many out of the box forms for users to choose from. These forms are ready-to-use online forms specifically designed for accepting donations on websites, platforms, or through email communications. These pre-built forms offer a convenient solution for nonprofits who want to collect donations online without investing significant time and resources into developing a custom donation system. By utilizing these forms, you can quickly integrate a donation functionality into your website or application.
Out-of-the-box donation web forms usually come with several key features and benefits:
1. Ease of implementation: These forms are designed to be easily integrated into existing websites or platforms, typically requiring minimal technical knowledge.
2. Customization options: While forms are pre-built, forms can also be customization to match the branding and design of your website. You can customize the form fields, colors, fonts, and add your logo or images to create a seamless and consistent donation experience for your donors.
3. Secure payment processing: Donation web forms out of the box are built to handle secure online transactions. Your forms will integrate with your payment gateway(s), ensuring that donor information and financial details are protected.
4. Donation tracking and reporting: Forms come with built-in reporting and analytics features. This allows you to track and monitor donation activity, generate reports, and gain insights into your fundraising efforts.
5. Donor management: Donation web forms provide basic donor management functionalities, allowing you to store donor information securely, send acknowledgments or receipts, and manage donor relationships effectively.
6. Mobile responsiveness: In today's mobile-driven world, these forms are designed to be mobile-friendly and responsive, ensuring that donors can easily make donations from their smartphones or tablets.
It's important to note that while donation web forms out of the box offer convenience and simplicity, they may have limitations in terms of advanced customization or specific integration requirements. If you have unique needs or complex donation workflows, you may consider building a custom donation forms or consulting with a web developer to tailor the solution to your requirements.
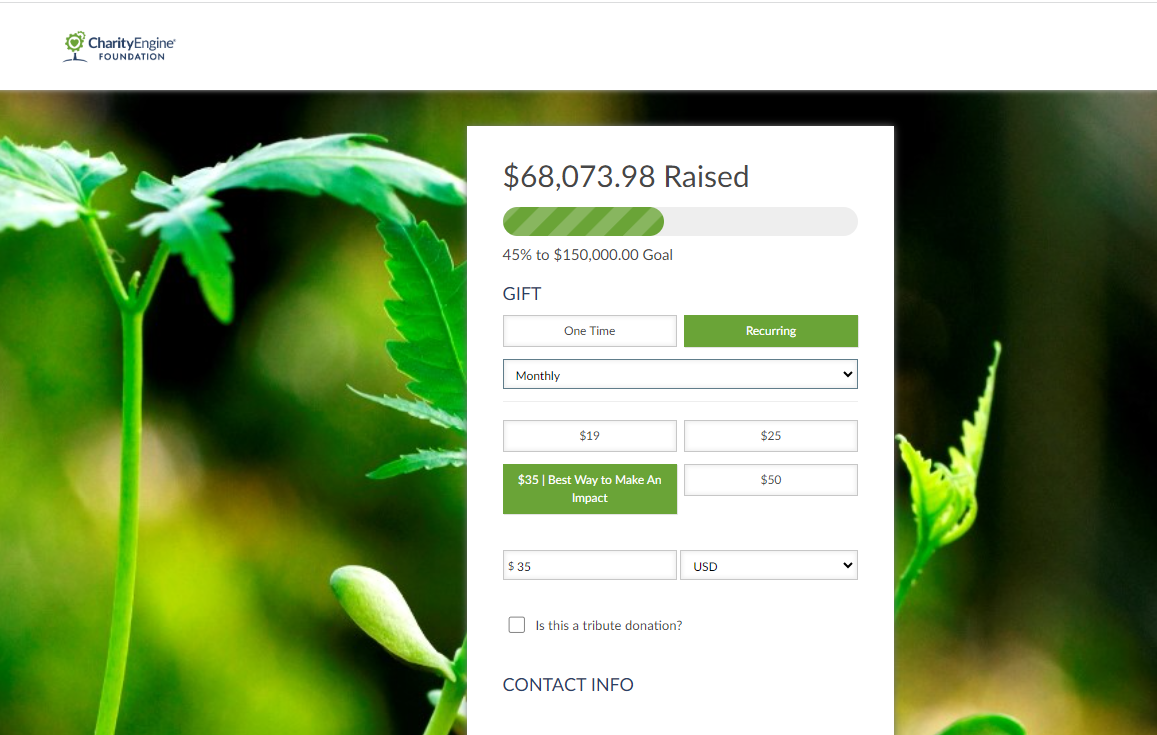
Table of Contents
- Introduction
- Prerequisites
- Getting Started - Simple Out of the Box Donation Forms
- General Tab: Basic Set-Up and Attributions
- Design Tab: Basic Set-Up and Design Customization
- Layout Tab: Out of the Box Set-Up and Basic Customization
- Content Tab: Out of the Box Set-Up and Basic Customization
- Email Tab: Out of the Box Set-Up and Basic Customization for Receipting and/or Acknowledgements
- Social Tab: Out of the Box Set-Up to Expose Social Media Sharing
- SEO Tab: Search Engine Optimization
- Cards Tab: Leveraging Cards (eCards/Print Cards)
- Advanced Tab: Additional Attributions and Advanced Configuration
- Advanced System Mapping & Configuration
- Managing the Media Library
- FAQs & Additional Reading
Prerequisites
While web forms provide flexibility for customization, all out of the box settings have been designed to maximize the easy of use for set-up and for donor/end user engagement. Users can simply create and go to get started. However, advanced configuration options are available for customization.
Important Note: When customizing web form templates, it is important to exercise caution as any modifications made to the templates may potentially lead to issues or breakages during future releases or updates. Before making any changes to CharityEngine out of the box form templates, please ensure you have CSS, HTML, and JavaScript experience. Please read more in our article Web Forms: How to Design Your Web From
Getting Started - Simple Out of the Box Donation Forms
Overall, donation, out of the box, web forms can be a great starting point for quickly implementing a donation feature on your website, helping you engage donors and raise funds efficiently.
Step 1: To create a donation form, navigate to the Online Application > Web Forms > Search & Manage > Create New ( upper right-hand corner)
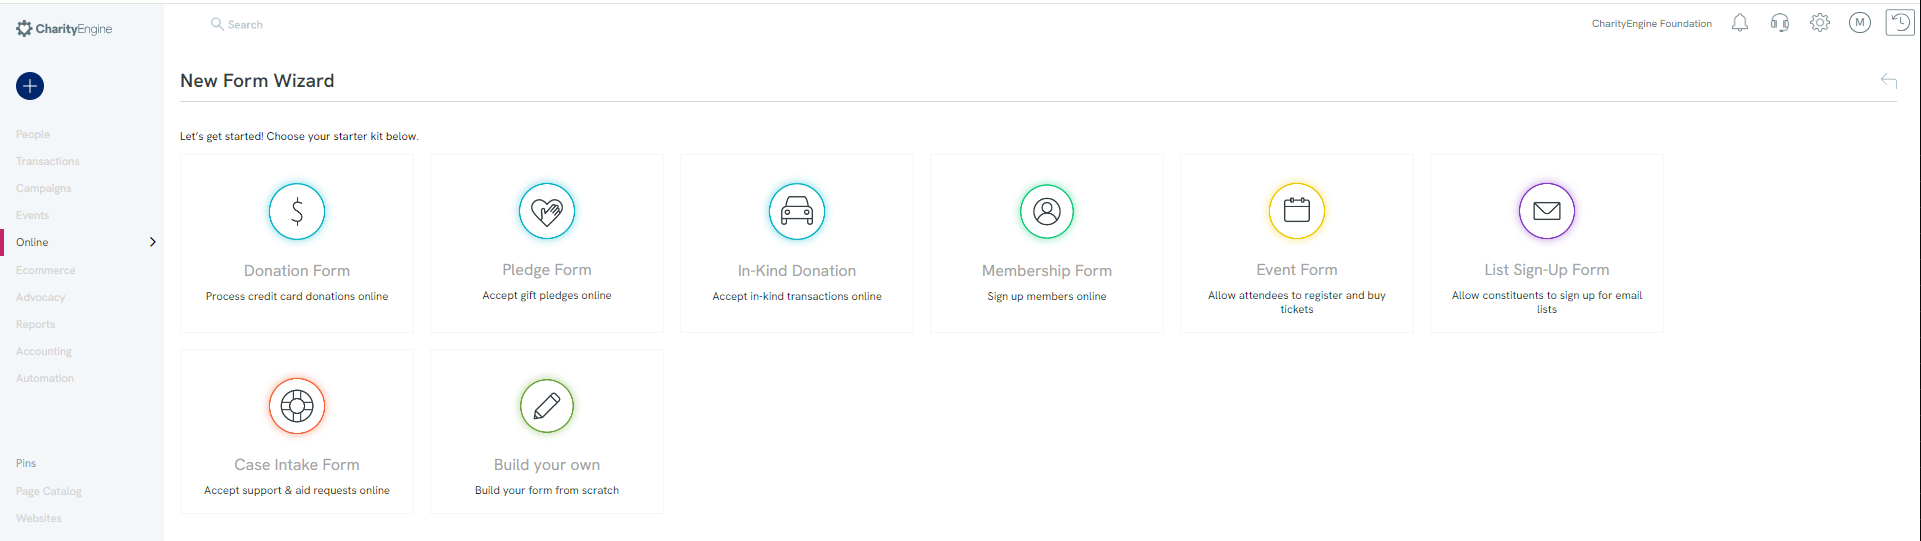
Step 2: The New Form Wizard workflow will be initiated
Step 3: Click on Donation Form to initiate the donation form
General Tab: Basic Set-Up and Attributions
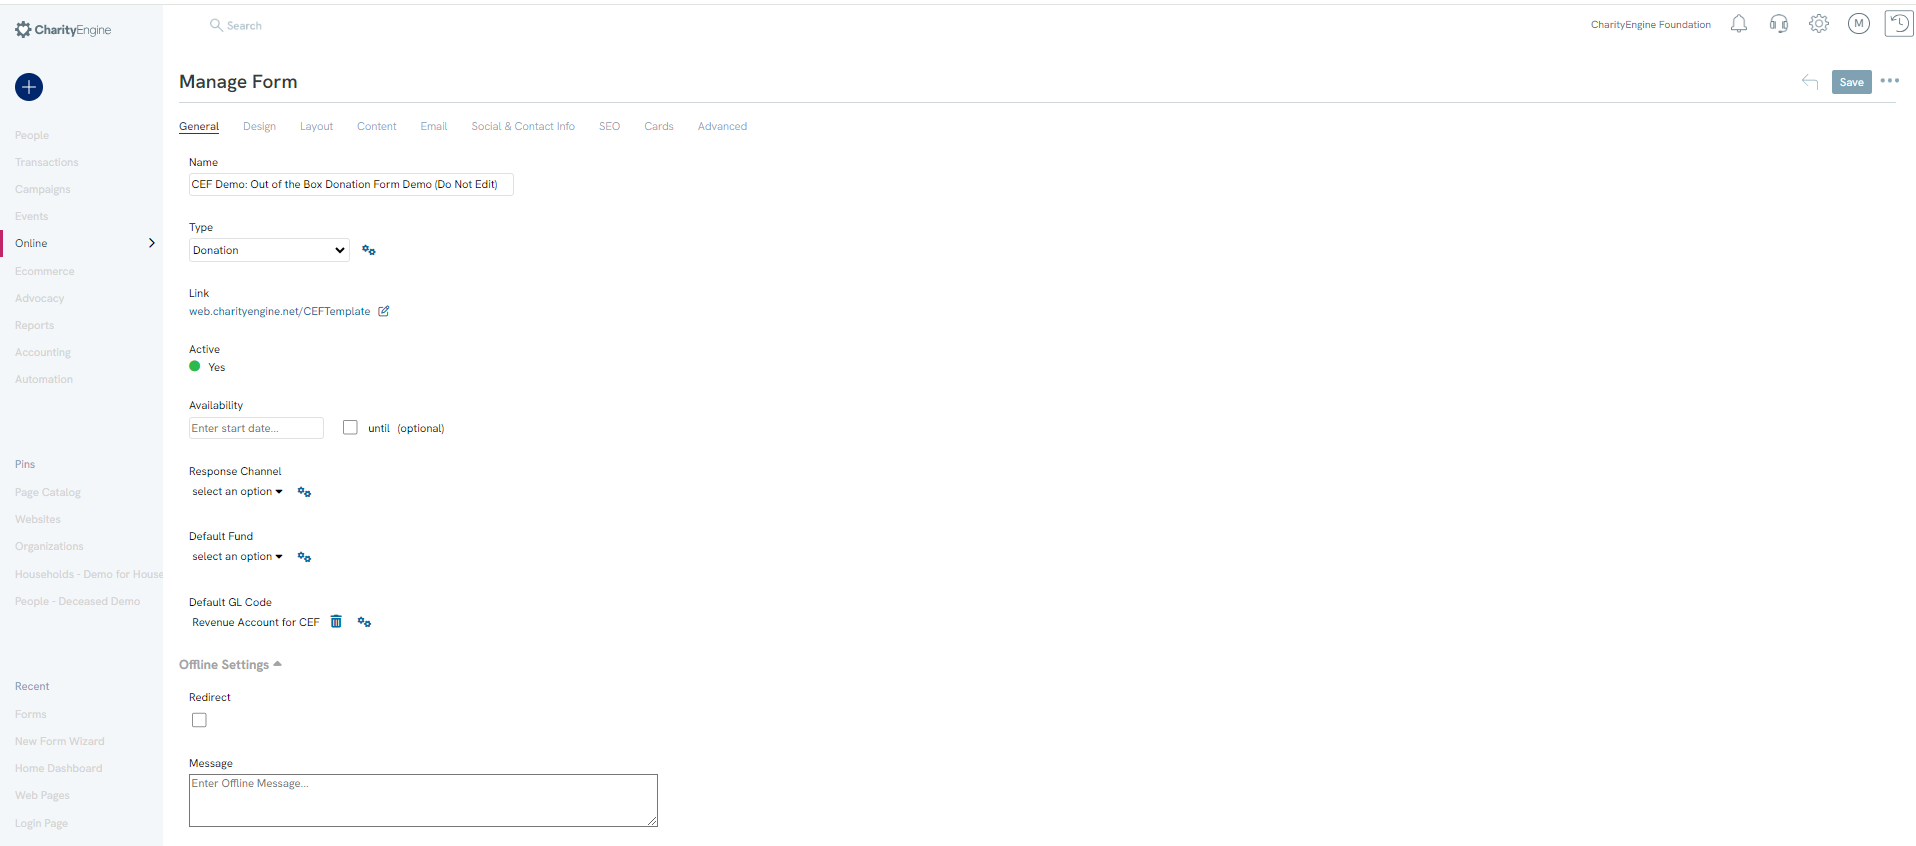
Upon creation of a new donation form begin set-up from the General tab, including:
- Name: Customize the form name
- Type: Donation, will be set based upon web form wizard
- Link: Use the box/pencil icon to modify the web form suffix
- Note: If the organization leverages vanity URLs, new forms will be created with the identified vanity URL. For more information on vanity URLs, please see your account manager.
- If an existing web form requires update of a vanity URL, navigate to the SEO Tab > Root Domain and enter the organization's vanity domain > Save
- Note: The link provided can be used to embed within the organization's website, emails, or other digital communications.
- Active: Toggle to off upon completion of web form
- Deactivation of a web form is a best practice to avoid potential fraudulent activity in the future. CharityEngine strongly encourage deactivation when a web form is no longer required.
- Availability: Select start and/or end date
- Note: If a start date/end date is set for the current date/time, the user may experience a white screen with an error message "Form disabled (check status and active dates configuration)". Please update the form start/end date to allow for visibility and testing.
- Response Channel: Assign automatic attribution of response channel for transaction attributions
- Default Fund: Assign appropriate fund name if required for transactional detail
- Default GL Code: Assign the appropriate general ledger code if required for transaction attributions
- QR Codes: Expand to view a unique QR code related to this specific form. This can be copied and used with advertisements, emails, or other communication channels
- If the organization leverages QuickBooks integration, the user will be able to automatically assign a General Ledger Account to transactions. Select the GL Code for assignment (if using QuickBooks integration, select the Revenue Account the organization is leveraging for QuickBooks).
- Offline Settings: Configure redirects when the web form is offline/deactivated
- Record History: View and monitor form creation, modification, and change history
Remember to click Save to secure any changes.
From the ellipsis  (located to the right of the Save button), easily access options to preview the online form, confirmation page, decline page, or success page.
Pro Tip: When a form is created, the name will be automatically generated. For ease of use within the organization, rename to an identifiable title useful to the organization.
Design Tab: Basic Set-Up and Design Customization
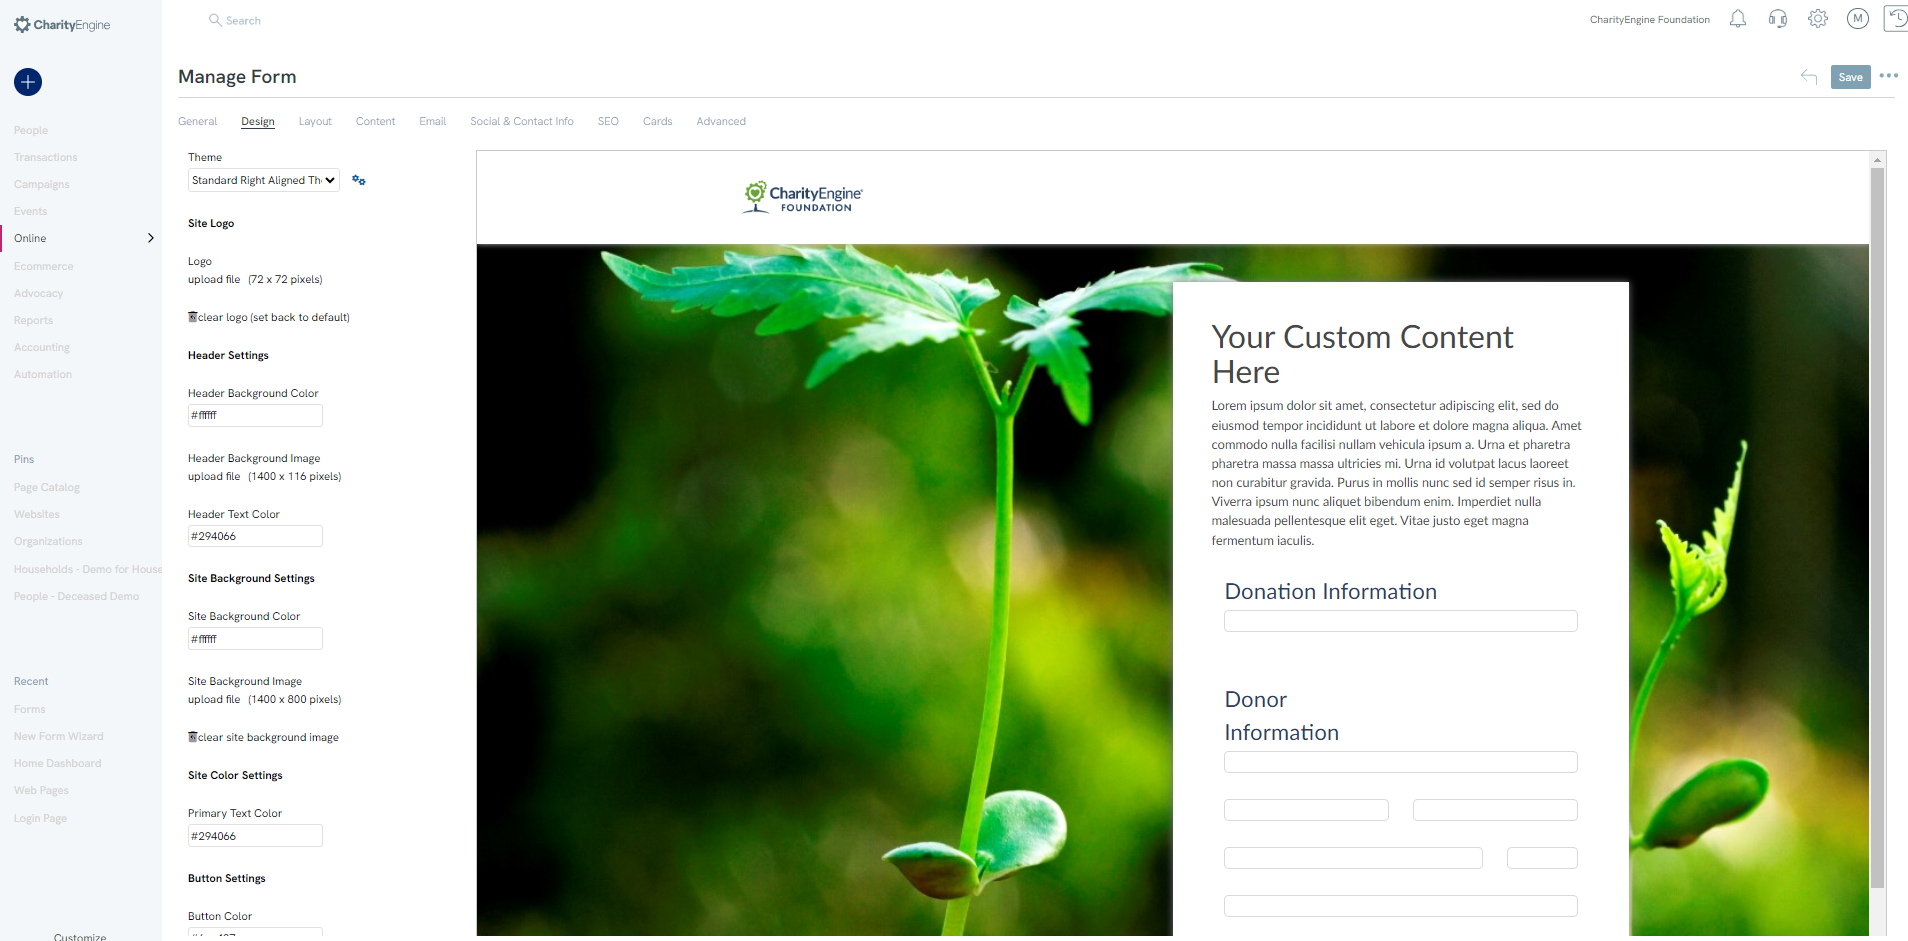
- Theme: select several out of the box themes. While you can create custom themes, please review the prerequisites for guidance for ongoing management and maintenance to themes.
- Site Logo: Upload an organization logo; no action will default to logos as stored within Setting App > General > Account Settings > General > Organizational Logo
- Header Settings: Select from the color picker for custom:
- Header Background Color
- Header Background Image (recommended 1400 X 116 pixels)
- Header Text Color
- Site Background Settings: Select from the color picker for Primary Text Color
- Button Settings: Select from the color picker for custom:
- Button Color
- Button Text Color
- Footer Settings: Select from the color picker for custom:
- Footer Background Color
- Footer Text Color
Important Note: When customizing web form templates, it is important to exercise caution as any modifications made to the templates may potentially lead to issues or breakages during future releases or updates. Before making any changes to CharityEngine out of the box form templates, please ensure you have CSS, HTML, and JavaScript experience. Please read more in our article Web Forms: How to Design Your Web From
Remember to click Save to secure any changes.
From the ellipsis (located to the right of the Save button), easily access options to preview the online form, confirmation page, decline page, or success page.
Layout Tab: Out of the Box Set-Up and Basic Customization
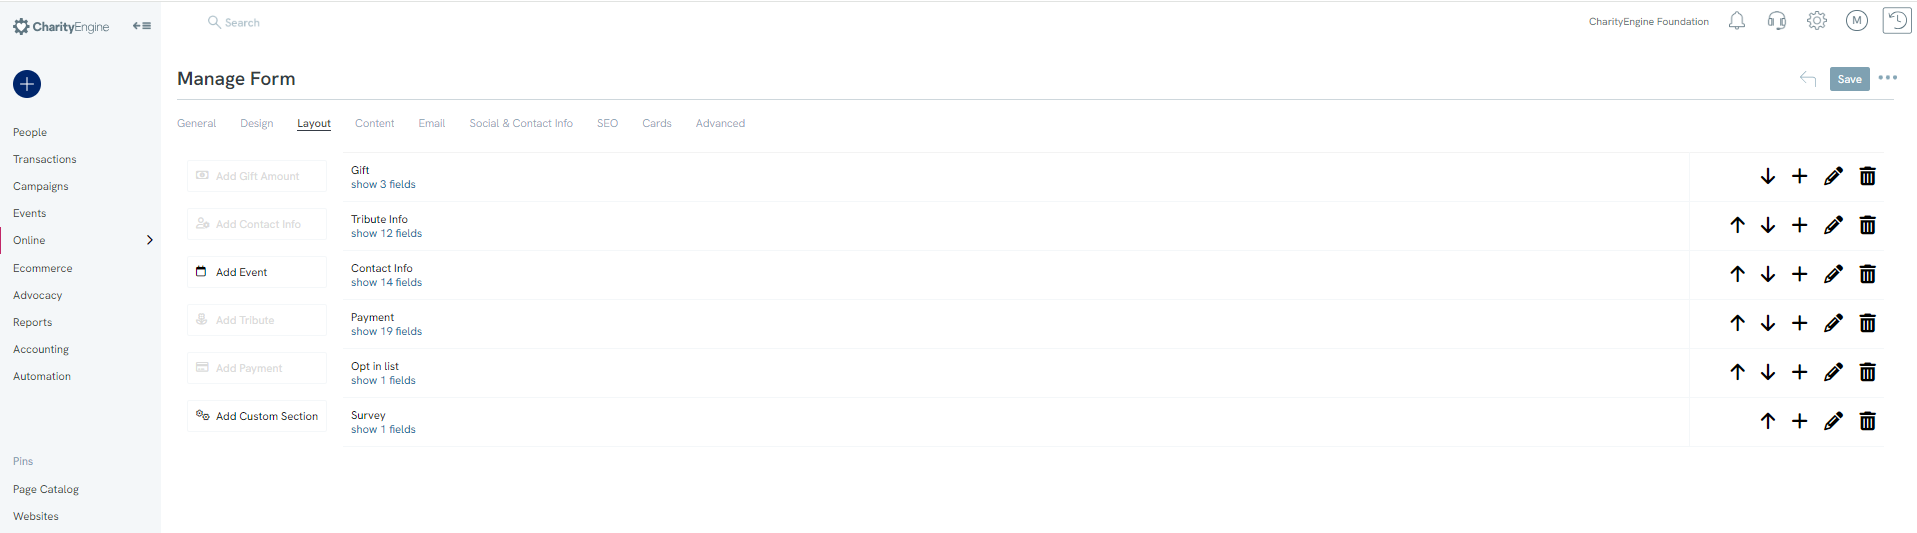
Out of the box layout for donation forms will automatically assign:
- Gift block: including one time and recurring gifts, gift strings, and currency (if supporting multiple currency types)
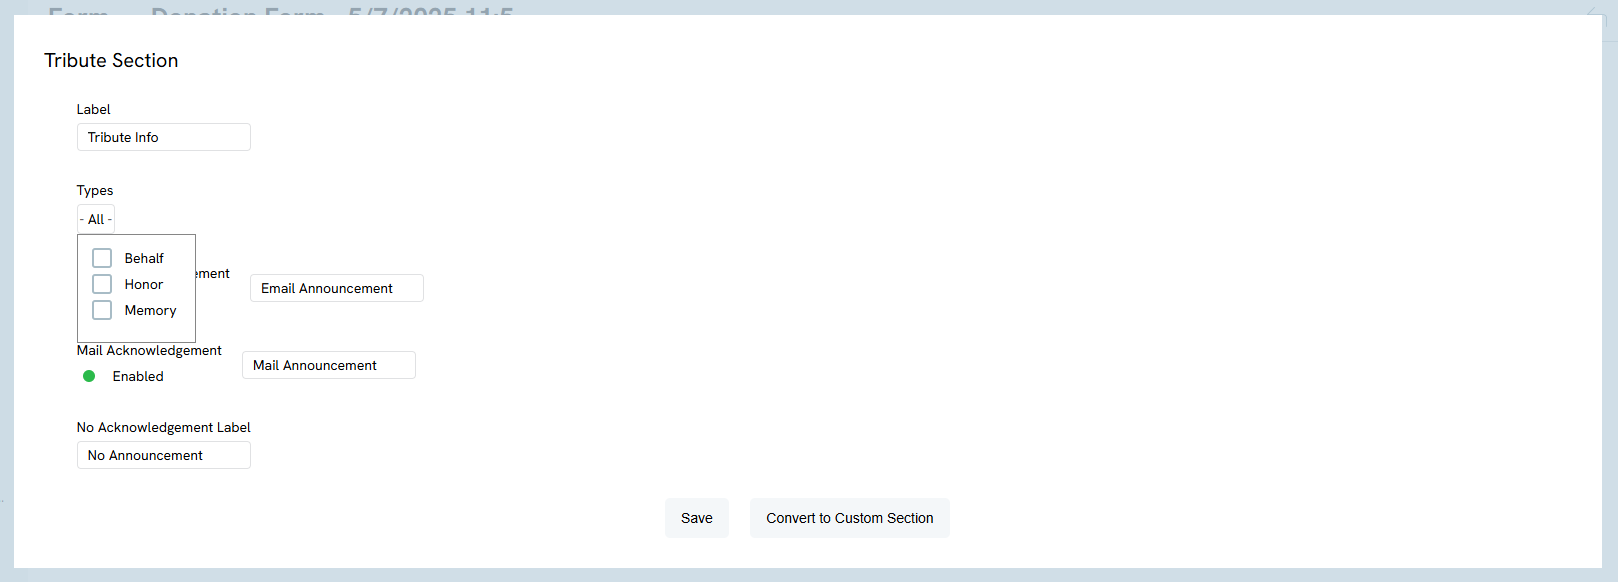
- Tribute Information block: allowing tribute donations and acknowledgee communication needs. You also have the ability to choose which type of tributes are added to your form.
- Contact Information block: capturing donor name, address, email, phone and communication opt in
- Note, if capturing phone, default is set to "Mobile" type
- Payment block: allowing credit card, ACH, Google Pay, and PayPal (if applicable), and gift increases
Blocks can be removed by using the Trash Can icon. Or blocks can be moved in order using the Up/Down arrow.
Click on Pencil for each block to expose easy configuration.
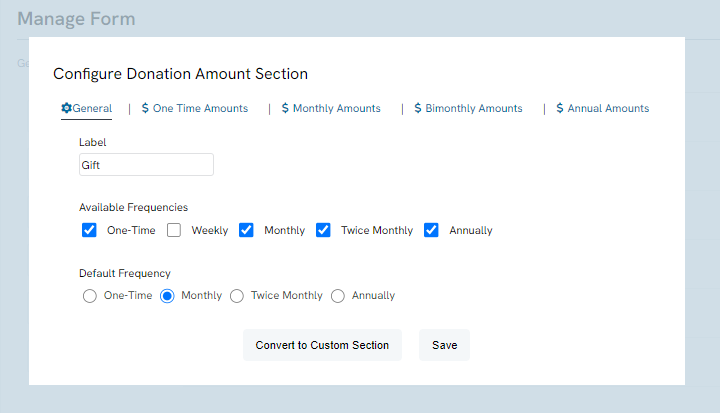
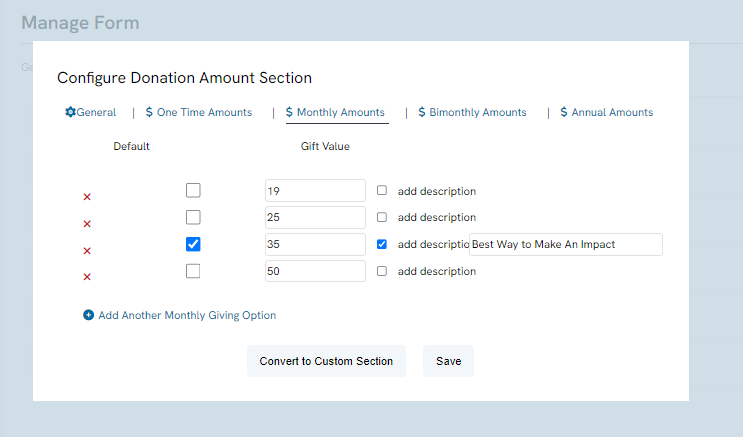
Each block has available customization. In this example, by clicking on the Gift block, the user can access basic customization. The user can expose available frequencies to present to donors. By clicking on each of the frequency types on the top tabs, users can customize gift string asks, default values, and customize descriptions for each type and value.
Payment Block:
Use the Pencil icon of the Payment Block to expose payment options including:
- Include Credit Card
- Include Name on Card
- Include CVV (recommended)
- Include ACH/Bank Account
- Include PayPal (PayPal account and API configuration required) (Please also connect PayPal payment gateway in Advanced tab - see below)
- PayPal Subscription (PayPal Subscription account required and API configuration required) (Please also connect PayPal payment gateway in Advanced tab - see below)
- DAFPay (toggle to Yes to allow for donors to make gifts through donor advised funds)
- ApplePay Subscription (toggle to Yes to allow for recurring gifts using ApplePay)
- Enable Cover Processing Fees (Cover Processing Fee configuration required)
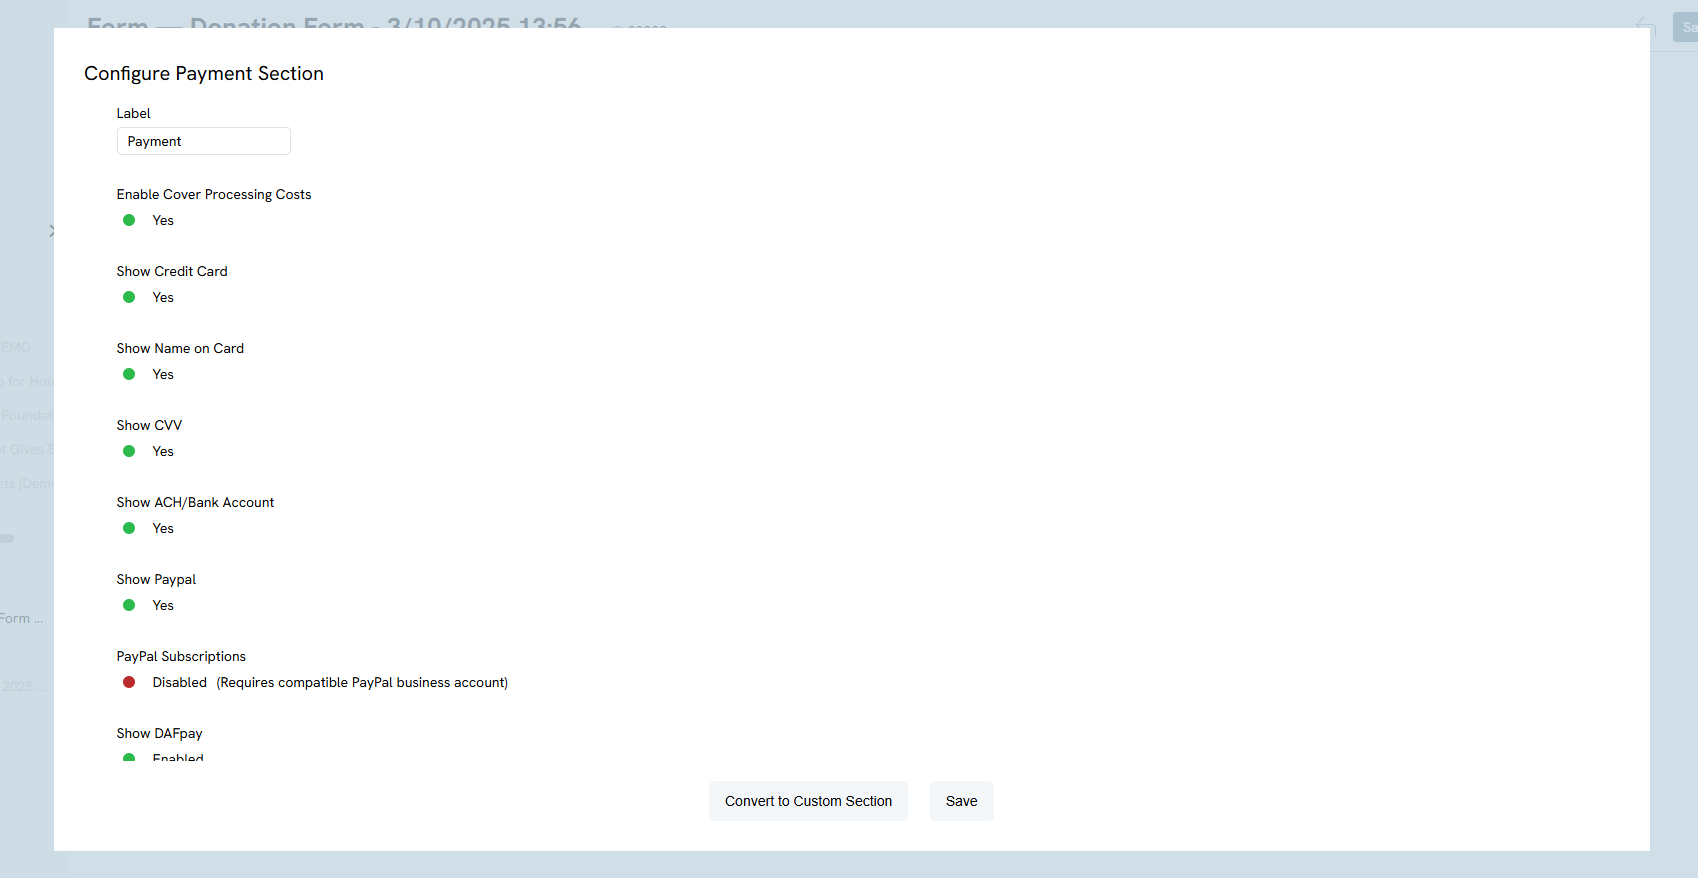
To modify or adjust block fields, click on the show # fields to expose the individual fields. Use the Drag and Drop to easily adjust the field presentment. Or the Trash icon to remove a field.
Remember to click SAVE to secure any changes.
From the ellipsis (located to the right of the Save button), easily access options to preview the online form, confirmation page, decline page, or success page.
Content Tab: Out of the Box Set-Up and Basic Customization
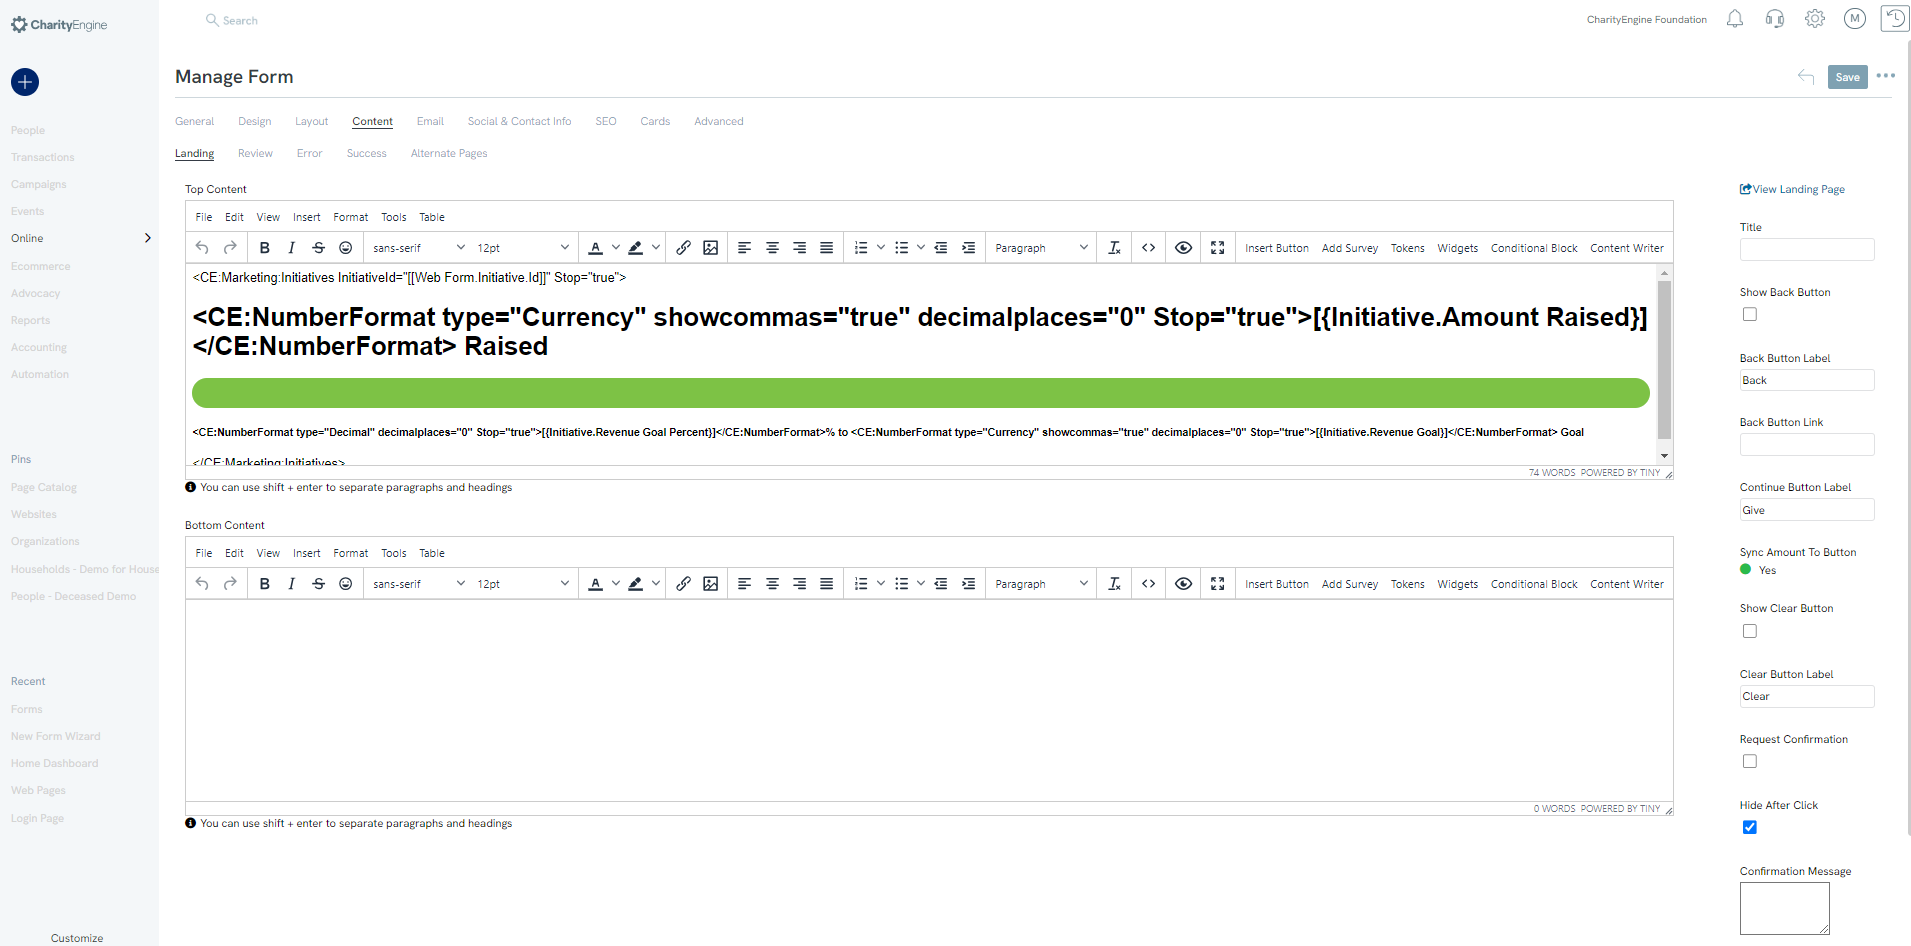
The Content tab allows the user to customize one or more of the web form flows. Each tab can be customized to support the steps and flow within the organization's donation form. The user has the option to customize the top and bottom content boxes inserting text, images, system tokens, and widgets (as demonstrated with the "Raised Meter" example - please ensure an initiative is assigned as defined in the Advanced tab).
To the right, users can further customize other form elements.
The Content Tab also allows users to immediately access media library when user is looking to inert an image. Also ensures that users are not adding repetitive image for storage purposes. 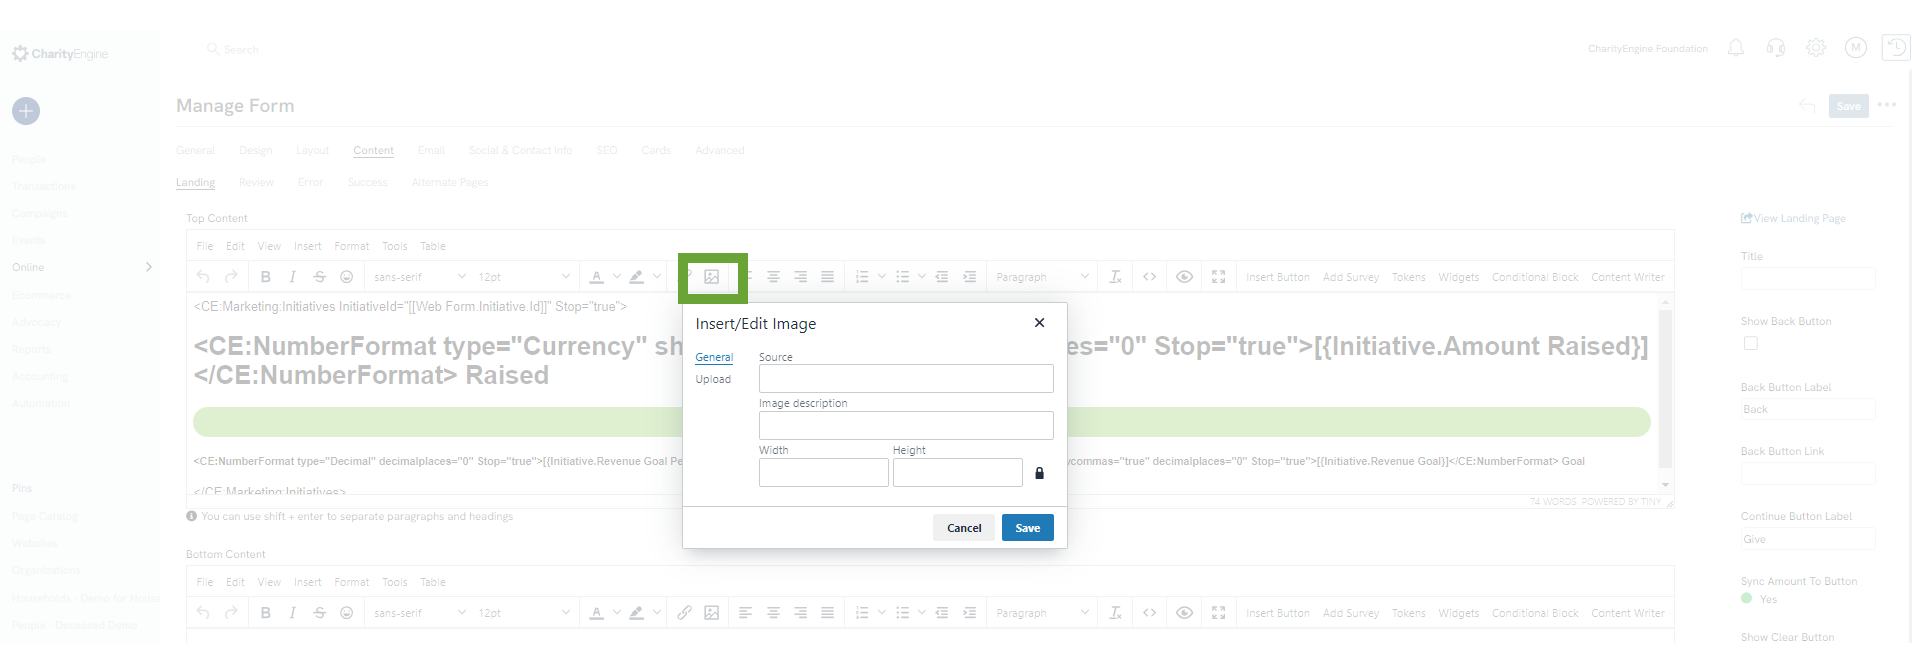
Note, CharityEngine recommends clicking Hide After Click to reduce occurrences in which donors may double click causing duplicate transactions. Most default settings have configured to maximize form performance and maximize usability for donors. While customization is available, these modifications are optional to the organization.
Remember to click Save to secure any changes.
From the ellipsis (located to the right of the Save button), easily access options to preview the online form, confirmation page, decline page, or success page.
Email Tab: Out of the Box Set-Up and Basic Customization for Receipting and/or Acknowledgements
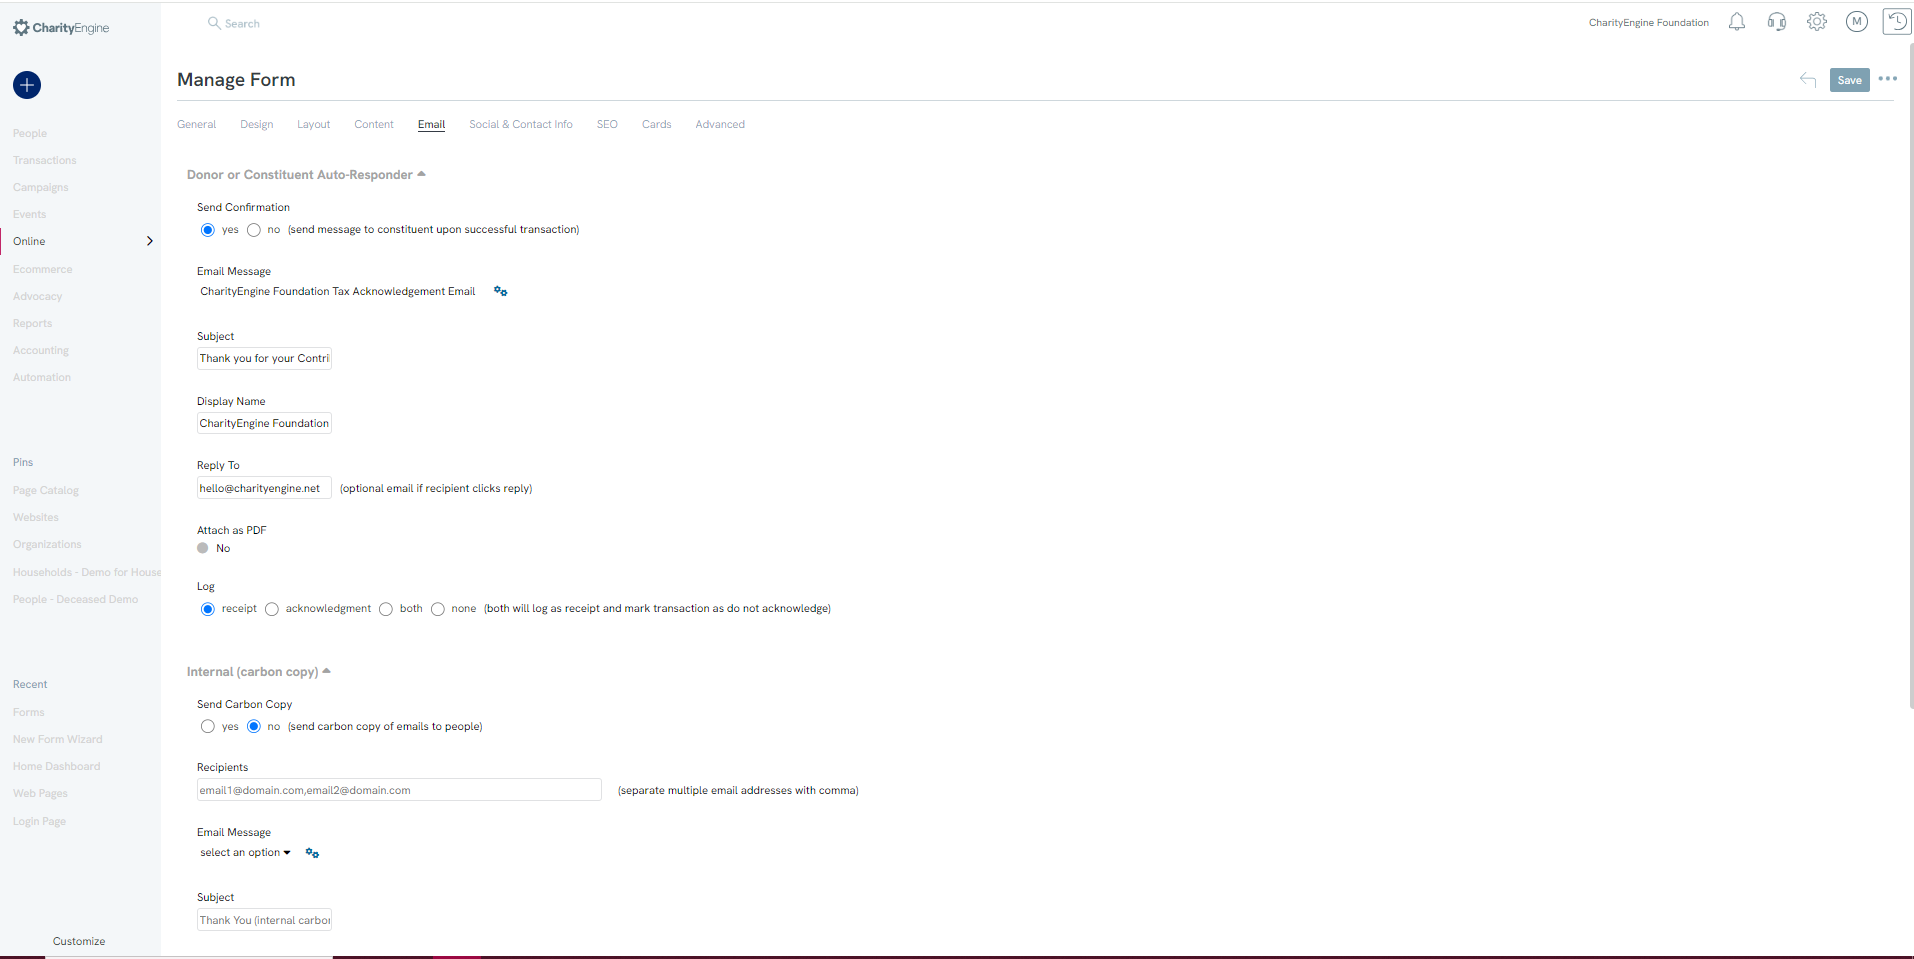
The Email Tab allows organizations to initiate auto-responders for donor receipts and/or acknowledgements. Use the Donor or Constituent Auto-Responder to customize the auto-responder.
Use the Internal (carbon copy) feature to automatically initiate carbon copies to internal members. (Character limit of 1,000; for additional need consider establishing an internal distribution list for internal management.) Users ill need to select the email message that will be sent internally from the dropdown, the email that is sent to the donor is not automatically applied.
Finally, use the Ecard Receipt or Acknowledgee if the organization prefers to support ecards.
Remember to click SAVE to secure any changes.
From the ellipsis (located to the right of the Save button), easily access options to preview the online form, confirmation page, decline page, or success page.
Social Tab: Out of the Box Set-Up to Expose Social Media Sharing
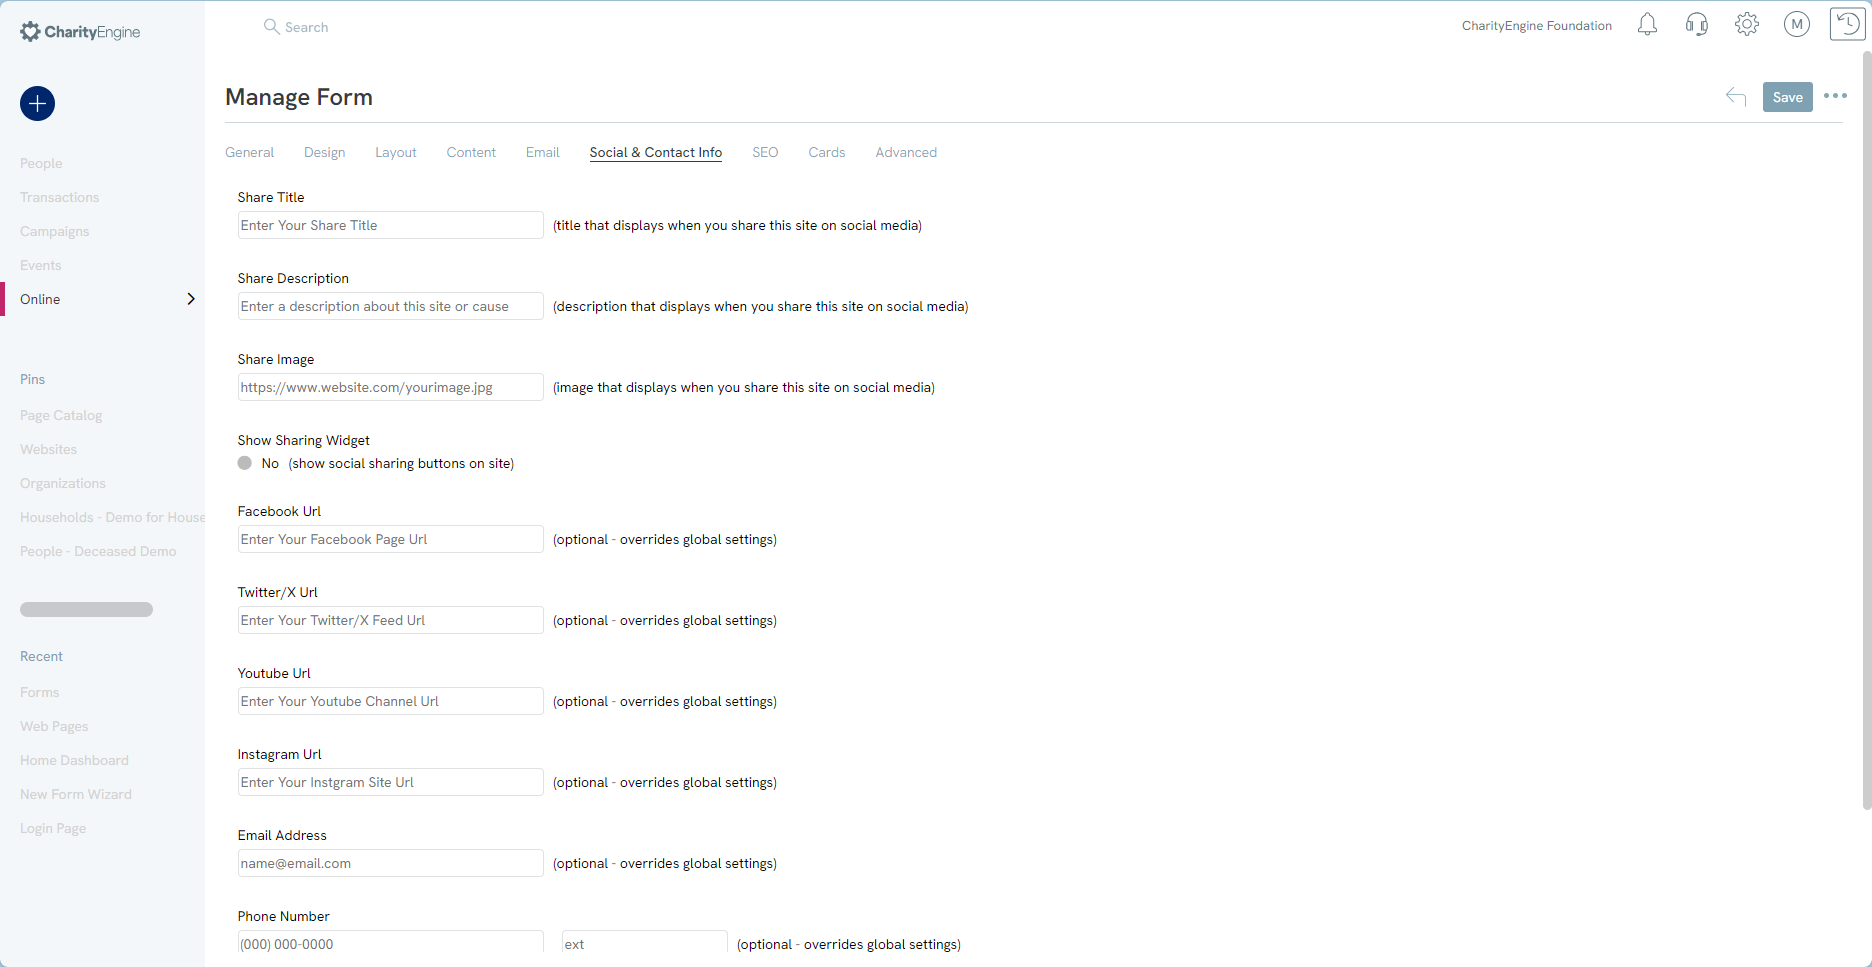
From the Social tab, add one or more of the organization's social media links to allow donors/constituents to share within social networks.
Remember to click Save to secure any changes.
From the ellipsis (located to the right of the Save button), easily access options to preview the online form, confirmation page, decline page, or success page.
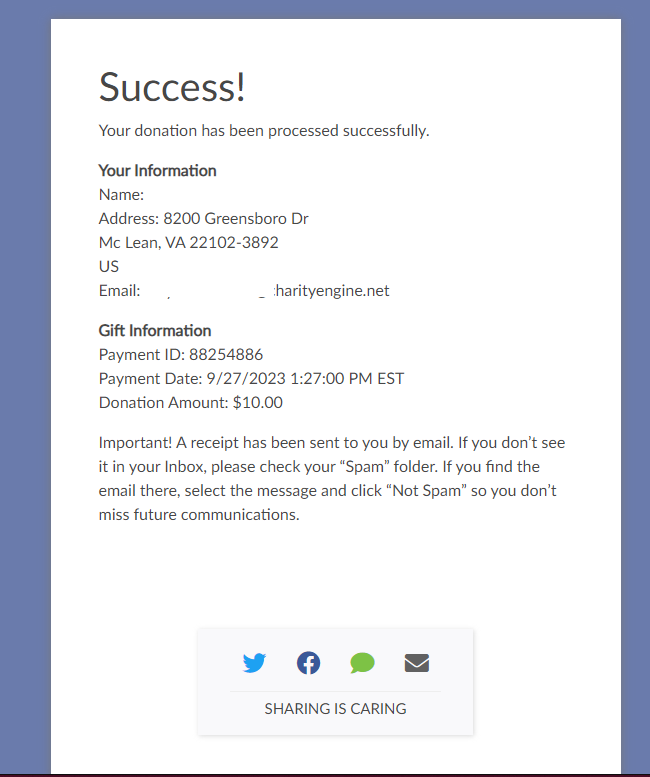
Social Sharing Options will be presented on the web form and available on success screens.
SEO Tab: Search Engine Optimization
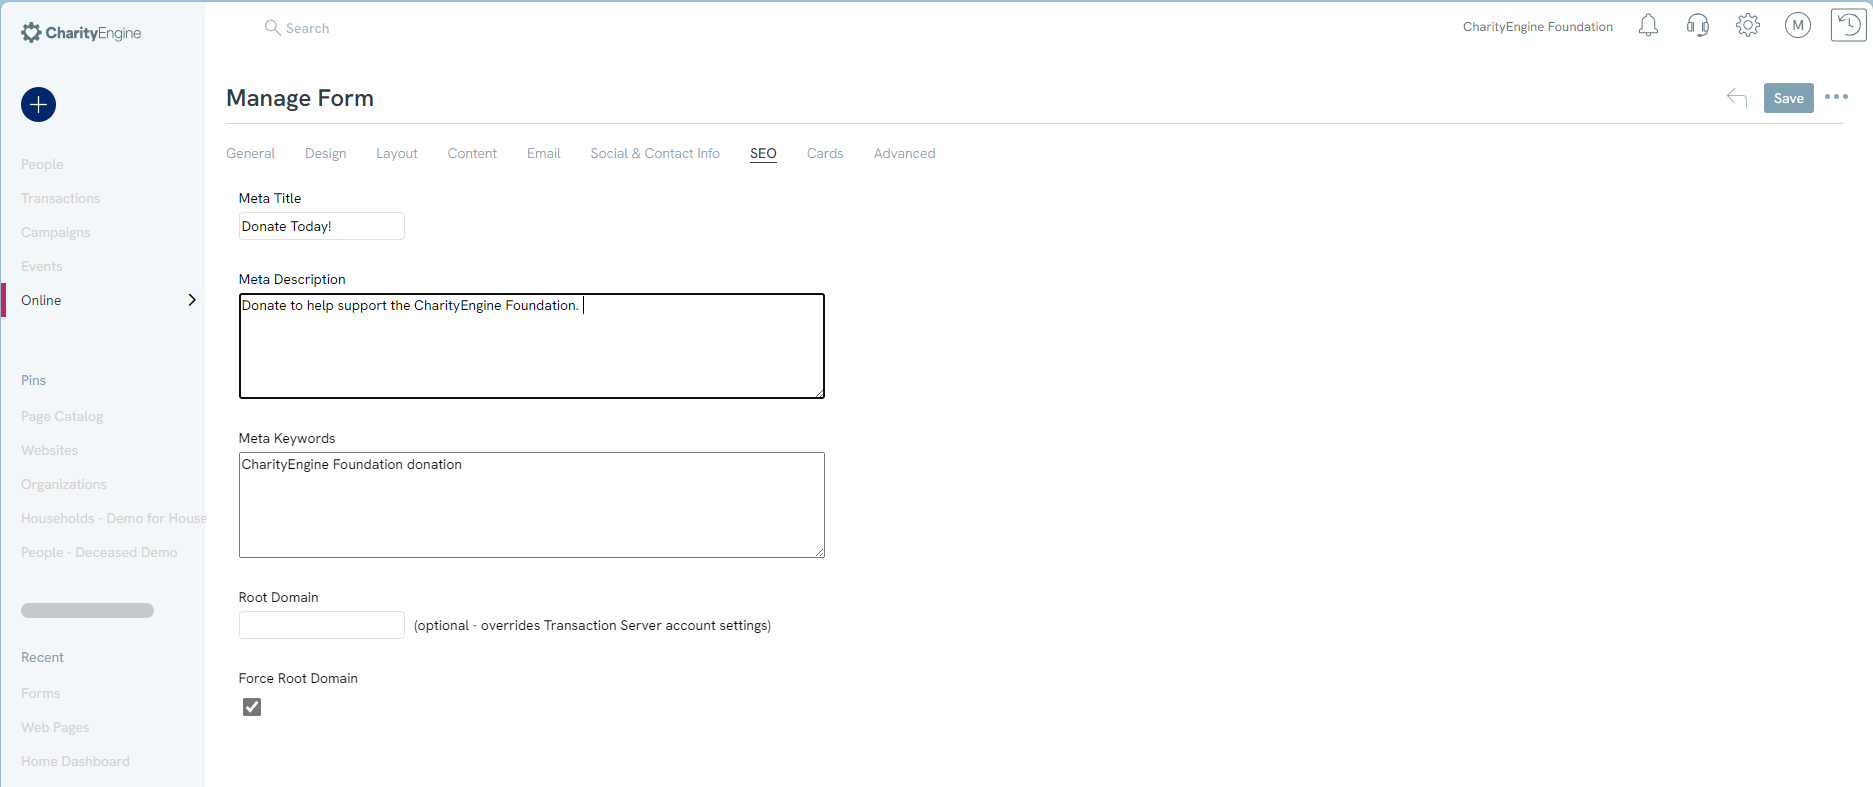
SEO stands for Search Engine Optimization. It is a set of practices and strategies aimed at improving the visibility and ranking of a website or web page in search engine results pages (SERPs). The goal of SEO is to attract organic (non-paid) traffic from search engines and increase the chances of your website being found by users searching for relevant information. Improve search engine optimization of the organization's web form by including a Meta Title, Meta Description, Meta Keywords. Please be aware that updating the Meta Title will also update the language displayed on the constituent's browser tab when the page is opened.
If the organization is leveraging vanity URLs, enter the organization's vanity URL within Root Domain to expose within the web form. Note, this will not be required if the organization's vanity URL has been configured within the instance. Root Domain update may only be required for web forms created prior to the establishment of the vanity domain.
Remember to click SAVE to secure any changes.
From the ellipsis (located to the right of the Save button), easily access options to preview the online form, confirmation page, decline page, or success page.
Cards Tab: Leveraging Cards (eCards/Print Cards)
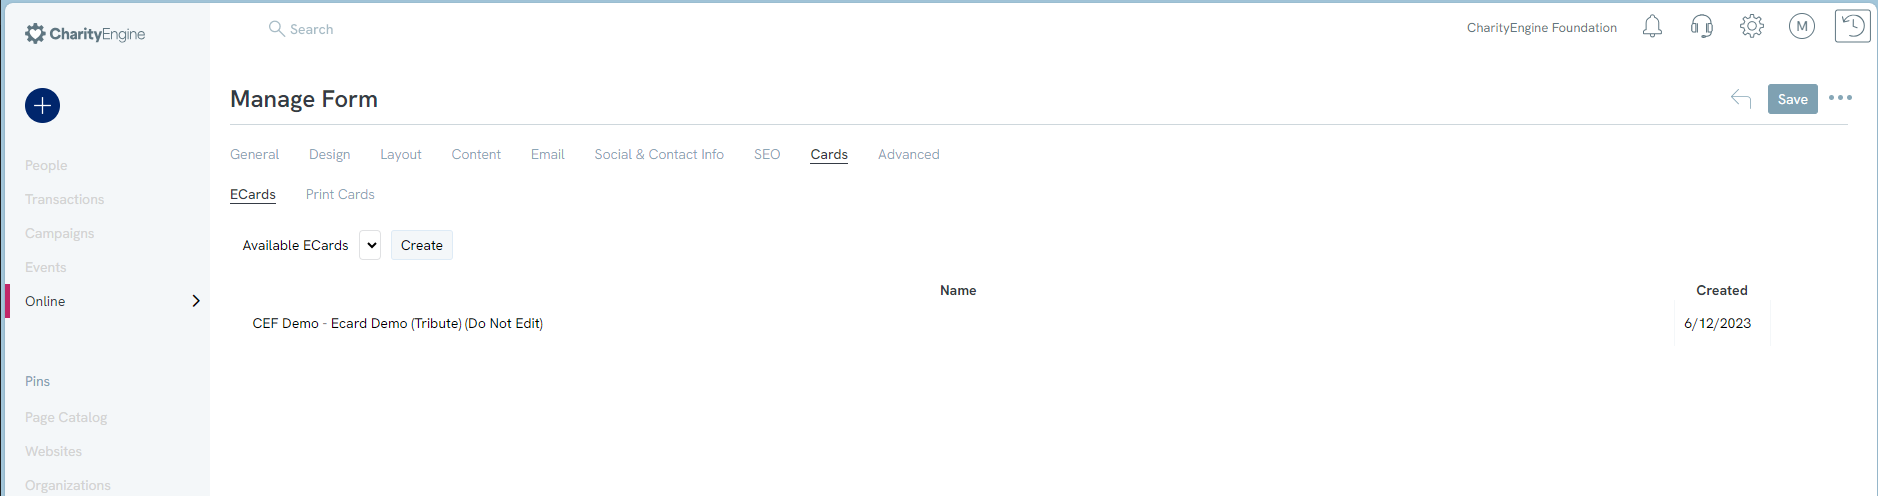
eCards, short for electronic cards, are digital versions of traditional greeting cards that can be sent and received electronically. They are typically designed to mimic the appearance and sentiment of physical greeting cards, but instead of being printed on paper, they are created and shared digitally via email or social media platforms. If the organization elects to leverage eCards, create/add eCards here.
Remember to click SAVE to secure any changes.
From the ellipsis (located to the right of the Save button), easily access options to preview the online form, confirmation page, decline page, or success page.
Advanced Tab: Additional Attributions and Advanced Configuration
There are several components within the Advanced tab designed to support transaction/contact attributions and advanced developer support.
Remember to click SAVE to secure any changes.
From the ellipsis (located to the right of the Save button), easily access options to preview the online form, confirmation page, decline page, or success page.
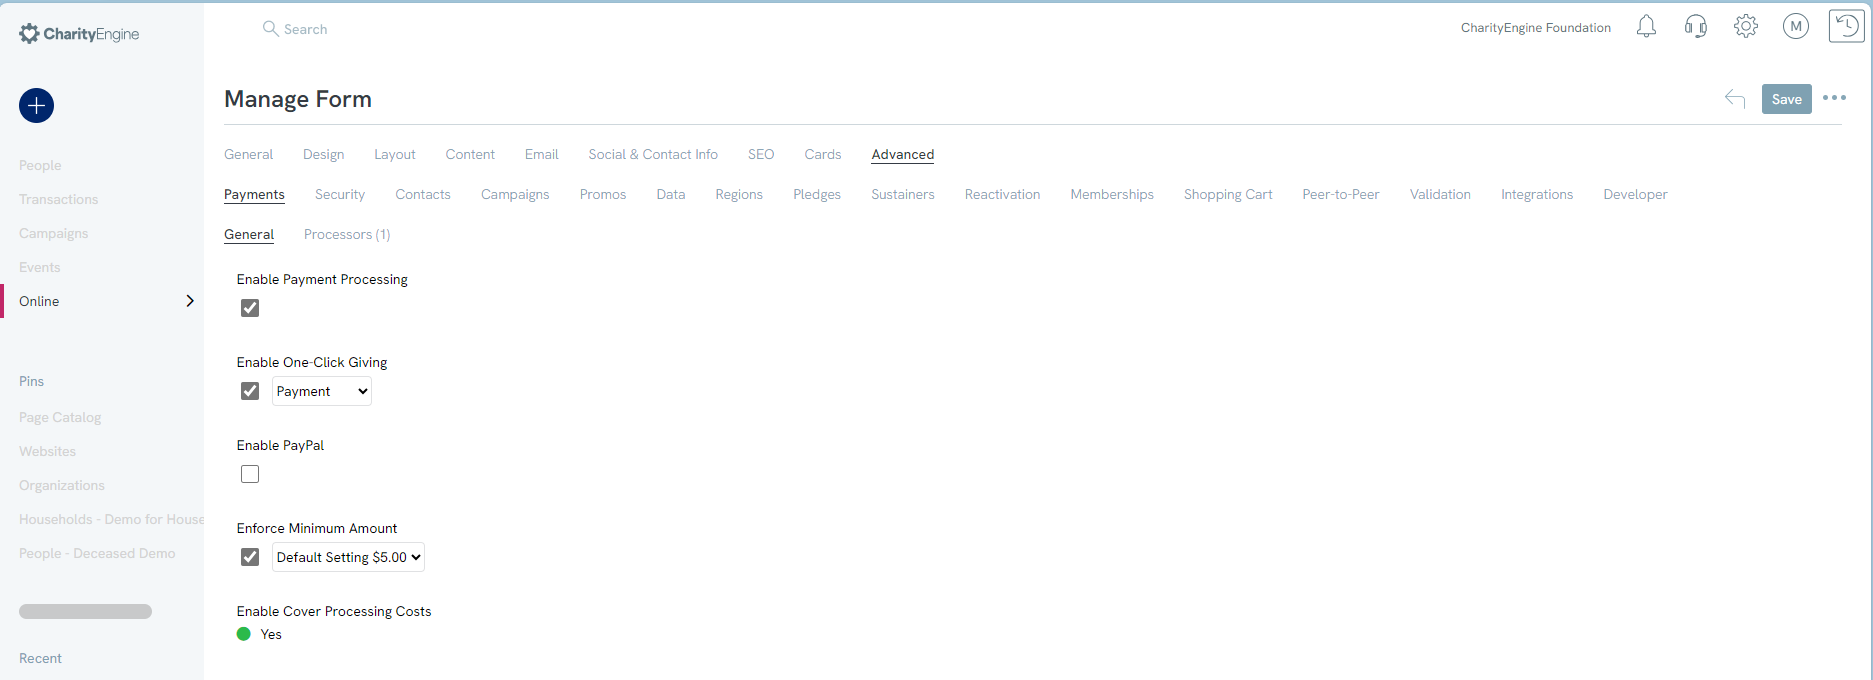
Payments
-
General:
- This tab will allow users to determine payment processing options including:
- Enable Payment Processing: Check mark on will connect the web form to the organization's payment processor
- Enable One Click Giving: Will enable the form to use previous donor information to simplify giving
- Enable PayPal: If the organization has integrated PayPal as an additional payment type, navigate to the Payments > General tab > check Enable PayPal
- Note: PayPal must be pre-configured as a payment gateway in order to enable this option. If the organization is interested in adding PayPal payment feature, please reach out to your account manager for additional details.
- Enforce Minimum Amount: As a best practice, web forms will default to a minimum however organizations can manage
- Enable Cover Processing Costs: The “Donor to Cover Fee” fundraising tool is designed so donors can assist to cover the fees and processing your organization incurs increase gift sizes as a percentage to the donor’s total donation amount. While this is designed as a fundraising tool, it is important to note that this option does not automatically calculate the donor’s total fees as payment processors will assess fees based upon payment tender type and gross donation amount.
- This tab will allow users to determine payment processing options including:
-
Processor:
- Use this section to assign a specific payment processor
Security
- Use this tab to set additional security options including forced user sign in, fraud limits, and browser rate limits
Contacts
- Automatically assign contact level status and/or priorities for donors who interactive with the web form
Campaigns
- Assign the initiative in which all actions and financial transactions should be attributed towards
- Click on Actions > search initiatives to display workflow to search for a campaign initiative or initiative segment
Promos
- For support of promotional codes, configure settings here. Learn more about promotional code configuration in our article Promo Codes & Discounts
Data
- Assign additional attribution elements including:
- Funds - leverage this feature to allocate financial dollars towards one or more fund types
- CRM Groups/CRM Tag - create automatic assignment of contact records to specific groups and/or tags
- Opt In Lists - automatically assign opt-in lists for future communication needs
Regions
- Create automatic attribution of region assignment at the contact level when a user engages with a web form
Pledges/Sustainers/Memberships
- If the web form is used to create pledge, sustainer, or membership accounts, leverage these areas to create assignments of account status, account type, and/or assignment of specific payment gateways (if using more than one payment gateway)
Shopping Cart
- If the organization leverages the Shopping Cart feature, assign products and fulfillment details directly to the web form
Peer-to-Peer
- If the web form requires attribution to a peer-to-peer event, donations can be attributed directly to a specific peer-to-peer event and/or a specific peer-to-peer team
Validation
- Leverage this section to customize the display and view of errors presented if a user has an invalid entry or is missing a required field on the web form
Integrations
- If the organization leverages Double the Donation, expose this feature by toggling to on. To learn more about Double the Donation integration, learn more in our article Adding "Double the Donation" to a Form.
Developer
- Enable Cookie Pre-populate (Auto-Fill Feature): For donor ease of use, web forms are auto-configured to enable the auto-fill of a donor's information based upon saved information from their personal browser. If the organization wishes to disable this feature, navigate to the Advanced tab > Developer sub tab > uncheck Enable Cookie Pre-populate .
- Auto-Correct Address (USPS Standardization): By default, out of the box web forms are set with the USPS formatting. This feature uses capitalization for improved mailing practices by the USPS. If your organization actively mails, CharityEngine strongly recommends maintaining this setting for improved mailbox delivery. However, if you chose to remove, you can access your online form and navigate to the Advanced tab > Developer sub tab > General > deselect the Auto-Correct Address
- Custom JS & Conversion Code: CharityEngine will automatically assign Google Analytics and Google Tag codes if the organization uses Google Analytics.
Remember to click SAVE to secure any changes.
From the ellipsis (located to the right of the Save button), easily access options to preview the online form, confirmation page, decline page, or success page.
Advanced System Mapping & Configuration
Users can create fields designed to map to CharityEngine fields for easier data capture and attribution. These data points provide users with advanced data mapping needs to meet their business needs.
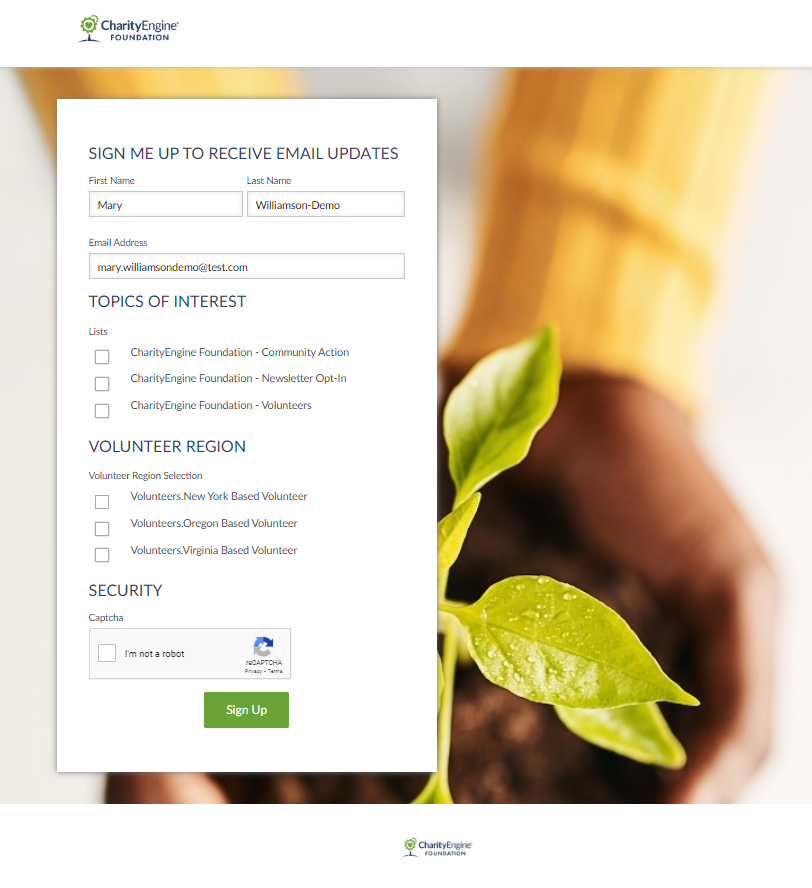
In the following use case, a Contact type web form has been created designed to allow the constituent to select one or more email opt-in lists (stored as an "Opt In List") as well as select their volunteer region preference (stored as a "Group").
Prerequisites include: creating a basic Contact type web form, creation of Opt In Lists (via Campaigns App), and creation of Group names (via Configuration App).
Step 1: Once the web form has been created, navigate to the Layout tab
Step 2: Create 2 custom sections (selecting the Add Custom Section on the left options) - "Topics of Interest" & "Volunteer Region"
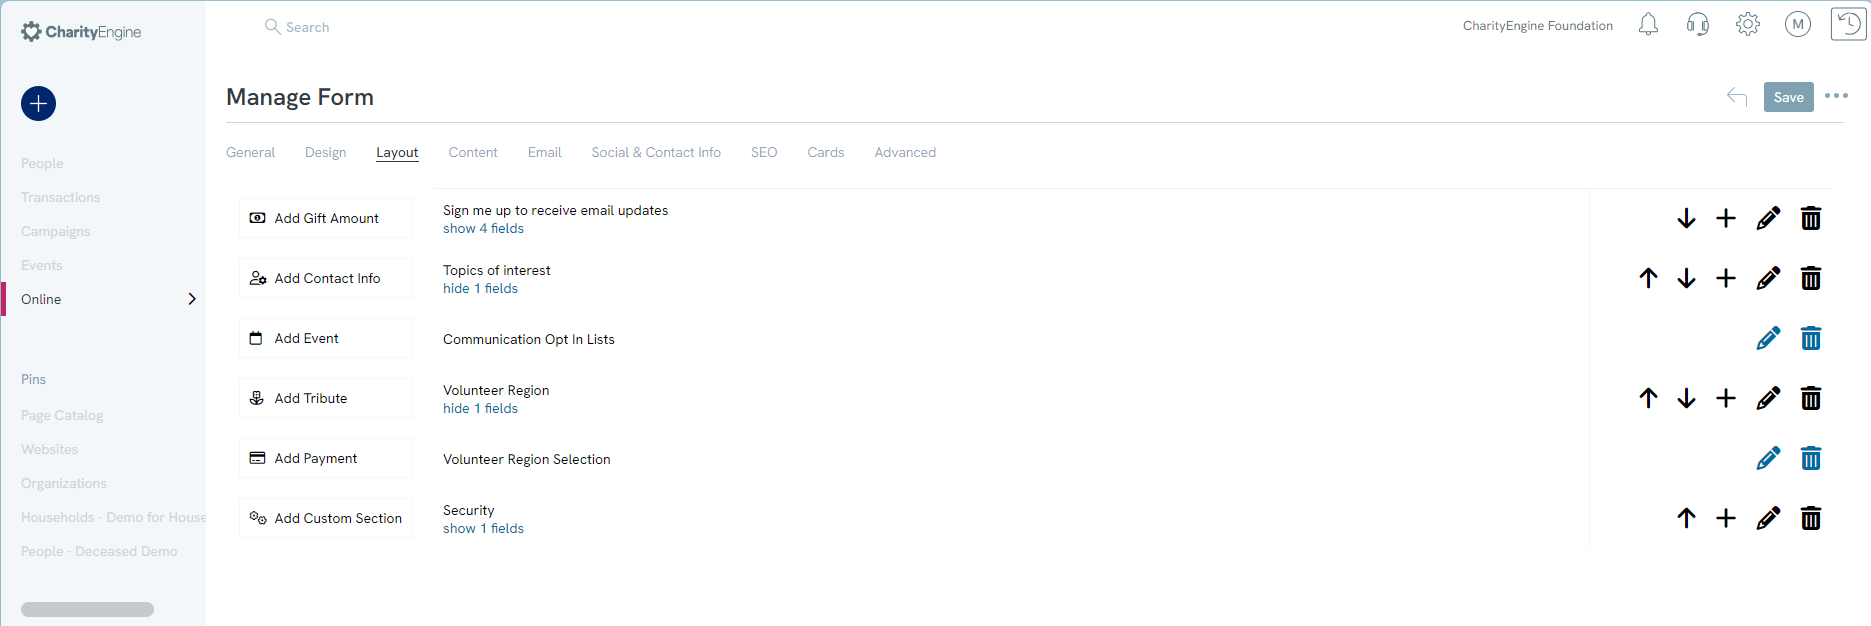
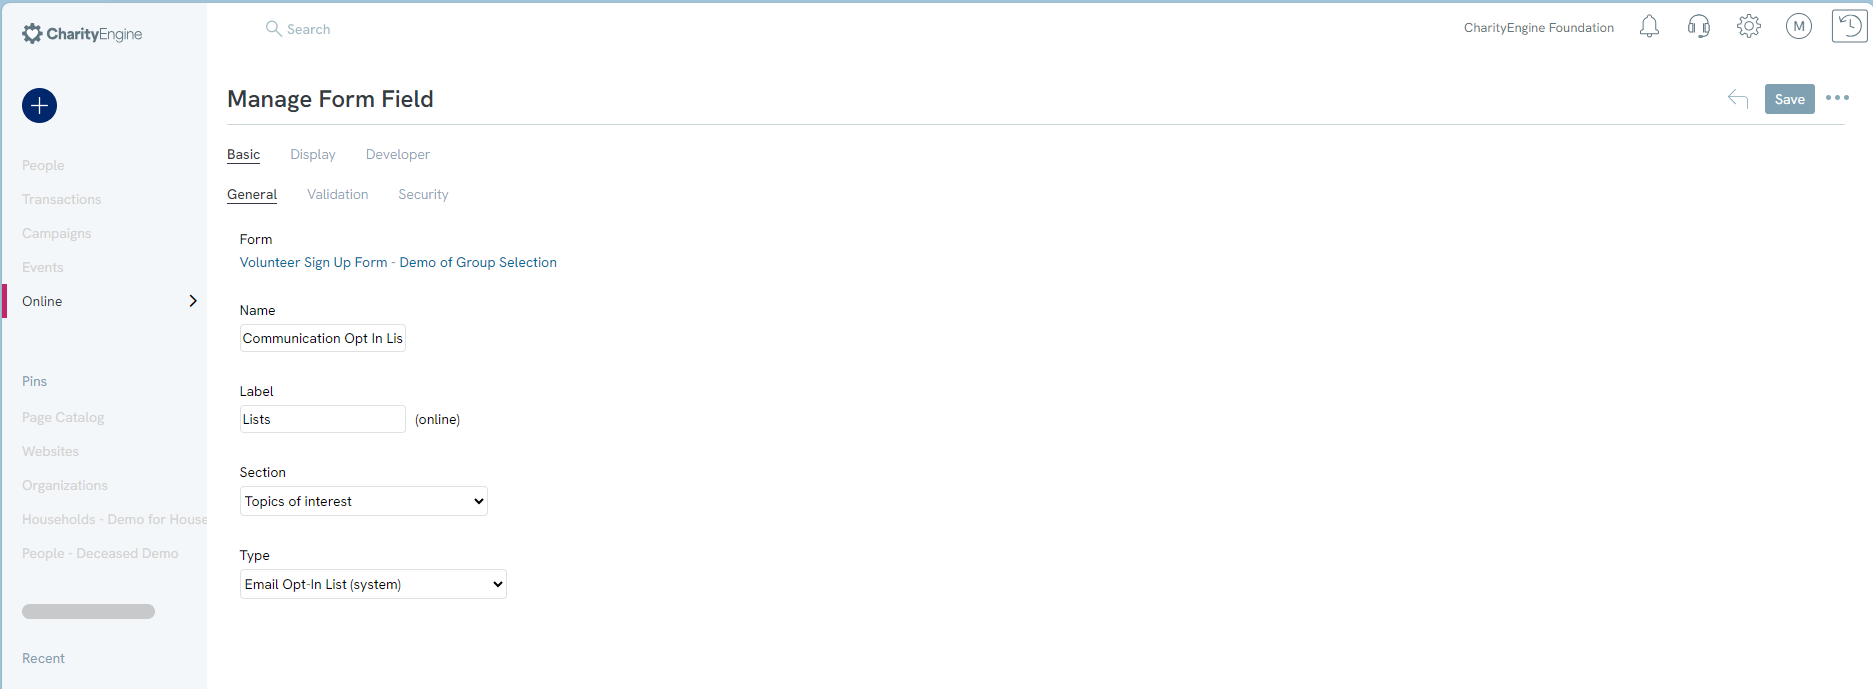
Step 3: Click on the + icon to create and map the fields for each section. For the "Topics of Interest", add a field labeled "Communication Opt In List" and click on the Pencil icon to manage the field. Once exposed, from the Type drop down box select Email Opt-In List (system) and click SAVE
Step 4: For the "Volunteer Region", add a field labeled "Volunteer Region Selection" and click on the Pencil icon to manage the field. Once exposed, from the Type drop down box select CRM Group Selector (system) and click SAVE
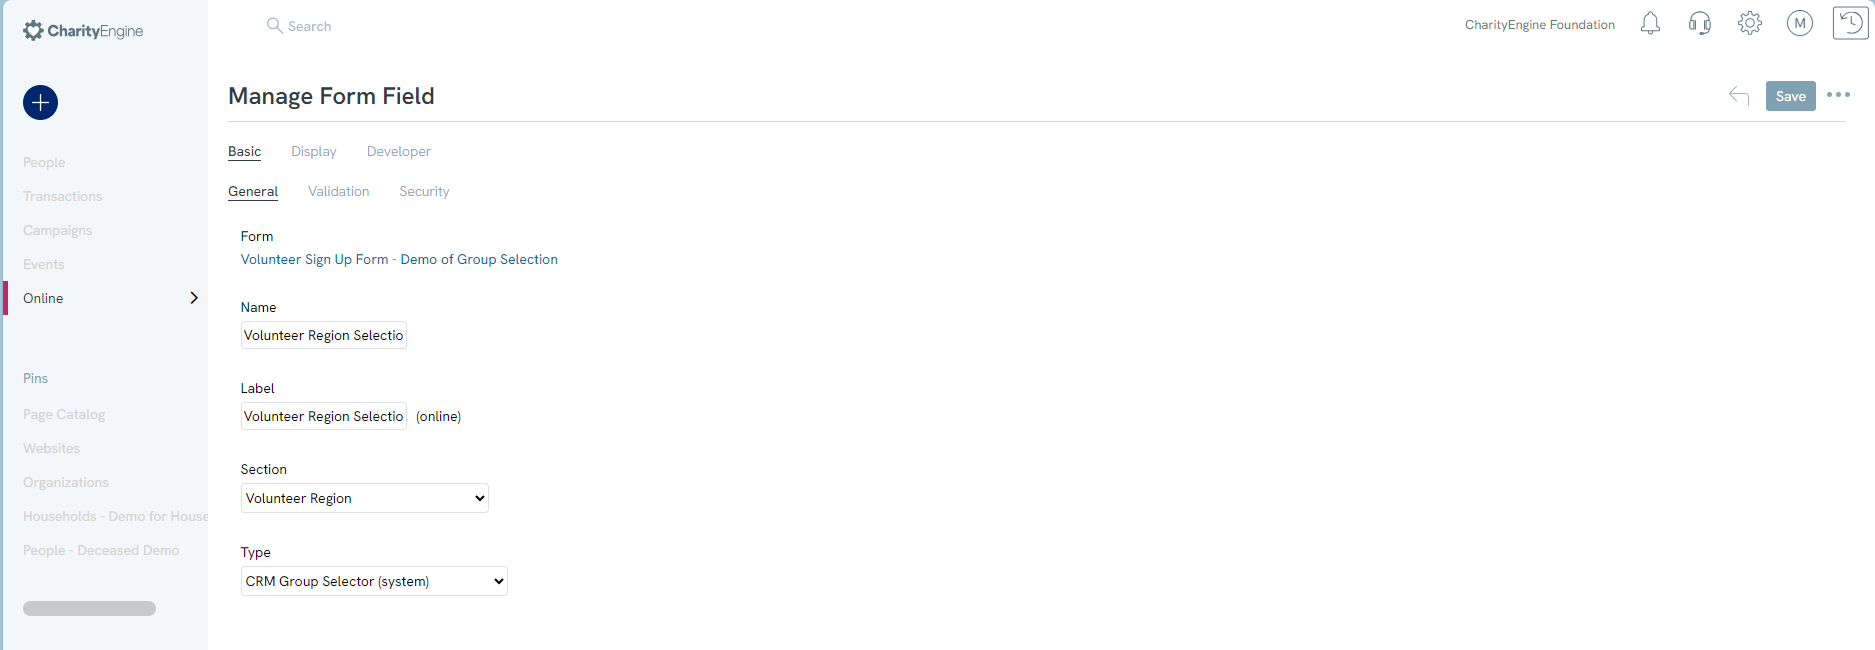
Step 5: Now that the fields have been exposed for constituent selection, finalize the mapping by navigating to the Advanced > Data tab
Step 6: For the "Topics of Interest", navigate to the Opt-In Lists tab and select each opt-in list to be exposed to the constituent group. Click on the Type hyperlink to change to Manual (allowing the constituent to select one or more). Any option added as Auto will not be presented to the constituent but will be automatically assigned to the contact record. Actions will allow the user to move options up and down for presentment.
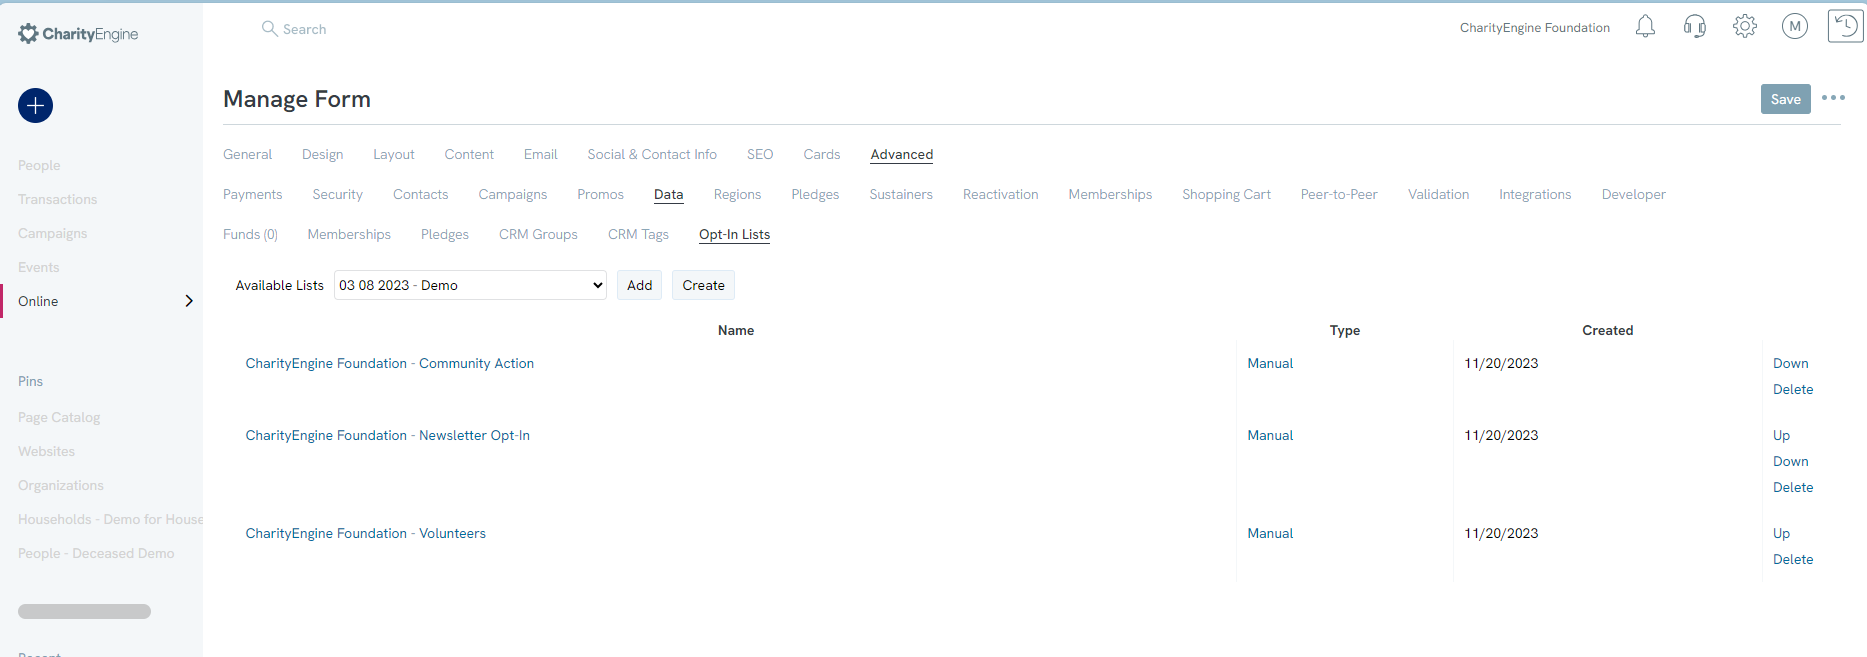
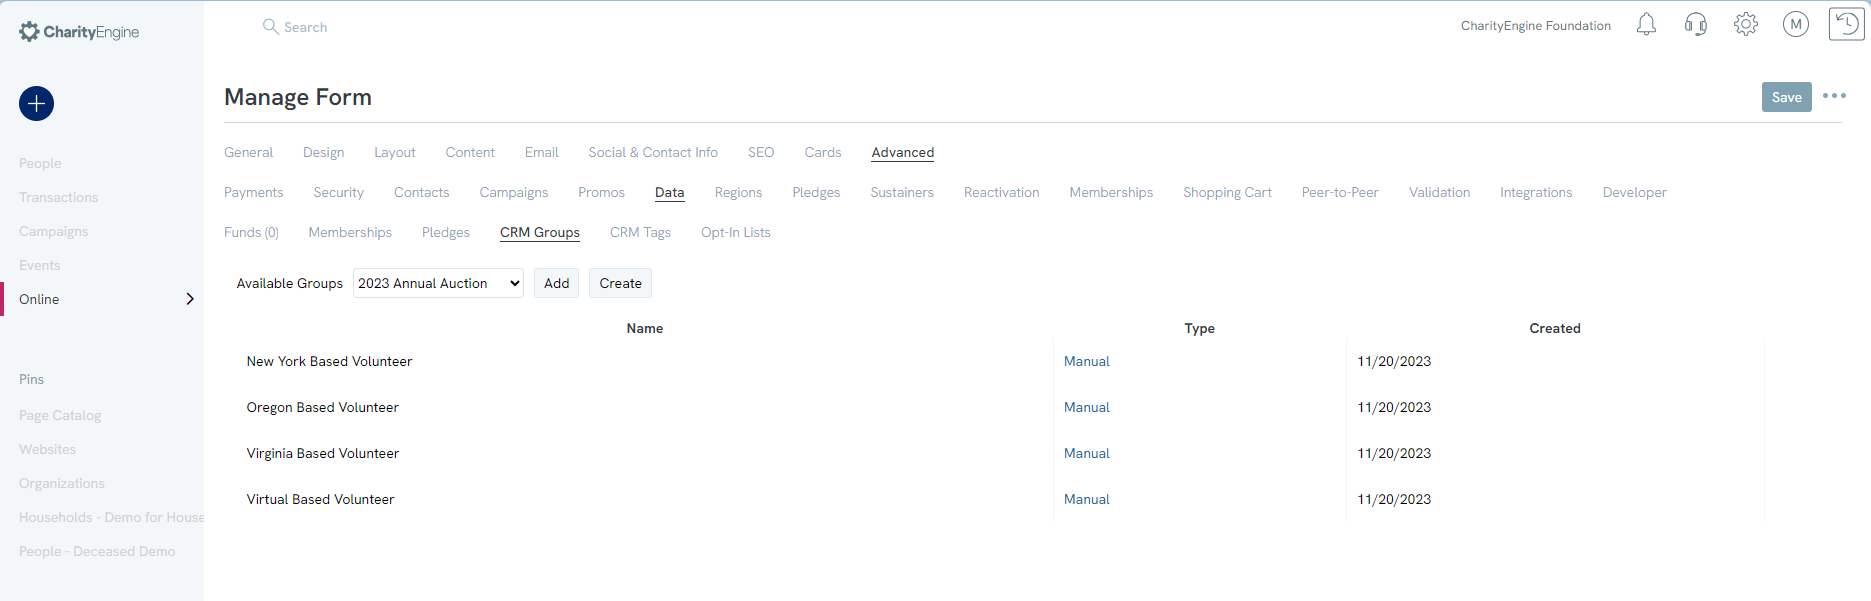
Step 7: For the "Volunteer Region Selection", navigate to the CRM Groups tab and select each group to be exposed to the constituent group. Click on the Type hyperlink to change to Manual (again, allowing the constituent to select one or more). Any option added as Auto will not be presented to the constituent but will be automatically assigned to the contact records. Actions will allow the user to move options up and down for end user presentment.
Step 8: Click SAVE to secure all changes
This is just a brief example of available system fields available for users to customize and collect data while engaging with donors and constituents. These data points will then be available through reporting (search/advanced filters) as well as a advanced reporting via queries.
Managing the Media Library
Monitoring Media Storage Rates
Managing the media library is an important aspect of database management. Users will have specific storage rates and should be monitored to avoid overages.
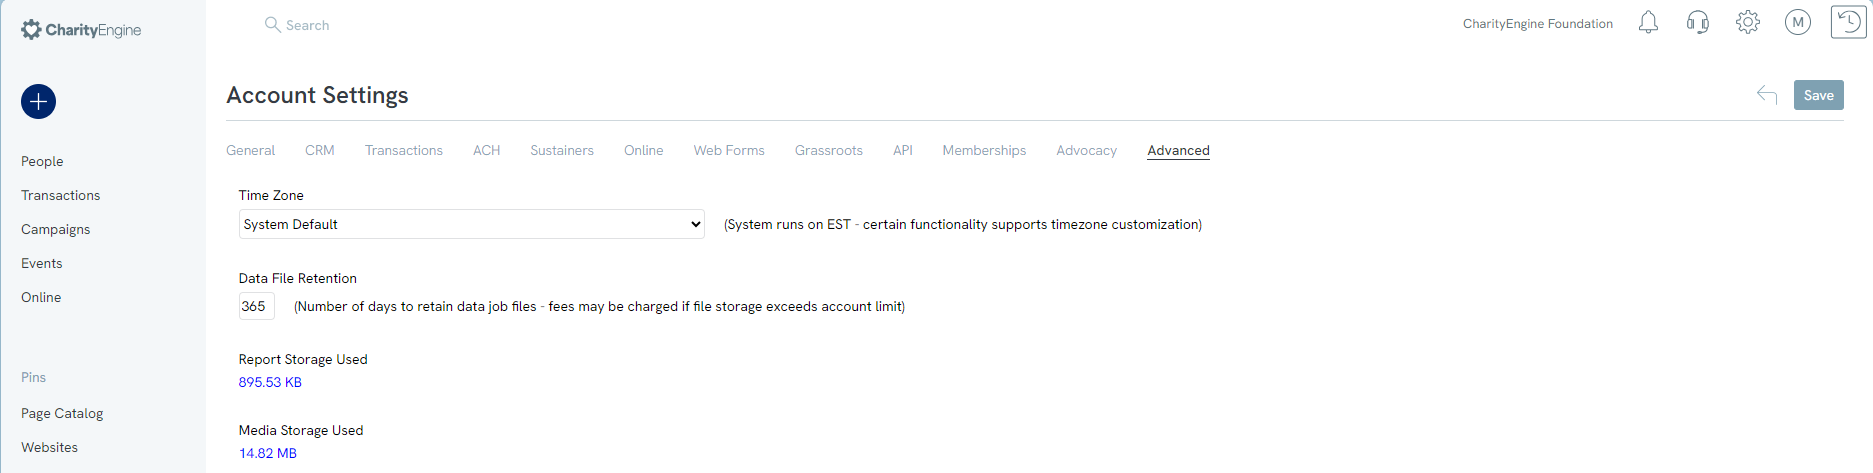
To monitor overages access the Settings App (![]() ) > General > Account Setting > Advanced > Media Storage Used:
) > General > Account Setting > Advanced > Media Storage Used:
See contact details for thresholds. Please connect with your account manager for pricing or contract questions.
Managing Media Categories
To customize organizational specific media categories, users can easily create categories that align with the needs of their organization. This assists with better image management and organization.
Access the Settings App (![]() ) > Online > Media Categories
) > Online > Media Categories
Click Create New > Enter Name
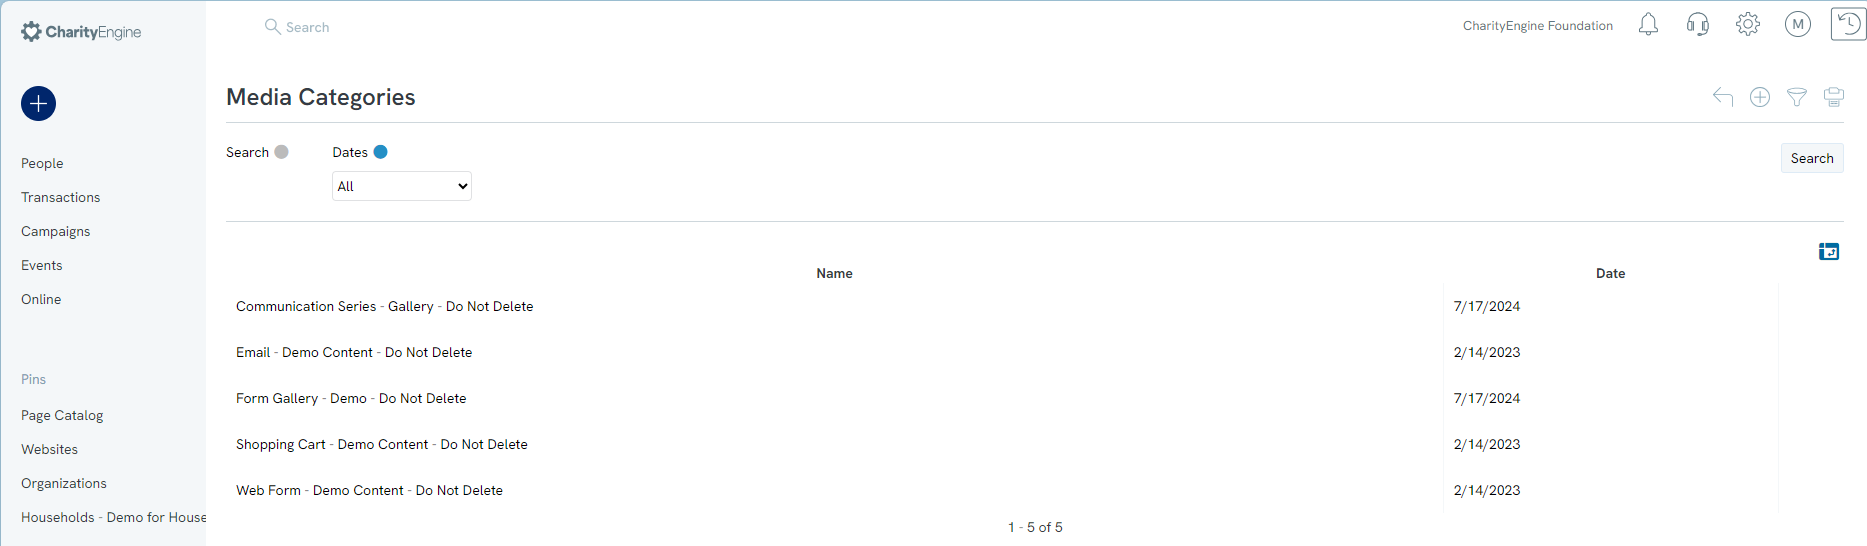
As new images are added, users can attribute to a media category and users can then sort/locate images based upon category.
Access the Online App > Media > Media Library
Use the Quick Filter > Category to filter category types for easier management and selection/location
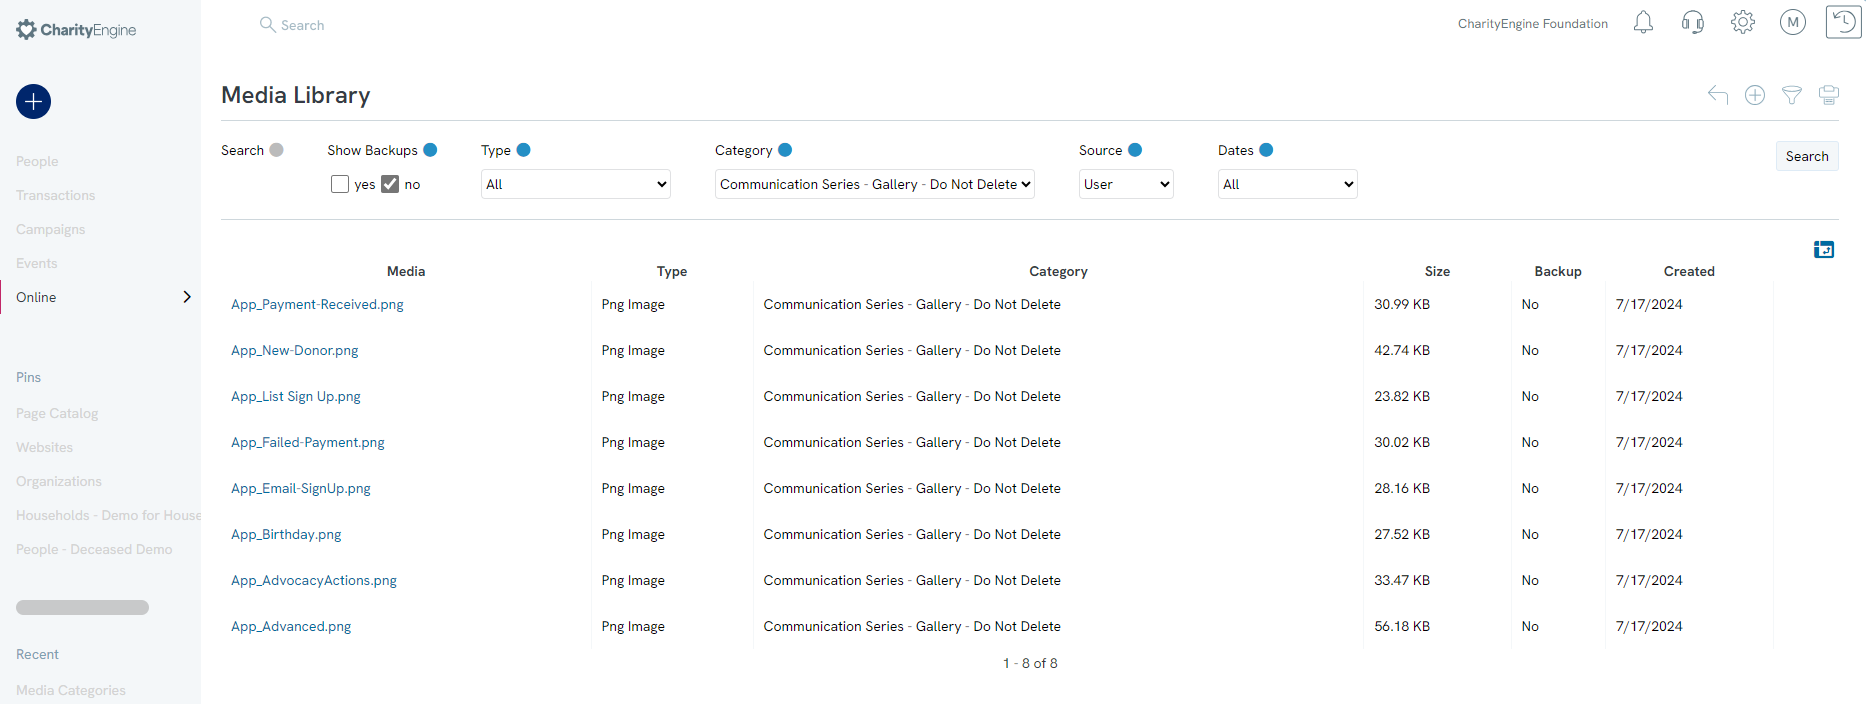
Adding Media Content (for Web Forms & Marketing Creatives)
To add a media file, navigate to the Online App > Media > Media Library
Click Create New Record ( ) to Select File, update/modify the File Name, and assign the Category (optional)
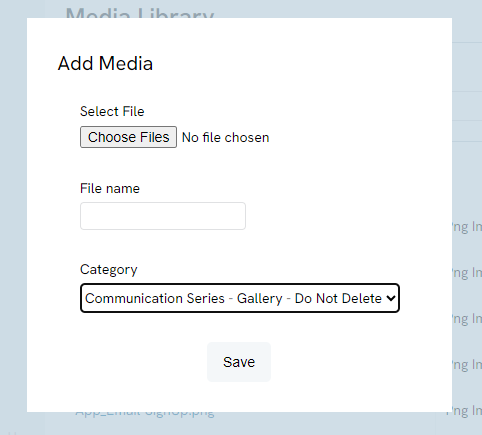
Click Save to complete the upload process
Best Practice:
As users can utilize media content across web forms, email creatives, mail creatives, etc., consider naming conventions for the organization. Proper naming conventions will reduce duplicate uploads which may unnecessarily inflight storage costs.
Couple with the use of Category to group like content for easier end user management.
Please also be aware that deletion of a media file will impact the presence of the image on any prior released content. Be sure that images are not actively used on web forms, emails, etc. prior to deleting.
FAQs & Additional Reading
Q. What/how is the "Cover Processing Fee" leveraged within CharityEngine?
A. This feature is Within CharityEngine, our web form layout feature allows you to the ability to offer an additional fundraising tool to increase gift sizes. This feature can be leveraged to assist you in covering your general costs associated with fundraising. The “Donor to Cover Fee” fundraising tool is designed so your donor can assist to cover the fees and processing your organization incurs increase gift sizes as a percentage to the donor’s total donation amount. In addition, CharityEngine’s feature allows you to set the percentage that is most meaningful to your organization’s needs and your donors. While this is designed as a fundraising tool, it is important to note that this option does not automatically calculate the donor’s total fees as payment processors will assess fees based upon payment tender type and gross donation amount. Learn more in our article Why and How to Use "Donor Covers Processing Fee" as a Fundraising Tool for Online Donation Forms
Q. What steps are needed to protect for security and fraudulent activities?
A. There are steps an organization can take to support secure processing of web forms. Learn more in our article Web Forms: Preventing Fraudulent Activities with Security Settings & Features.
Q. Can I create a sign up for for SMS/Texting opt in?
A. Yes - learn more in our article SMS Campaigns: How to Set up SMS/Text to Give Functionality
Q. I have a custom form, can I suppress ApplePay?
A. Yes - Use the API webcall applePayApi.HideButton()
Q. I would like to leverage the QR code on receipting using the global token (i.e. ) and present a QR code image. How can I achieve this?
A. You can present QR codes on receipts or success pages. Learn more in our article Events: Adding QR codes to Emails to Check-in & Management of Tickets
Q. What is DAFPay and how to I enable this payment feature?
A. DAFPay enables donors to contribute directly from their Donor-Advised Fund (DAF) in just a few clicks. By activating DAFPay, nonprofits can connect with high-value donors, as the average online DAF gift exceeds $1,000. The simplified giving process removes friction, ensuring donors can support your mission effortlessly. Plus, with automatic fund transfers, your organization saves valuable time by reducing manual processing. Learn more here: Online: How to Enable DAF Pay as a Payment Method
Q. Where can I set up my Chariot Account for DAFPay Payment Methods?
A. You will receive an email from Chariot to activate your account. Here is an article to help guide you through the activation process Claiming your account with Chariot | Help Center
For additional information regarding creating forms click Here
