Introduction
The CharityEngine List Sign-Up Form is a great way to create a contact form for your organization. This web form can be used within email campaigns or embedded within your website to capture new donor information. With our New Form Wizard, set-up is a breeze.
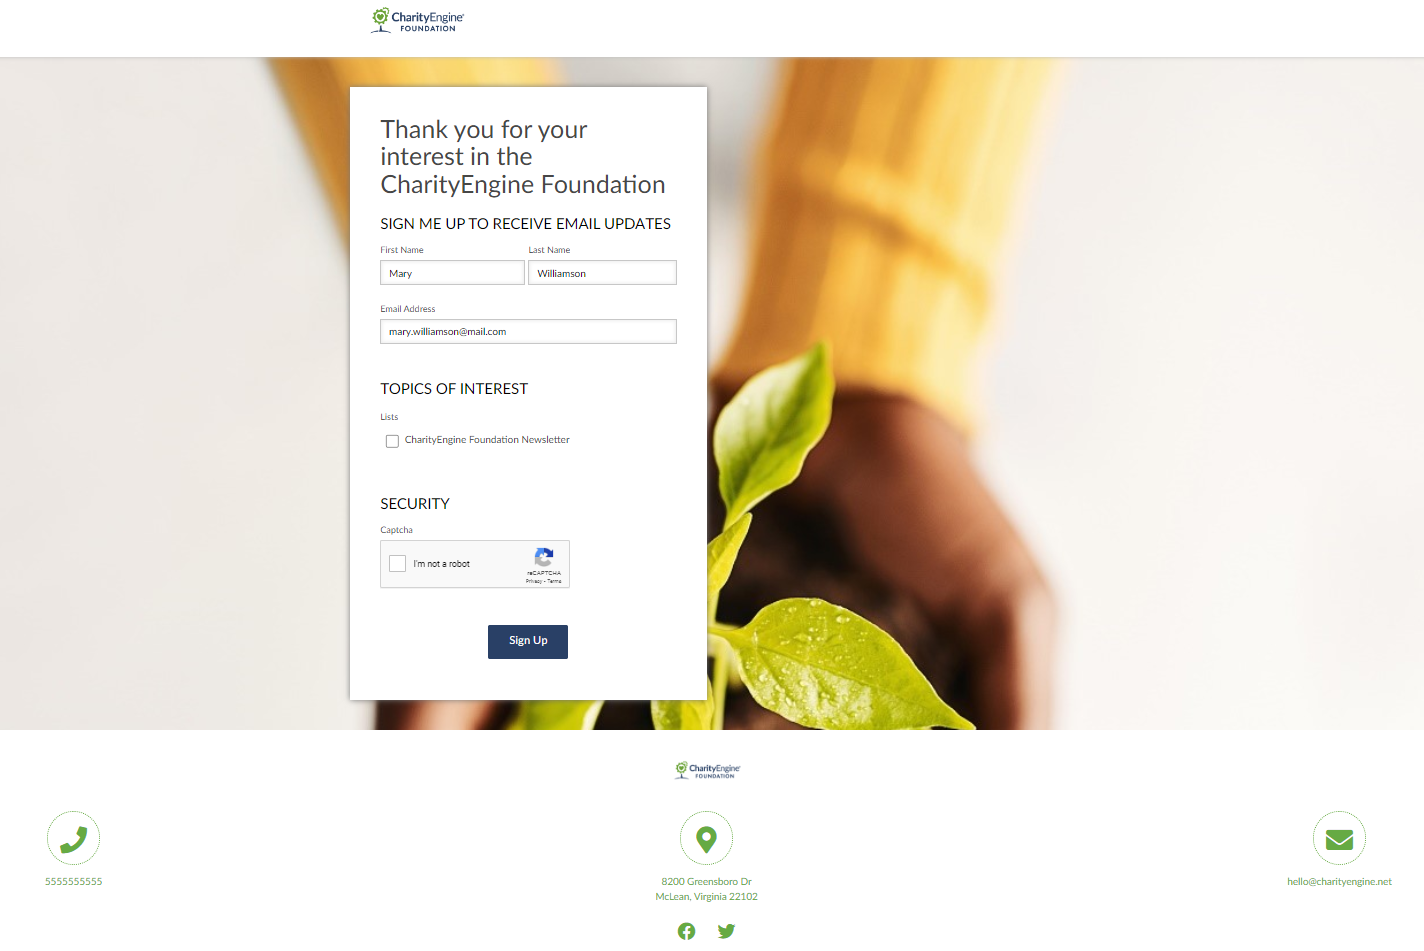
Table of Contents
Prerequisites
Be sure to set up the Opt-In List(s) you wish to have users added to when completing the List Sign-Up FormInstructions
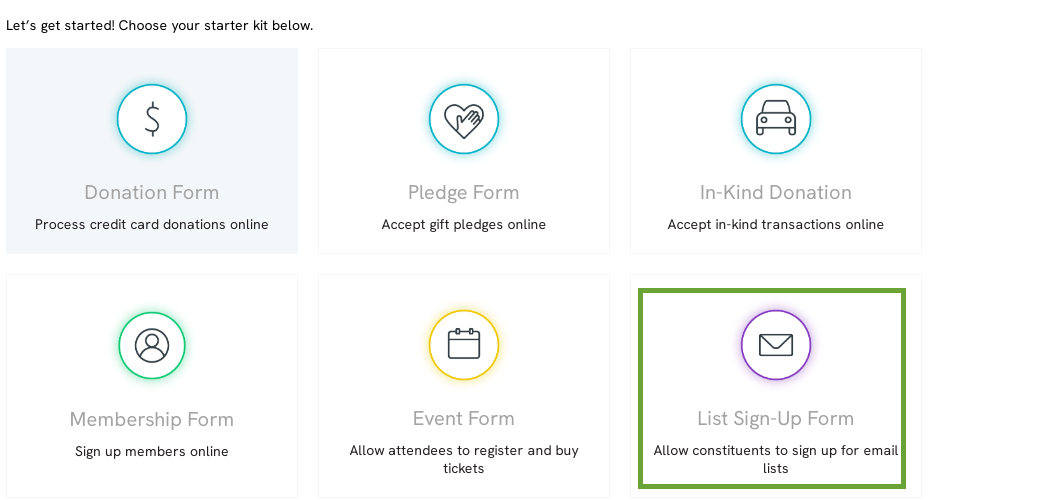
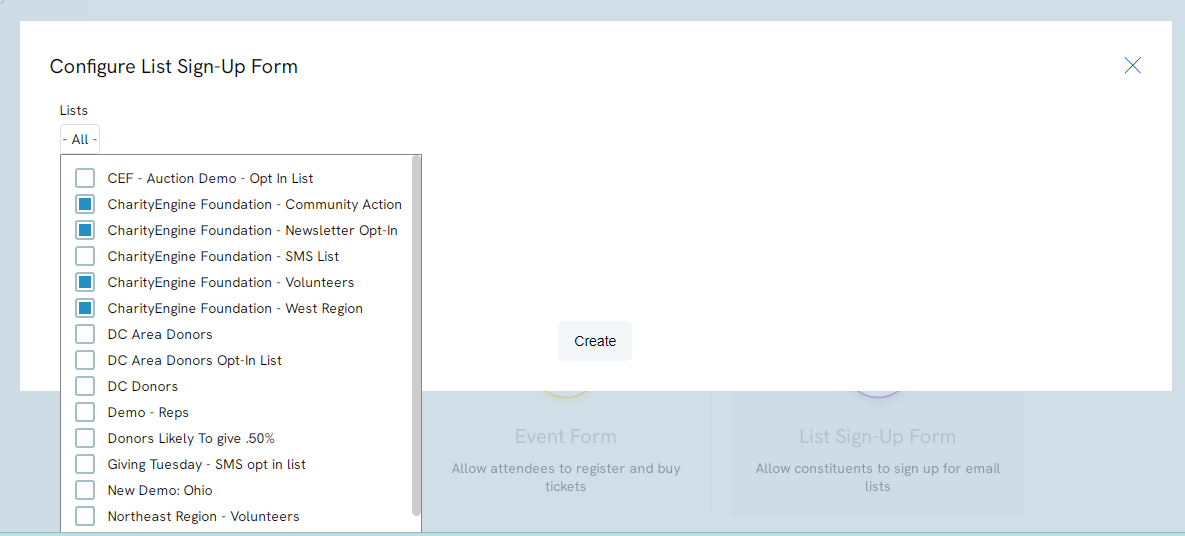
Step 2: Select the email Opt-In list for which new contacts will be added - more than one may be selected. Then click CREATE.
Step 3: From the General tab, customize the name of your form (internal).
- Optional - You can also:
- Modify the suffix of your web form by navigating to the box by Link
- Set availability of this form if you have a specific start date and/or specific end date
- Set Response Channel as an attribution for contact records
- Set Fund or GL Code as an attribution for contact records
- Reminder: Click SAVE to secure your updates
Step 5: Navigate to the Layout tab
- From here click on the show # fields to expose all pre-configured fields
- Leverage the Pencil to edit details and displays to end users
- Reminder: Click SAVE to secure your changes
Step 6: Navigate to the Content tab to customize the landing, review, error, success, or alternative pages. Lever the View <page> link to see a preview of your customization.
Step 7: Next navigate to the Email tab to configure auto-responder, internal (carbon copy) notifications, or to deliver Ecards to successful registrants.
Step 8: If you wish to update search engine optimization, leverage the SEO tab for necessary updates.
Step 9: Navigate to the Advanced tab. While there are a variety of customizations and contact attributions available to you for configuration, this web form will be linked to your opt-in list as identified in step 2. Navigating to Advanced > Data > Opt-In Lists will allow the user to edit, add, or create new opt-in lists in the future.
-
- Should you require additional attributions, there are a host of options available - particularly related to assignment of groups, tags, funds, memberships, etc. This is a broad area that allows deeper customization for your organizational needs.

Step 10: Navigate to the Transactions App > Transactions > Search & Manage > Advanced Filter > General tab > Form Id <insert form id> to identify all constituents who engaged with the form.
Advanced System Mapping & Configuration
Users can create fields designed to map to CharityEngine fields for easier data capture and attribution. These data points provide users with advanced data mapping needs to meet their business needs.
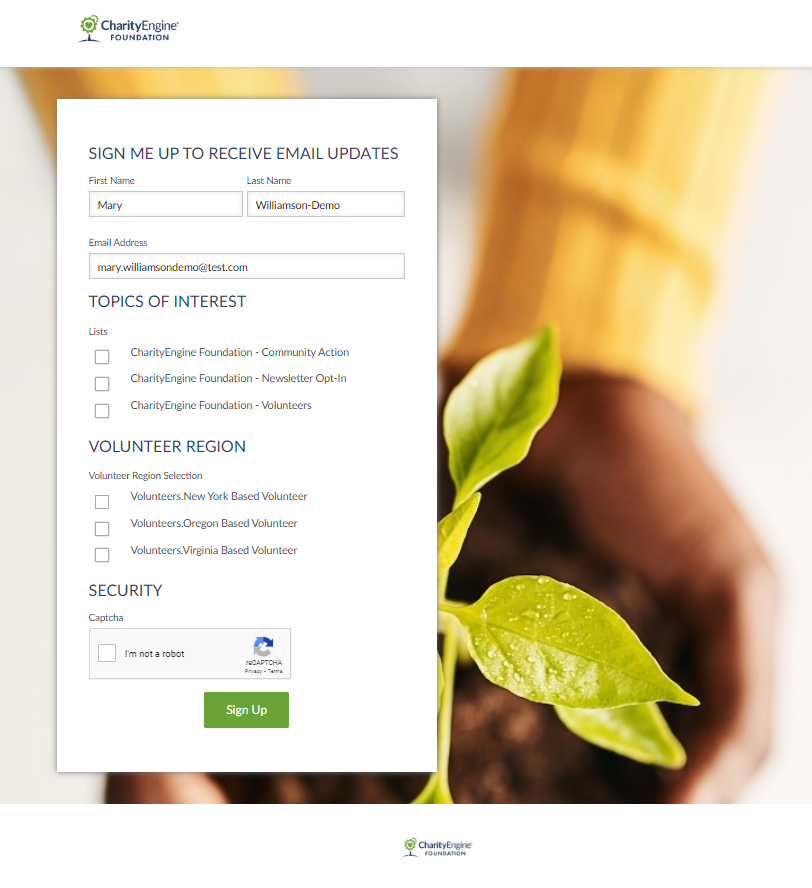
In the following use case, a Contact type web form has been created designed to allow the constituent to select one or more email opt-in lists (stored as an "Opt In List") as well as select their volunteer region preference (stored as a "Group").
Prerequisites include: creating a basic Contact type web form, creation of Opt In Lists (via Campaigns App), and creation of Group names (via Configuration App).
Step 1: Once the web form has been created, navigate to the Layout tab
Step 2: Create 2 custom sections (selecting the Add Custom Section on the left options) - "Topics of Interest" & "Volunteer Region"
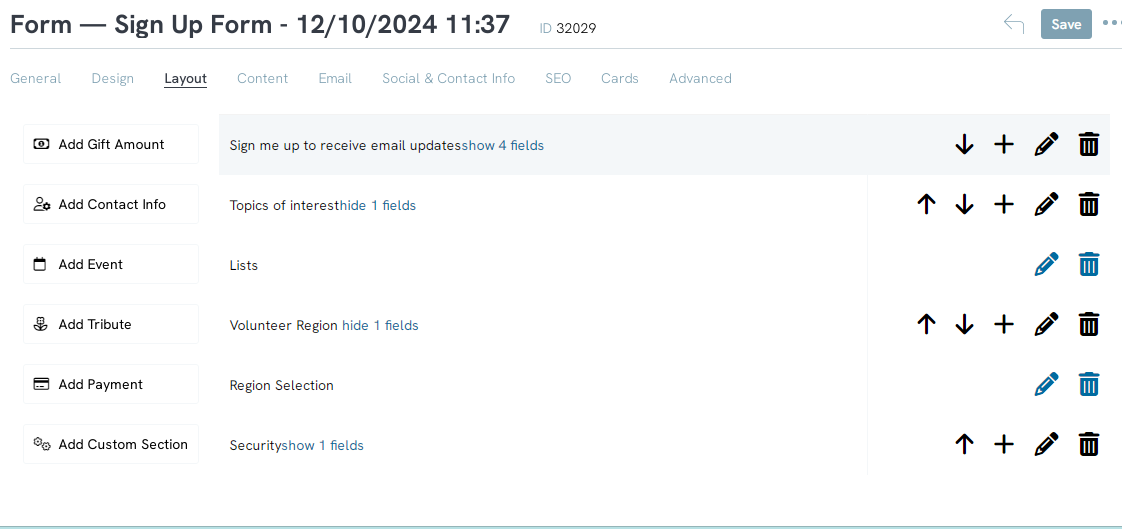
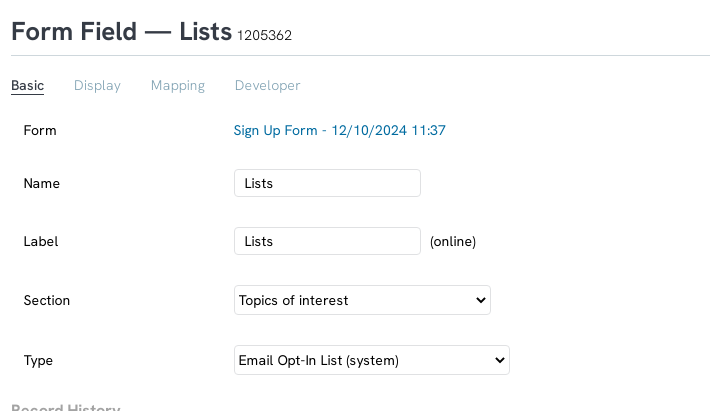
Step 3: Click on the + icon to create and map the fields for each section. For the "Topics of Interest", add a field labeled "Communication Opt In List" and click on the Pencil icon to manage the field. Once exposed, from the Type drop down box select Email Opt-In List (system) and click SAVE
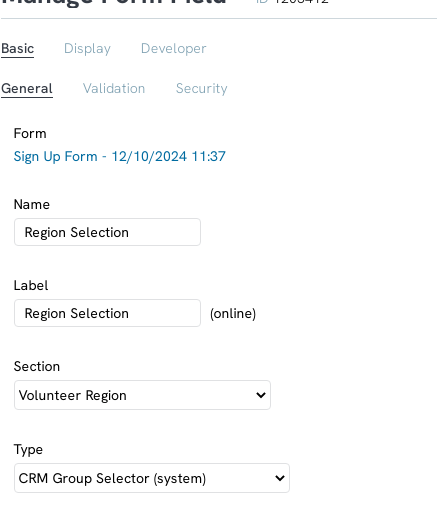
Step 4: For the "Volunteer Region", add a field labeled "Volunteer Region Selection" and click on the Pencil icon to manage the field. Once exposed, from the Type drop down box select CRM Group Selector (system) and click SAVE
Step 5: Now that the fields have been exposed for constituent selection, finalize the mapping by navigating to the Advanced > Data tab
Step 6: For the "Topics of Interest", navigate to the Opt-In Lists tab and select each opt-in list to be exposed to the constituent group. Click on the Type hyperlink to change to Manual (allowing the constituent to select one or more). Any option added as Auto will not be presented to the constituent but will be automatically assigned to the contact record. Actions will allow the user to move options up and down for presentment.
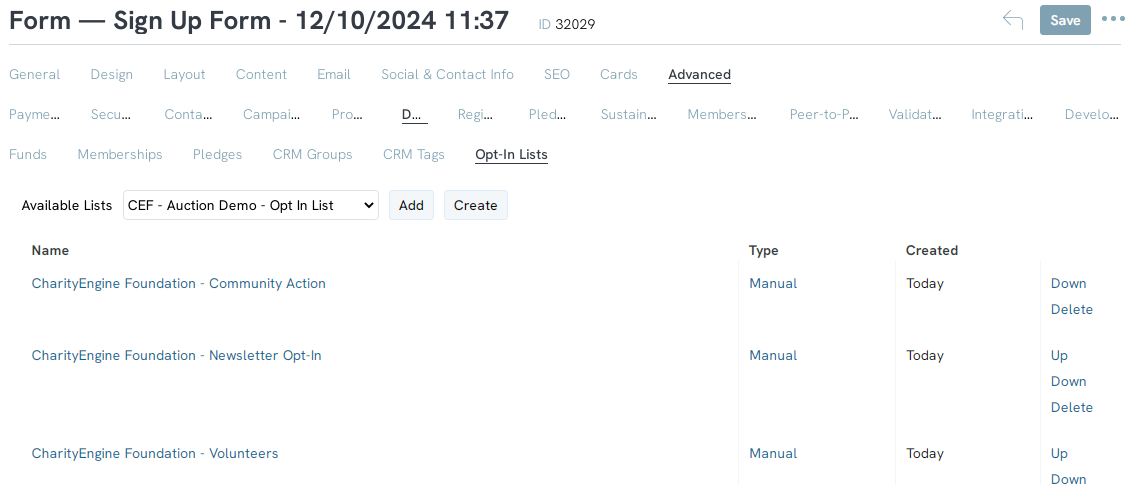
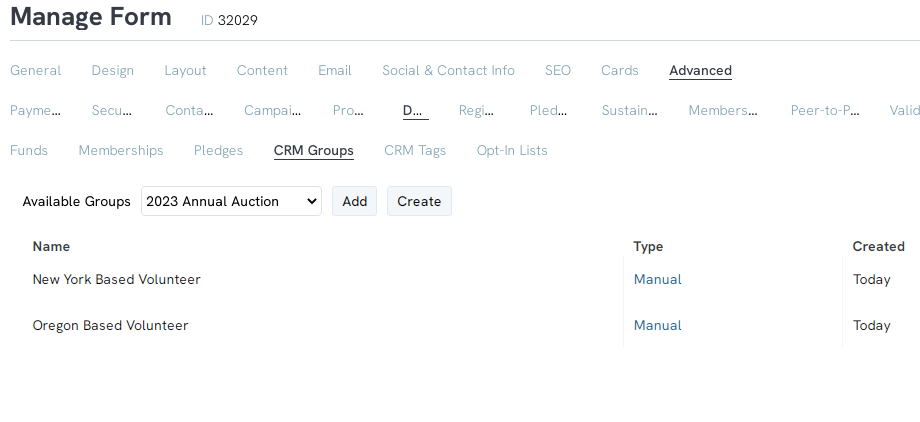
Step 7: For the "Volunteer Region Selection", navigate to the CRM Groups tab and select each group to be exposed to the constituent group. Click on the Type hyperlink to change to Manual (again, allowing the constituent to select one or more). Any option added as Auto will not be presented to the constituent but will be automatically assigned to the contact records. Actions will allow the user to move options up and down for end user presentment.
Step 8: Click SAVE to secure all changes
This is just a brief example of available system fields available for users to customize and collect data while engaging with donors and constituents. These data points will then be available through reporting (search/advanced filters) as well as a advanced reporting via queries.
Frequently Asked Questions & Further Reading
Q. How do I establish an auto-responder?
A. You can create a custom auto-responder for this an all web forms. Simply follow our article steps for creating an auto-responder.
Q. How do I leverage E-Cards within CharityEngine?
A. E-Cards are a great way to engage with your new donors. E-Cards can be included in this and all web forms. Follow our information guide here for more information.
Q. Am I able to customize forms using JavaScript or HTML?
A. Yes - if you have advanced web development, you can customize your web forms by accessing the Advanced tab > Developer > Custom JS & Conversion Code for custom coding. Please note, you will want to monitor for any changes related to CharityEngine release cycles as this may impact any custom coding that has taken place on your forms.
Q. How do I embed my web form?
A. Simply leverage the Link from the web forms General tab to locate the link and embed accordingly within your organization's website.
