Web Forms: How to Add an E-Card to a Form
Introduction
E-Cards are a fun way for your donors to let someone know they donated in their honor or a family member’s memory. You can add pictures and text to customize the e-card and your donors can choose to send these cards when they make a tribute donation.
Add an eCard to your tribute workflow can be achieved in a few steps as outlined below.
Table of Contents
How to Create an eCard
Creating an eCard involves multiple steps, including setting up the eCard record, associating it with a template, and integrating it with an online donation form. Follow the steps below to complete the process.
Step 1: Configure the eCard Template Message
- Go to Configuration App > Messages and Templates.
- Click Create New Template.
- Set the Type to eCard.
- Name the template and define the Message Content.
- You can use available tokens to personalize the message.
- Save the template.
Step 2: Create a New eCard Record
- Go to the Online App > Cards & Promos > Ecards.
- Click Create New Record.
- Enter a Name for the eCard.
- Upload a Small Image and a Large Image for the eCard.
- Associate the eCard with a pre-existing eCard Template.
- Click SAVE to secure.
Step 3: Create an Online Web Form for the eCard
- Navigate to the Online App > Quick Actions > New Web Form.
- Select Donation Form and continue.
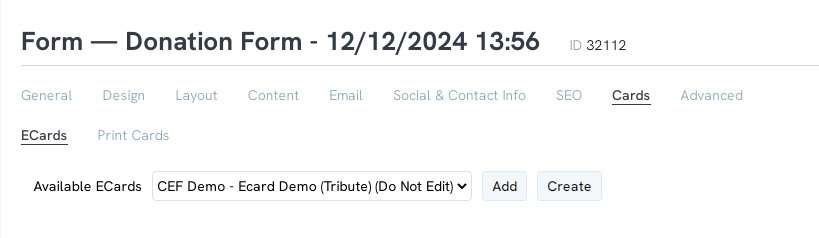
- Navigate to the Cards section.
- Select one or more eCards to be available for user selection and click Add to append.
- Save the form.
Step 4: Set Up the E-Card Email Notification
- Navigate to Email tab.
- Locate eCard Recipient Notification or Acknowledgee.
- Under the Subject line, create your customized subject line for the eCard email.
- Click Save to secure the change.
Step 5: Add the eCard Field to the Tribute Section
- Go to Layout tab and under Tribute Info, click on plus sign icon to add a new field to this section.
- Add Field by creating a Name and selecting Type = Text, and then click Create Field.
- Expand the fields for this section, and navigate to your newly created field.
- Click on the Pencil icon to manage the field.
- From the Basic Tab > General sub tab, locate Type and change to ECard (system).
- Next select Display Format
- Radio Button Images - for user selection with small image as presented on the eCard in step 3.
- Radio Button - for user selection with no image but name as presented on the eCard in step 3.
- Drop Down - for user selection with no image but name as presented on the eCard in step 3.
- Save the field and apply it to the tribute section.
Step 6: Test and Validate the eCard Process
- Create a test tribute donation.
- Select an eCard.
- Review the acknowledgment message and tokens.
- Ensure all tokens populate correctly.
- Verify the eCard email is sent successfully with the correct subject line and message.
Troubleshooting
- If tokens do not work, review the template setup to ensure tokens are correctly formatted.
- If eCards do not appear in the form, confirm that they are properly linked in the Cards section.
- If email notifications fail, check email configurations and ensure all required fields are filled in.
By following these steps, you can successfully create and configure an eCard for online use.
