Introduction
This article aims to guide non-profit organizations in crafting effective and impactful creative content for their marketing campaigns, emphasizing the importance of storytelling, visuals, community engagement, and measurable impact in driving support for their cause. The following detail will provide a strategic overview with guidance on how to leverage CharityEngine Creative functionality to design and develop content.
Table of Contents
- Introduction
- The Art of Crafting Compelling Creative Pieces for Non-Profit Marketing Campaigns
- Marketing Creative: How to Create a Simple Marketing Creative
- Creating Marketing Content (Creatives)
- How to Restore a Previous Creative
- How to Add System/Global Tokens and Conditional Blocks
- Writer & Email Concierge - Using AI to Inspire Your Content
- Spam Analysis Tool
- Managing the Media Library
- Integrated Templates
- Frequently Asked Questions & Further Reading:
The Art of Crafting Compelling Creative Pieces for Non-Profit Marketing Campaigns
Non-profit organizations play a vital role in advocating for social causes, driving change, and inspiring action. In the realm of marketing, creating compelling and impactful creative pieces is essential to engage audiences, raise awareness, and drive support for the organization's mission. Let's explore how to craft effective creative content for non-profit marketing campaigns.
Understand Your Audience and Mission
Before diving into the creative process, it's crucial to have a deep understanding of your target audience and the core mission of your non-profit. Who are you trying to reach? What motivates and inspires your audience? Align your creative content with the values, emotions, and aspirations of your audience while staying true to your organization's mission.
Tell a Captivating Story
Stories have the power to evoke emotions and drive connections. Craft a compelling narrative that humanizes your cause and resonates with your audience. Highlight real stories of impact, showcasing the lives changed or the positive outcomes achieved through your non-profit's efforts. Incorporate personal anecdotes, testimonials, or visual storytelling to make your message relatable and memorable.
Utilize Visual and Multimedia Elements
Visual elements are impactful tools for conveying your message effectively. Use striking imagery, videos, infographics, and compelling design elements that complement your narrative. Visuals can help capture attention, evoke emotions, and simplify complex messages, making your cause more accessible and engaging to a wider audience.
Create Compelling Calls-to-Action (CTAs)
Guide your audience toward the desired action by incorporating clear and compelling CTAs. Whether it's encouraging donations, volunteer sign-ups, petition signatures, or event participation, make your CTAs actionable, specific, and easy to follow. Use persuasive language that motivates and empowers individuals to take part in furthering your cause.
Engage and Collaborate with Your Community
Engage your community by involving them in the creative process. Encourage user-generated content, testimonials, or participatory campaigns that foster a sense of belonging and ownership. Collaborate with influencers, partners, or volunteers who align with your cause to amplify your message and reach a broader audience.
Measure Impact and Adapt
Track the performance of your creative campaigns using metrics like engagement rates, conversions, donations, or awareness metrics. Analyze the data to understand what resonates with your audience and what needs improvement. Use these insights to refine and adapt your creative strategies for future campaigns.
Conclusion
In the realm of non-profit marketing, the effectiveness of your creative content lies in its ability to inspire action, raise awareness, and drive meaningful change. By understanding your audience, telling compelling stories, leveraging visuals, creating impactful CTAs, engaging your community, and measuring impact, your non-profit can create powerful creative pieces that resonate with audiences and drive support for your cause.
Remember, every creative piece is an opportunity to inspire and ignite change. Embrace the art of storytelling and creativity to make a lasting impact in your non-profit marketing campaigns.
Marketing Creative: How to Create a Simple Marketing Creative
Creating an email or mail marketing creative using the Email builder is very easy and can be done in a matter of minutes. You will be able to customize the content that is being sent to your contacts with company logos and images.
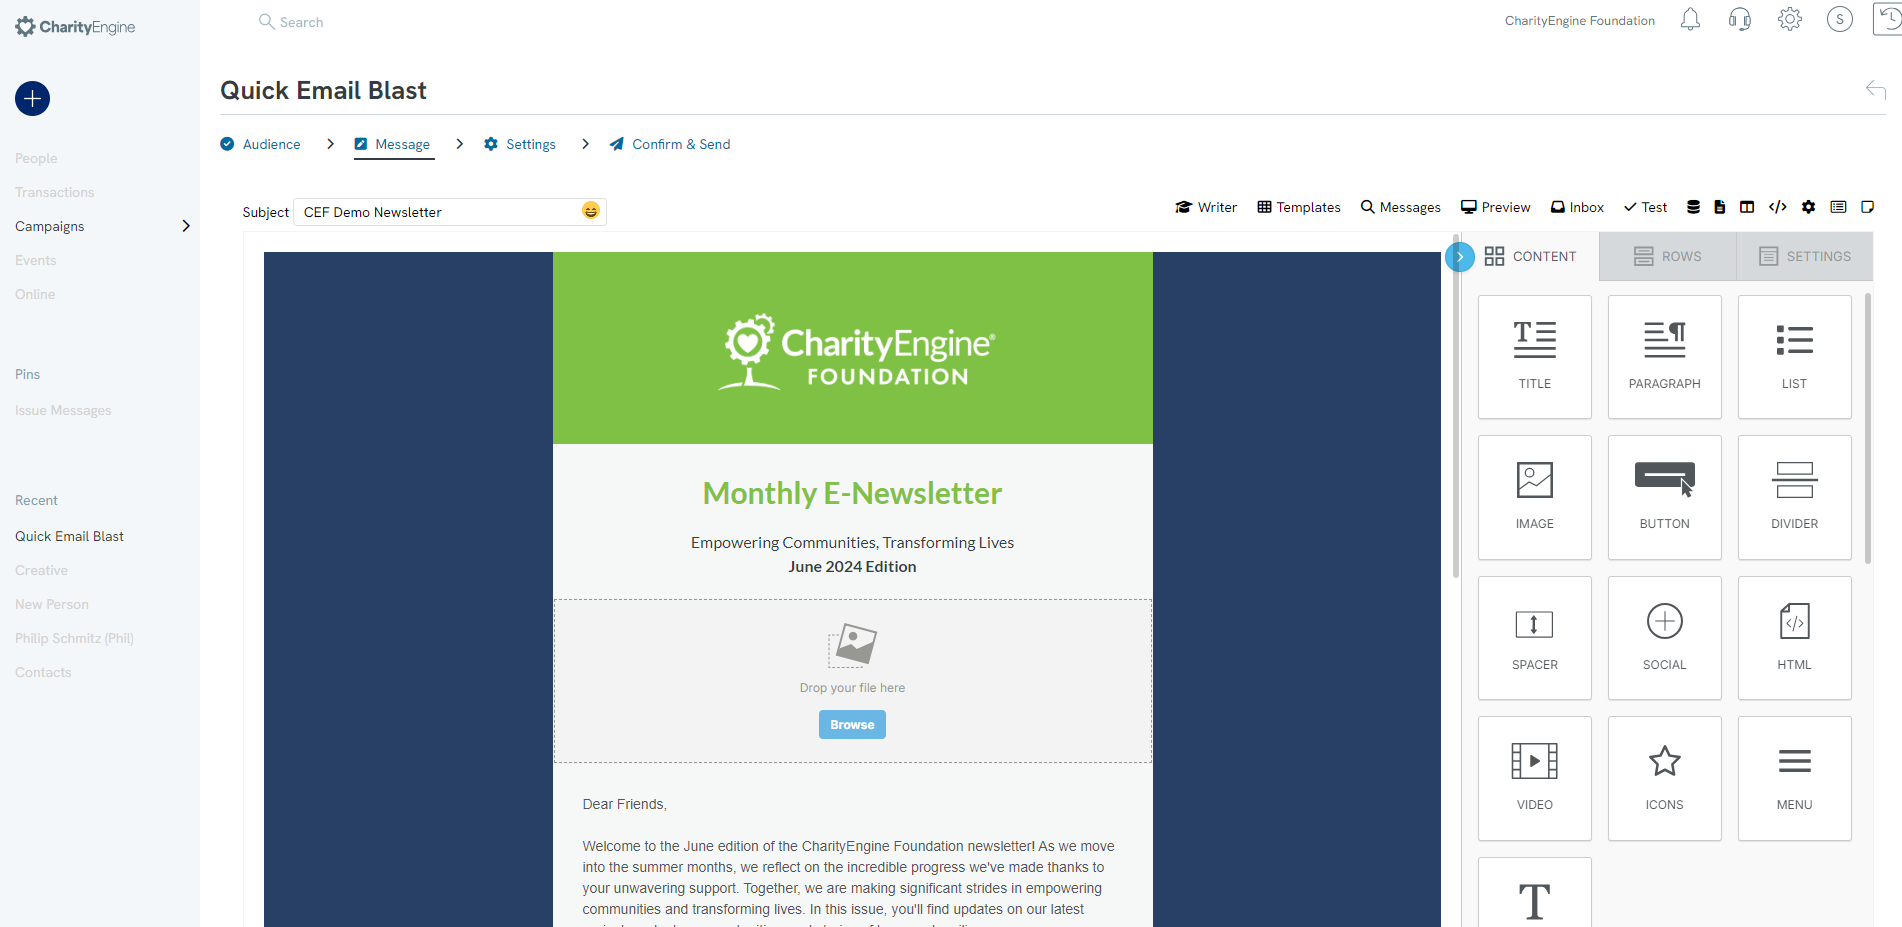

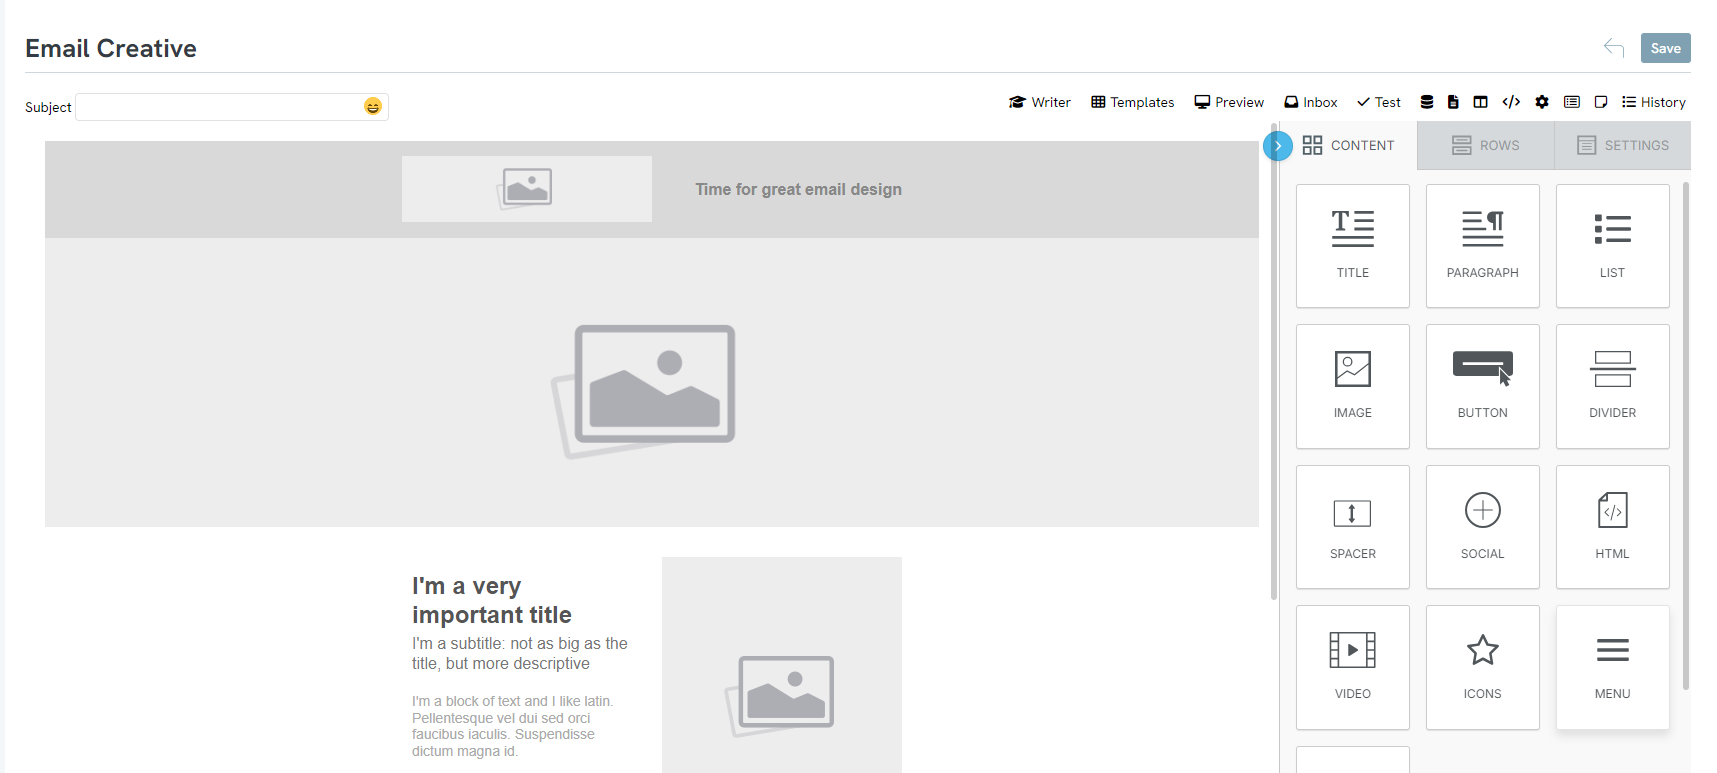
Step 4: Insert CONTENT, ROWS, or other SETTINGS
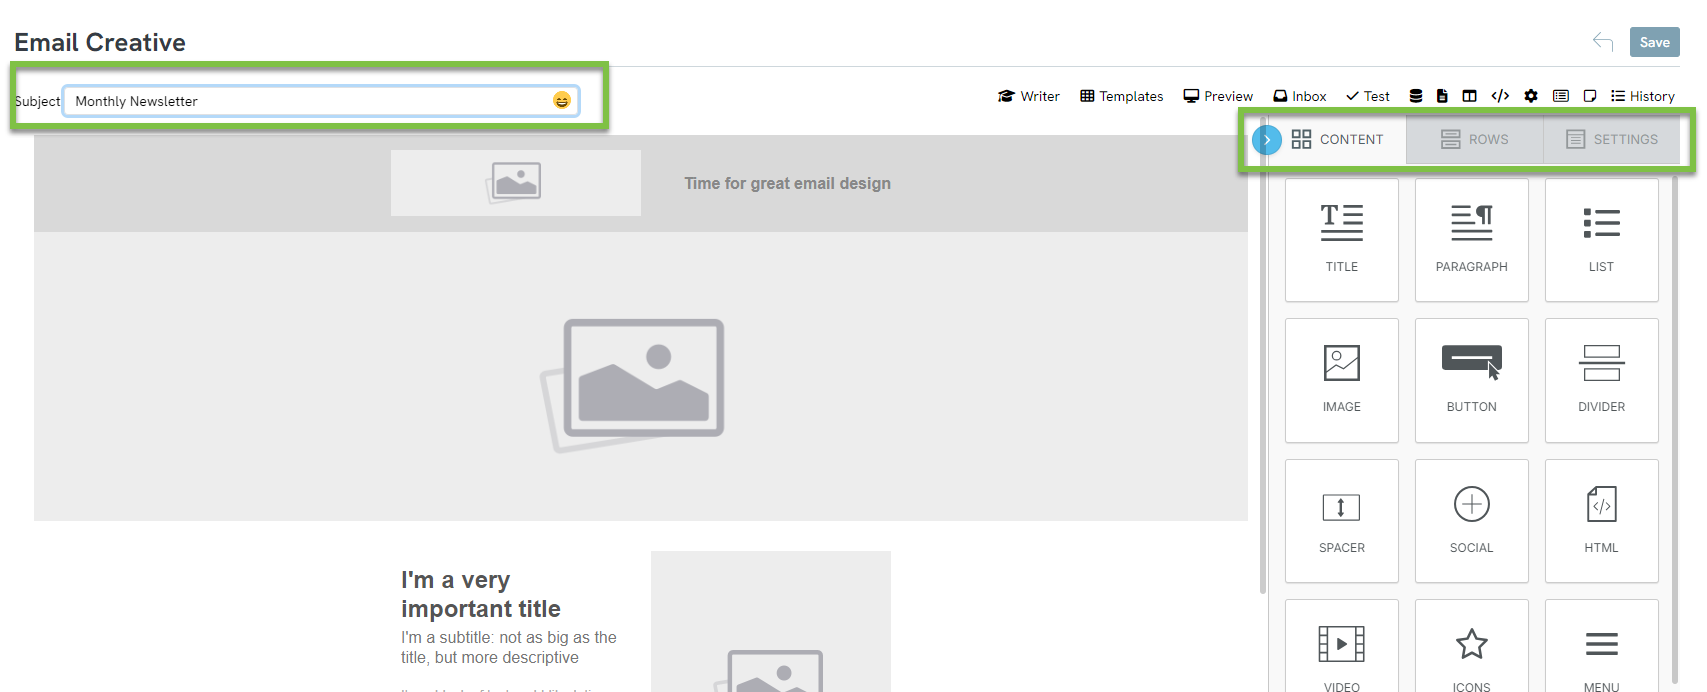
Step 5: Add content, images, button, videos, etc. by navigating to the CONTENT tab and drag/drop of TEXT, IMAGE, BUTTON, VIDEO, SOCIAL, HTML, etc.
-
- -Navigate to the ROWS tab to insert new rows
- -Navigate to SETTINGS tab to align content, modify background colors, default font, etc.
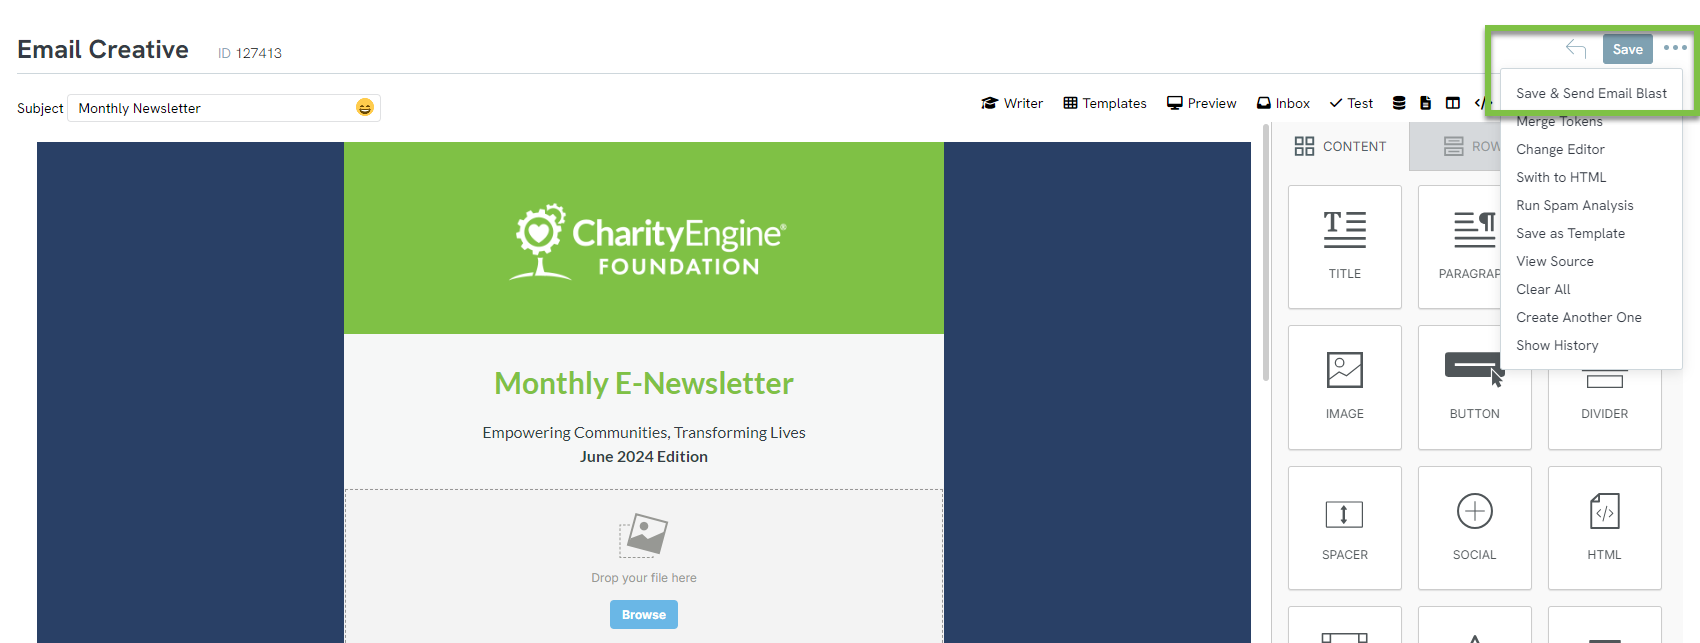
-
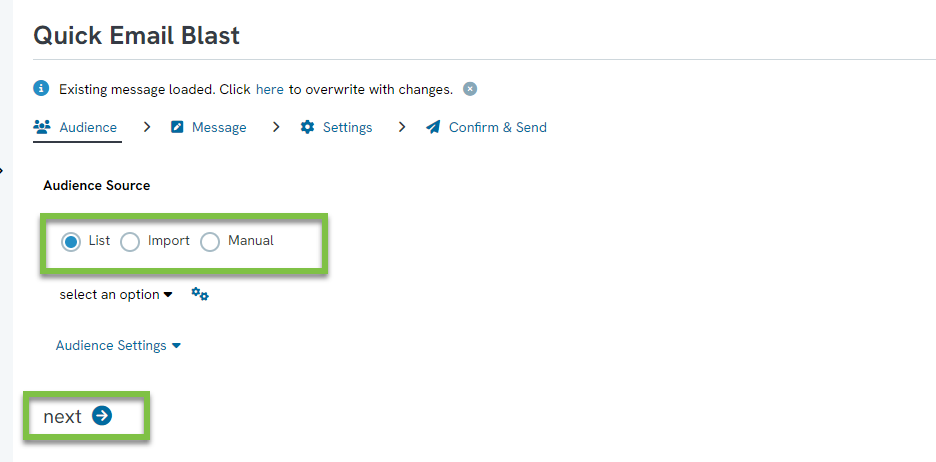
- -List: Refers to an existing Opt-In List or other Query (as created from Automation & Workflow)
- -Import: Refers to the ability to create an email list from an external source (CharityEngine ID minimum requirement)
- -Manual: Refers to the ability to physically type email address(es) directly into the entry field
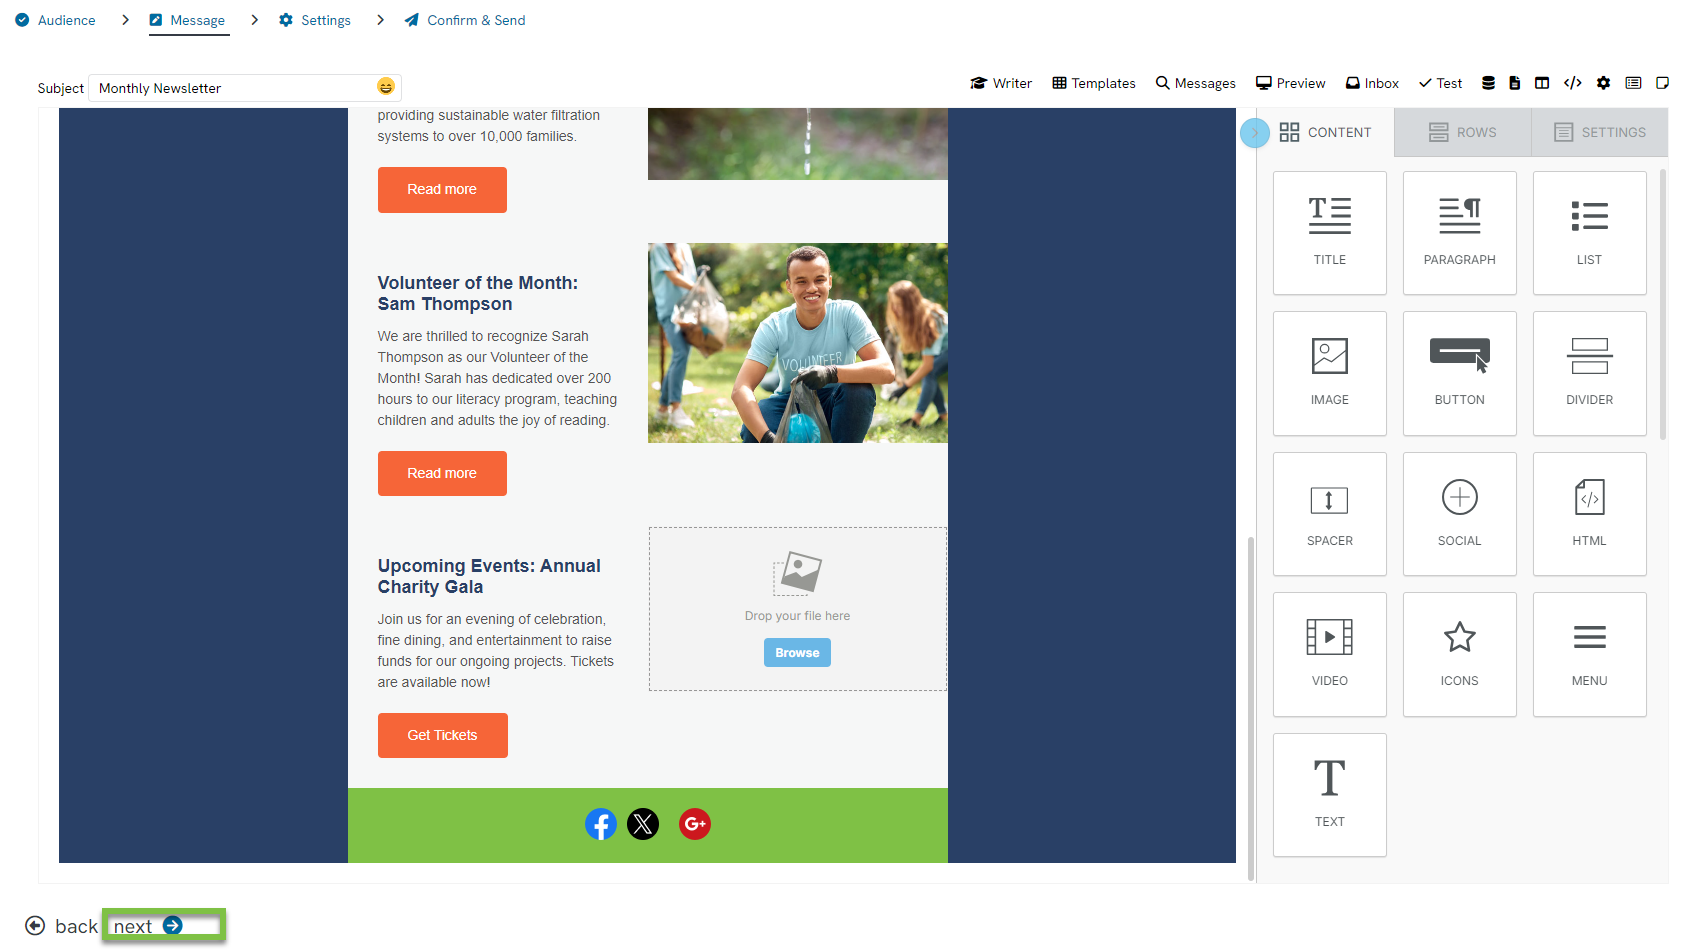
Step 9: Review the message you just created and click next
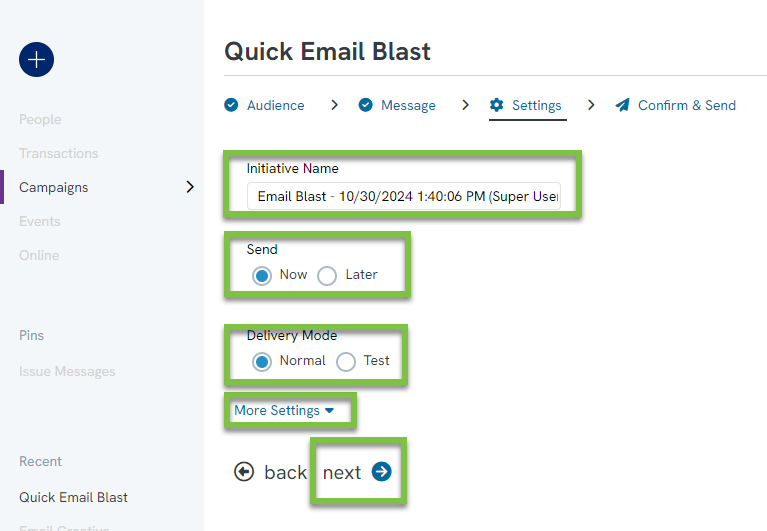
Step 10: Finalize all Settings
-
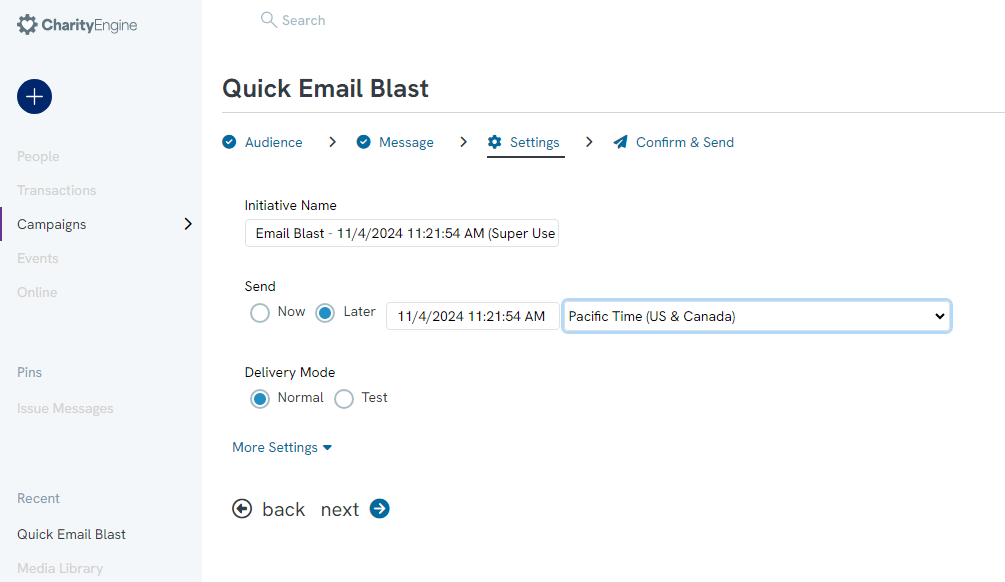
- Decide to Send Now or Schedule for Later
- You may modify the Initiative Name or leverage the system generated value
- Delivery Mode allows you to send to your audience or perform a test send (to receive three versions of your email in Standard, HTML and Text Format for review)
- Leverage MORE SETTINGS to modify additional attributions such as campaign, funds, display name, reply to address, etc.)
- Complete all change and proceed to next
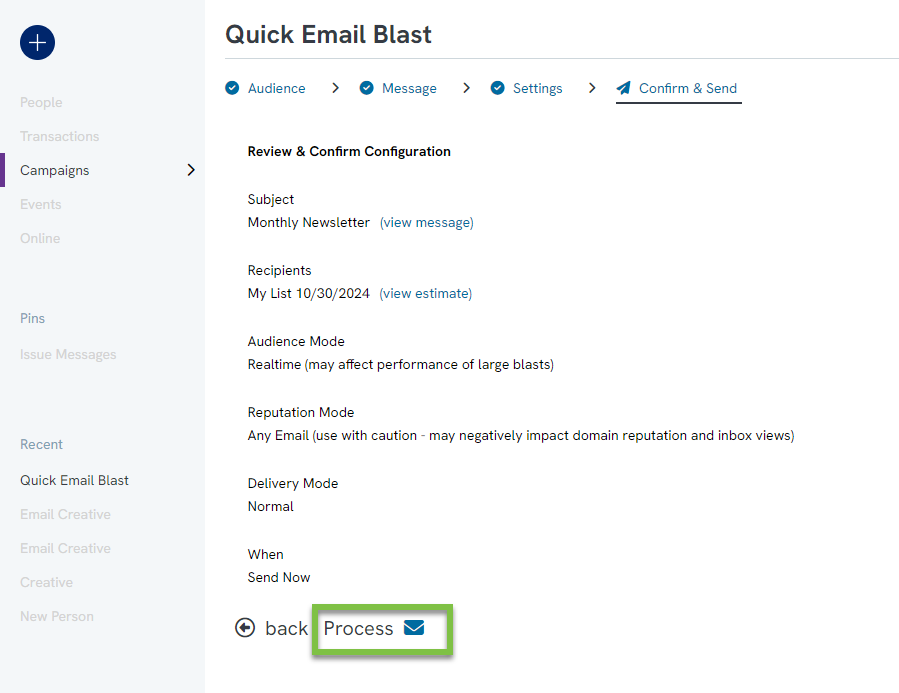
Step 11: Review your email campaign details and proceed to PROCESS to send your email
Creating Marketing Content (Creatives)
Navigating to the Email Builder
To find the email builder and begin designing an email for a campaign, click Campaigns > Create & Push > Creative.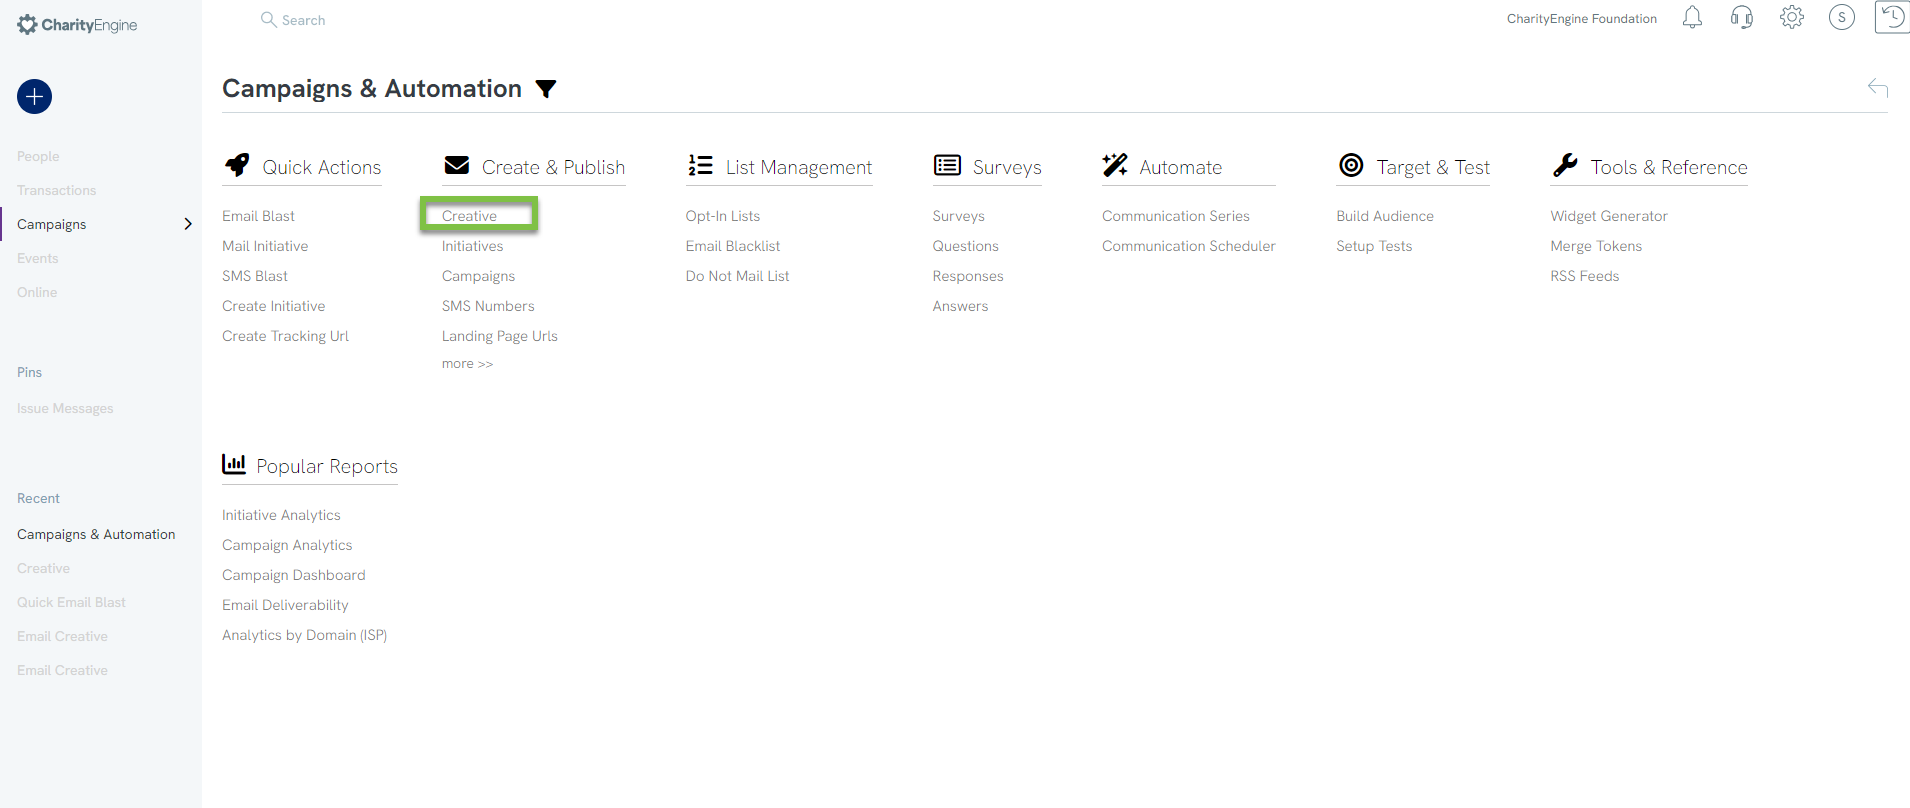
To create a new email, hover over Create New and select Email Message.
Basic Design Tips
The CharityEngine® email design is a click-and-drag structure. The sample screen below is the CharityEngine® default design screen.
Under the first Content tab is a selection of tools and items to click and drag into your email.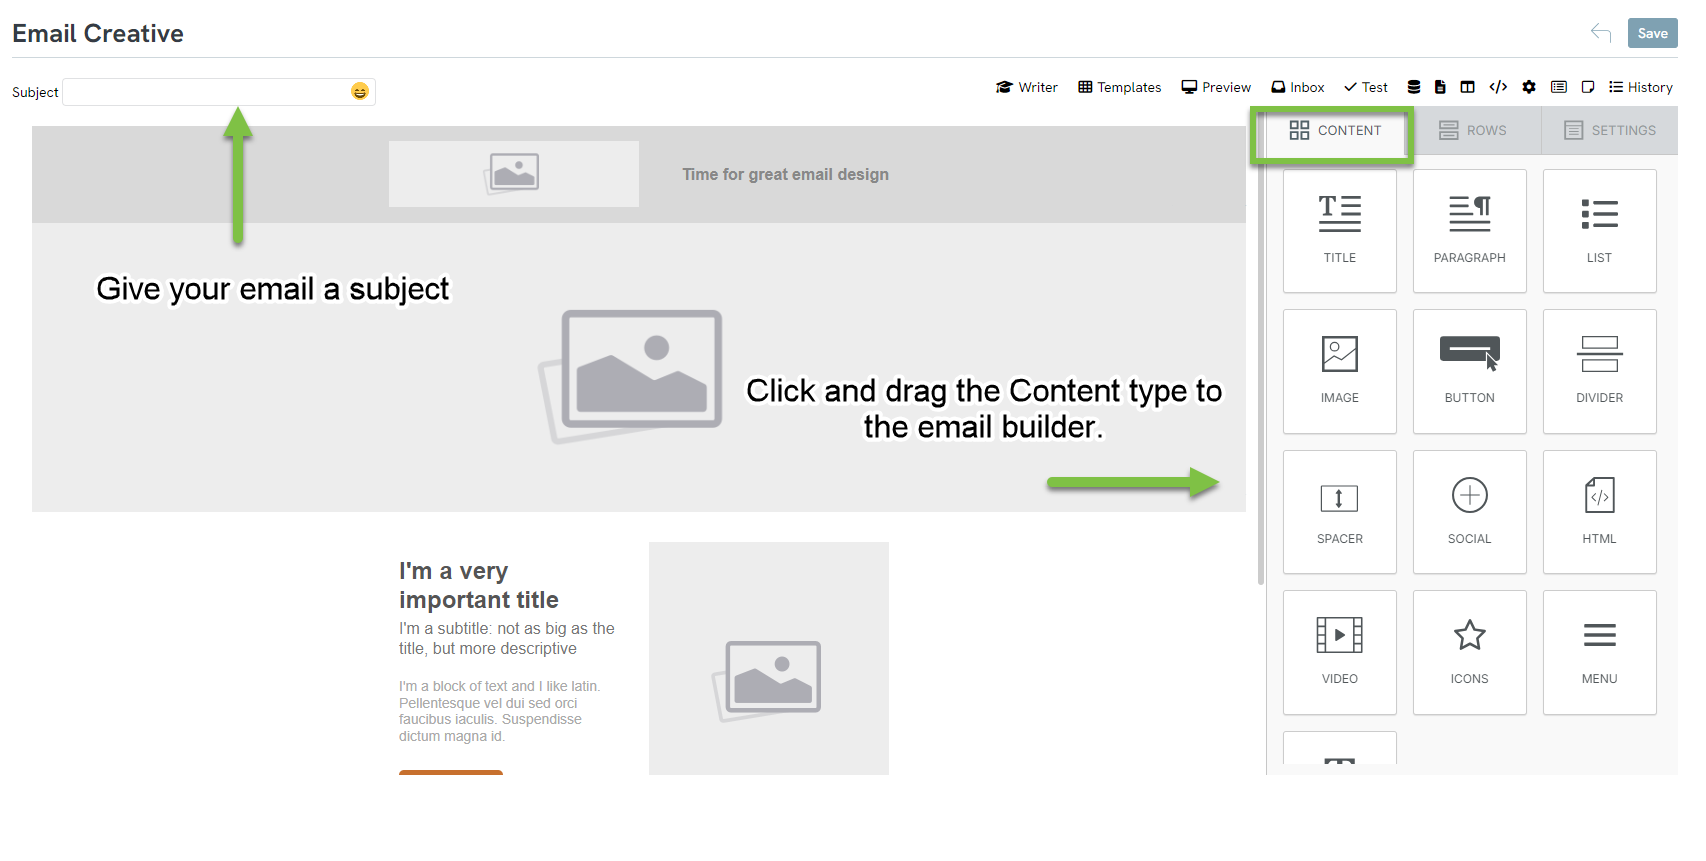
Each piece of the default CharityEngine® email setup can be deleted and replaced with a different draggable piece. Click on the piece you want to delete. A blue box will appear around it with the option to delete it or copy it.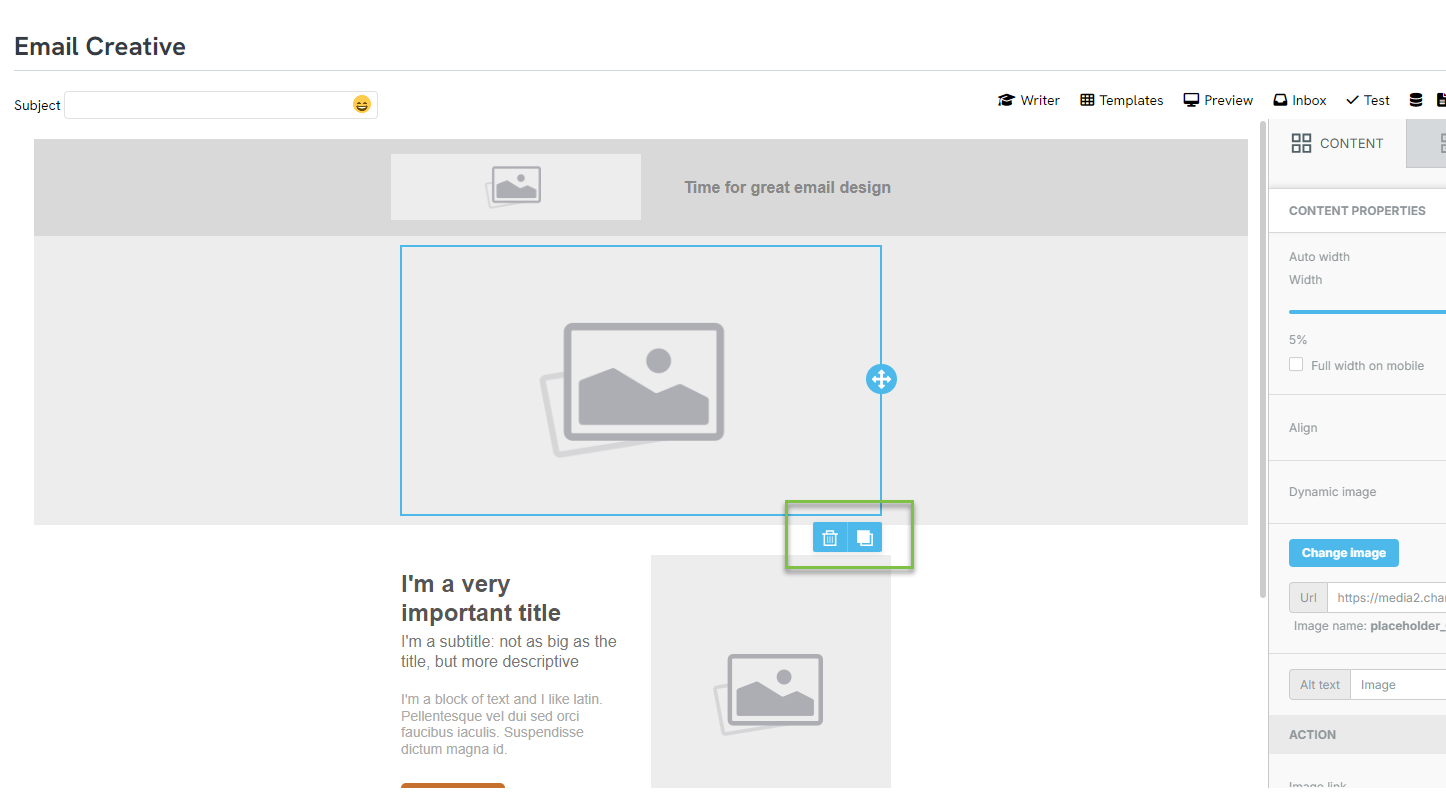
NOTE: Clicking the middle of text boxes will also bring up a design toolbar for the fonts, colors, etc. This toolbar can appear on top of the delete/copy options. If this happens, simply click on the circle that appears lined up with part of the blue box to make the toolbar disappear. You can access the delete/copy buttons from here once the toolbar is gone. If you want the toolbar back, click in the middle of the box in order to edit it and use the toolbar.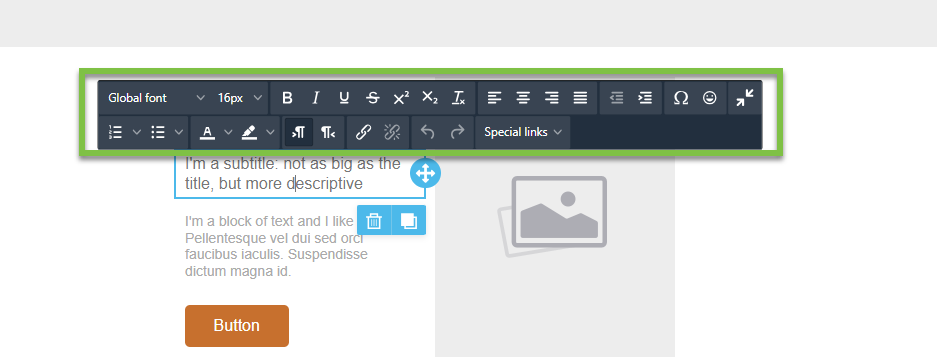
Templates, Outline, and Preview
Templates
If you aren’t sure where to start when designing your new email, check out the CharityEngine® Templates selection. There are several different design options to start with, based on what kind of email you would like to design. Click in the top right-hand corner of the email builder to find the templates.
Preview
Click the Preview button in the top right-hand corner of the email builder to preview what the design would look like in the email. Choose to view from Desktop or Mobile. Click the X to exit the preview.


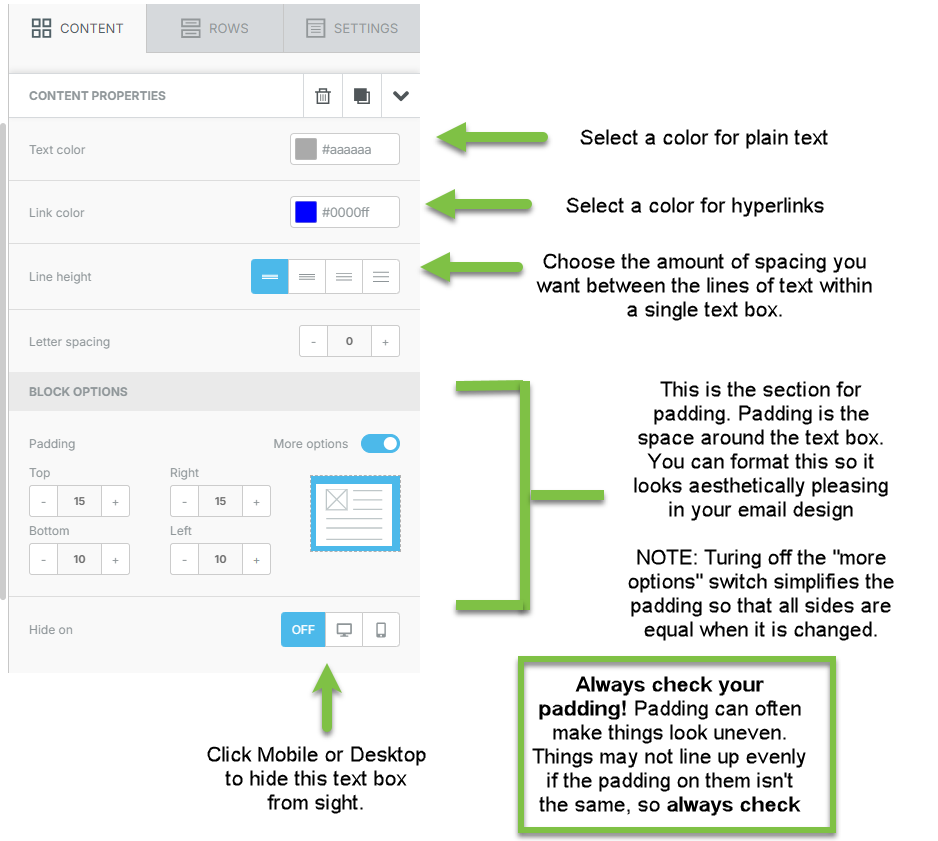
Text Box
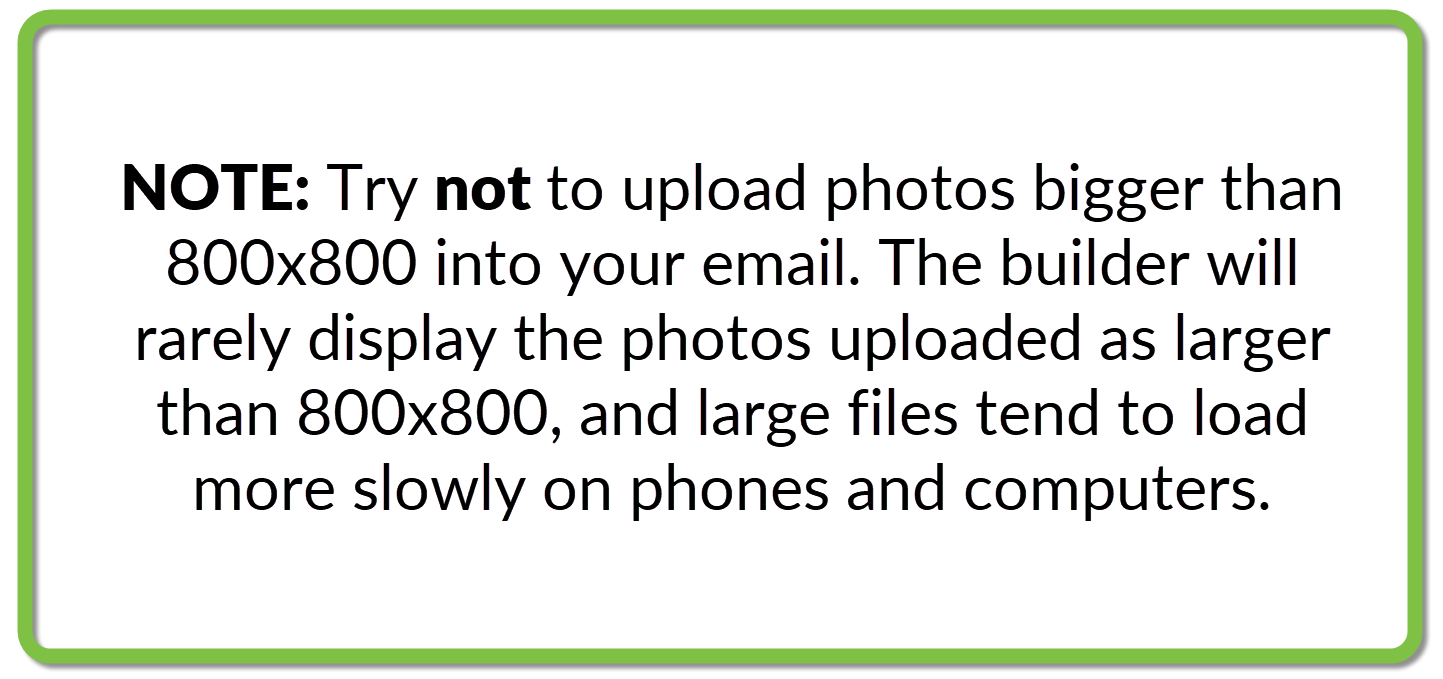
Image
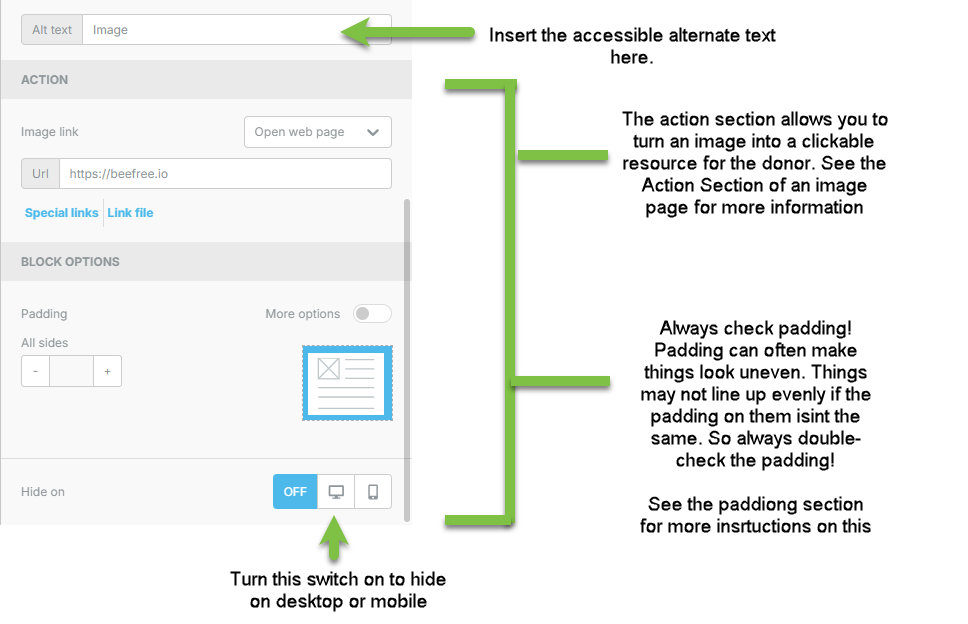
Action Section (Turn image/button into interactive link)
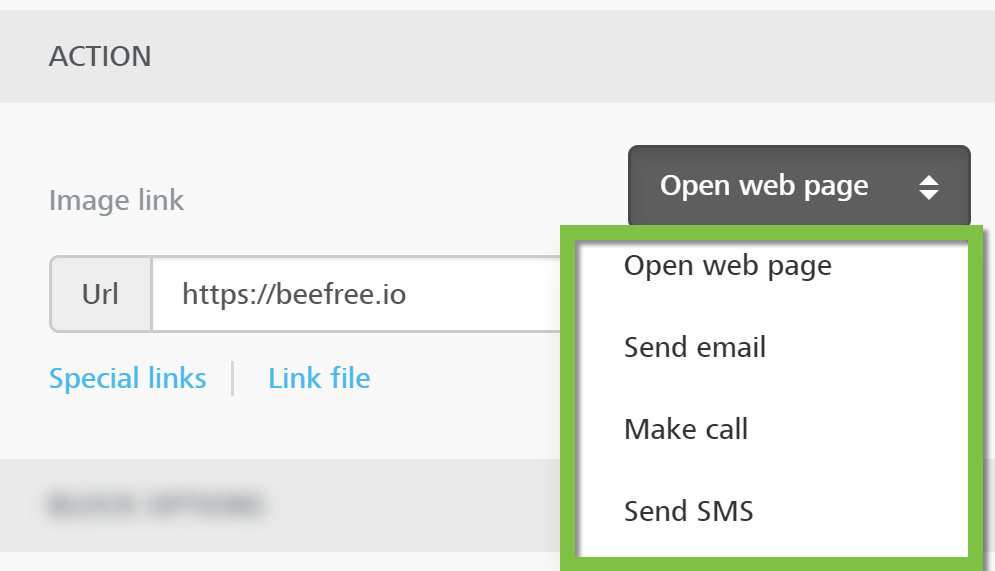
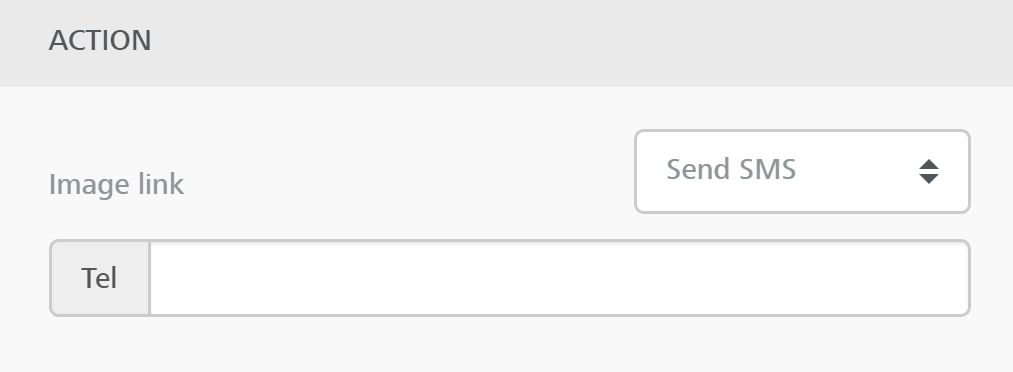
The Action section allows you to turn an image or a button into an interactive link. There are four options: open a web page, send an email, make a phone call, or send an SMS text. Choosing one of the four options and filling out the links required will turn your image or button into a link. Clicking the link will lead to the selected one of the four options occurring.
Open Web Page/Unsubscribe/Activation/View Online Links
Under the Open Web Page selection, insert the web page URL you would like the image to link to. There are also Special Links provided by CharityEngine® that you can insert into the image: Unsubscribe, Activation, and View Online.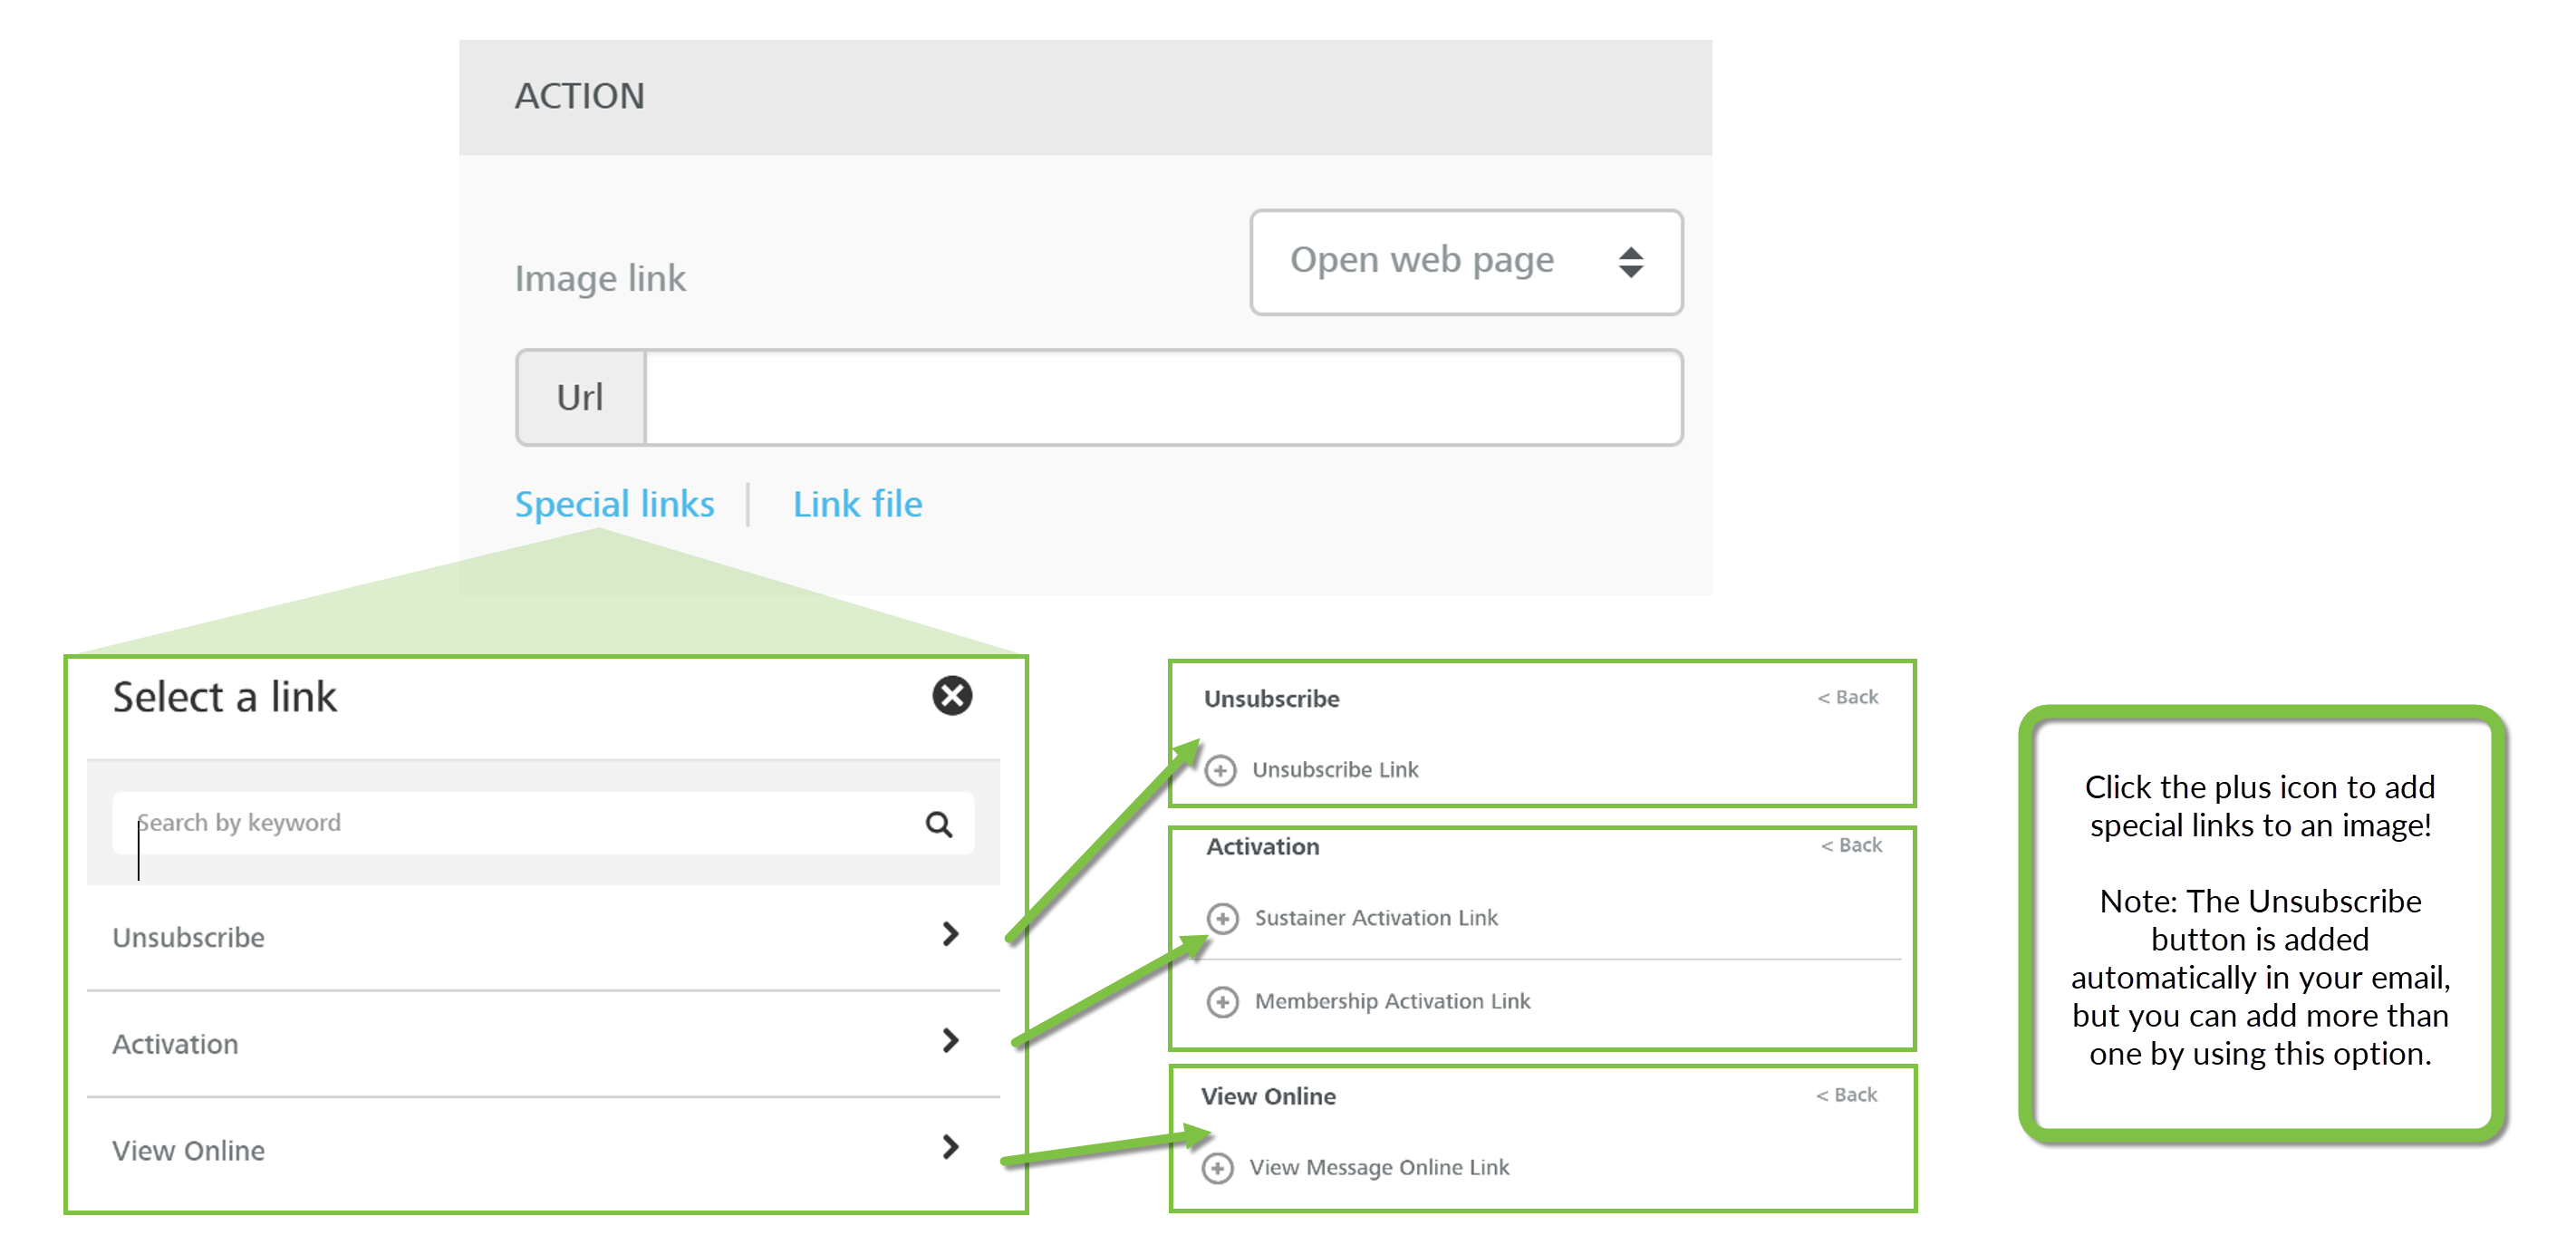
Send Email
Add an easy link for donors to send emails back to your organization. Fill in the receiving email address where the message would be sent, a subject, and a body.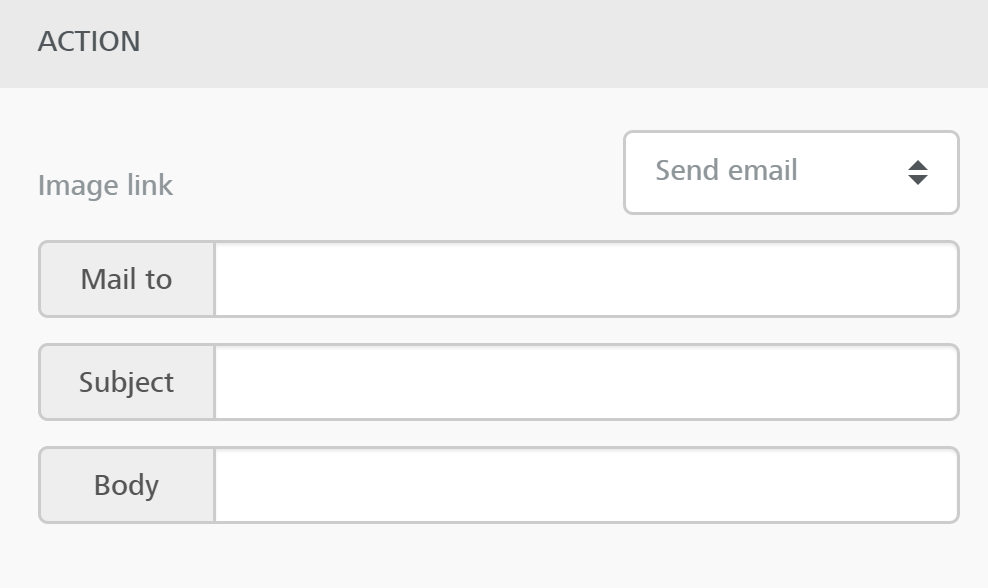
Make Call
Link a phone number to an image to allow a donor to make a phone call to your organization.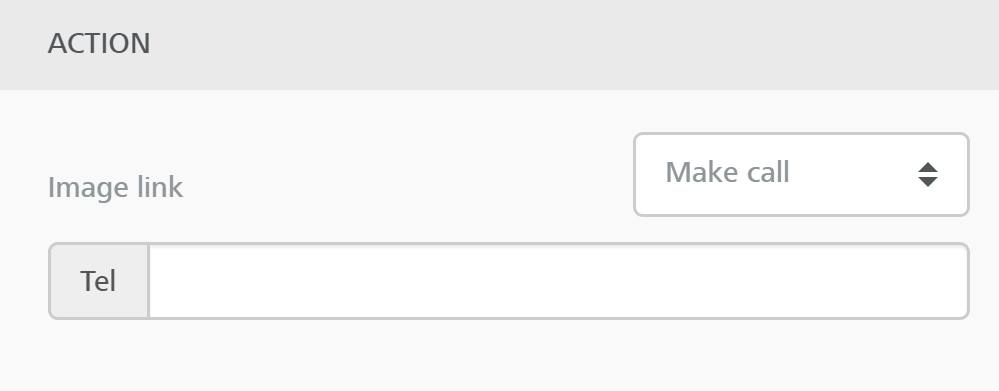
Send SMS
Link a phone number to an image to allow a donor to send a text message to your organization.
Button
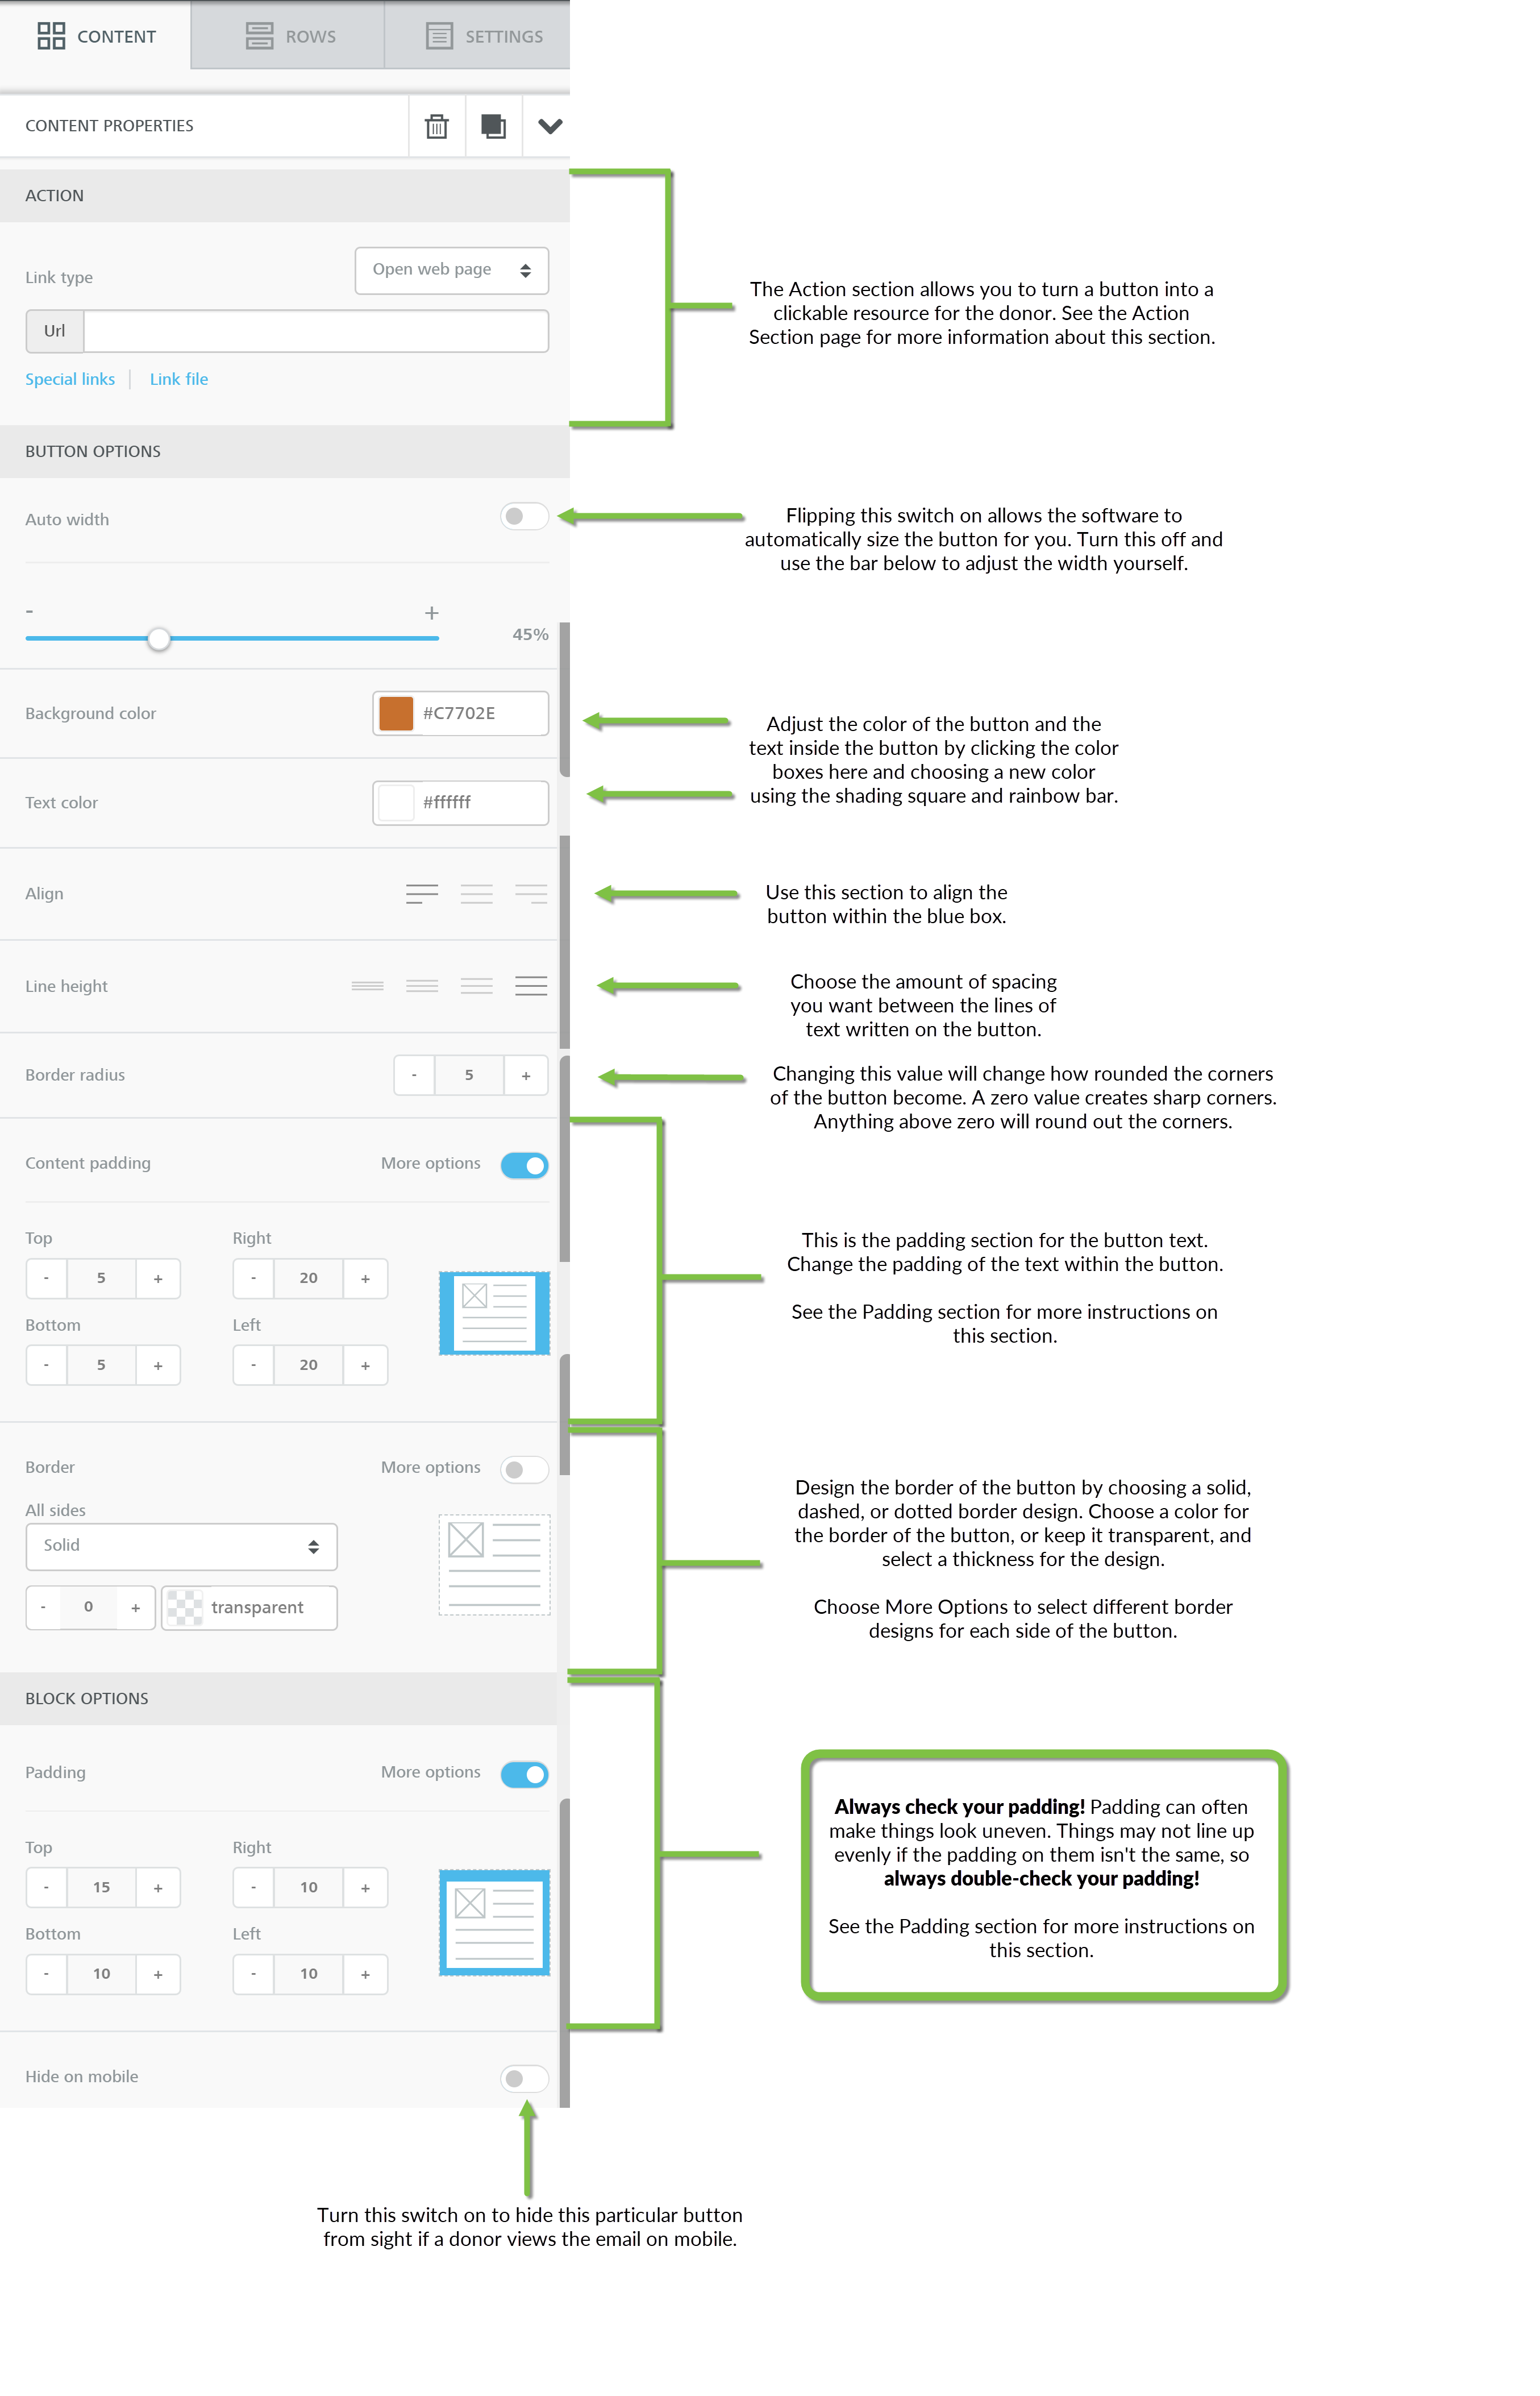
Divider
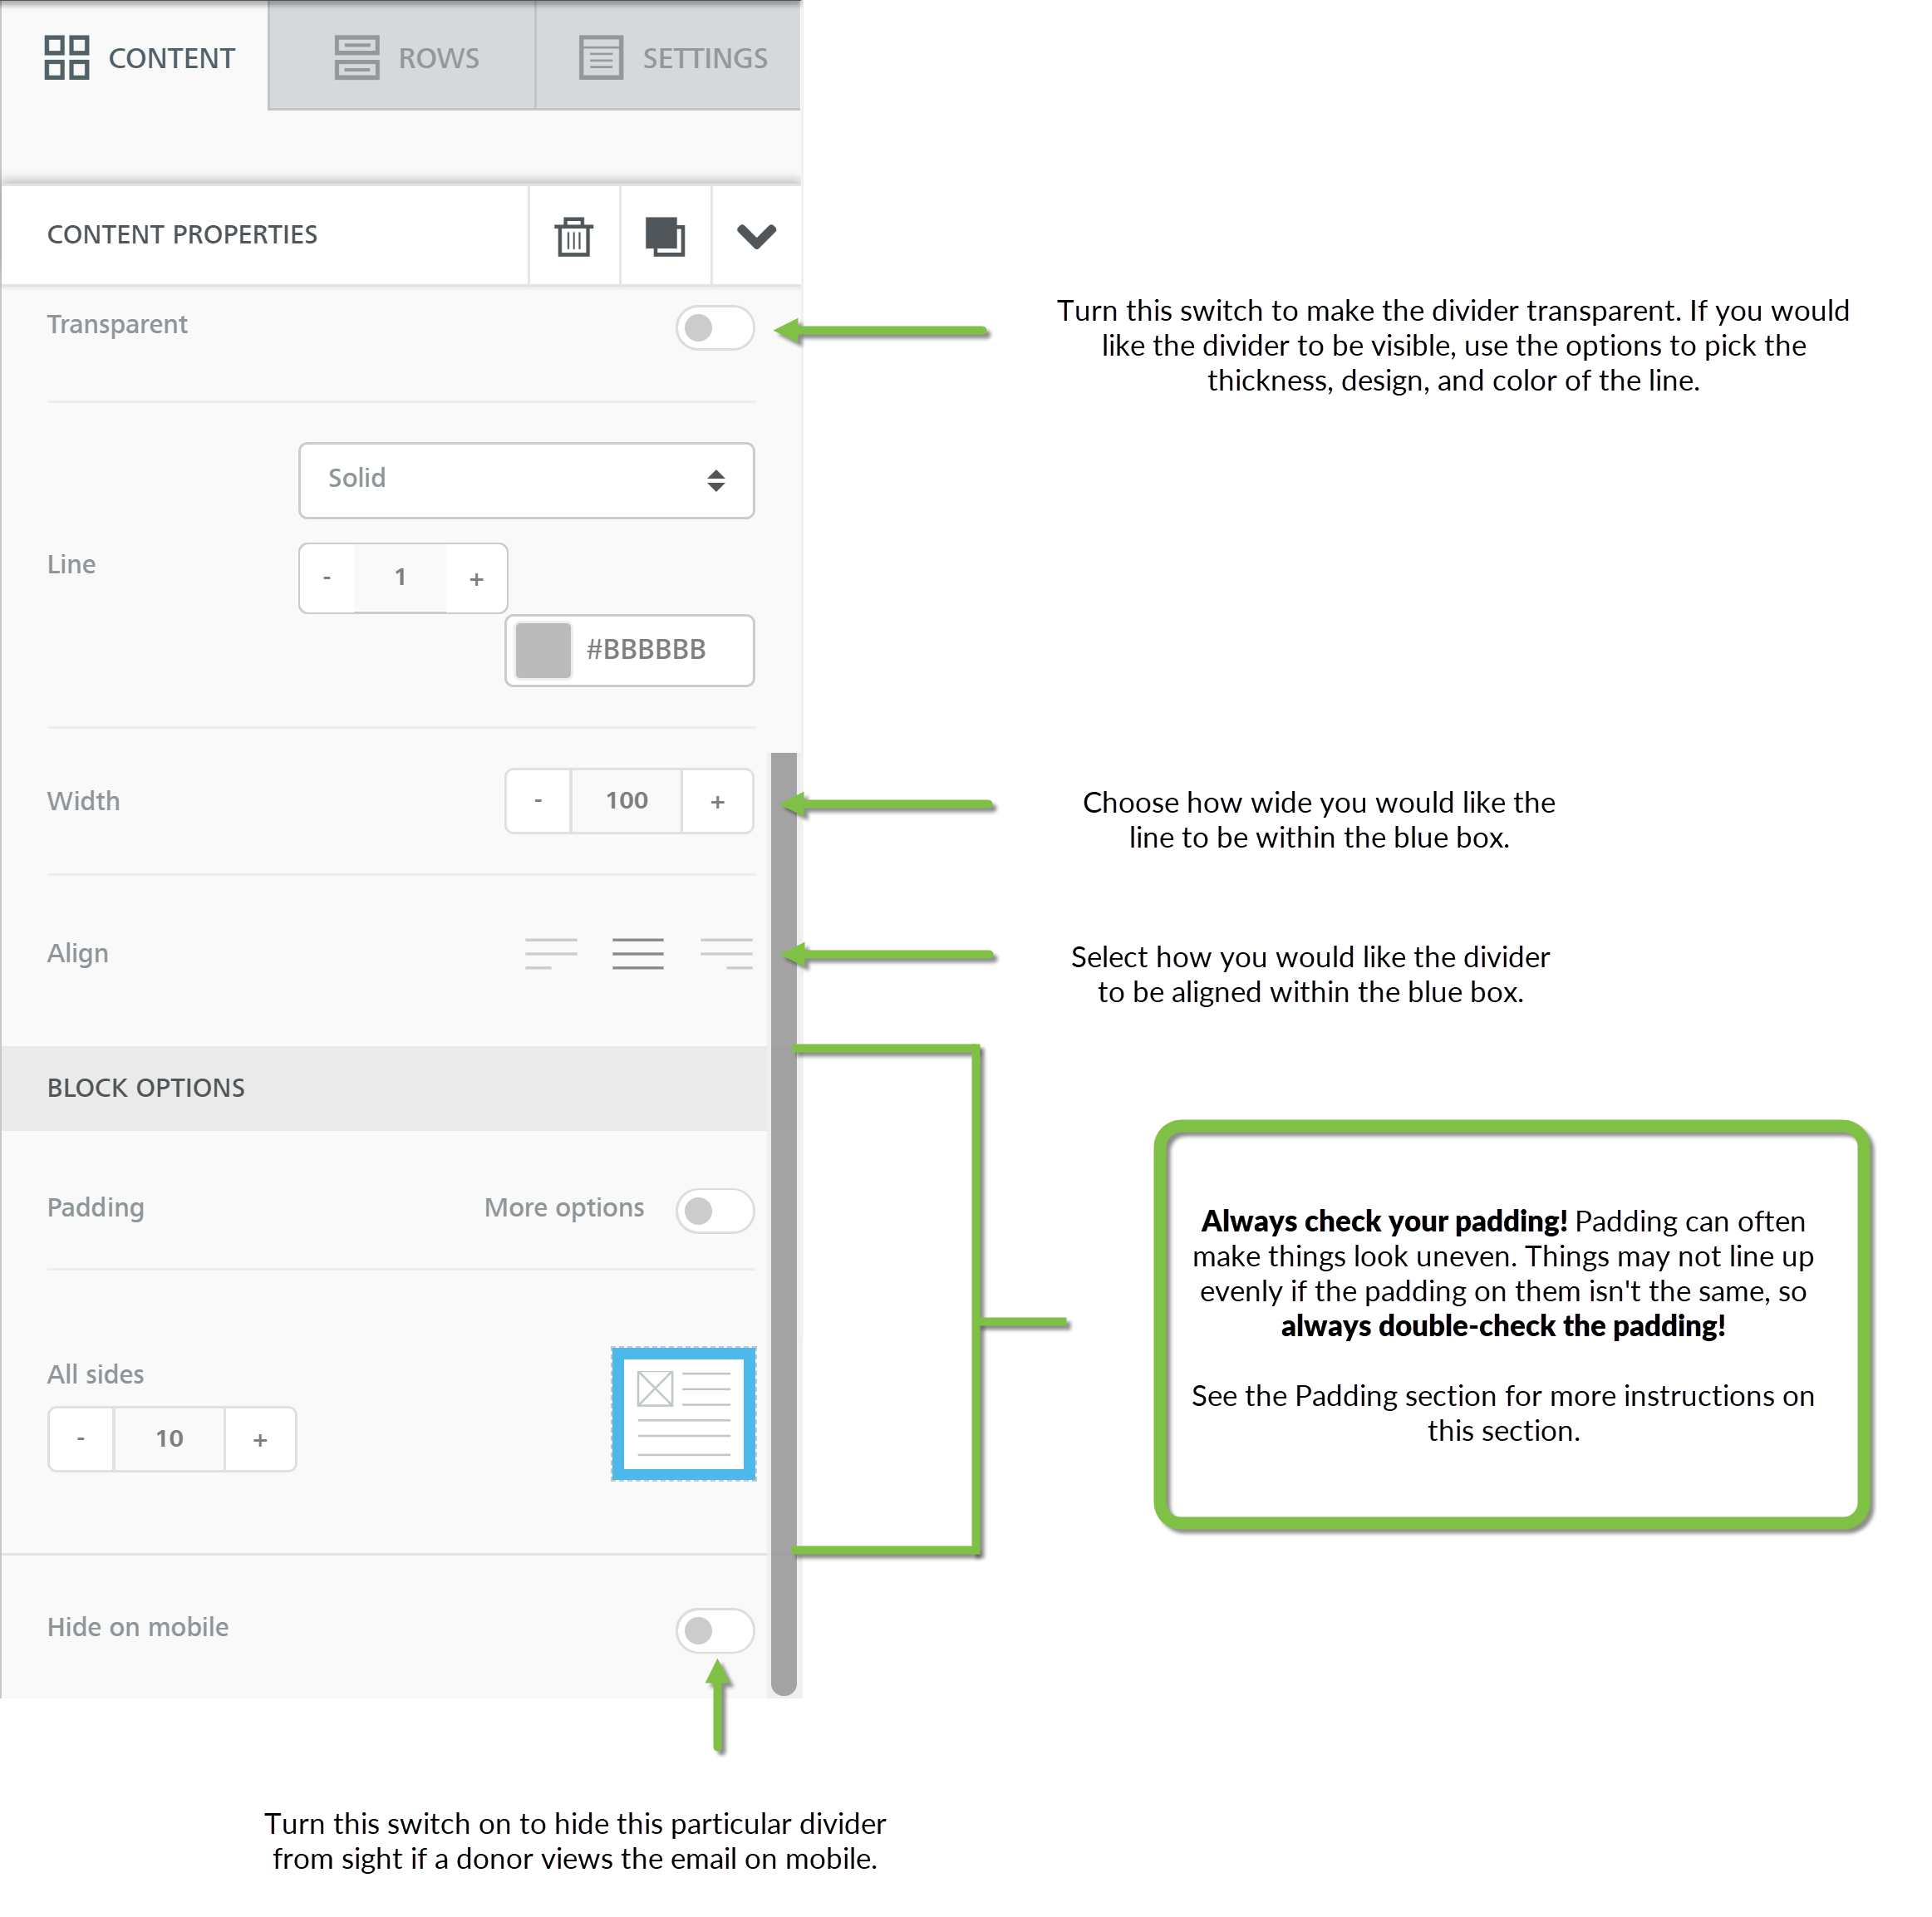
Social
Video
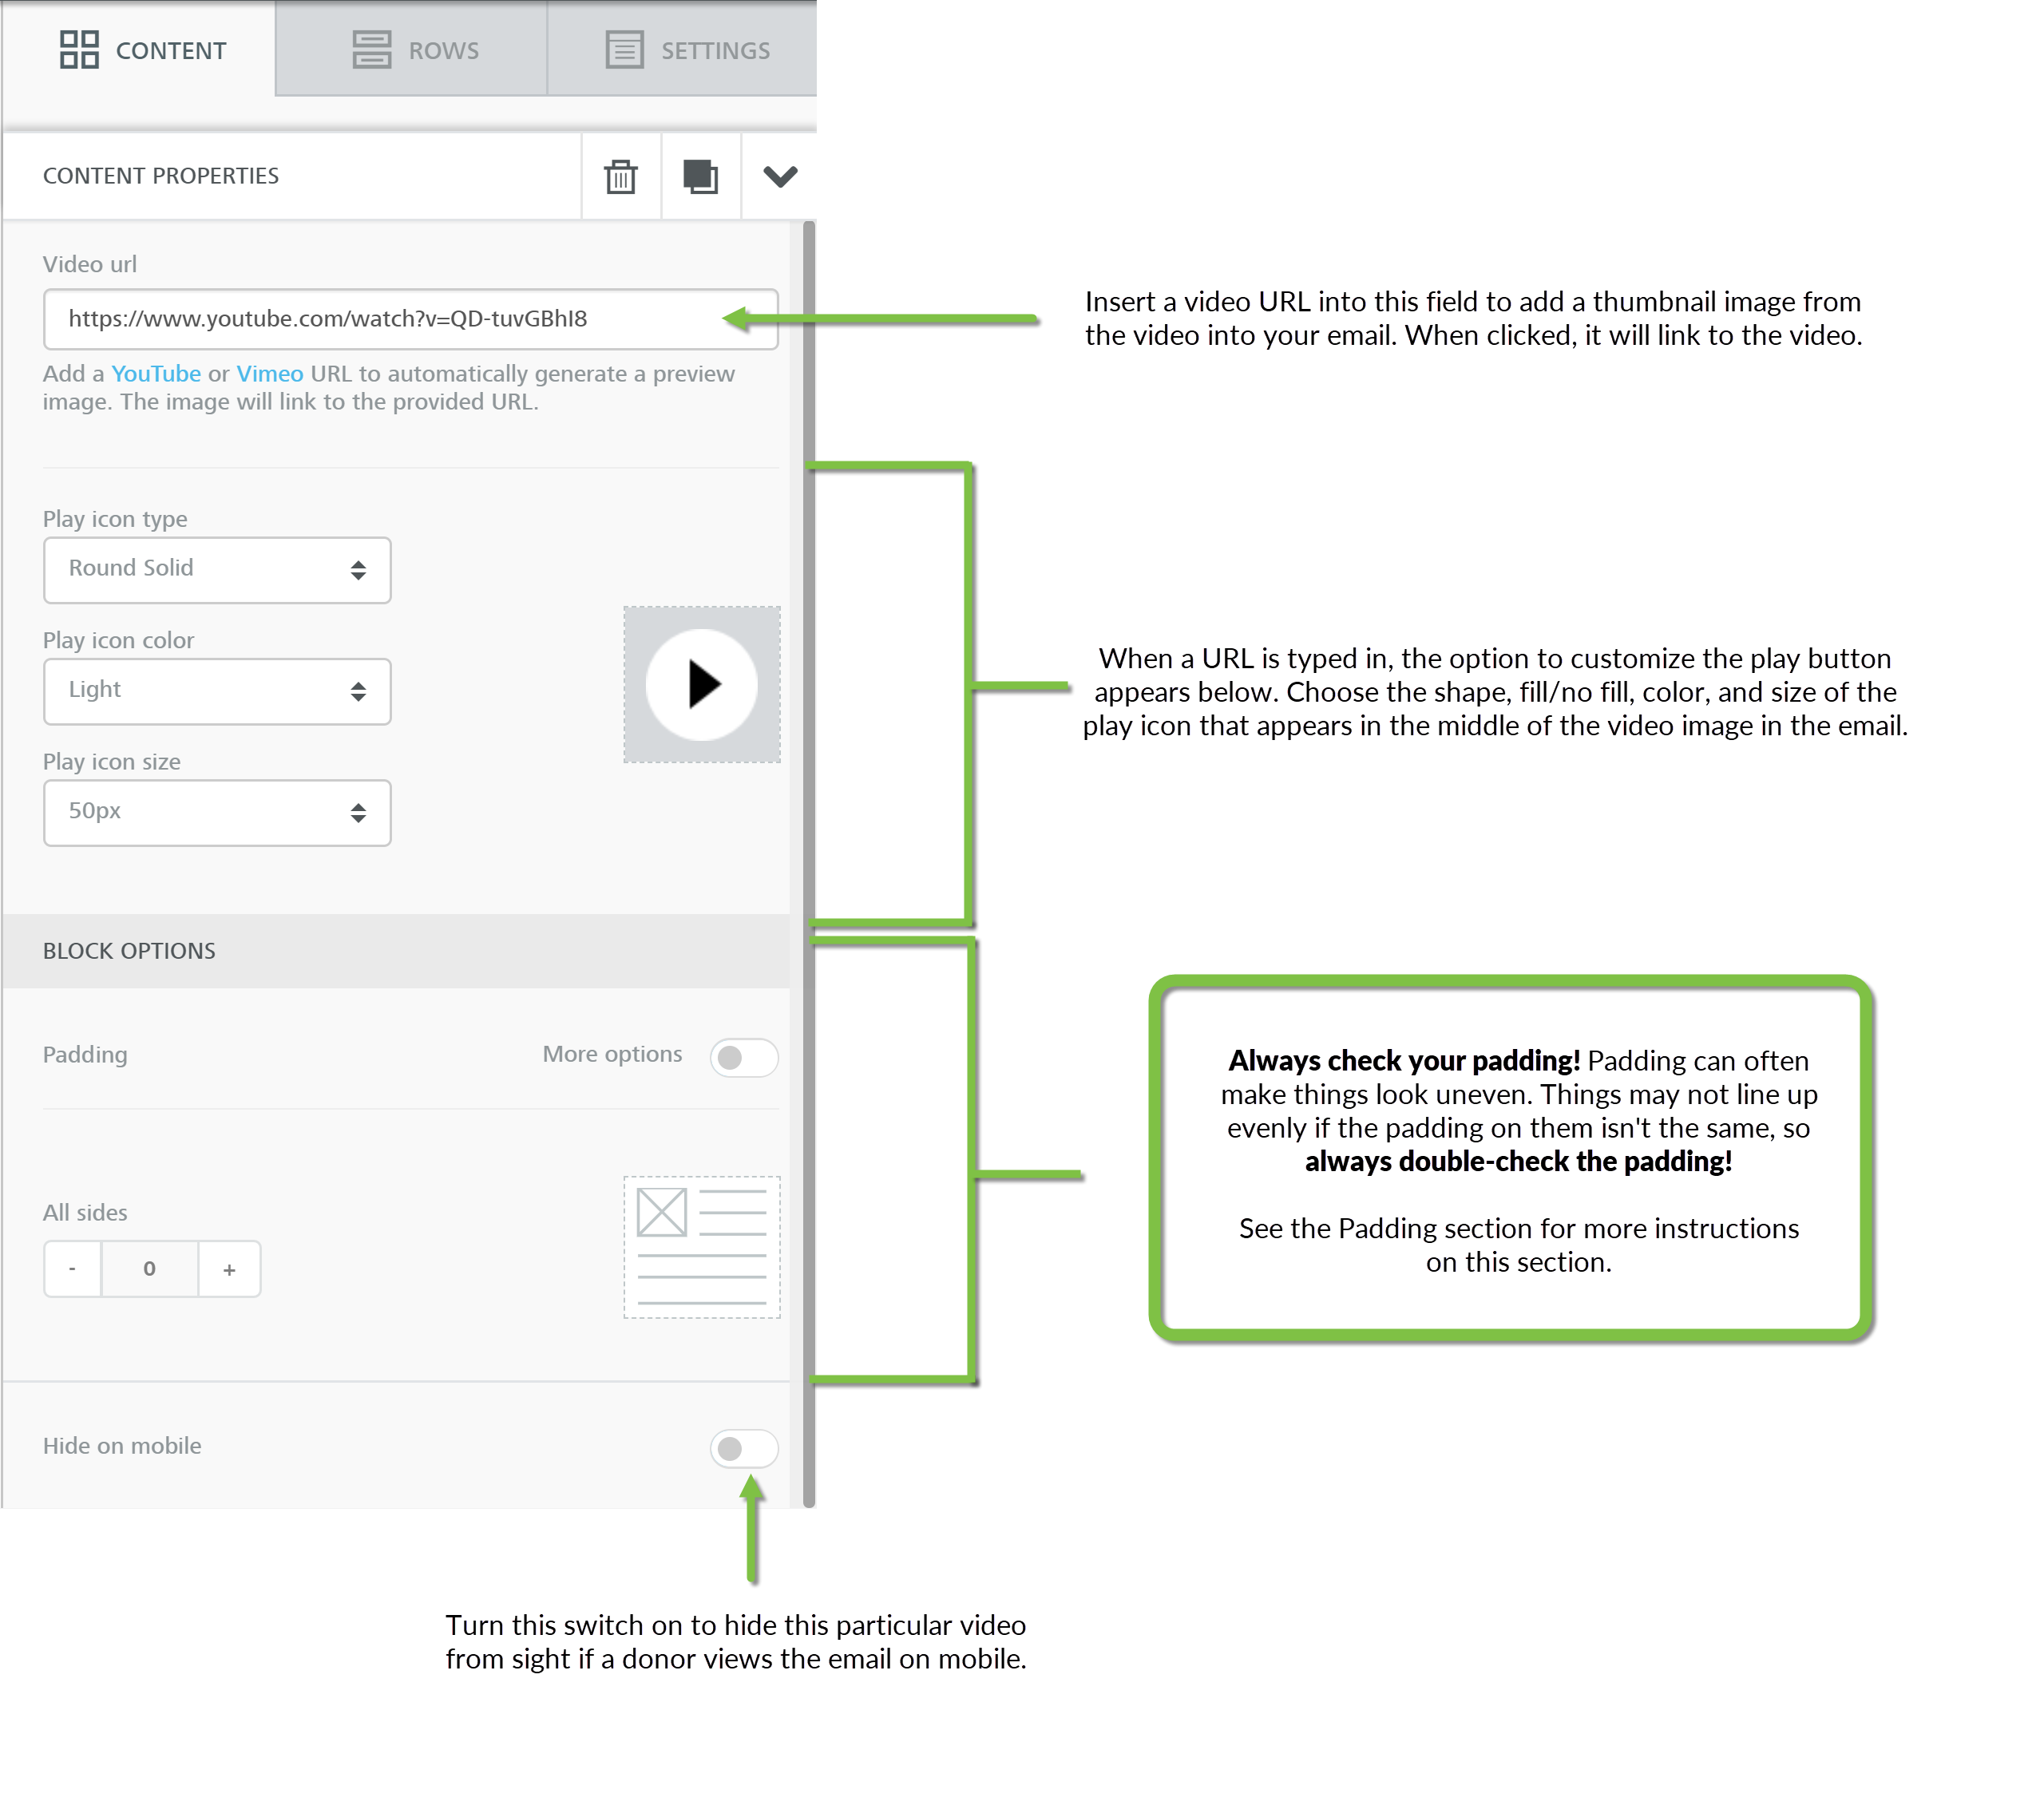
Rows Section
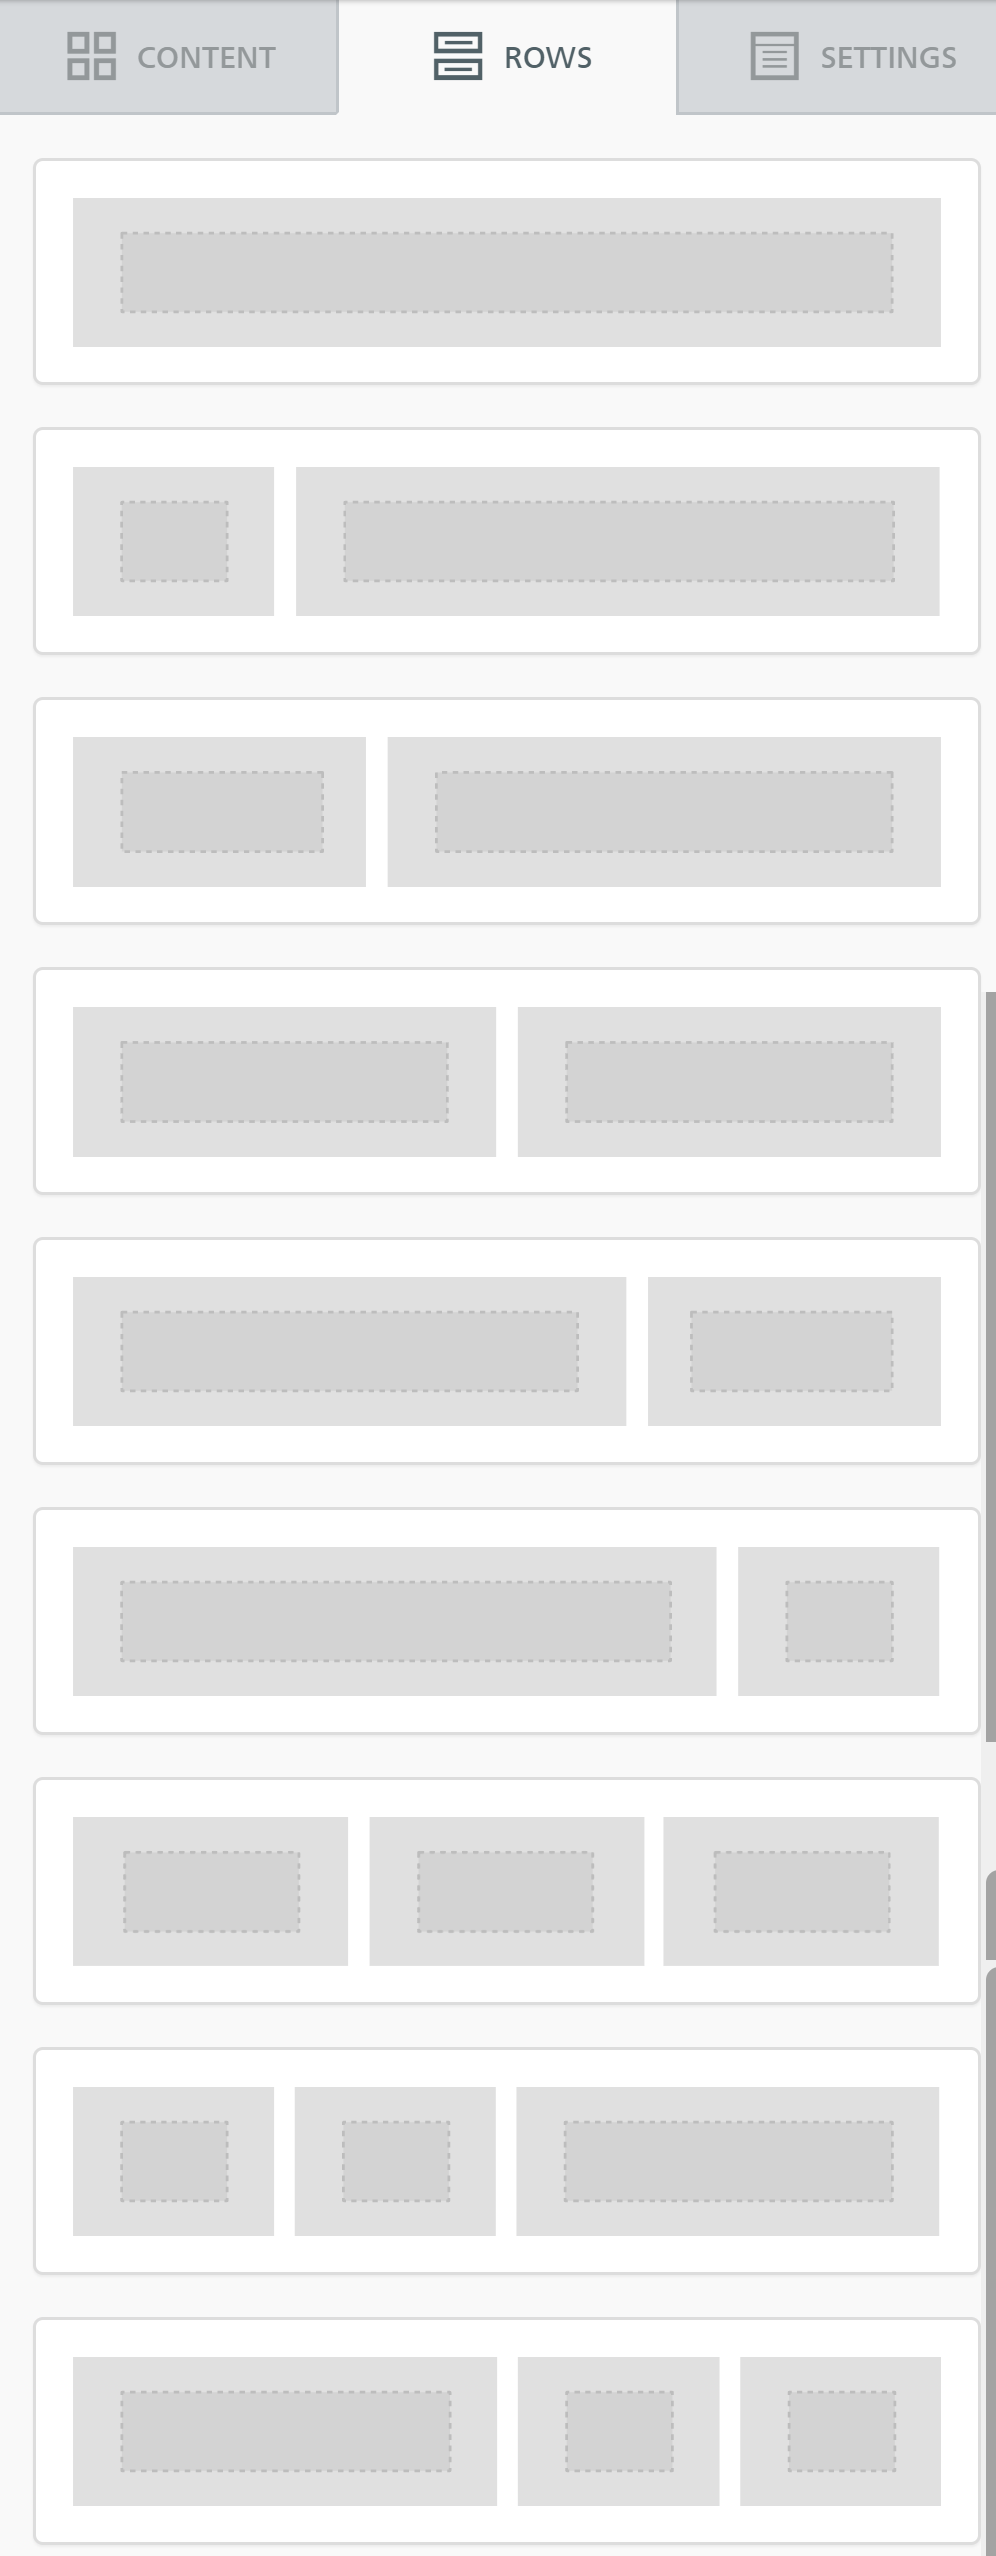
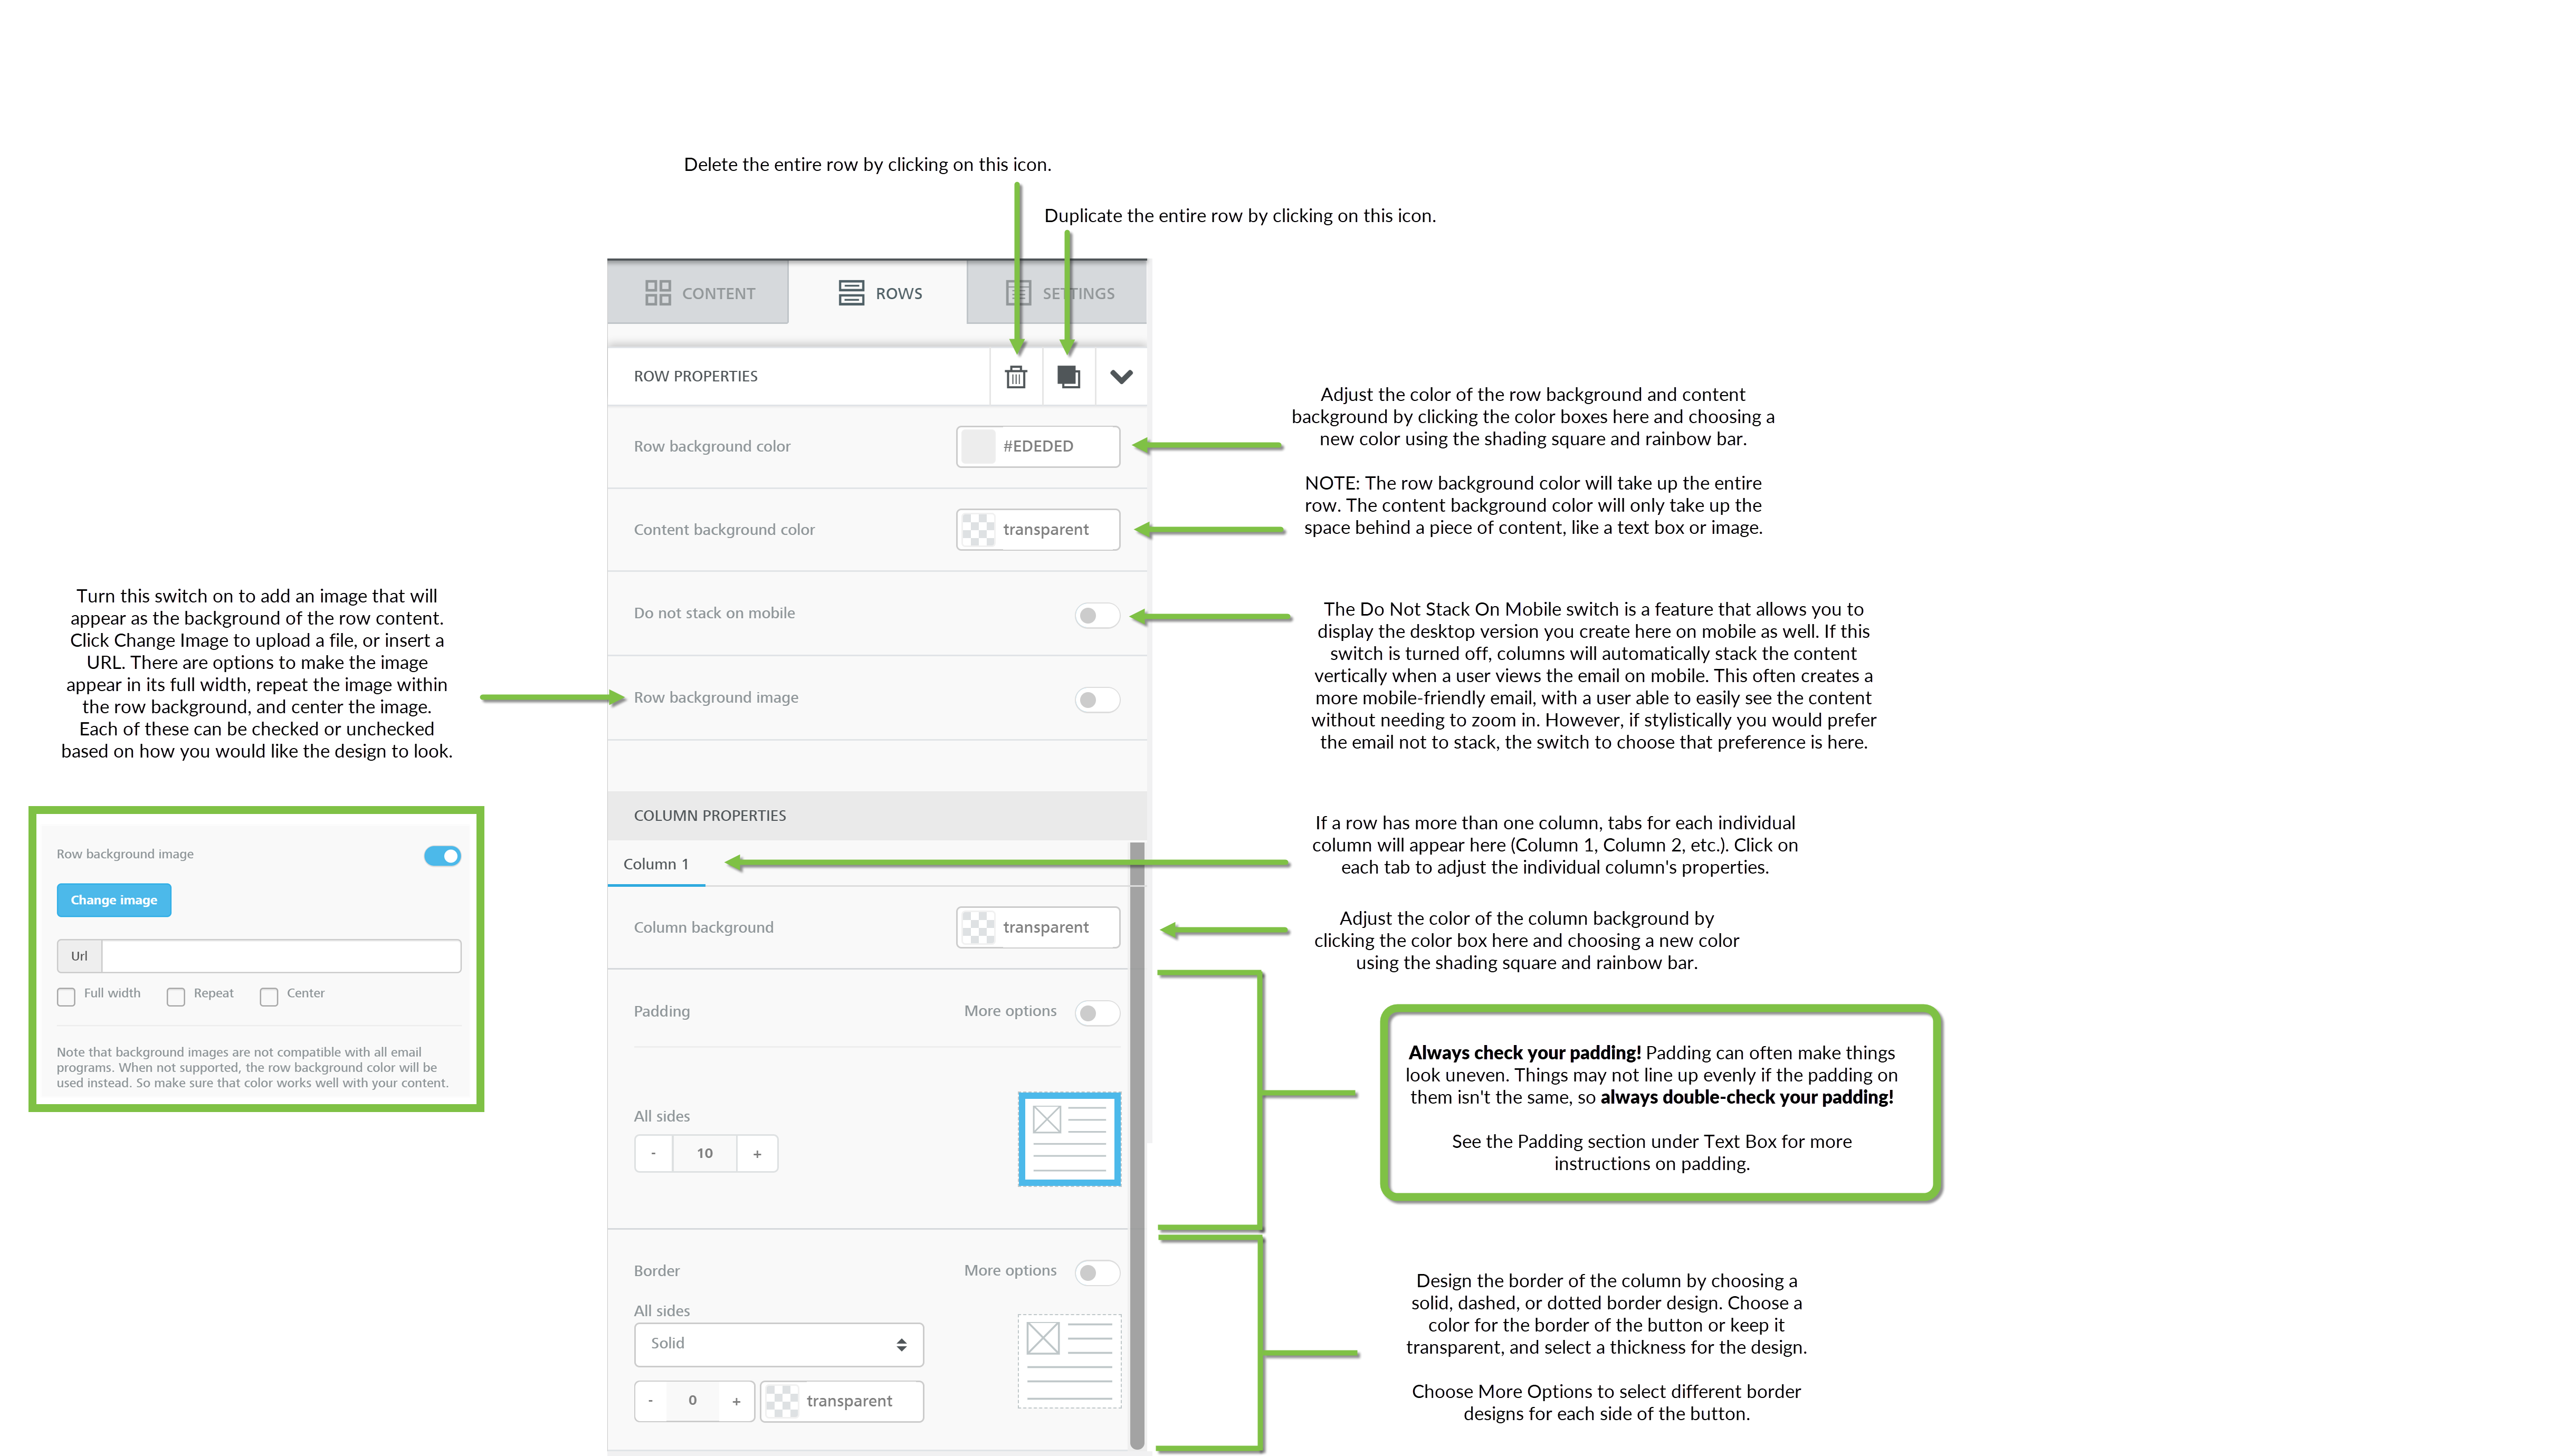
Rows Properties
Settings Section
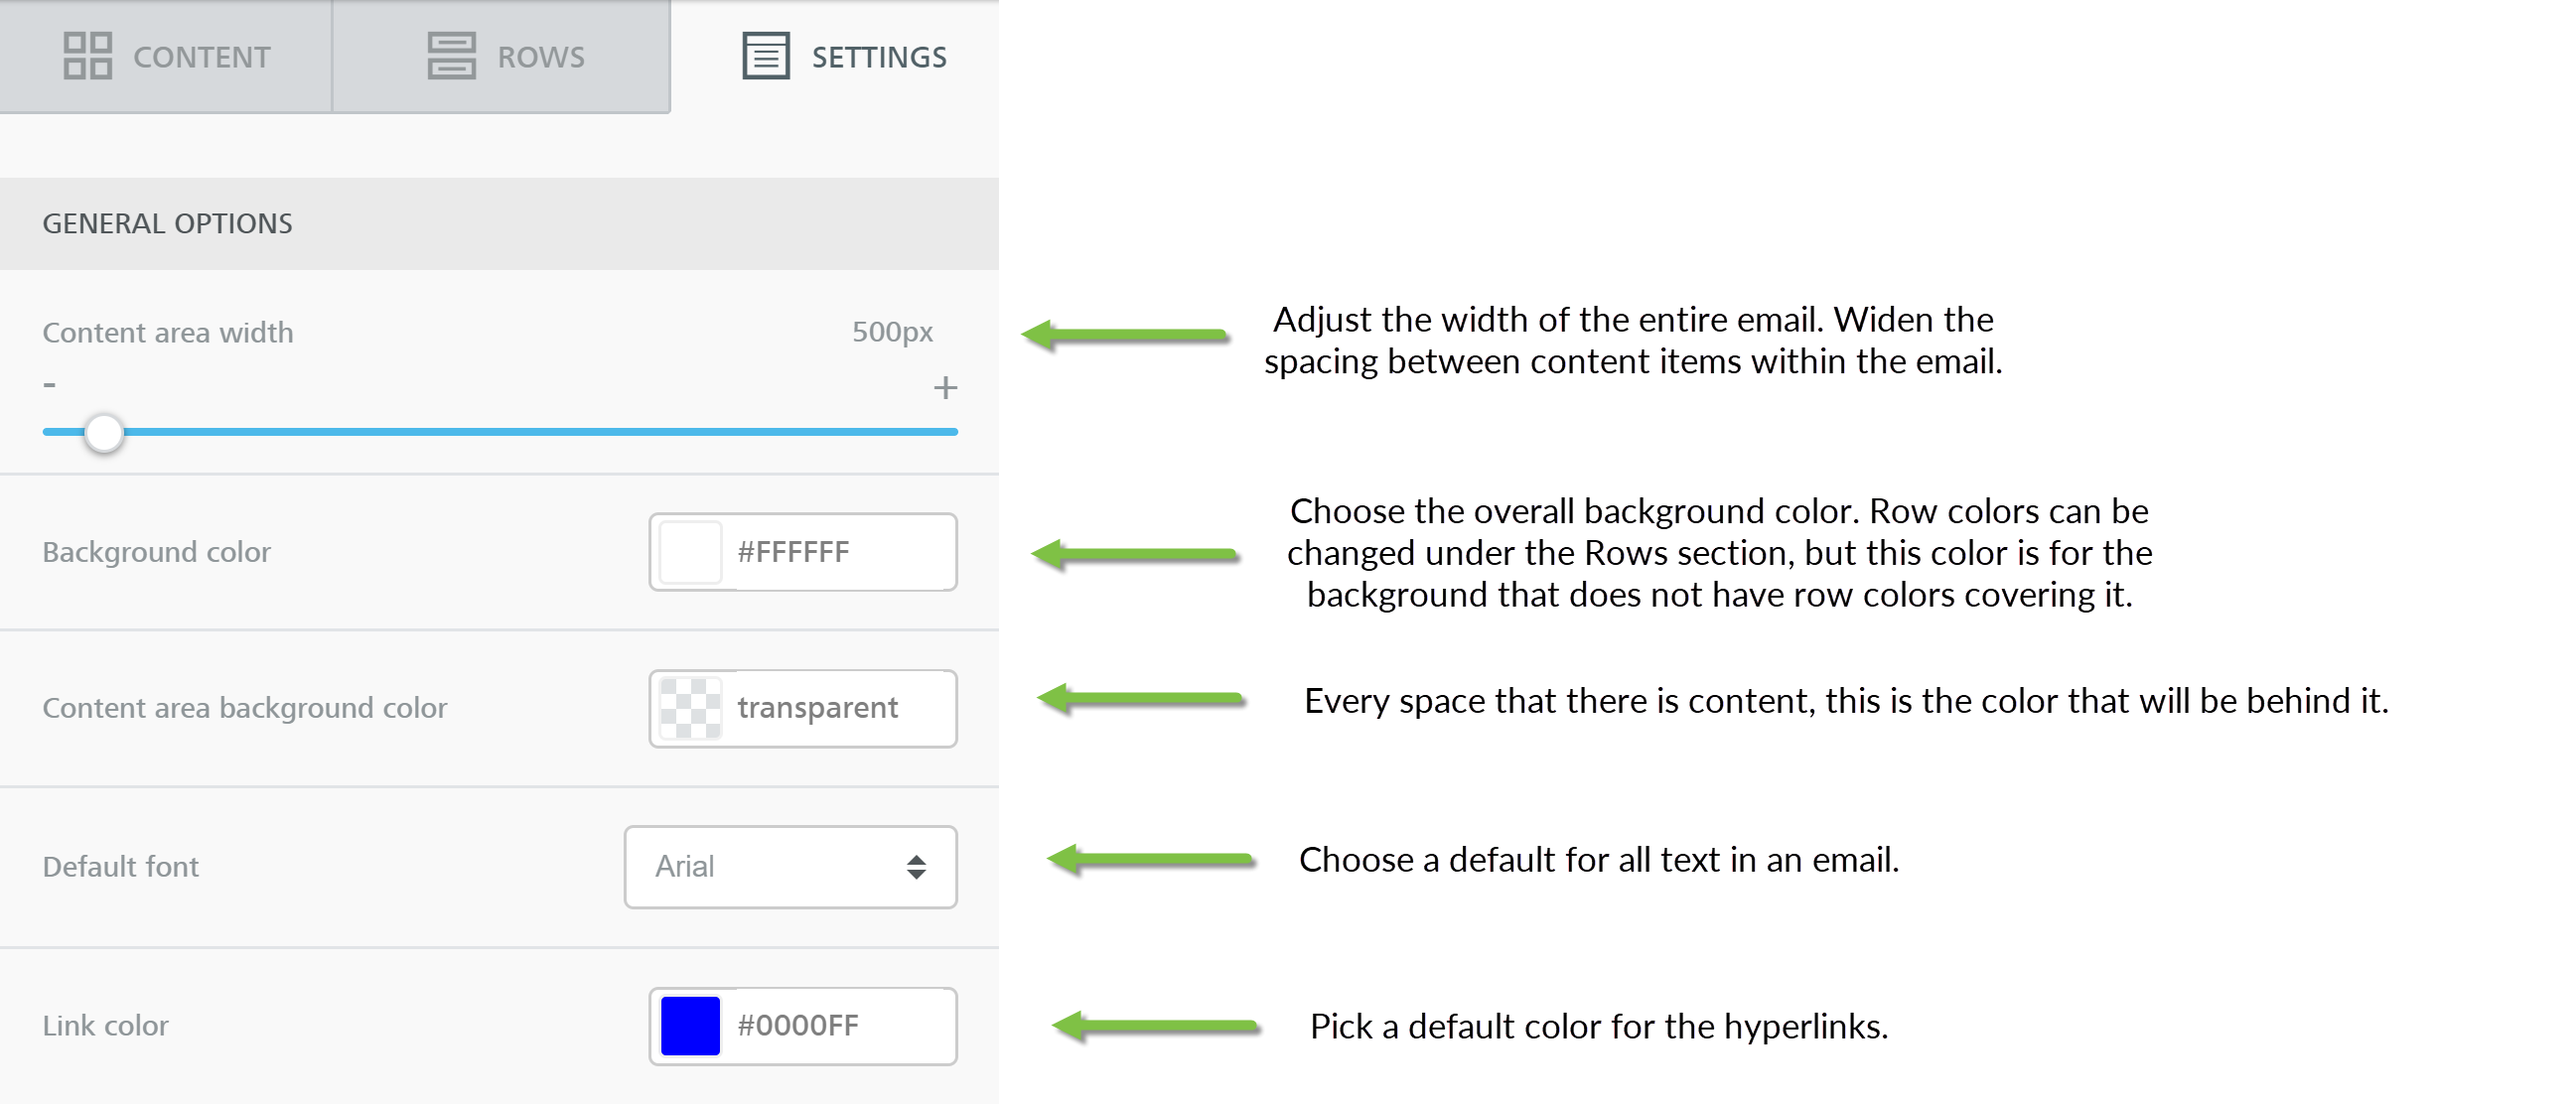
Adjust the general email builder settings under the Settings section.
Special Links
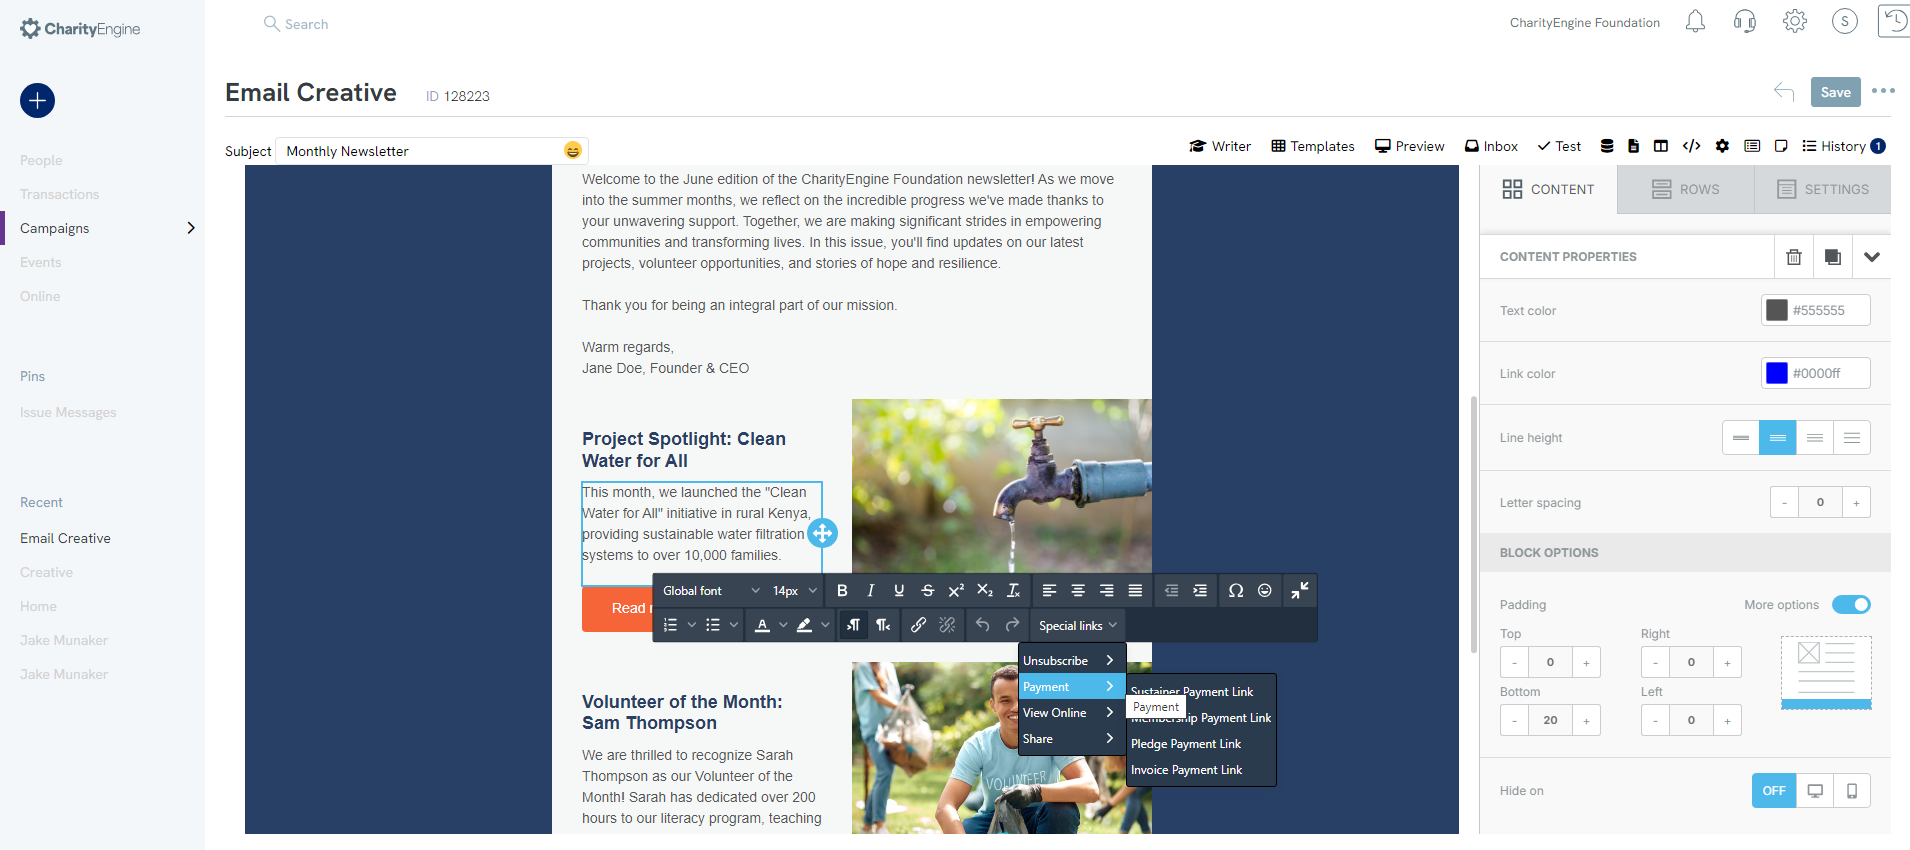
Special links can be used to complete a host of activities. To begin, highlight any specific text within your creative. Once highlighted, a formatting bar will appear - locate Special links to expose:
- Unsubscribe - allow user to unsubscribe; note: CharityEngine sending templates will always include global unsubscribe link for all outbound emails for compliance of CAN-SPAM
- Payments:
- Sustainer Payment Link
- Membership Payment Link
- Pledge Payment Link
- Invoice Payment Link
- View Online - allow user to view email online
- Share - allows user to forward email to others; allowing access to all links/buttons
Additional Message Settings*
*This is a very important section!
This section is imperative in order to reach a full, complete audience. In order to make sure every single one of your donors receives the same general message you are trying to send in your email, you must fill out the text version of your email. This text version will appear to your donors if their email preference is set to text only. This way, even if they cannot see the full email, they will still be informed of your fundraiser, event, etc.
How to Restore a Previous Creative
When creating an email creative, you may save your work to later realize that you preferred a previous version. Instead of creating a whole new creative or redoing your work, you can restore any previous versions of the creative by looking at the creative history.

Step 1: Navigate to Campaigns > Create & Publish > Creative > Locate creative > Manage Creative (or click through creative id)
Step 2: Locate History tab (top right corner)
Step 3: Click on the version you wish to restore, and the creative will refresh to show the previous version
If you decide to revert back, simply click on the history button again and restore the version.
How to Add System/Global Tokens and Conditional Blocks
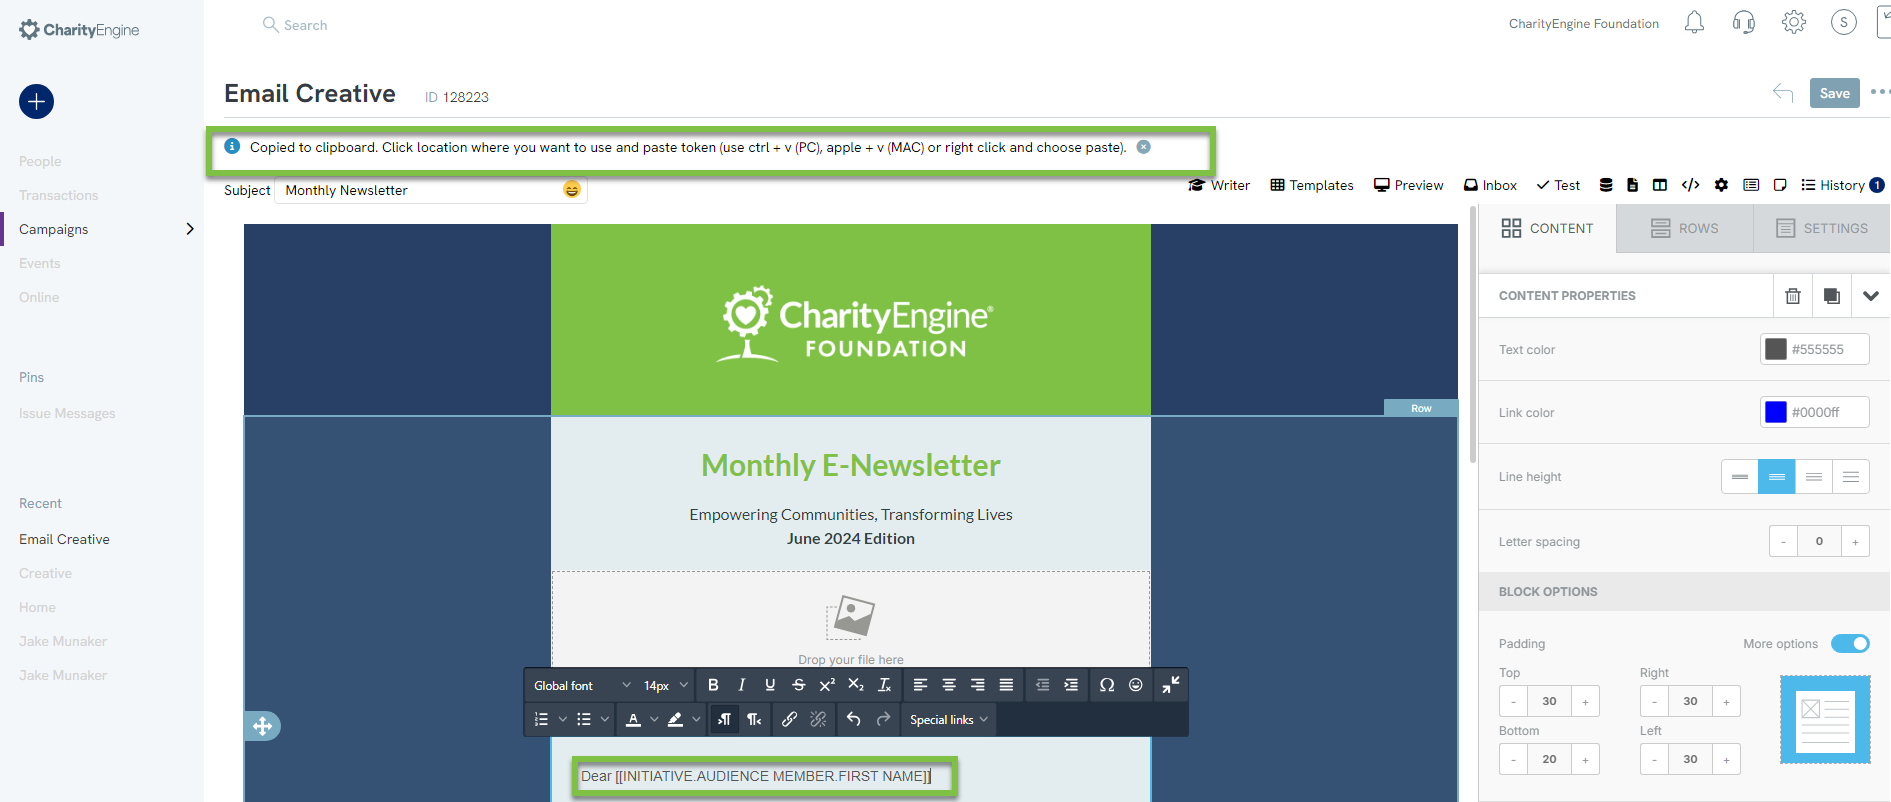
Tokens allow you to add elements to your marketing content (including subject line) that are personalized based on the information you already know about constituents. Tokens can be used to insert data points such as first name, organization address, donation amount, initiative name, event name, etc. In addition, CharityEngine also leverages conditional blocks to further customize your message.
For example, you may want to email constituents who recently donated at a recent event. In that email you would like to leverage the constituent’s first and last name as well as place the total donation value received during your event. Tokens are a great way to insert critical data elements in an email and further personal your donor’s experience with your organization. Tokens can also be leveraged within Web Forms for customization.
Within CharityEngine, users will be able to leverage both System Tokens (most frequently used and pre-defined) as well as have the ability to create Custom Tokens (those that may be unique to your organization or not currently available through the token list).
-
-If you are adding customs tokens for emails, the usage of Query will be required. The custom tokens that are available for your email content will need to be included within the Source file
Learn more at Email Campaigns & Web Forms: How to Add System/Global Tokens and Conditional Blocks
Writer & Email Concierge - Using AI to Inspire Your Content
Users can use the power of AI to assist in crafting marketing content with the integration of the Writer feature.
Access the Campaign App > Create & Publish > Creative > Create New or Manage Existing
Click on the Writer to initiate the workflow

Add content to initiate the AI generated content
Select the Style of the message
Click GO
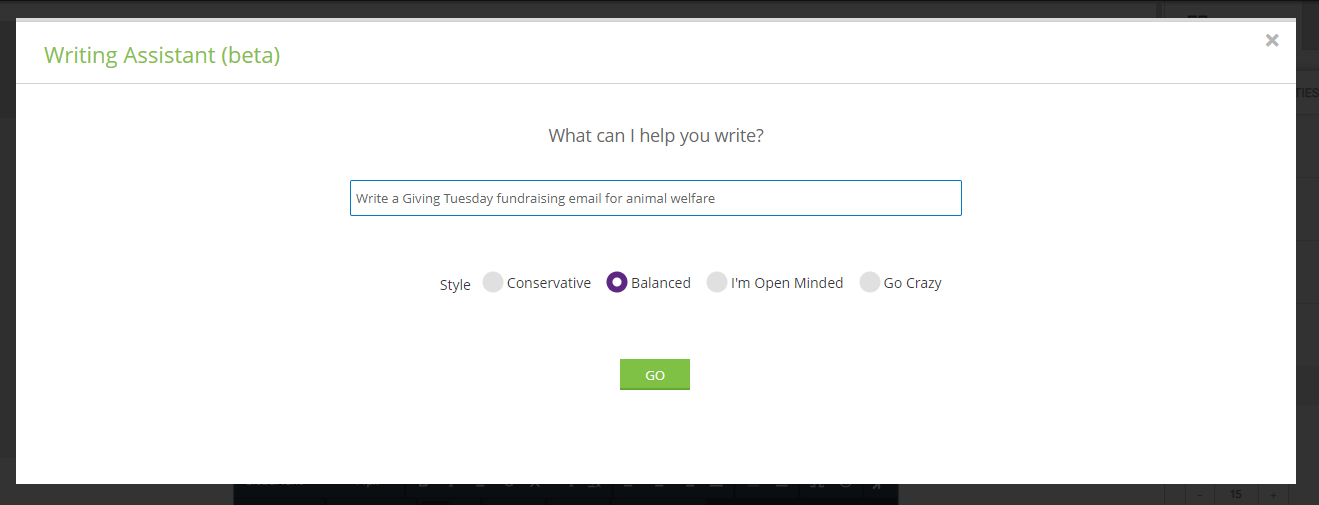
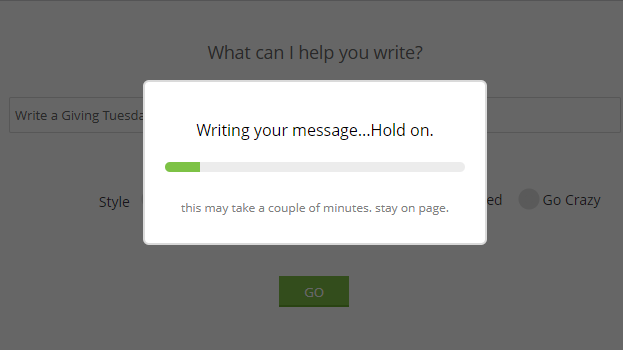
The AI generated content will be initiated:
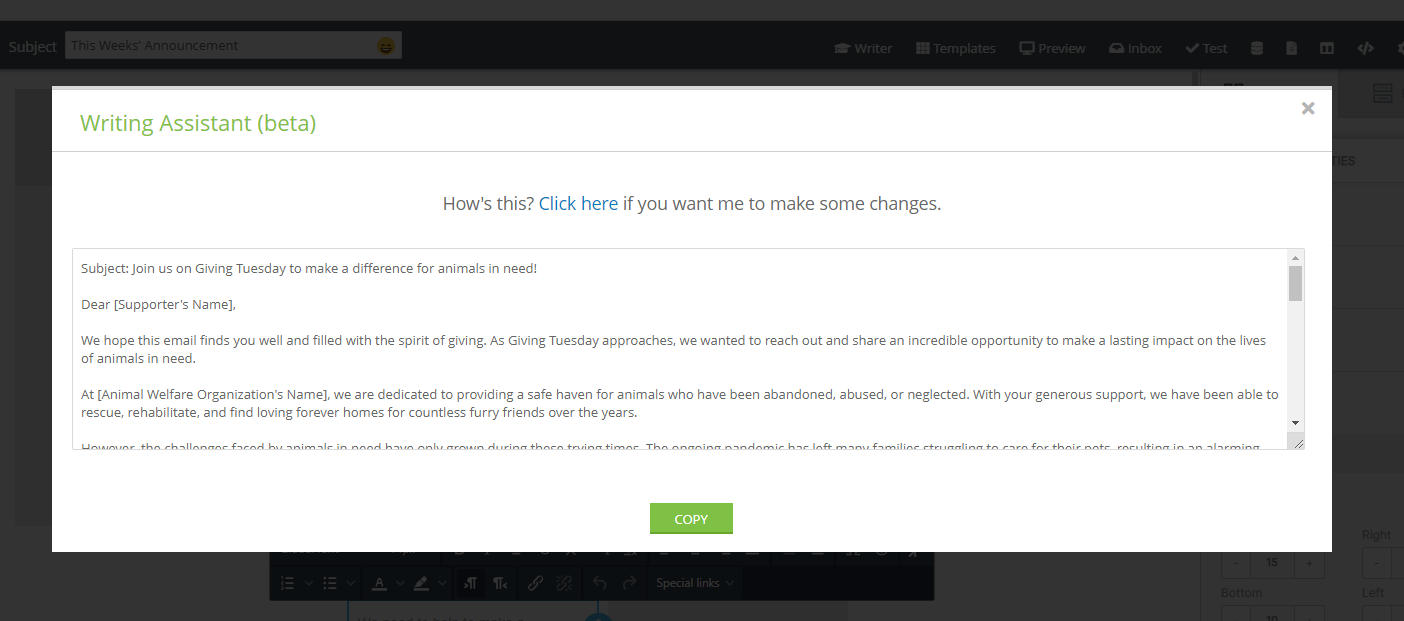
Once content is generated, a similar screen will appear with the suggested content. Users can select to Click here to modify the AI content. Or, users can click on COPY to copy the existing content and paste into the creative.
Be sure to update system tokens where needed (i.e. [Supporter's Name] - replace using the Merge Token feature to replace with ).
Spam Analysis Tool

Analyzing email content for "spammy content" will enhance a client's chances of successfully reaching email service providers' inboxes. As a bulk sender, it's the client's responsibility to monitor and adjust content accordingly to optimize inbox placement. CharityEngine provides an integrated tool to help users evaluate potential issues affecting email deliverability.
To begin, build the email content. Once complete, click on the Test option presented in the top row to initiate the spam tester. The analysis will be initiated upon click. Once the analysis has been completed, the user will see the direct results of the scanned email content along with a score as well as reason for each identified score.

The integrated tool will analyze the email content to assign a "spamminess" grade. The lower the score, the better, with anything above 5 being considered spam by default. A score is given for each attribute checked. These show the likelihood that the email is indeed spam. Individual attribute scores are added to give you your overall score.
- Negative numbers are great, as this indicates the email is unlikely to be spam, and will keep your overall score down
- “0” is neutral, meaning that this factor has little impact
- Positive numbers suggest possible spam
- Spammy email content
- Presence on blocklists
- DKIM and SPF record configuration
- Suspicious links and attachments
- Spam related terms
- Disallowed scripts
If your score is above 5, there’s a very high chance that your email will land in the spam folder rather than the main inbox. But that doesn’t mean a score under 5 will automatically land in the inbox as it depends on the inbox administrator threshold, plus other factors they use to assess spam. Higher scores indicate higher risk and should be address prior to bulk sending from the client's account.
Managing the Media Library
Monitoring Media Storage Rates
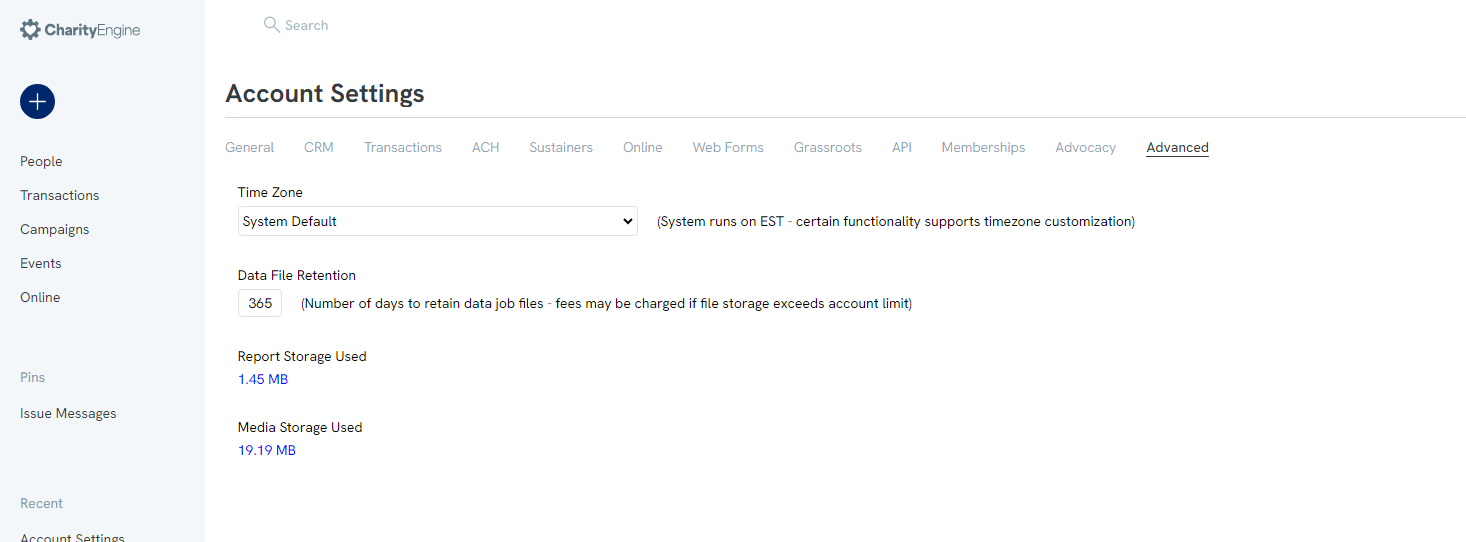
Managing the media library is an important aspect of database management. Users will have specific storage rates and should be monitored to avoid overages.
To monitor overages access the Configuration App > General > Account Setting > Advanced > Media Storage Used:
See contact details for thresholds. Please connect with your account manager for pricing or contract questions.
Managing Media Categories
To customize organizational specific media categories, users can easily create categories that align with the needs of their organization. This assists with better image management and organization.
Access the Configuration App > Online > Media Categories
Click Create New > Enter Name

As new images are added, users can attribute to a media category and users can then sort/locate images based upon category.
Access the Online App > Media > Media Library
Use the Quick Filter > Category to filter category types for easier management and selection/location

Adding Media Content (for Web Forms & Marketing Creatives)
To add a media file, navigate to the Online App > Media > Media Library
Click ADD NEW FILE to Select File, update/modify the File Name, and assign the Category (optional)
Click SAVE to complete the upload process
Best Practice:
As users can utilize media content across web forms, email creatives, mail creatives, etc., consider naming conventions for the organization. Proper naming conventions will reduce duplicate uploads which may unnecessarily inflight storage costs.
Couple with the use of Category to group like content for easier end user management.
Please also be aware that deletion of a media file will impact the presence of the image on any prior released content. Be sure that images are not actively used on web forms, emails, etc. prior to deleting.
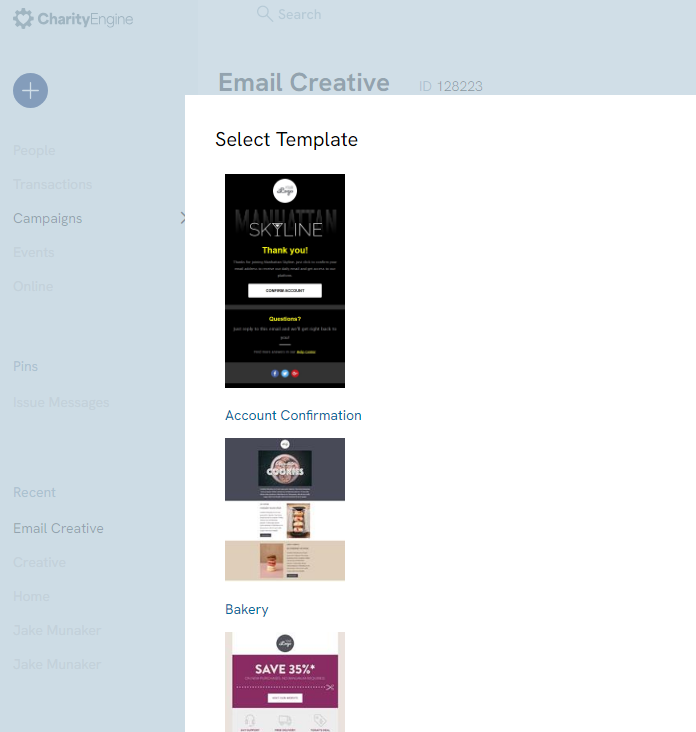
Integrated Templates
Users can use the integrated templates for inspired design and content.

Frequently Asked Questions & Further Reading:
Q. Where can I review the sending results of my email campaign?
A. Initiative Analytics are easily located in the Popular Reports section within the Campaign App. Read more here on email analytics to monitor your sending results.
Q. How can I ensure my emails are delivered?
A. Email Service Providers (ESPs) have rules in place to prevent unwanted messages from appearing in their users’ inboxes. Due to these rules, wanted and subscribed-to messages may end up in spam and could be blocked from delivery altogether. As an email sender, there are things you can do to improve your inbox deliverability. Read more here.
Q. What other best practices does CharityEngine recommend when sending emails?
A. Managing your email list is crucial for not only reaching your constituents but for also managing your reputation as a sender. CharityEngine provides a variety of features and tools to ensure you can manage your email lists and increase the success of your emails reaching your constituent's inbox. Read more here.
Q. How do I add tokens into my email content?
A. Adding system or custom tokens is an easy way to personalize your message. Read more here about adding tokens to your email content.
Q. I'd like to learn more about all of the creative design options. Where can I learn more?
A. Please visit our article on Creating an Email Blast where we cover the various template and formatting options available.
Q. Can I schedule an email based upon time zone?
A. Yes - Clients can schedule email sends in different international time zones. When you’ve done the research and understand the best time to have emails hit donors on the West Coast, for example, it’s nice to be able to schedule that send when you know it’s going to be most effective. Simply navigate to Campaigns > Quick Actions > Email Blast > complete the Audience > insert Message > Settings > Schedule for Later > select date/time and time zone
Q. Can I add formatting conditions to adjust system and custom tokens within my creative?
A. Yes. Here are two available examples of formatting structures to support currency and date formatting.
This example will set the creative to read $2000.05: $2,000.06
This example will set the creative to read October 20, 2024: 10/24/2024 1:00:58 PM
