Introduction
CharityEngine provides you with advanced access to leverage public APIs. This will allow web developers to integrate CharityEngine fields and data in a more advanced approach.
Table of Contents
Prerequisites
- Establish and set up your API key within CharityEngine (see below)
- If you are using a 3rd party website, add the domain of your website within CharityEngine (see below)
Instructions - Setting Up your API Key
Step 1: Navigate to the Automation App > API > Web API
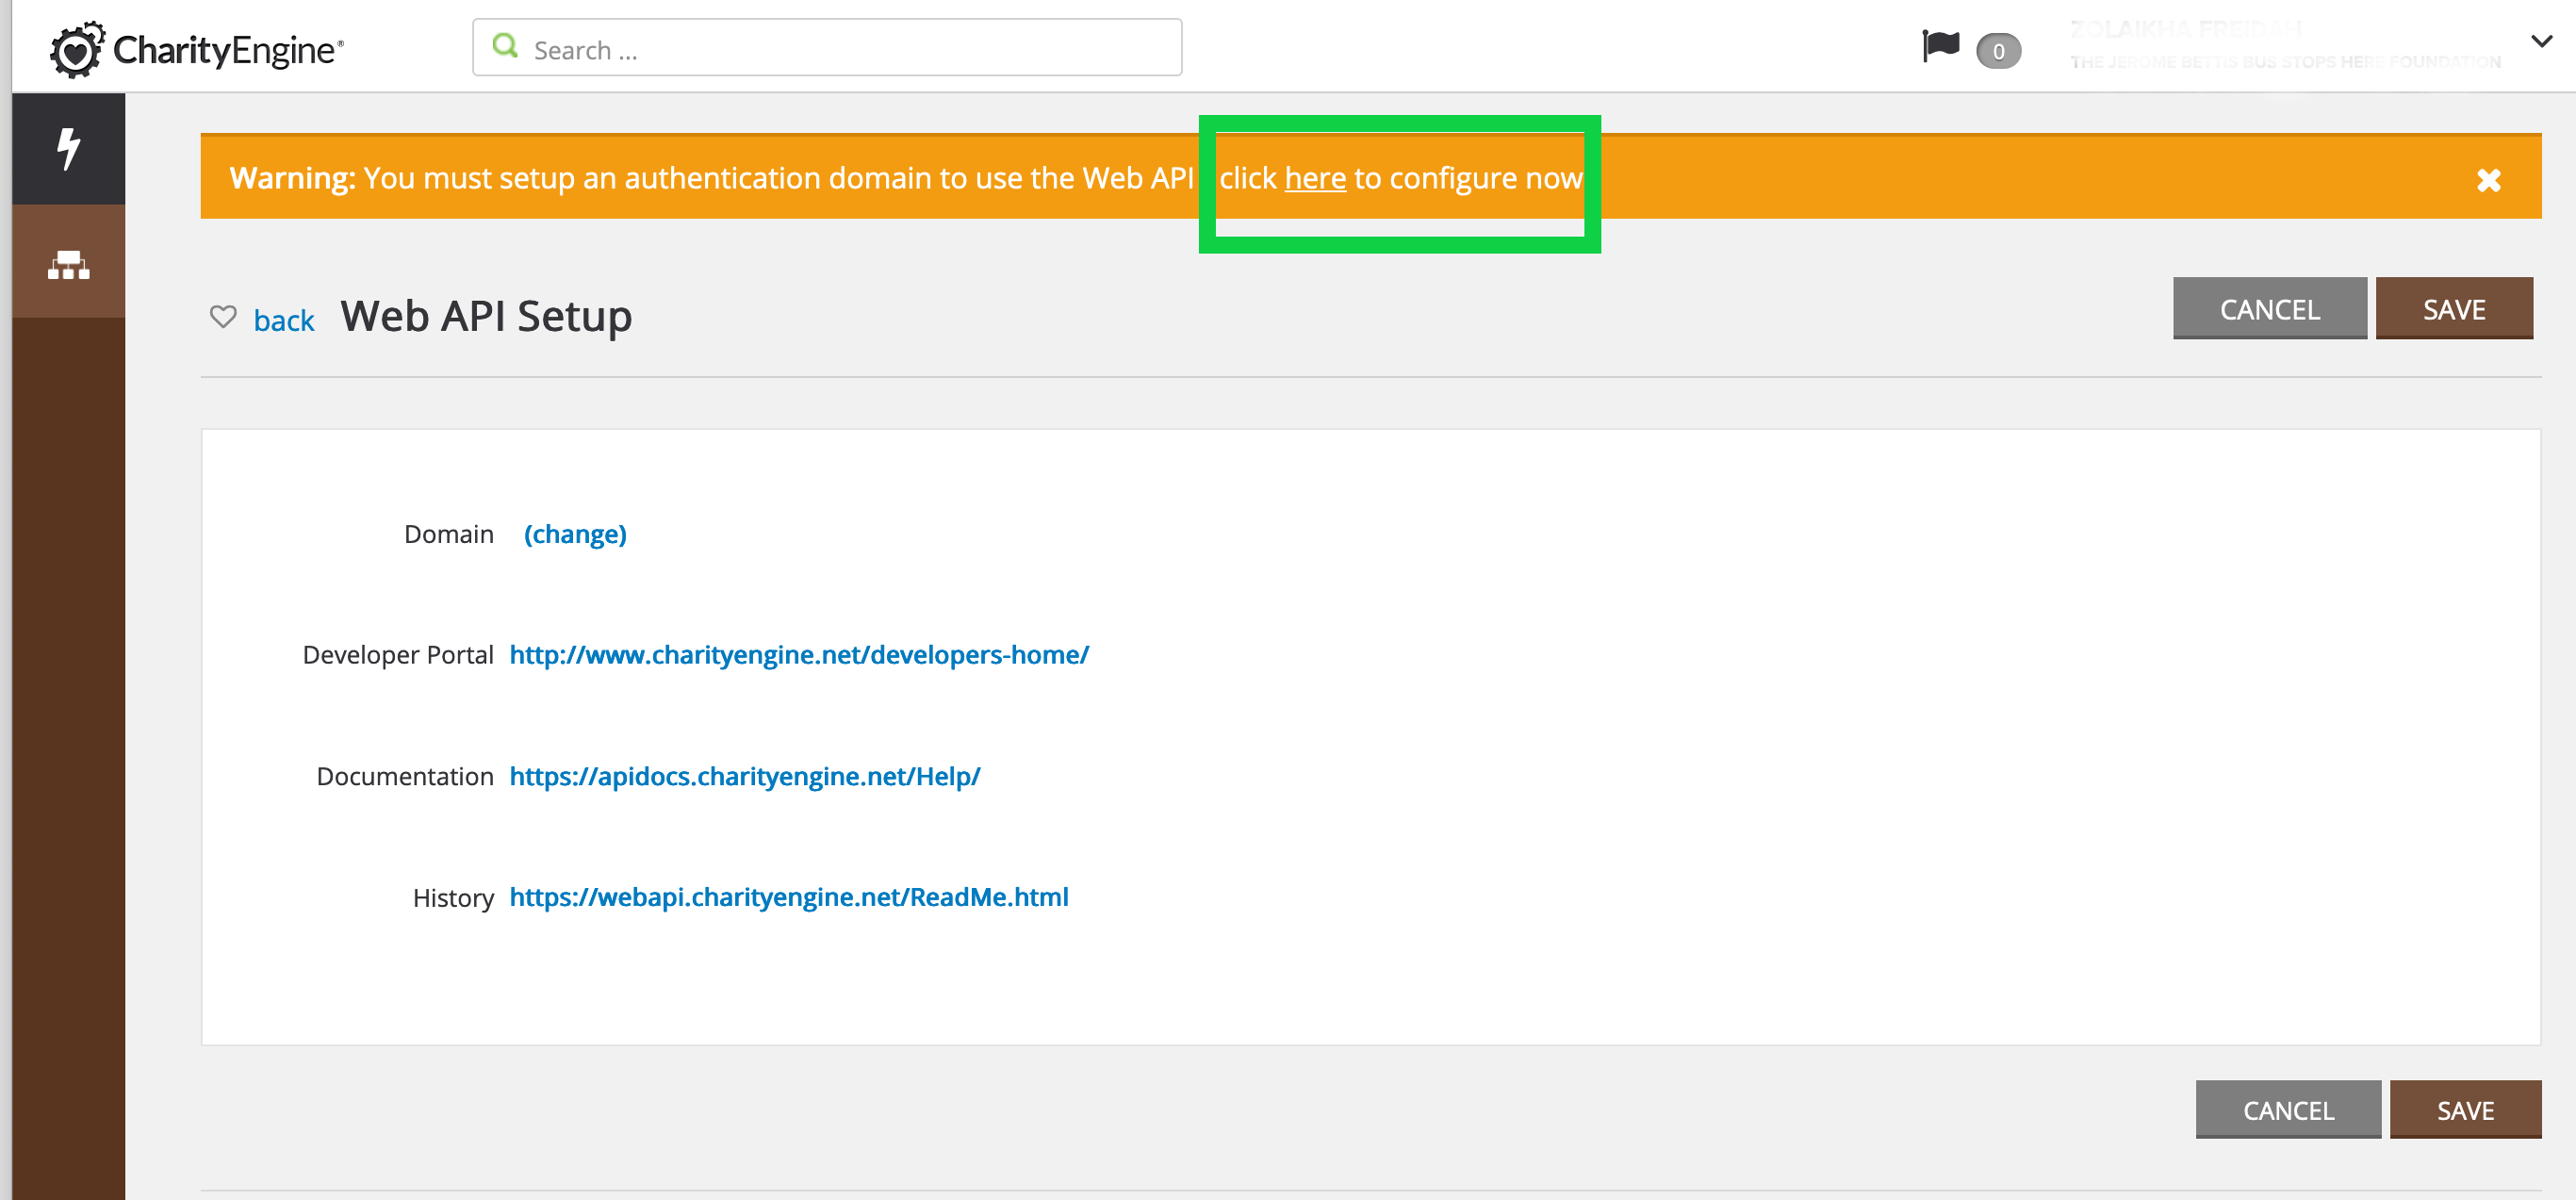
Step 2: If you see the orange banner alerting you to set up your key, click on the link outlined below.
**If the key has already been set up, you will see a value next to the Domain field. 

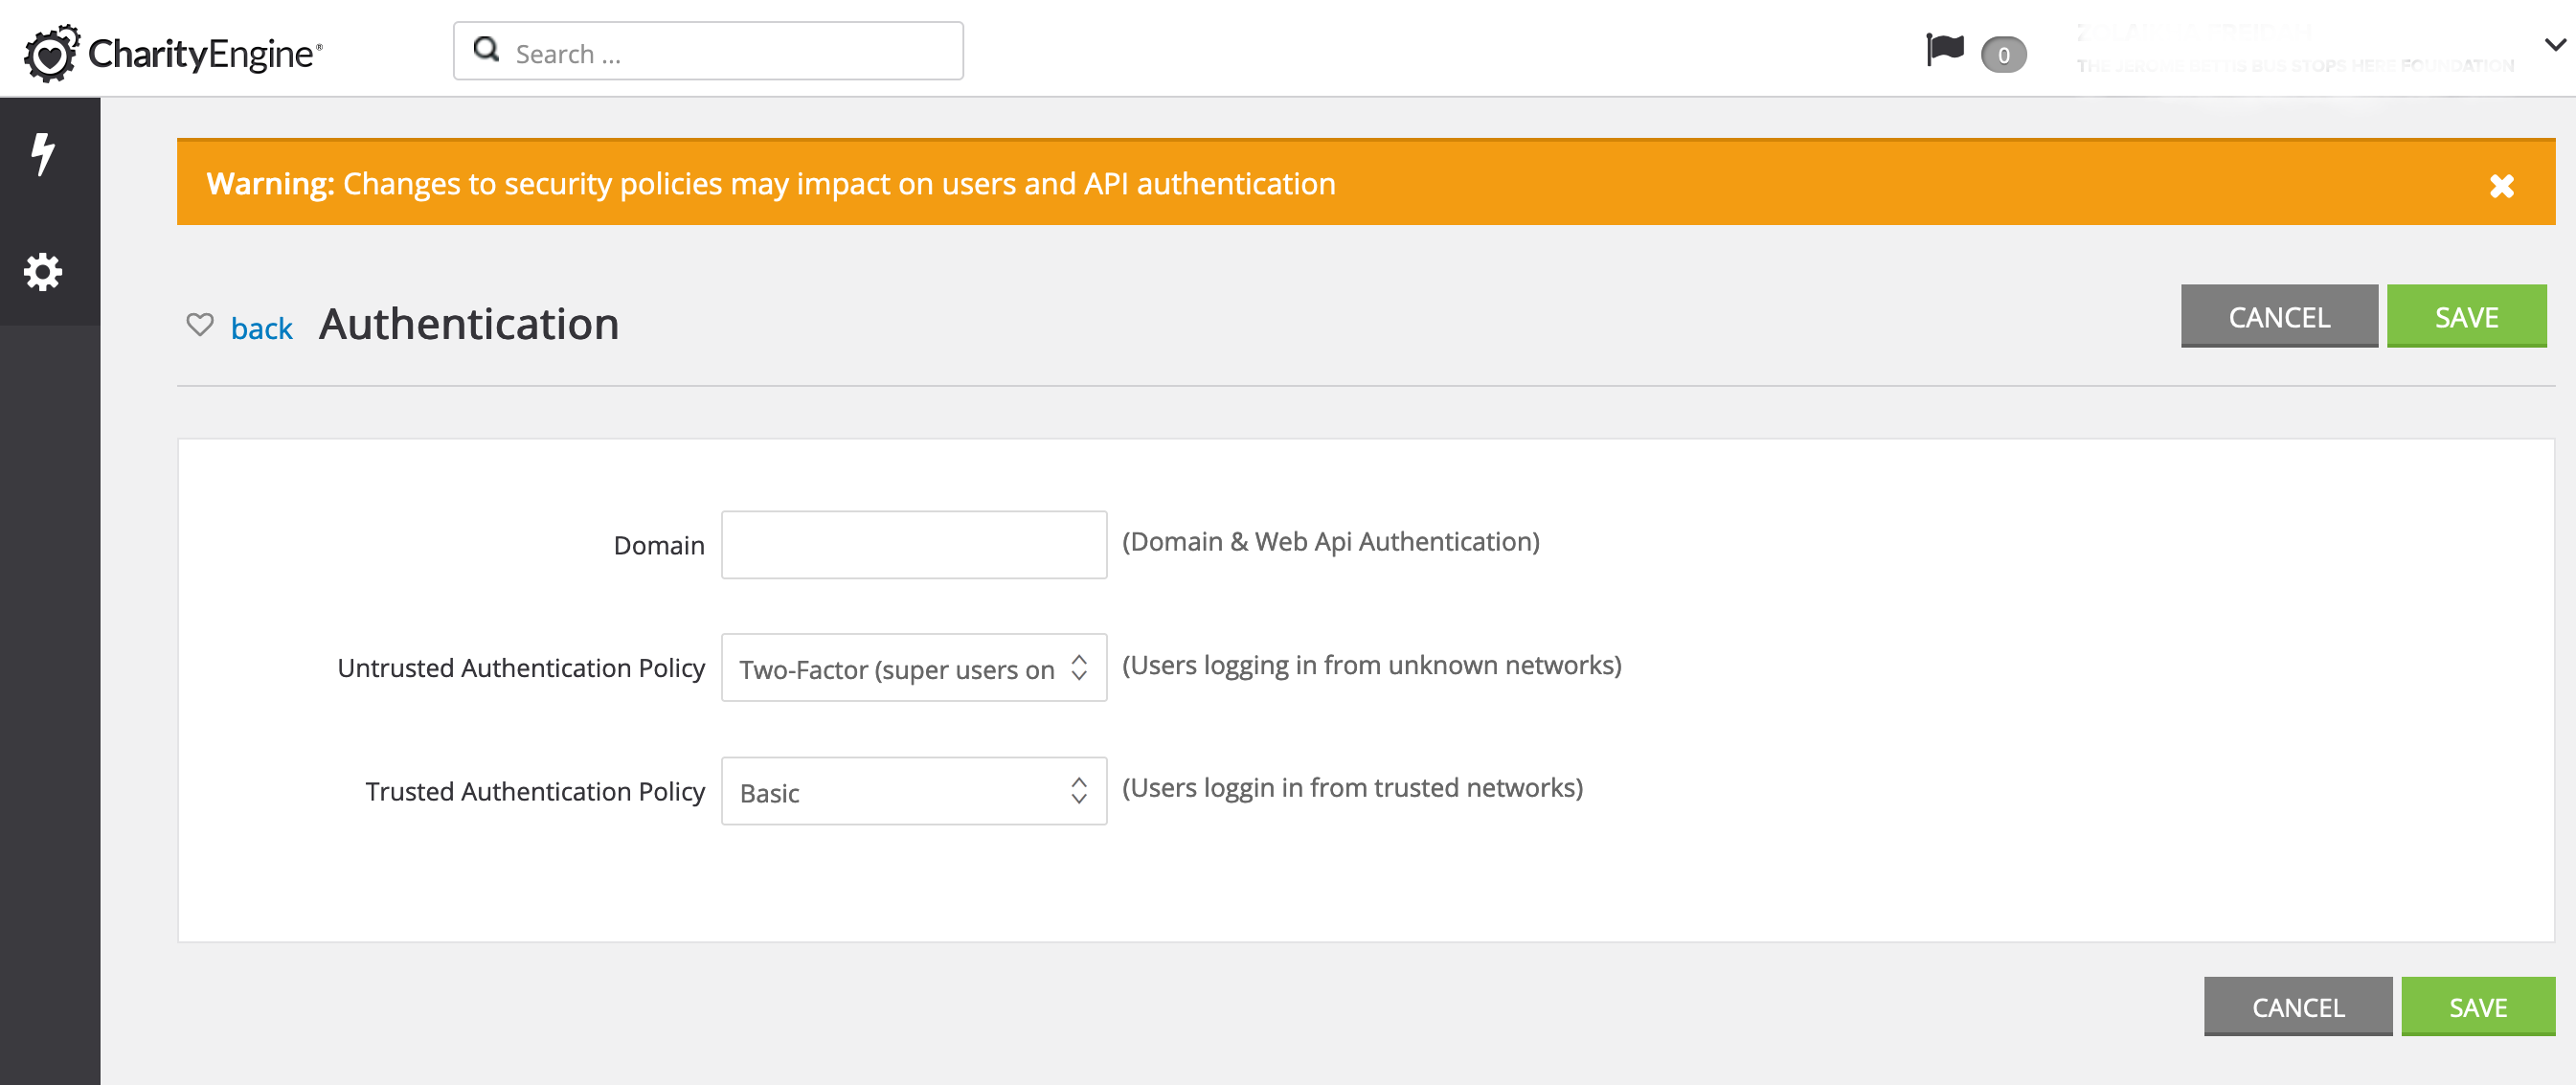
Step 4: Populate the Domain field with a key that makes sense for your organization. For example, if my organization's name is The Washington DC Homeless Fund, I would name my key "WDCHF".
Step 5: Click the Save button to save your key and other configuration.
**NOTE: If you already have a key or once your key is created, the API must be toggled to Enable: Yes for the API to work on your associated sites:

Instructions - Enabling Access to Your Website (3rd party websites)
**NOTE: The following steps are needed only if your website is hosted by a Third-Party outside of CharityEngine (ex: Wordpress).
Step 1: Navigate to the Online App > Domain Names > App Domains
Step 2: Click on the Create New Record ![]() link at the top right-hand corner of the page.
link at the top right-hand corner of the page.
Step 3: Enter in your website URL in the Name field. Click Save to secure your changes.

Step 4: Once your new app domain has been created and saved, you will have to add your site as a Third-Party site to the CharityEngine CMS. Navigate to the Online App > Websites > Websites > Create New
Step 5: Select Type: Third-Party (not hosted)
Step 6: Enter a Name for your website and click the Save button in the upper right-hand corner of the page.
Step 7: Once the page refreshes, you will see a new tab for Domain Names. By default, the cms.charityengine.net domain is added.
Step 8: The new domain you created in the previous steps will appear in the list of available domains. Select it and then click the Add button to add the domain:
Step 9: Once the page refreshes, you will see that the new domain has been added.
Step 10: Remove the entry for cms.charityengine.net by clicking the Delete link under the last column. The list of domains should now include only the third-party hosted domain(s) where you would like to use the CharityEngine Public API:
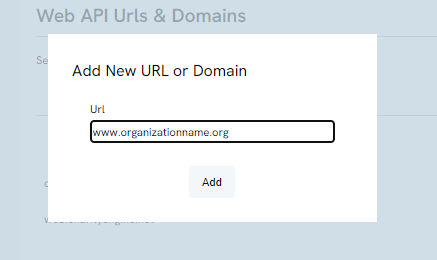
Step 11: Next, add your website to the website domains configuration. Navigate to Automation App > API > Web API Urls (click on See More to expose) > click Create New Record ![]() to expose a pop-up box to enter the website name. Click Add to confirm your changes.
to expose a pop-up box to enter the website name. Click Add to confirm your changes.
NOTE: This URL needs to be the exact link where the donation widget is applied. For example: web.charityengine.net/doantion_widget/Page1


Instructions - Installing the Public Web API
Step 1: Install the CharityEnigne Web API by including the following code in the header of your website:
<script src="https://webapi.charityengine.net/api.js"></script>
Note: This step is not needed if you are using the API on a site generated within CharityEngine's ecosystem of public applications (ex. CMS Shopping Cart, Web Forms, Advocacy, etc.). The two steps above are however required. The API will be automatically included.
Instructions - Set Your API Key
Step 1: After installing the API, set your API key:
<script type="text/javascript">
CE_API.SetApiKey('Your API Key');
</script>
FAQs & Additional Reading
A. If you are experiencing any unexpected behavior after following the directions above, visit our troubleshooting guide.
Q. How do I install the API?
A. In order to use the CharityEngine Public Web API, you first have to set up or find your API key. Then, add the domain of the website where you would like to leverage the API. Once you have completed those two steps, you can simply install the API by adding a reference to the API's JavaScript library.
A. If you want to use the API on a site generated within CharityEngine's ecosystem of public applications (ex. CMS Shopping Cart, Web Forms, Advocacy, etc...), you have to ensure both Instructions - Setting Up Your API Key & Instructions - Enabling Access to Your Website steps have been completed. However, you do NOT need to install the API on the site. The API will automatically be included. However, you will still need to set your API Key.
